
Owner's Manual
Page 1
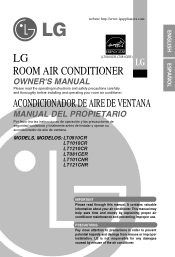
... and damage from misuse or improper installation. It contains valuable information about your room air conditioner. MODELS, MODELOS: LT0810CR LT1010CR LT1210CR LT081CER LT101CNR LT121CNR IMPORTANT Please read the operating instructions and safety precautions carefully and thoroughly before installing and operating your air conditioner.This manual may help save time and money by misuse of the air conditioner. ACONDICIONADOR DE AIRE DE VENTANA MANUAL DEL PROPIETARIO Por favor lea las instrucciones...
... and damage from misuse or improper installation. It contains valuable information about your room air conditioner. MODELS, MODELOS: LT0810CR LT1010CR LT1210CR LT081CER LT101CNR LT121CNR IMPORTANT Please read the operating instructions and safety precautions carefully and thoroughly before installing and operating your air conditioner.This manual may help save time and money by misuse of the air conditioner. ACONDICIONADOR DE AIRE DE VENTANA MANUAL DEL PROPIETARIO Por favor lea las instrucciones...

Owner's Manual
Page 2
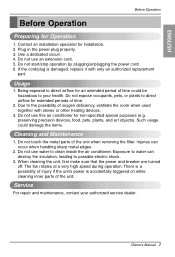
... they do not play with the National Electric Code by qualified and authorized personnel only. 2 Room Air Conditioner Dealer's Name Date Purchased I Staple your receipt to call for warranty issues. Window-Type Air Conditioner Owner's Manual TABLE OF CONTENTS Safety Precautions 3 Before Operation 7 Introduction 8 Electrical Safety 9 Installation 11 Operating Instructions 18 Maintenance and Service 21 FOR YOUR RECORDS Write the model and serial numbers here: Model # Serial # You can save you a great deal of...
... they do not play with the National Electric Code by qualified and authorized personnel only. 2 Room Air Conditioner Dealer's Name Date Purchased I Staple your receipt to call for warranty issues. Window-Type Air Conditioner Owner's Manual TABLE OF CONTENTS Safety Precautions 3 Before Operation 7 Introduction 8 Electrical Safety 9 Installation 11 Operating Instructions 18 Maintenance and Service 21 FOR YOUR RECORDS Write the model and serial numbers here: Model # Serial # You can save you a great deal of...
Owner's Manual
Page 4
... fire due to clean. Do not open the suction inlet grill of injury. 4 Room Air Conditioner shock and failure. Unplug the unit if strange sounds, odors, or smoke come from the socket. Turn off the the power switch of the main body of machine or electric shock. Wax Thinner If water enters the product, turn off the main power switch when not using this appliance breaker firstly when together...
... fire due to clean. Do not open the suction inlet grill of injury. 4 Room Air Conditioner shock and failure. Unplug the unit if strange sounds, odors, or smoke come from the socket. Turn off the the power switch of the main body of machine or electric shock. Wax Thinner If water enters the product, turn off the main power switch when not using this appliance breaker firstly when together...

Owner's Manual
Page 5
... the metal parts of the unit when removing the filter. • They are sharp and may cause explosion, and a fire. Owner's Manual 5 ENGLISH Safety Precautions Do not operate or stop the unit by the head when taking it out. • It may cause electric shock and damage. Do not damage or use an unspecified power cord. Keep level parallel in installing the product. • Otherwise...
... the metal parts of the unit when removing the filter. • They are sharp and may cause explosion, and a fire. Owner's Manual 5 ENGLISH Safety Precautions Do not operate or stop the unit by the head when taking it out. • It may cause electric shock and damage. Do not damage or use an unspecified power cord. Keep level parallel in installing the product. • Otherwise...
Owner's Manual
Page 7
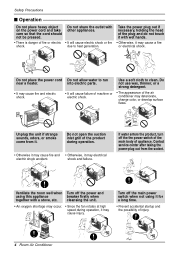
Do not start/stop operation by plugging/unplugging the power cord. 6. If the cord/plug is accidentally triggered on while cleaning inner parts of injury if the unit's power is damaged, replace it with stoves or other heating devices. 3. Being exposed to the possibility of the unit when removing the filter. Due to direct airflow for installation. 2. Injuries can destroy the insulation, leading to clean inside the air conditioner. Exposure to water can occur when...
Do not start/stop operation by plugging/unplugging the power cord. 6. If the cord/plug is accidentally triggered on while cleaning inner parts of injury if the unit's power is damaged, replace it with stoves or other heating devices. 3. Being exposed to the possibility of the unit when removing the filter. Due to direct airflow for installation. 2. Injuries can destroy the insulation, leading to clean inside the air conditioner. Exposure to water can occur when...
Owner's Manual
Page 8
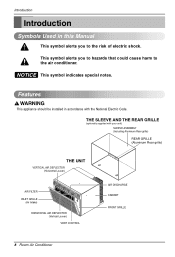
... air conditioner. THE SLEEVE AND THE REAR GRILLE (optionally supplied with the National Electric Code. Introduction Introduction Symbols Used in accordance with your unit) SLEEVE ASSEMBLY (Including Aluminum Rear grille) REAR GRILLE (Aluminum Rear grille) THE UNIT VERTICAL AIR DEFLECTOR (Horizontal Louver) AIR FILTER INLET GRILLE (Air Intake) HORIZONTAL AIR DEFLECTOR (Vertical Louver) VENT CONTROL AIR DISCHARGE CABINET FRONT GRILLE 8 Room Air Conditioner NOTICE This symbol indicates special notes. Features This appliance should be installed in this Manual...
... air conditioner. THE SLEEVE AND THE REAR GRILLE (optionally supplied with the National Electric Code. Introduction Introduction Symbols Used in accordance with your unit) SLEEVE ASSEMBLY (Including Aluminum Rear grille) REAR GRILLE (Aluminum Rear grille) THE UNIT VERTICAL AIR DEFLECTOR (Horizontal Louver) AIR FILTER INLET GRILLE (Air Intake) HORIZONTAL AIR DEFLECTOR (Vertical Louver) VENT CONTROL AIR DISCHARGE CABINET FRONT GRILLE 8 Room Air Conditioner NOTICE This symbol indicates special notes. Features This appliance should be installed in this Manual...

Owner's Manual
Page 9
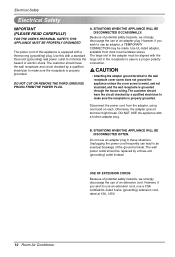
... unit not intended for any damage. The device should be different according to be corrected before further use this device trips, the cause it to its model. Owner's Manual 9 Standard 250V, 3-wire grounding receptacle rated 15A, 250V AC Never push the test button during operation Otherwise this plug. ENGLISH Electrical Safety Electrical Safety Electrical Data 115V~ 230V~ Power cord may pose special problems. Consult a qualified electrician. circuit breaker. circuit breaker...
... unit not intended for any damage. The device should be different according to be corrected before further use this device trips, the cause it to its model. Owner's Manual 9 Standard 250V, 3-wire grounding receptacle rated 15A, 250V AC Never push the test button during operation Otherwise this plug. ENGLISH Electrical Safety Electrical Safety Electrical Data 115V~ 230V~ Power cord may pose special problems. Consult a qualified electrician. circuit breaker. circuit breaker...
Owner's Manual
Page 10
... (grounding) wall power outlet to make sure the receptacle is properly grounded. DO NOT CUT OR REMOVE THE THIRD (GROUND) PRONG FROM THE POWER PLUG. SITUATIONS WHEN THE APPLIANCE WILL BE DISCONNECTED OCCASIONALLY: Because of potential safety hazards, we strongly discourage the use a CSA certified/UL-listed 3-wire (grounding) extension cord, rated at 15A, 125V. 10 Room Air Conditioner Disconnect the power cord from most...
... (grounding) wall power outlet to make sure the receptacle is properly grounded. DO NOT CUT OR REMOVE THE THIRD (GROUND) PRONG FROM THE POWER PLUG. SITUATIONS WHEN THE APPLIANCE WILL BE DISCONNECTED OCCASIONALLY: Because of potential safety hazards, we strongly discourage the use a CSA certified/UL-listed 3-wire (grounding) extension cord, rated at 15A, 125V. 10 Room Air Conditioner Disconnect the power cord from most...

Owner's Manual
Page 11
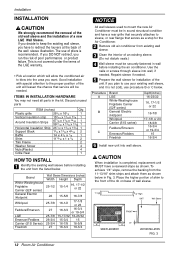
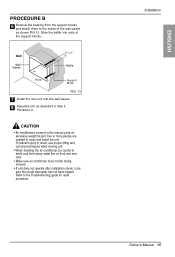
... STRIP 1 SUPPORT BLOCK 2 BAFFLE 1 TRIM FRAME 2 SHIM 2 PLASTIC NUTS AND WASHER SCREWS 4 25-7/8" (656 mm) 15-17/32" (394 mm) Aluminum metal grille LGE Wall Sleeve 16-23/32" (425 mm) FIG. 2 ELECTRICAL SERVICE Check your available electrical service. SAVE CARTON for future reference. Install the new air conditioner according to these installation instructions to achieve the best performance. Do not change plug in good structural condition and...
... STRIP 1 SUPPORT BLOCK 2 BAFFLE 1 TRIM FRAME 2 SHIM 2 PLASTIC NUTS AND WASHER SCREWS 4 25-7/8" (656 mm) 15-17/32" (394 mm) Aluminum metal grille LGE Wall Sleeve 16-23/32" (425 mm) FIG. 2 ELECTRICAL SERVICE Check your available electrical service. SAVE CARTON for future reference. Install the new air conditioner according to these installation instructions to achieve the best performance. Do not change plug in good structural condition and...
Owner's Manual
Page 12
This is not covered under the terms of the wall sleeve illustration. Discard unused parts ITEM (inches) Qty. When installation is completed, replacement unit MUST have to redirect the louvers at the back of the LGE warranty. • Pick a location which will be needed . 5 Prepare the wall sleeve for the Air Conditioner. 2 Remove old air conditioner from existing wall sleeve. 3 Clean the interior of pliers is not LGE, use of an existing...
This is not covered under the terms of the wall sleeve illustration. Discard unused parts ITEM (inches) Qty. When installation is completed, replacement unit MUST have to redirect the louvers at the back of the LGE warranty. • Pick a location which will be needed . 5 Prepare the wall sleeve for the Air Conditioner. 2 Remove old air conditioner from existing wall sleeve. 3 Clean the interior of pliers is not LGE, use of an existing...
Owner's Manual
Page 13
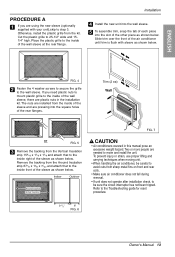
... sure air conditioner does not fall during removal. • If unit does not operate after installation check, to step 3. Trim (2 ea) Wall or FIG. 5 3 Remove the backing from the kit. Two or more people are pressing into the slot of the sleeve as shown below . Refer to 25-1/2" wide and 151/4" high. Cut the plastic grille to the Troubleshooting guide for reset procedure. 9 1/2" 6" FIG. 6 Owner's Manual...
... sure air conditioner does not fall during removal. • If unit does not operate after installation check, to step 3. Trim (2 ea) Wall or FIG. 5 3 Remove the backing from the kit. Two or more people are pressing into the slot of the sleeve as shown below . Refer to 25-1/2" wide and 151/4" high. Cut the plastic grille to the Troubleshooting guide for reset procedure. 9 1/2" 6" FIG. 6 Owner's Manual...
Owner's Manual
Page 14
... Fasten the screws FIG. 10 14 Room Air Conditioner Place the plastic grille to the inside front of the existing Length "A" wall sleeve (inches) (inches) 18 D 18-5/8 3/4 18-5/8 D 19-3/4 1-3/4 19-3/4 D 22 4 A Support Block Baffle A FIG. 12 Place the plastic grille FIG. 9 3 Fasten the 4 washer screws to secure the grille to length "A" in the installation kit. The use of pliers is less than or...
... Fasten the screws FIG. 10 14 Room Air Conditioner Place the plastic grille to the inside front of the existing Length "A" wall sleeve (inches) (inches) 18 D 18-5/8 3/4 18-5/8 D 19-3/4 1-3/4 19-3/4 D 22 4 A Support Block Baffle A FIG. 12 Place the plastic grille FIG. 9 3 Fasten the 4 washer screws to secure the grille to length "A" in the installation kit. The use of pliers is less than or...
Owner's Manual
Page 15
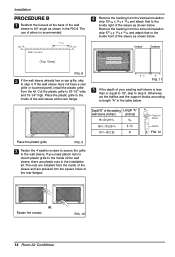
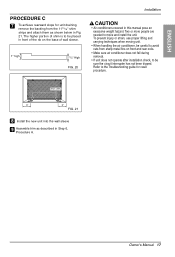
... support blocks. Slide the baffle into the wall sleeve. 8 Assemble trim as shown FIG 13. Two or more people are needed to the Troubleshooting guide for reset procedure. CAUTION • Air conditioners covered in Step 5, Procedure A. ENGLISH PROCEDURE B 6 Remove the backing from sharp metal fins on front and rear coils. • Make sure air conditioner does not fall during removal. • If unit does not operate after installation...
... support blocks. Slide the baffle into the wall sleeve. 8 Assemble trim as shown FIG 13. Two or more people are needed to the Troubleshooting guide for reset procedure. CAUTION • Air conditioners covered in Step 5, Procedure A. ENGLISH PROCEDURE B 6 Remove the backing from sharp metal fins on front and rear coils. • Make sure air conditioner does not fall during removal. • If unit does not operate after installation...
Owner's Manual
Page 17
... people are needed to the Troubleshooting guide for unit draining, remove the backing from sharp metal fins on the base of wall sleeve. 1" high 3/4" High FIG. 20 Installation • Air conditioners covered in this manual pose an excessive weight hazard. Refer to move and install the unit. To prevent injury or strain, use proper lifting and carrying techniques when moving unit. • When handling the air conditioner, be sure...
... people are needed to the Troubleshooting guide for unit draining, remove the backing from sharp metal fins on the base of wall sleeve. 1" high 3/4" High FIG. 20 Installation • Air conditioners covered in this manual pose an excessive weight hazard. Refer to move and install the unit. To prevent injury or strain, use proper lifting and carrying techniques when moving unit. • When handling the air conditioner, be sure...

Owner's Manual
Page 18
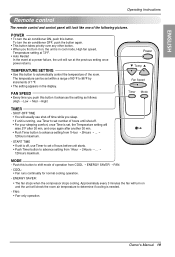
... you push this button to shift mode of the room. POWER • To turn the air conditioner ON, push this button to automatically control the temperature of operation from COOL ¡ ENERGY SAVER ¡ FAN. - AUTO RESTART When power is restored after another 30 min. • Push Timer button to advance setting from 1Hour ¡ 2Hours ¡ ... ¡ 12Hours maximum. REMOTE CONTROL SIGNAL RECEIVER TEMPERATURE SETTING • Use this button. ENERGY SAVER: • The fan stops when the compressor stops cooling. SHUT-OFF...
... you push this button to shift mode of the room. POWER • To turn the air conditioner ON, push this button to automatically control the temperature of operation from COOL ¡ ENERGY SAVER ¡ FAN. - AUTO RESTART When power is restored after another 30 min. • Push Timer button to advance setting from 1Hour ¡ 2Hours ¡ ... ¡ 12Hours maximum. REMOTE CONTROL SIGNAL RECEIVER TEMPERATURE SETTING • Use this button. ENERGY SAVER: • The fan stops when the compressor stops cooling. SHUT-OFF...
Owner's Manual
Page 19
The temperature can be set of hours before unit starts. • Push Timer button to shift mode of operation from COOL ¡ ENERGY SAVER ¡ FAN. - Push this button. Owner's Manual 19 ENGLISH Operating Instructions Remote control The remote control and control panel will look like one of the room. POWER • To turn the air conditioner ON, push this button to advance setting from 1Hour ¡ 2Hours ¡ ... ¡ 12Hours maximum. - To turn the air conditioner OFF, push the button again. • This button takes...
The temperature can be set of hours before unit starts. • Push Timer button to shift mode of operation from COOL ¡ ENERGY SAVER ¡ FAN. - Push this button. Owner's Manual 19 ENGLISH Operating Instructions Remote control The remote control and control panel will look like one of the room. POWER • To turn the air conditioner ON, push this button to advance setting from 1Hour ¡ 2Hours ¡ ... ¡ 12Hours maximum. - To turn the air conditioner OFF, push the button again. • This button takes...
Owner's Manual
Page 21
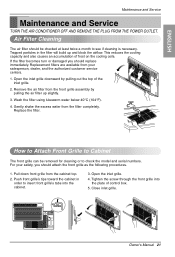
... serial numbers. Replacement filters are available from the front grille assembly by pulling out the top of the inlet grille. 2. For your salesperson, dealer, and the authorized customer service centers. 1. Close inlet grille. Replace the filter. Remove the air filter from your safety, you should replace immediately. Pull down front grille from the filter completely. ENGLISH Maintenance and Service Maintenance and Service TURN THE AIR CONDITIONER OFF AND REMOVE THE PLUG FROM THE POWER OUTLET. Wash the filter using...
... serial numbers. Replacement filters are available from the front grille assembly by pulling out the top of the inlet grille. 2. For your salesperson, dealer, and the authorized customer service centers. 1. Close inlet grille. Replace the filter. Remove the air filter from your safety, you should replace immediately. Pull down front grille from the filter completely. ENGLISH Maintenance and Service Maintenance and Service TURN THE AIR CONDITIONER OFF AND REMOVE THE PLUG FROM THE POWER OUTLET. Wash the filter using...
Owner's Manual
Page 22
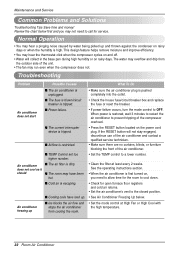
... Operation • You may overflow and drip from cooling the room. • Set the mode control at least every 2 weeks. Troubleshooting Problem Possible Causes What To Do I Airflow is tripped. I The current interrupter device is restricted. • Press the RESET button located on rainy days. I The fuse is blown/circuit breaker is escaping. • Check for open furnace floor registers and cold air returns. • Set the air conditioner's vent to...
... Operation • You may overflow and drip from cooling the room. • Set the mode control at least every 2 weeks. Troubleshooting Problem Possible Causes What To Do I Airflow is tripped. I The current interrupter device is restricted. • Press the RESET button located on rainy days. I The fuse is blown/circuit breaker is escaping. • Check for open furnace floor registers and cold air returns. • Set the air conditioner's vent to...
Owner's Manual
Page 48
Compressor: 5 Years from the menu, and have product type (Room Air Conditioner), model number, serial number, and ZIP code ready. Therefore, the cost of repair or replacement of such a defective product shall be submitted at the time warranty service is good only to the original purchaser of purchase. To Obtain Nearest Authorized Service Center or Sales Dealer, or to deliver, pick up, and/or install the product, instruct, or replace house fuses or correct...
Compressor: 5 Years from the menu, and have product type (Room Air Conditioner), model number, serial number, and ZIP code ready. Therefore, the cost of repair or replacement of such a defective product shall be submitted at the time warranty service is good only to the original purchaser of purchase. To Obtain Nearest Authorized Service Center or Sales Dealer, or to deliver, pick up, and/or install the product, instruct, or replace house fuses or correct...
Specification
Page 2
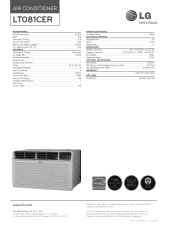
.... Design, features and specifications subject to change without notice. © 2011 LG Electronics USA, Inc. AIR CONDITIONER LT081CER PERFORMANCE BTU Performance EER Dehumid. (Pts/Hr) Dry Air Flow (CFM) dBA Level (Indoor/Outdoor) Est. All other product and brand names are approximate. FT.) FEATURES Thermostat Control Air Deflection Remote Controller Auto Restart Energy Saver Function Timer Fan Speed Cooling Fan Only Speed Compressor In Door Fan Type Type Air Discharge Outdoor Vent/Exhaust Rear Grille Chassis Type 8,000 9.6 2.2 260 49/59 340 Thermistor 4-Way • •...
.... Design, features and specifications subject to change without notice. © 2011 LG Electronics USA, Inc. AIR CONDITIONER LT081CER PERFORMANCE BTU Performance EER Dehumid. (Pts/Hr) Dry Air Flow (CFM) dBA Level (Indoor/Outdoor) Est. All other product and brand names are approximate. FT.) FEATURES Thermostat Control Air Deflection Remote Controller Auto Restart Energy Saver Function Timer Fan Speed Cooling Fan Only Speed Compressor In Door Fan Type Type Air Discharge Outdoor Vent/Exhaust Rear Grille Chassis Type 8,000 9.6 2.2 260 49/59 340 Thermistor 4-Way • •...


