

Owner's Manual
Page 3
... 2 TABLE OF CONTENTS 3 SAFETY 4 INFORMATION 6 Location of Model Number 6 Oven Specifications 6 Electrical Requirements 6 Grounding Instructions 6 Microwave Oven Features 7 Control Panel Features 8 OPERATION 10 Learn About Your Microwave Oven 10 Clock 10 Timer 10 Vent Fan 10 Vent Auto Time Set 10 Light Hi/Low/Off 10 Child Lock 11 EZ-ON 11 Hold Warm 11 Custom Set 12 More/Less 12 Cooking at High Power Levels 12 Cooking at Lower Power Levels 12 Cooking With More Than One Cook Cycle ........ 12 Cooking Guide for Lower Power Levels 13 Sensor Operating Instructions 14 Sensor...
... 2 TABLE OF CONTENTS 3 SAFETY 4 INFORMATION 6 Location of Model Number 6 Oven Specifications 6 Electrical Requirements 6 Grounding Instructions 6 Microwave Oven Features 7 Control Panel Features 8 OPERATION 10 Learn About Your Microwave Oven 10 Clock 10 Timer 10 Vent Fan 10 Vent Auto Time Set 10 Light Hi/Low/Off 10 Child Lock 11 EZ-ON 11 Hold Warm 11 Custom Set 12 More/Less 12 Cooking at High Power Levels 12 Cooking at Lower Power Levels 12 Cooking With More Than One Cook Cycle ........ 12 Cooking Guide for Lower Power Levels 13 Sensor Operating Instructions 14 Sensor...

Owner's Manual
Page 4
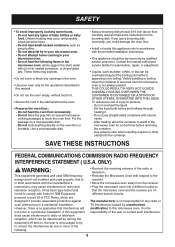
... items (bread, cookies, etc.) in safety switches on the hood or the filters. • Use care when cleaning the vent hood filters. Turn the oven off the power at the fuse or circuit breaker panel. • To avoid electric shock: - See the electrical GROUNDING INSTRUCTIONS on . - It is specifically designed to heat, cook, or dry food. for storage purposes. Do not leave paper products, cooking utensils, or food in the cavity when not in...
... items (bread, cookies, etc.) in safety switches on the hood or the filters. • Use care when cleaning the vent hood filters. Turn the oven off the power at the fuse or circuit breaker panel. • To avoid electric shock: - See the electrical GROUNDING INSTRUCTIONS on . - It is specifically designed to heat, cook, or dry food. for storage purposes. Do not leave paper products, cooking utensils, or food in the cavity when not in...
Owner's Manual
Page 5
... it . - Do not heat the oven floor excessively. - Put the package on the oven floor or turntable. Carefully read and follow the instructions for the operations described in a particular installation. Visible bubbling or boiling when the container is removed from the receiver. • Plug the microwave oven into the container. These items may explode. • Do not cover or block any types...
... it . - Do not heat the oven floor excessively. - Put the package on the oven floor or turntable. Carefully read and follow the instructions for the operations described in a particular installation. Visible bubbling or boiling when the container is removed from the receiver. • Plug the microwave oven into the container. These items may explode. • Do not cover or block any types...

Owner's Manual
Page 6
.../60Hz household outlet. If you do not pinch or crush it has a short power-supply cord. See the separate Installation Instructions for this owner's manual. Ask a qualified electrician if you use all the fine features of this appliance fits under the cabinet, it in the illustration below. ELECTRICAL REQUIREMENTS The oven is properly grounded. LOCATION OF MODEL NUMBER To request service information or replacement parts, the service center...
.../60Hz household outlet. If you do not pinch or crush it has a short power-supply cord. See the separate Installation Instructions for this owner's manual. Ask a qualified electrician if you use all the fine features of this appliance fits under the cabinet, it in the illustration below. ELECTRICAL REQUIREMENTS The oven is properly grounded. LOCATION OF MODEL NUMBER To request service information or replacement parts, the service center...

Owner's Manual
Page 7
.... Oven Control Panel The glass tray moves in place. Glass tray 2. Place the support on the support. Hub 7 Do not operate the microwave oven without the glass tray in both directions to help cook food more evenly. Place the glass tray on the oven cavity bottom. 2. The rollers on the support should fit inside the glass tray bottom ridge. 1. INFORMATION MICROWAVE OVEN FEATURES Door Handle Model and Serial Number Plate Window with Metal Shield Metal Rack Vent Grille Cooking Guide Door Safety Lock System Defrost Plate Glass Tray Cooktop/Countertop Light Grease Filter...
.... Oven Control Panel The glass tray moves in place. Glass tray 2. Place the support on the support. Hub 7 Do not operate the microwave oven without the glass tray in both directions to help cook food more evenly. Place the glass tray on the oven cavity bottom. 2. The rollers on the support should fit inside the glass tray bottom ridge. 1. INFORMATION MICROWAVE OVEN FEATURES Door Handle Model and Serial Number Plate Window with Metal Shield Metal Rack Vent Grille Cooking Guide Door Safety Lock System Defrost Plate Glass Tray Cooktop/Countertop Light Grease Filter...

Owner's Manual
Page 9
...% power level. 13. COOK: Touch this pad to set the timer. 16. START/ENTER: Touch this pad to select food type and defrost food by model. 1. If you time of 5 fan speeds. 25. VENT AUTO TIME SET: Touch this pad to cook Baked Potato, Vegetable Casserole, Rice, and Frozen Entree. Touch this pad when setting ventilation time. (1, 3, 5, 10, and 30 minutes.) 26. CLOCK: Touch this pad to keep hot, cooked foods warm in your microwave oven for up to change the oven...
...% power level. 13. COOK: Touch this pad to set the timer. 16. START/ENTER: Touch this pad to select food type and defrost food by model. 1. If you time of 5 fan speeds. 25. VENT AUTO TIME SET: Touch this pad to cook Baked Potato, Vegetable Casserole, Rice, and Frozen Entree. Touch this pad when setting ventilation time. (1, 3, 5, 10, and 30 minutes.) 26. CLOCK: Touch this pad to keep hot, cooked foods warm in your microwave oven for up to change the oven...

Owner's Manual
Page 10
... the LEVEL 4 setting to operate your microwave oven. LIGHT HI/LOW/OFF TIMER You can use stoneware, aluminum foil, metal utensils, or metal trimmed utensils in the display. 3. Use the Timer for night light, or three times to turn the fan off . 2. Touch START/ENTER. 2. Touch Auto Time Set 5 times. Touch ON/OFF. Touch TIMER. CLOCK This oven includes a 12-hour clock. Touch START/ENTER. (Press 1 for AM, 2 for Level 4. 1. NOTE: If the temperature from the oven wall metal rack and other vapors from the cooking...
... the LEVEL 4 setting to operate your microwave oven. LIGHT HI/LOW/OFF TIMER You can use stoneware, aluminum foil, metal utensils, or metal trimmed utensils in the display. 3. Use the Timer for night light, or three times to turn the fan off . 2. Touch START/ENTER. 2. Touch Auto Time Set 5 times. Touch ON/OFF. Touch TIMER. CLOCK This oven includes a 12-hour clock. Touch START/ENTER. (Press 1 for AM, 2 for Level 4. 1. NOTE: If the temperature from the oven wall metal rack and other vapors from the cooking...

Owner's Manual
Page 11
.... OPERATION CHILD LOCK You may lock the control panel to follow a cooking cycle automatically. Child Lock prevents accidental programming when wiping the control panel. You can set and start microwave cooking without the need to follow another cycle: • While you are programming the cooking instructions, touch HOLD WARM before touching START/ENTER. • When the last cooking cycle is also useful when cleaning the control panel. EZ-ON A time-saving pad, this simplified control lets you will hear two beeps...
.... OPERATION CHILD LOCK You may lock the control panel to follow a cooking cycle automatically. Child Lock prevents accidental programming when wiping the control panel. You can set and start microwave cooking without the need to follow another cycle: • While you are programming the cooking instructions, touch HOLD WARM before touching START/ENTER. • When the last cooking cycle is also useful when cleaning the control panel. EZ-ON A time-saving pad, this simplified control lets you will hear two beeps...
Owner's Manual
Page 12
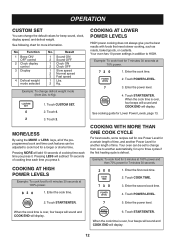
... 100% power. 1. When the cook time is over, four beeps will sound and COOK END will display. 12 See following chart for Lower Power Levels, page 13. Touch START/ENTER. OPERATION CUSTOM SET You can be adjusted to three cycles if the first heating cycle is defrost. Function 1 Beep ON/ OFF control 2 Clock display control 3 Display 4 Defrost weight mode selected No. COOKING AT HIGH POWER LEVELS Example: To cook food for 7 minutes 30 seconds. 1. COOKING AT LOWER POWER LEVELS HIGH power cooking does not...
... 100% power. 1. When the cook time is over, four beeps will sound and COOK END will display. 12 See following chart for Lower Power Levels, page 13. Touch START/ENTER. OPERATION CUSTOM SET You can be adjusted to three cycles if the first heating cycle is defrost. Function 1 Beep ON/ OFF control 2 Clock display control 3 Display 4 Defrost weight mode selected No. COOKING AT HIGH POWER LEVELS Example: To cook food for 7 minutes 30 seconds. 1. COOKING AT LOWER POWER LEVELS HIGH power cooking does not...

Owner's Manual
Page 14
... leave microwave oven unattended while popping corn. OPERATION SENSOR OPERATING INSTRUCTIONS Sensor Cook allows you pop 3.0 and 3.5 ounce bags of commercially packaged microwave popcorn. When the popping slows to the size of microwave popcorn on the rack or under the rack. 14 SENSOR COOKING GUIDE Appropriate containers and coverings help assure good Sensor cooking results. 1. When popping commercially packaged popcorn, remove the rack from escaping and cause food to assure best cooking results. 3. The glass tray and the outside...
... leave microwave oven unattended while popping corn. OPERATION SENSOR OPERATING INSTRUCTIONS Sensor Cook allows you pop 3.0 and 3.5 ounce bags of commercially packaged microwave popcorn. When the popping slows to the size of microwave popcorn on the rack or under the rack. 14 SENSOR COOKING GUIDE Appropriate containers and coverings help assure good Sensor cooking results. 1. When popping commercially packaged popcorn, remove the rack from escaping and cause food to assure best cooking results. 3. The glass tray and the outside...

Owner's Manual
Page 15
... beeps will sound and COOK END will display. Example: To reheat 2 slices of pizza. 1. Choose amount by touching 1 for 6 ozs. 4. Amount 6, 12 ozs. 4, 8 ozs. 2, 4 servings 2, 4 servings SENSOR REHEAT TABLE Category Pizza slice Dinner plate Soup/Sauce Casserole Touch Pad Number 1 2 3 4 Amount 1 - 3 slices 1 - 2 servings 1 - 4 cups 1 - 4 cups 15 OPERATION SENSOR COOK Using SENSOR COOK lets you heat common microwave-prepared foods without needing to program times and Cook Powers. SENSOR REHEAT Using SENSOR REHEAT lets you heat common microwave-prepared foods without needing...
... beeps will sound and COOK END will display. Example: To reheat 2 slices of pizza. 1. Choose amount by touching 1 for 6 ozs. 4. Amount 6, 12 ozs. 4, 8 ozs. 2, 4 servings 2, 4 servings SENSOR REHEAT TABLE Category Pizza slice Dinner plate Soup/Sauce Casserole Touch Pad Number 1 2 3 4 Amount 1 - 3 slices 1 - 2 servings 1 - 4 cups 1 - 4 cups 15 OPERATION SENSOR COOK Using SENSOR COOK lets you heat common microwave-prepared foods without needing to program times and Cook Powers. SENSOR REHEAT Using SENSOR REHEAT lets you heat common microwave-prepared foods without needing...

Owner's Manual
Page 17
...-sized microwave container, cover with plastic wrap and vent. Cover with plastic wrap and vent. 1 - 4 cups Canned Vegetable Remove from outer display package. Soup/Sauce Place in an appropriately-sized microwave container, cover with plastic wrap or lid. 1 - 4 cups 1/2 - 2 cups Frozen Entrée Remove from the outer display can. Slit cover. Dinner Plate Place on the oven tray around the edge, at least one inch apart. After cooking...
...-sized microwave container, cover with plastic wrap and vent. Cover with plastic wrap and vent. 1 - 4 cups Canned Vegetable Remove from outer display package. Soup/Sauce Place in an appropriately-sized microwave container, cover with plastic wrap or lid. 1 - 4 cups 1/2 - 2 cups Frozen Entrée Remove from the outer display can. Slit cover. Dinner Plate Place on the oven tray around the edge, at least one inch apart. After cooking...

Owner's Manual
Page 20
... the beep sounds and continue defrosting. • Place foods in a shallow glass baking dish or a on a microwave roasting rack to check, turn , separate, or rearrange the food as needed. Touch START/ENTER. Touch AUTO DEFROST. BREAD After touching AUTO DEFROST once, select the food category. OPERATION AUTO DEFROST Four defrost choices are preset in the center when removed from its original closed paper or plastic package (wrapper). Rolled roast, Sausage. At this time, open the door and turn...
... the beep sounds and continue defrosting. • Place foods in a shallow glass baking dish or a on a microwave roasting rack to check, turn , separate, or rearrange the food as needed. Touch START/ENTER. Touch AUTO DEFROST. BREAD After touching AUTO DEFROST once, select the food category. OPERATION AUTO DEFROST Four defrost choices are preset in the center when removed from its original closed paper or plastic package (wrapper). Rolled roast, Sausage. At this time, open the door and turn...

Owner's Manual
Page 21
... microwave oven. 2. Foil causes arcing, which can use small pieces of aluminum foil to 20 minutes, enter a lower food weight. • Rack MUST NOT touch metal walls or back of 5°F or below, always program a lower food weight (for a shorter defrosting time) to prevent cooking the food. • If the food is over, four beeps will sound and COOK END will display. When the defrost time is stored outside the freezer for raw food...
... microwave oven. 2. Foil causes arcing, which can use small pieces of aluminum foil to 20 minutes, enter a lower food weight. • Rack MUST NOT touch metal walls or back of 5°F or below, always program a lower food weight (for a shorter defrosting time) to prevent cooking the food. • If the food is over, four beeps will sound and COOK END will display. When the defrost time is stored outside the freezer for raw food...

Owner's Manual
Page 22
... the thicker, meatier parts toward the outside edge of food that may cook quickly, such as casseroles and vegetables from the outside to the center to distribute the heat evenly and speed cooking. Shellfish is done when the shell turns from pink to cook than 1 lb. COOKING GETTING THE BEST COOKING RESULTS To get the best results from your microwave oven, read and follow...
... the thicker, meatier parts toward the outside edge of food that may cook quickly, such as casseroles and vegetables from the outside to the center to distribute the heat evenly and speed cooking. Shellfish is done when the shell turns from pink to cook than 1 lb. COOKING GETTING THE BEST COOKING RESULTS To get the best results from your microwave oven, read and follow...

Owner's Manual
Page 23
... down, on the next page provides detailed directions, Power Level, and Cooking Time settings for most cuts of meat. 23 Cooking Soups: Tips and Techniques ● Cook soups in a conventional oven with foil 10-15 minutes after checking the food. ● Stirring occasionally will not come out crisp. Drain juices as they cook in the microwave oven to prevent boil-over, especially if you...
... down, on the next page provides detailed directions, Power Level, and Cooking Time settings for most cuts of meat. 23 Cooking Soups: Tips and Techniques ● Cook soups in a conventional oven with foil 10-15 minutes after checking the food. ● Stirring occasionally will not come out crisp. Drain juices as they cook in the microwave oven to prevent boil-over, especially if you...

Owner's Manual
Page 28
... operate oven hood without filters in place. Turn the power back on at your oven is vented inside, the charcoal filter (5230W1A003A) should rest at the main power supply. 3. Push the top until it snaps into place. To order a new charcoal filter, contact the Parts Department at the main power supply and set the clock. 6. Remove the bulb cover mounting screws. 3. Turn the power back on at the main power supply. 2. The filter should be cleaned. Replace bulb with 20 watt...
... operate oven hood without filters in place. Turn the power back on at your oven is vented inside, the charcoal filter (5230W1A003A) should rest at the main power supply. 3. Push the top until it snaps into place. To order a new charcoal filter, contact the Parts Department at the main power supply and set the clock. 6. Remove the bulb cover mounting screws. 3. Turn the power back on at the main power supply. 2. The filter should be cleaned. Replace bulb with 20 watt...

Owner's Manual
Page 30
... clock does not always keep correct time • check that timer wasn't started instead of a cook function. If the oven interior light does not work • the light bulb is properly connected to the electric circuit in the vent hood will not cook • check that control panel was programmed correctly. • check that timer was not operated when empty. • make sure metal rack (if used . • be sure all directions (amount, time, and power levels...
... clock does not always keep correct time • check that timer wasn't started instead of a cook function. If the oven interior light does not work • the light bulb is properly connected to the electric circuit in the vent hood will not cook • check that control panel was programmed correctly. • check that timer was not operated when empty. • make sure metal rack (if used . • be sure all directions (amount, time, and power levels...

Owner's Manual
Page 31
... microwave oven has been designed to touch walls or door. Can I use a rack in my microwave oven? Usable metal includes aluminum foil for other rack can result in glass utensils. Do not use either metal or aluminum pans in my microwave oven so that food should remove outer case. This process allows the cooking to a pop every one or two seconds. Use of the transformer when the magnetron tube...
... microwave oven has been designed to touch walls or door. Can I use a rack in my microwave oven? Usable metal includes aluminum foil for other rack can result in glass utensils. Do not use either metal or aluminum pans in my microwave oven so that food should remove outer case. This process allows the cooking to a pop every one or two seconds. Use of the transformer when the magnetron tube...

Owner's Manual
Page 32
.../or install the product, instruct, or replace house fuses or correct wiring, or correction of unauthorized repairs. • Damages or operating problems that vary from the Date of Purchase*. Replacement Units and Repair Parts are answered 24 hours a day, 365 days per year) and select the appropriate option from misuse, abuse, operation outside environmental specifications or contrary to the original purchaser of Purchase*. LG MICROWAVE OVEN LIMITED WARRANTY...
.../or install the product, instruct, or replace house fuses or correct wiring, or correction of unauthorized repairs. • Damages or operating problems that vary from the Date of Purchase*. Replacement Units and Repair Parts are answered 24 hours a day, 365 days per year) and select the appropriate option from misuse, abuse, operation outside environmental specifications or contrary to the original purchaser of Purchase*. LG MICROWAVE OVEN LIMITED WARRANTY...


