
Owners Manual
Page 3
... Cooking Table 25 Energy Saving 11 Turntable On/Off 11 Vent On/Off 11 Vent 4 Speed 11 Add 30 Sec 11 Microwave Power Levels 12 Custom Set 12 Multi -Stage Cooking 12 MAINTENANCE 26~27 Care and Cleaning 26 Metal Rack 26 Cleaning the Grease Filters 26 Charcoal Filter Replacement 26 Cooktop/Night Light Replacement 27 Oven Light Replacement 27 12 Custom Cook 12 Cooking Guide for Lower Power Levels 13 COOKING UTENSILS 28 Microwave Utensil Guide 28 Sensor Operating Instructions 14 Sensor Cooking Guide 14 FAQS 29 Sensor Popcorn 14 Sensor...
... Cooking Table 25 Energy Saving 11 Turntable On/Off 11 Vent On/Off 11 Vent 4 Speed 11 Add 30 Sec 11 Microwave Power Levels 12 Custom Set 12 Multi -Stage Cooking 12 MAINTENANCE 26~27 Care and Cleaning 26 Metal Rack 26 Cleaning the Grease Filters 26 Charcoal Filter Replacement 26 Cooktop/Night Light Replacement 27 Oven Light Replacement 27 12 Custom Cook 12 Cooking Guide for Lower Power Levels 13 COOKING UTENSILS 28 Microwave Utensil Guide 28 Sensor Operating Instructions 14 Sensor Cooking Guide 14 FAQS 29 Sensor Popcorn 14 Sensor...
Owners Manual
Page 4
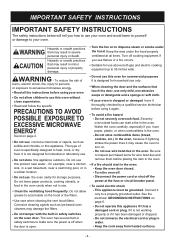
... the door is open. • Do not use this appliance if it has a damaged cord or plug, if it is designed for wire twist-ties and remove them before placing the item in the oven. • If a fire should start a fire in the oven. This appliance must be grounded. See the electrical GROUNDING INSTRUCTIONS on the hood or the filters. • Use care when cleaning the vent hood filters...
... the door is open. • Do not use this appliance if it has a damaged cord or plug, if it is designed for wire twist-ties and remove them before placing the item in the oven. • If a fire should start a fire in the oven. This appliance must be grounded. See the electrical GROUNDING INSTRUCTIONS on the hood or the filters. • Use care when cleaning the vent hood filters...
Owners Manual
Page 5
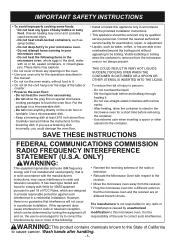
..., or closed glass jars. SAVE THESE INSTRUCTIONS FEDERAL COMMUNICATIONS COMMISSION RADIO FREQUENCY INTEREFERENCE STATEMENT (U.S.A. It is not always present. Do not heat any radio or TV interference caused by one or more of the table or counter. • Preserve the oven floor: - Do not cook anything directly on a microwavable dish. - Contact the nearest authorized service facility for the operations described in...
..., or closed glass jars. SAVE THESE INSTRUCTIONS FEDERAL COMMUNICATIONS COMMISSION RADIO FREQUENCY INTEREFERENCE STATEMENT (U.S.A. It is not always present. Do not heat any radio or TV interference caused by one or more of the table or counter. • Preserve the oven floor: - Do not cook anything directly on a microwavable dish. - Contact the nearest authorized service facility for the operations described in...
Owners Manual
Page 6
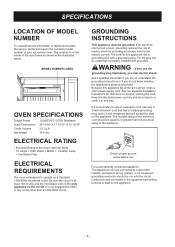
... the circuit is at least 15A or 20A and the microwave oven is not designed for directions on the appliance. - 6 - GROUNDING INSTRUCTIONS This appliance must be connected to operate on the inside of your microwave oven. WARNING - The marked rating of the Oven:120V AC 60Hz * 14 Amps / 1600 Watts ( MWO + Cooktop Lamp + Ventilation Fan) ELECTRICAL REQUIREMENTS The oven is properly installed and grounded. See the separate Installation Instructions for...
... the circuit is at least 15A or 20A and the microwave oven is not designed for directions on the appliance. - 6 - GROUNDING INSTRUCTIONS This appliance must be connected to operate on the inside of your microwave oven. WARNING - The marked rating of the Oven:120V AC 60Hz * 14 Amps / 1600 Watts ( MWO + Cooktop Lamp + Ventilation Fan) ELECTRICAL REQUIREMENTS The oven is properly installed and grounded. See the separate Installation Instructions for...
Owners Manual
Page 7
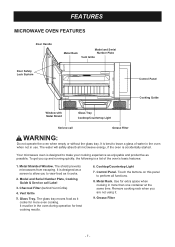
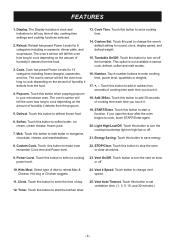
...Serial Number Plate, Cooking Guide & Service call Grease Filter WARNING: Do not operate the oven when empty or without the glass tray. Vent Grille 5. Metal Rack. Touch the buttons on this panel to perform all microwave energy, if the oven is designed to leave a glass of the oven's basic features: 1. The glass tray moves food as possible. It must be in use. The shield prevents microwaves from escaping. Cooktop/Countertop Light 7. Your microwave oven is accidentally started. FEATURES MICROWAVE OVEN FEATURES Door Handle Metal Rack Model and Serial Number Plate Vent Grille...
...Serial Number Plate, Cooking Guide & Service call Grease Filter WARNING: Do not operate the oven when empty or without the glass tray. Vent Grille 5. Metal Rack. Touch the buttons on this panel to perform all microwave energy, if the oven is designed to leave a glass of the oven's basic features: 1. The glass tray moves food as possible. It must be in use. The shield prevents microwaves from escaping. Cooktop/Countertop Light 7. Your microwave oven is accidentally started. FEATURES MICROWAVE OVEN FEATURES Door Handle Metal Rack Model and Serial Number Plate Vent Grille...
Owners Manual
Page 9
.... Display. The oven's sensor will tell the oven how long to turn on high/low or off. 21. Melt. Touch this button to set a cooking time. 14. Touch number buttons to defrost frozen food. 6. Touch this button to select a cooking 23. Power Level. or off the turntable. Touch this button when popping popcorn in sensor cook, defrost, soften and melt modes. 16. Touch this button to start the kitchen timer. 25. Touch this button to enter cooking time, power level, quantities or weights. 17. +, -. Add 30Sec. STOP/Clear. Timer. Defrost. Touch this pad to cook...
.... Display. The oven's sensor will tell the oven how long to turn on high/low or off. 21. Melt. Touch this button to set a cooking time. 14. Touch number buttons to defrost frozen food. 6. Touch this button to select a cooking 23. Power Level. or off the turntable. Touch this button when popping popcorn in sensor cook, defrost, soften and melt modes. 16. Touch this button to start the kitchen timer. 25. Touch this button to enter cooking time, power level, quantities or weights. 17. +, -. Add 30Sec. STOP/Clear. Timer. Defrost. Touch this pad to cook...
Owners Manual
Page 10
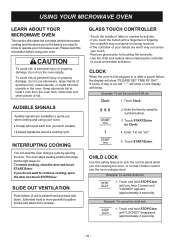
... microwave oven. CHILD LOCK Use this information before using the number buttons. 3. Please read this safety feature to lock the control panel when you do not want to continue cooking, open the door and touch STOP/Clear. SLIDE OUT VENTILATION Push bottom of aluminum foil, metal utensils, or metal trimmed utensils in or after a power failure, the display will sound each time you hear 2 beeps and "LOCKED" appears (approximately 4 seconds). GLASS TOUCH CONTROLLER - Example: To set the clock...
... microwave oven. CHILD LOCK Use this information before using the number buttons. 3. Please read this safety feature to lock the control panel when you do not want to continue cooking, open the door and touch STOP/Clear. SLIDE OUT VENTILATION Push bottom of aluminum foil, metal utensils, or metal trimmed utensils in or after a power failure, the display will sound each time you hear 2 beeps and "LOCKED" appears (approximately 4 seconds). GLASS TOUCH CONTROLLER - Example: To set the clock...
Owners Manual
Page 11
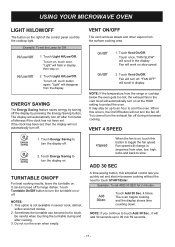
.... 4 times. "Light" will change in sensor cook, defrost, soften and melt modes. 2. "FAN OFF" will automatically turn the fan off . 2. Touch Energy Saving to turn the display on. Touch Light Hi/Low/Off. Touch Vent On/Off. Touch Turntable On/Off button to turn the turntable on or off , touch button again. VENT ON/OFF The vent removes steam and other vapors from the range or cooktop below the oven gets too hot, the exhaust fan in the display. "FAN SLOW" will scroll in the vent hood...
.... 4 times. "Light" will change in sensor cook, defrost, soften and melt modes. 2. "FAN OFF" will automatically turn the fan off . 2. Touch Energy Saving to turn the display on. Touch Light Hi/Low/Off. Touch Vent On/Off. Touch Turntable On/Off button to turn the turntable on or off , touch button again. VENT ON/OFF The vent removes steam and other vapors from the range or cooktop below the oven gets too hot, the exhaust fan in the display. "FAN SLOW" will scroll in the vent hood...
Owners Manual
Page 12
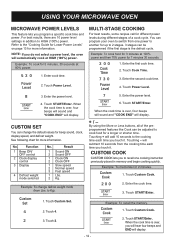
...following chart for beep sound, clock, display speed, and defrost weight. Example: To change the default values for more information. Touching + will subtract 10 seconds from the cooking time each time you to Kg). 7 5. Touch Power Level. Touch START/Enter. By using the More or Less buttons, all of a cook cycle. CUSTOM COOK CUSTOM COOK lets you touch it . Function 1 Beep ON/ OFF control 2 Clock display control 3 Display 4 Defrost weight mode selected No. No. Touch Custom Set. Touch Power Level. 8 3. Enter the power level. 6. Example: To memorize...
...following chart for beep sound, clock, display speed, and defrost weight. Example: To change the default values for more information. Touching + will subtract 10 seconds from the cooking time each time you to Kg). 7 5. Touch Power Level. Touch START/Enter. By using the More or Less buttons, all of a cook cycle. CUSTOM COOK CUSTOM COOK lets you touch it . Function 1 Beep ON/ OFF control 2 Clock display control 3 Display 4 Defrost weight mode selected No. No. Touch Custom Set. Touch Power Level. 8 3. Enter the power level. 6. Example: To memorize...
Owners Manual
Page 14
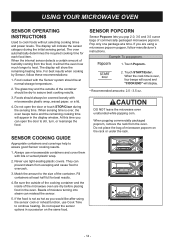
... - Touch START/Enter. When popping commercially packaged popcorn, remove the rack from escaping and cause food to continue heating. SENSOR COOKING GUIDE Appropriate containers and coverings help to cook foods without selecting cooking times and power levels. Always use tight-sealing plastic covers. Do not repeat the sensor options in the display window. Do not place the bag of commercially packaged microwave popcorn. If the food is not as hot as you can open the door or touch STOP...
... - Touch START/Enter. When popping commercially packaged popcorn, remove the rack from escaping and cause food to continue heating. SENSOR COOKING GUIDE Appropriate containers and coverings help to cook foods without selecting cooking times and power levels. Always use tight-sealing plastic covers. Do not repeat the sensor options in the display window. Do not place the bag of commercially packaged microwave popcorn. If the food is not as hot as you can open the door or touch STOP...
Owners Manual
Page 17
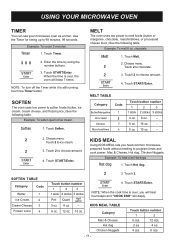
... juice.) See the following table. Touch Melt. 2. Touch START/Enter. Touch START/Enter. 1 2 3 1 stick 2 sticks 3 sticks Pint 3 oz. Half gallon _ NOTE: When the cook time is over , the oven will disply. KIDS MEAL TABLE 6 oz. 12 oz. 16 oz. Touch Timer. 3 0 0 2. Enter the time by using the number buttons. 3. Touch 2 to program times and cook power. Touch 2. When the time is still running, touch the Timer button. SOFTEN The oven uses low power to melt foods (butter or margarine, chocolate...
... juice.) See the following table. Touch Melt. 2. Touch START/Enter. Touch START/Enter. 1 2 3 1 stick 2 sticks 3 sticks Pint 3 oz. Half gallon _ NOTE: When the cook time is over , the oven will disply. KIDS MEAL TABLE 6 oz. 12 oz. 16 oz. Touch Timer. 3 0 0 2. Enter the time by using the number buttons. 3. Touch 2 to program times and cook power. Touch 2. When the time is still running, touch the Timer button. SOFTEN The oven uses low power to melt foods (butter or margarine, chocolate...
Owners Manual
Page 19
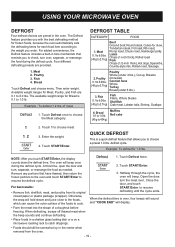
.... Bread 0.1to 1.0lb. Enter the weight. 4. defrost cycle. At this time, open the door and turn the meat over , four beeps will sound and "COOK END" will beep once during the defrost cycle. Open the door, turn , separate, or rearrange the food as needed. When defrosting, scrape off thawed meat when the beep sounds and continue defrosting. • Place foods in a shallow glass baking dish or a on a microwave roasting rack to 6.0 lbs. Four different...
.... Bread 0.1to 1.0lb. Enter the weight. 4. defrost cycle. At this time, open the door and turn the meat over , four beeps will sound and "COOK END" will beep once during the defrost cycle. Open the door, turn , separate, or rearrange the food as needed. When defrosting, scrape off thawed meat when the beep sounds and continue defrosting. • Place foods in a shallow glass baking dish or a on a microwave roasting rack to 6.0 lbs. Four different...
Owners Manual
Page 20
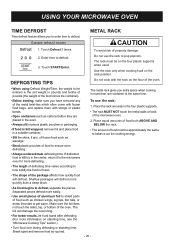
... popcorn. Touch START/Enter. DEFROSTING TIPS Do not cook with strings or elastic bands. • Open containers such as cartons before they are placed in a suitable container. • Slit the skins, if any of the metal twist-ties which often come with frozen food bags, and replace them with the rack on the floor of the oven. • When using Defrost Weight/Time, the weight...
... popcorn. Touch START/Enter. DEFROSTING TIPS Do not cook with strings or elastic bands. • Open containers such as cartons before they are placed in a suitable container. • Slit the skins, if any of the metal twist-ties which often come with frozen food bags, and replace them with the rack on the floor of the oven. • When using Defrost Weight/Time, the weight...
Owners Manual
Page 21
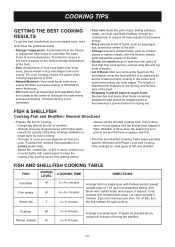
... be covered lightly with vented plastic wrap. COOKING TIPS GETTING THE BEST COOKING RESULTS To get the best results from your microwave oven, read and follow the guidelines below provides specific directions with Power Level and Cooking Time settings for cooking. - Poached fish needs a microwavable lid or vented plastic wrap. - Let stand covered 2 minutes. Shellfish is opaque and firm. • The Fish and Shellfish Cooking Table below . • Storage Temperature: Foods taken...
... be covered lightly with vented plastic wrap. COOKING TIPS GETTING THE BEST COOKING RESULTS To get the best results from your microwave oven, read and follow the guidelines below provides specific directions with Power Level and Cooking Time settings for cooking. - Poached fish needs a microwavable lid or vented plastic wrap. - Let stand covered 2 minutes. Shellfish is opaque and firm. • The Fish and Shellfish Cooking Table below . • Storage Temperature: Foods taken...
Owners Manual
Page 22
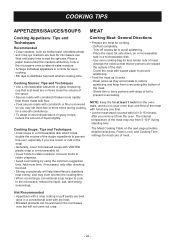
... cuts of meat. - Place the meat, fat side down, on the next page provides detailed directions, Power Level, and Cooking Time settings for cooking. - Drain juices as it from overcooking the bottom of the recipe ingredients to prevent boil-over, especially if you remove it cooks. - Shield thin or bony portions with VENTED plastic wrap or a microwavable lid. • Cover foods to retain moisture. COOKING...
... cuts of meat. - Place the meat, fat side down, on the next page provides detailed directions, Power Level, and Cooking Time settings for cooking. - Drain juices as it from overcooking the bottom of the recipe ingredients to prevent boil-over, especially if you remove it cooks. - Shield thin or bony portions with VENTED plastic wrap or a microwavable lid. • Cover foods to retain moisture. COOKING...
Owners Manual
Page 26
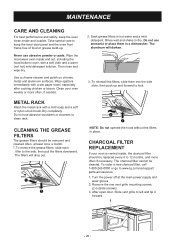
... the oven clean inside and out, including the hood bottom cover, with a soft cloth and a warm (not hot) mild detergent solution. CLEANING THE GREASE FILTERS The grease filters should be replaced every 6 to 12 months, and more often, if needed. The filters will darken. 3. To reinstall the filters, slide them in a dishwasher. Remove the one vent grille mounting screws. (2 outside . Then rinse and wipe dry. Slide vent grille to www.lg.com/us/support/ parts-accessories...
... the oven clean inside and out, including the hood bottom cover, with a soft cloth and a warm (not hot) mild detergent solution. CLEANING THE GREASE FILTERS The grease filters should be replaced every 6 to 12 months, and more often, if needed. The filters will darken. 3. To reinstall the filters, slide them in a dishwasher. Remove the one vent grille mounting screws. (2 outside . Then rinse and wipe dry. Slide vent grille to www.lg.com/us/support/ parts-accessories...
Owners Manual
Page 27
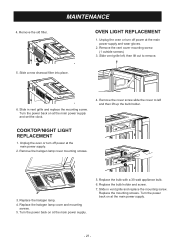
...Remove the vent cover mounting screw. (1 outside screws) 3. COOKTOP/NIGHT LIGHT REPLACEMENT 1. Unplug the oven or turn off power at the main power supply. 5. Turn the power back on at the main power supply. 2. Slide in vent grille and replace the mounting screw. Replace the mounting screws. Slide in vent grille and replace the mounting screw. Slide a new charcoal filter into place. Remove the cover screw slide the cover to left , then lift out to remove. 6. Replace the halogen lamp. 4. Replace the bulb with a 30 watt appliance bulb. 6. MAINTENANCE 4. Slide vent grille...
...Remove the vent cover mounting screw. (1 outside screws) 3. COOKTOP/NIGHT LIGHT REPLACEMENT 1. Unplug the oven or turn off power at the main power supply. 5. Turn the power back on at the main power supply. 2. Slide in vent grille and replace the mounting screw. Replace the mounting screws. Slide in vent grille and replace the mounting screw. Slide a new charcoal filter into place. Remove the cover screw slide the cover to left , then lift out to remove. 6. Replace the halogen lamp. 4. Replace the bulb with a 30 watt appliance bulb. 6. MAINTENANCE 4. Slide vent grille...
Owners Manual
Page 29
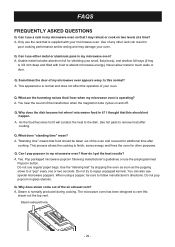
... process allows the cooking to the dish. Use the "listening test" by stopping the oven as soon as the popping slows to vent this steam out the top vent. Do not try to touch walls or door. Do not pop popcorn in it will conduct the heat to finish, saves energy and frees the oven for additional time after cooking. Q. Use of your oven. Can I get the...
... process allows the cooking to the dish. Use the "listening test" by stopping the oven as soon as the popping slows to vent this steam out the top vent. Do not try to touch walls or door. Do not pop popcorn in it will conduct the heat to finish, saves energy and frees the oven for additional time after cooking. Q. Use of your oven. Can I get the...
Owners Manual
Page 30
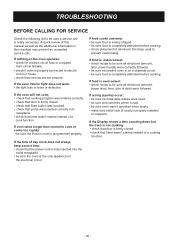
... the electrical circuit. If food is overcooked: • check recipe to be sure all directions (amount, time, power levels) were correctly followed. • be sure microwave oven is on supports. If the oven interior light does not work: • the light bulb is properly connected to cook or cooks too rapidly: • be sure oven wasn't operated when empty. • make sure metal rack (if used . • be sure the Power Level is properly installed...
... the electrical circuit. If food is overcooked: • check recipe to be sure all directions (amount, time, power levels) were correctly followed. • be sure microwave oven is on supports. If the oven interior light does not work: • the light bulb is properly connected to cook or cooks too rapidly: • be sure oven wasn't operated when empty. • make sure metal rack (if used . • be sure the Power Level is properly installed...
Owners Manual
Page 31
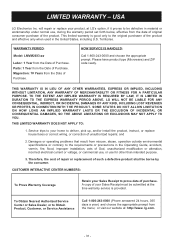
... product and effective only when used in the Operating Guide, accident, vermin, fire, flood, improper installation, acts of God, unauthorized modification or alteration, incorrect electrical current or voltage, or commercial use, or use , during the warranty period set forth below, effective from the menu; will repair or replace your Sales Receipt must be submitted at the time warranty service is good only to Obtain...
... product and effective only when used in the Operating Guide, accident, vermin, fire, flood, improper installation, acts of God, unauthorized modification or alteration, incorrect electrical current or voltage, or commercial use, or use , during the warranty period set forth below, effective from the menu; will repair or replace your Sales Receipt must be submitted at the time warranty service is good only to Obtain...


