
Owner's Manual
Page 1
Website: http://us.lgservice.com MICROWAVE OVEN OWNER'S MANUAL & COOKING GUIDE PLEASE READ THIS OWNER'S MANUAL THOROUGHLY BEFORE OPERATING. LMVM1945SW LMVM1945SB LMVM1945SBQ LMVM1945T K M P/NO. 3828W5A3267
Website: http://us.lgservice.com MICROWAVE OVEN OWNER'S MANUAL & COOKING GUIDE PLEASE READ THIS OWNER'S MANUAL THOROUGHLY BEFORE OPERATING. LMVM1945SW LMVM1945SB LMVM1945SBQ LMVM1945T K M P/NO. 3828W5A3267
Owner's Manual
Page 2
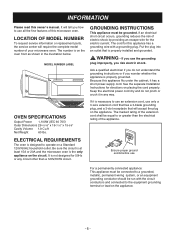
...your receipt here to prove your contact with LG (LG Electronics U.S.A., Inc.) concerning this unit. Huntsville, AL 35824-0126 PRECAUTIONS TO AVOID POSSIBLE EXPOSURE TO EXCESSIVE MICROWAVE ENERGY... (a) Do not attempt to operate this oven with the safety interlocks. (b) Do not ...oven should not be adjusted or repaired by anyone except properly qualified service personnel. -2- Please record the model number and serial number of your retail purchase. Service Division Bldg. #3 201 James Record Rd. Thank you record the details of this unit for purchasing an LG microwave oven...
...your receipt here to prove your contact with LG (LG Electronics U.S.A., Inc.) concerning this unit. Huntsville, AL 35824-0126 PRECAUTIONS TO AVOID POSSIBLE EXPOSURE TO EXCESSIVE MICROWAVE ENERGY... (a) Do not attempt to operate this oven with the safety interlocks. (b) Do not ...oven should not be adjusted or repaired by anyone except properly qualified service personnel. -2- Please record the model number and serial number of your retail purchase. Service Division Bldg. #3 201 James Record Rd. Thank you record the details of this unit for purchasing an LG microwave oven...
Owner's Manual
Page 3
...Auto Defrost 20 Location of Model Number 6 Weight conversion table 20 Oven Specifications 6 Operating Tips 20 Electrical Requirements 6 Auto Defrost Table 21 Grounding Instructions 6 Defrosting tips 23 Microwave Oven Features 7 Q Defrost 23 Control panel features 8 COOKING 24 ...OPERATION 10 Recipe Guide 24 Learn about your Microwave Oven 10 Getting the Best Cooking Results 27 Clock 10 Fish & ...
...Auto Defrost 20 Location of Model Number 6 Weight conversion table 20 Oven Specifications 6 Operating Tips 20 Electrical Requirements 6 Auto Defrost Table 21 Grounding Instructions 6 Defrosting tips 23 Microwave Oven Features 7 Q Defrost 23 Control panel features 8 COOKING 24 ...OPERATION 10 Recipe Guide 24 Learn about your Microwave Oven 10 Getting the Best Cooking Results 27 Clock 10 Fish & ...
Owner's Manual
Page 5
... such interference in a residential installation. If this equipment does cause interference to radio or television reception, which are designed to this microwave oven. SAFETY • To avoid improperly cooking some foods. - Do not allow the container to correct the interference by one or ...more of the radio or television. • Relocate the Microwave Oven with limits for the operations described in this appliance only in a particular installation. THIS COULD RESULT IN VERY HOT LIQUIDS SUDDENLY BOILING...
... such interference in a residential installation. If this equipment does cause interference to radio or television reception, which are designed to this microwave oven. SAFETY • To avoid improperly cooking some foods. - Do not allow the container to correct the interference by one or ...more of the radio or television. • Relocate the Microwave Oven with limits for the operations described in this appliance only in a particular installation. THIS COULD RESULT IN VERY HOT LIQUIDS SUDDENLY BOILING...
Owner's Manual
Page 6
... use the grounding plug improperly, you wonder whether the appliance is not designed for this microwave oven. It is properly grounded. Ensure proper ground exists before use all the fine features of your microwave oven. MODEL NUMBER LABEL GROUNDING INSTRUCTIONS This appliance must be connected to or greater than a ...if you risk electric shock. Be sure the circuit is at least 15A or 20A and the microwave oven is on the appliance. It will accept the plug on the oven front as shown in any circuit other than the electrical rating of electric shock by providing an ...
... use the grounding plug improperly, you wonder whether the appliance is not designed for this microwave oven. It is properly grounded. Ensure proper ground exists before use all the fine features of your microwave oven. MODEL NUMBER LABEL GROUNDING INSTRUCTIONS This appliance must be connected to or greater than a ...if you risk electric shock. Be sure the circuit is at least 15A or 20A and the microwave oven is on the appliance. It will accept the plug on the oven front as shown in any circuit other than the electrical rating of electric shock by providing an ...
Owner's Manual
Page 7
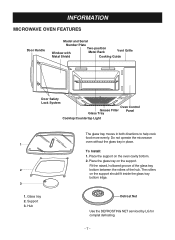
...of the hub. The rollers on the oven cavity bottom. 2. Support 3. INFORMATION MICROWAVE OVEN FEATURES Door Handle Model and Serial Number Plate Window with Two-position Metal Rack Vent Grille Metal Shield Cooking Guide Door Safety Lock System Oven Control Grease Filter Glass Tray Panel Cooktop/...bottom ridge. 1. Place the glass tray on the support. Hub Defrost Net Use the DEFROSTING NET serviced by LG for complet defrosting. -7- Glass tray 2. To Install: 1. Do not operate the microwave oven without the glass tray in both directions to help cook food more evenly.
...of the hub. The rollers on the oven cavity bottom. 2. Support 3. INFORMATION MICROWAVE OVEN FEATURES Door Handle Model and Serial Number Plate Window with Two-position Metal Rack Vent Grille Metal Shield Cooking Guide Door Safety Lock System Oven Control Grease Filter Glass Tray Panel Cooktop/...bottom ridge. 1. Place the glass tray on the support. Hub Defrost Net Use the DEFROSTING NET serviced by LG for complet defrosting. -7- Glass tray 2. To Install: 1. Do not operate the microwave oven without the glass tray in both directions to help cook food more evenly.
Owner's Manual
Page 8
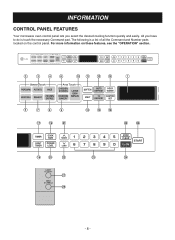
The following is touch the necessary Command pad. For more information on the control panel. All you select the desired cooking function quickly and easily. INFORMATION CONTROL PANEL FEATURES Your microwave oven control panel lets you have to do is a list of all the Command and Number pads located on these features, see the "OPERATION" section. 2 3 4 8 10 11 13 15 1 5 7 6 9 17 19 21 12 14 16 25 26 18 20 22 23 24 27 28 -8-
The following is touch the necessary Command pad. For more information on the control panel. All you select the desired cooking function quickly and easily. INFORMATION CONTROL PANEL FEATURES Your microwave oven control panel lets you have to do is a list of all the Command and Number pads located on these features, see the "OPERATION" section. 2 3 4 8 10 11 13 15 1 5 7 6 9 17 19 21 12 14 16 25 26 18 20 22 23 24 27 28 -8-
Owner's Manual
Page 9
... frozen entree. 7. FROZEN ENTREE: Touch this pad when popping popcorn in your microwave oven. 3. CHICKEN CHOICES: Touch this pad to select food type and defrost food by...100% power level. 25. LIGHT TIMER: Touch this pad to keep hot, cooked foods warm in your microwave oven for 1.0 pound ground beef. 15. START: Touch this pad to 99 minutes 99 seconds. 16. ..., START again. 27. DISPLAY: The Display includes a clock and indicators to tell you open the door after oven begins to turn the fan on the cooktop/countertop light. 28. MELT: Touch this pad to enter cooking time...
... frozen entree. 7. FROZEN ENTREE: Touch this pad when popping popcorn in your microwave oven. 3. CHICKEN CHOICES: Touch this pad to select food type and defrost food by...100% power level. 25. LIGHT TIMER: Touch this pad to keep hot, cooked foods warm in your microwave oven for 1.0 pound ground beef. 15. START: Touch this pad to 99 minutes 99 seconds. 16. ..., START again. 27. DISPLAY: The Display includes a clock and indicators to tell you open the door after oven begins to turn the fan on the cooktop/countertop light. 28. MELT: Touch this pad to enter cooking time...
Owner's Manual
Page 10
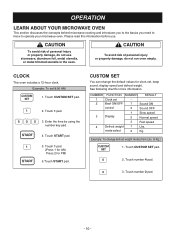
... by using the number key pad. 4. Example: To change the default values for PM) 6.Touch START pad. CLOCK This oven includes a 12-hour clock. to operate your microwave oven. Touch 1 pad. (Press 1 for AM, Press 2 for clock set, beep sound, display speed and defrost weight. CUSTOM... SET You can change defrost weight mode.(from Lbs. Touch number 4 pad. 3. OPERATION LEARN ABOUT YOUR MICROWAVE OVEN This section discusses the concepts behind microwave cooking and introduces you to the basics you need to know to Kg.) 1. See following chart for more information. Touch...
... by using the number key pad. 4. Example: To change the default values for PM) 6.Touch START pad. CLOCK This oven includes a 12-hour clock. to operate your microwave oven. Touch 1 pad. (Press 1 for AM, Press 2 for clock set, beep sound, display speed and defrost weight. CUSTOM... SET You can change defrost weight mode.(from Lbs. Touch number 4 pad. 3. OPERATION LEARN ABOUT YOUR MICROWAVE OVEN This section discusses the concepts behind microwave cooking and introduces you to the basics you need to know to Kg.) 1. See following chart for more information. Touch...

Owner's Manual
Page 11
... the LIGHT to cancel the LIGHT TIMER in the display window with two beeps. 2. Example: To set and start microwave cooking without the need to turn on . 3. The oven begins cooking and display shows time counting down. Touch TIMER pad. 2. Touch STOP/CLEAR pad. 2. Enter the time...4. Touch 1 pad. (Press 1 for AM., press 2 for 2 minutes. 1. Touch LIGHT TIMER pad. HI-LOW-OFF 3. LIGHT TIMER You can use your microwave oven as a timer. Example: Turn on at any time you should touch key. Touch LIGHT TIMER pad. 1. Touch START pad. Touch START pad. Example: To cancel...
... the LIGHT to cancel the LIGHT TIMER in the display window with two beeps. 2. Example: To set and start microwave cooking without the need to turn on . 3. The oven begins cooking and display shows time counting down. Touch TIMER pad. 2. Touch STOP/CLEAR pad. 2. Enter the time...4. Touch 1 pad. (Press 1 for AM., press 2 for 2 minutes. 1. Touch LIGHT TIMER pad. HI-LOW-OFF 3. LIGHT TIMER You can use your microwave oven as a timer. Example: Turn on at any time you should touch key. Touch LIGHT TIMER pad. 1. Touch START pad. Touch START pad. Example: To cancel...
Owner's Manual
Page 12
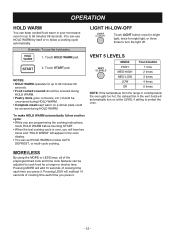
... 1 time 2 times 3 times 4 times 5 times NOTE: If the temperature from the range or cooktop below the oven gets too hot, the exhaust fan in the vent hood will appear in your microwave oven for up to follow a cooking cycle automatically. Touch START pad. To make HOLD WARM automatically follow another cycle...all of the preprogrammed cook and time cook features can use the hold warm. 1. Example: To use HOLD WARM by itself or to protect the oven. LIGHT HI-LOW-OFF LIGHT HI-LOW-OFF Touch LIGHT button once for bright light, twice for a longer or shorter time. You can be...
... 1 time 2 times 3 times 4 times 5 times NOTE: If the temperature from the range or cooktop below the oven gets too hot, the exhaust fan in the vent hood will appear in your microwave oven for up to follow a cooking cycle automatically. Touch START pad. To make HOLD WARM automatically follow another cycle...all of the preprogrammed cook and time cook features can use the hold warm. 1. Example: To use HOLD WARM by itself or to protect the oven. LIGHT HI-LOW-OFF LIGHT HI-LOW-OFF Touch LIGHT button once for bright light, twice for a longer or shorter time. You can be...

Owner's Manual
Page 17
...amount of humidity coming from the food, it will display. - 17 - Glass Tray and outside of the cooking container and the inside of the microwave oven are dry before placing food in the display window. At this time you can open the door or touch the STOP/CLEAR key during the... much longer to heat. Do not open the door to stir, turn, or rearrange the food. CAUTION Do not leave microwave oven unattended while popping. Never use microwavable containers and cover them with fork severral times. • After baking, let stand for best results. 4. They can mislead the sensor. NOTE: &#...
...amount of humidity coming from the food, it will display. - 17 - Glass Tray and outside of the cooking container and the inside of the microwave oven are dry before placing food in the display window. At this time you can open the door or touch the STOP/CLEAR key during the... much longer to heat. Do not open the door to stir, turn, or rearrange the food. CAUTION Do not leave microwave oven unattended while popping. Never use microwavable containers and cover them with fork severral times. • After baking, let stand for best results. 4. They can mislead the sensor. NOTE: &#...

Owner's Manual
Page 23
... sets the defrosting time for 1.0 pound ground beef. If defrosted food is still icy in the center, return it to the microwave oven for more defrosting. • The length of defrosting time varies according to how solidly the food is frozen. • The shape... and place it in a suitable container. 2. SPECIAL INSTRUCTIONS Place on standing time, see the "Microwave Cooking Tips" section.) • Turn over and rearrange. Example: To defrost ground beef. 1. The foil can damage the oven lining. • For better results, let food stand after defrosting. (For more easily. •...
... sets the defrosting time for 1.0 pound ground beef. If defrosted food is still icy in the center, return it to the microwave oven for more defrosting. • The length of defrosting time varies according to how solidly the food is frozen. • The shape... and place it in a suitable container. 2. SPECIAL INSTRUCTIONS Place on standing time, see the "Microwave Cooking Tips" section.) • Turn over and rearrange. Example: To defrost ground beef. 1. The foil can damage the oven lining. • For better results, let food stand after defrosting. (For more easily. •...
Owner's Manual
Page 27
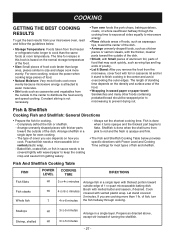
...how you use depends on the density and surface area of the food. • Wrapping in sauce needs to be wrapped prior to microwaving to microwave energy. • Place delicate areas of foods, such as asparagus tips, toward the center of the dish. • Arrange unevenly ... layer. COOKING GETTING THE BEST COOKING RESULTS To get the best results from your microwave oven, read and follow the guidelines below provides specific directions with thicker parts toward outside edge of 11/2 quart microwavable baking dish. For even cooking, reduce the power when cooking large pieces of food...
...how you use depends on the density and surface area of the food. • Wrapping in sauce needs to be wrapped prior to microwaving to microwave energy. • Place delicate areas of foods, such as asparagus tips, toward the center of the dish. • Arrange unevenly ... layer. COOKING GETTING THE BEST COOKING RESULTS To get the best results from your microwave oven, read and follow the guidelines below provides specific directions with thicker parts toward outside edge of 11/2 quart microwavable baking dish. For even cooking, reduce the power when cooking large pieces of food...

Owner's Manual
Page 28
...- Trim off excess fat to distribute heat and shorten cooking time. Drain juices as they cook in the microwave oven to absorb extra moisture. • Arrange individual appetizers in the microwave, reduce the liquid, salt, and strong seasonings. - 28 - The internal temperature of foil to retain ...- Cooking Sauces: Tips and Techniques • Use a microwavable casserole or glass measuring cup that thicker portions are best done in a conventional oven with dry heat. • Breaded products can be warmed in the microwave oven but will help blend flavors, distribute heat evenly, and ...
...- Trim off excess fat to distribute heat and shorten cooking time. Drain juices as they cook in the microwave oven to absorb extra moisture. • Arrange individual appetizers in the microwave, reduce the liquid, salt, and strong seasonings. - 28 - The internal temperature of foil to retain ...- Cooking Sauces: Tips and Techniques • Use a microwavable casserole or glass measuring cup that thicker portions are best done in a conventional oven with dry heat. • Breaded products can be warmed in the microwave oven but will help blend flavors, distribute heat evenly, and ...

Owner's Manual
Page 29
...again after 30 minutes. Turn roast over halfway through cooking and shield if necessary. 11-13 minutes per pound Remove roast from microwave when desired temperature per pound is reached. each ) 2 chops 4 chops 3 Place chops in center of pork should reach ... and place on microwavable roast rack. COOKING Meat Cooking Table MEAT POWER LEVEL Beef HI Hamburgers, Fresh or defrosted (4 oz. each ) 2 links 4 links 6 links 10 links (8 oz. Let stand covered 1 minute. Place on microwavable roast rack. Remove roast from microwave oven when desired MEDIUM(155...
...again after 30 minutes. Turn roast over halfway through cooking and shield if necessary. 11-13 minutes per pound Remove roast from microwave when desired temperature per pound is reached. each ) 2 chops 4 chops 3 Place chops in center of pork should reach ... and place on microwavable roast rack. COOKING Meat Cooking Table MEAT POWER LEVEL Beef HI Hamburgers, Fresh or defrosted (4 oz. each ) 2 links 4 links 6 links 10 links (8 oz. Let stand covered 1 minute. Place on microwavable roast rack. Remove roast from microwave oven when desired MEDIUM(155...

Owner's Manual
Page 31
...charcoal filter cannot be removed and cleaned often, at least once a month. 1. Remove old filter. 5. Wipe the microwave oven inside and outside. Clean your oven weekly or more often if necessary. CLEANING THE GREASE FILTERS The grease filter should be damaged. 3. The filter will ... Remove the two vent grille mounting screws. 3. Use a chrome cleaner and polish on chrome, metal, and aluminum surfaces. Disconnect power or unplug microwave oven. 2. NOTE: Do not operate the hood without the filter in a dishwasher. Do not clean filter with a soft cloth and a warm (not...
...charcoal filter cannot be removed and cleaned often, at least once a month. 1. Remove old filter. 5. Wipe the microwave oven inside and outside. Clean your oven weekly or more often if necessary. CLEANING THE GREASE FILTERS The grease filter should be damaged. 3. The filter will ... Remove the two vent grille mounting screws. 3. Use a chrome cleaner and polish on chrome, metal, and aluminum surfaces. Disconnect power or unplug microwave oven. 2. NOTE: Do not operate the hood without the filter in a dishwasher. Do not clean filter with a soft cloth and a warm (not...

Owner's Manual
Page 32
... vent grille into place. Q. Usable metal includes aluminum foil for shielding (use the rack that I microwave food in my microwave oven so that is not correctly in microwave oven. The glass tray does not moving. Why does the dish become hot when I may reheat or ...food to remove food after cooking. Q. When using a popper, be correct-side up the bulb holder. 5. Do not pop popcorn in microwave oven. Disconnect power or unplug microwave oven. 2. Replace bulb(s) with a candelabra-base 35 watt bulb. 6. Replace the bulb holder, if damaged. 7. Is this steam out the ...
... vent grille into place. Q. Usable metal includes aluminum foil for shielding (use the rack that I microwave food in my microwave oven so that is not correctly in microwave oven. The glass tray does not moving. Why does the dish become hot when I may reheat or ...food to remove food after cooking. Q. When using a popper, be correct-side up the bulb holder. 5. Do not pop popcorn in microwave oven. Disconnect power or unplug microwave oven. 2. Replace bulb(s) with a candelabra-base 35 watt bulb. 6. Replace the bulb holder, if damaged. 7. Is this steam out the ...
Owner's Manual
Page 33
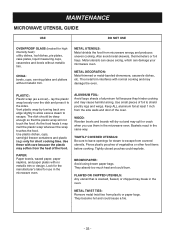
...food from plastic or paper bags. Metal utensils can cause arcing, which can damage your microwave oven. PLASTIC: Plastic wrap (as a cover)-- As the food heats it to leave openings for use them in the microwave oven. Use these with normal cooking and may cause harmful arcing. METAL TWIST TIES: Remove ...the same way. The dish should be deep enough so that is cracked, flawed, or chipped may split or crack when you use in the microwave oven. CHINA: bowls, cups, serving plates and platters without metallic trim. Keep ALL aluminum foil at least 1 inch from the heat of the food...
...food from plastic or paper bags. Metal utensils can cause arcing, which can damage your microwave oven. PLASTIC: Plastic wrap (as a cover)-- As the food heats it to leave openings for use them in the microwave oven. Use these with normal cooking and may cause harmful arcing. METAL TWIST TIES: Remove ...the same way. The dish should be deep enough so that is cracked, flawed, or chipped may split or crack when you use in the microwave oven. CHINA: bowls, cups, serving plates and platters without metallic trim. Keep ALL aluminum foil at least 1 inch from the heat of the food...
Owner's Manual
Page 34
... not cook: • check that controls are set properly. If arcing (sparks) occur: • be sure microwavable dishes were used. • be sure wire twist ties weren't used. • be sure oven wasn't operated when empty. • make sure metal rack (if used to cook or cooks too rapidly: •... BEFORE CALLING FOR SERVICE Check the following list to be sure all directions (amount, time, & power levels) were correctly followed. • be sure microwave oven is on the oven operates: • check for a blown circuit fuse or a tripped main circuit breaker. • check if...
... not cook: • check that controls are set properly. If arcing (sparks) occur: • be sure microwavable dishes were used. • be sure wire twist ties weren't used. • be sure oven wasn't operated when empty. • make sure metal rack (if used to cook or cooks too rapidly: •... BEFORE CALLING FOR SERVICE Check the following list to be sure all directions (amount, time, & power levels) were correctly followed. • be sure microwave oven is on the oven operates: • check for a blown circuit fuse or a tripped main circuit breaker. • check if...


