
Owner's Manual
Page 3
... Power Levels........ 16 EXPOSURE TO EXCESSIVE MICROWAVE Sensor Operating Instructions 17 ENERGY 2 Sensor Cooking Guide 17 Popcorn 17 TABLE OF CONTENTS 3 Potato 17 Vegetable 18 SAFETY 4 Reheat(Sensor 18 Important Safety Instructions 4 Sensor Cooking Table 19 Sensor Reheat Table 19 INFORMATION 6 Auto Defrost 20 Location of Model Number 6 Weight conversion table 20 Oven Specifications 6 Operating Tips 20 Electrical Requirements 6 Auto Defrost Table 21 Grounding Instructions 6 Defrosting tips 23 Microwave Oven Features 7 Q Defrost 23 Control panel...
... Power Levels........ 16 EXPOSURE TO EXCESSIVE MICROWAVE Sensor Operating Instructions 17 ENERGY 2 Sensor Cooking Guide 17 Popcorn 17 TABLE OF CONTENTS 3 Potato 17 Vegetable 18 SAFETY 4 Reheat(Sensor 18 Important Safety Instructions 4 Sensor Cooking Table 19 Sensor Reheat Table 19 INFORMATION 6 Auto Defrost 20 Location of Model Number 6 Weight conversion table 20 Oven Specifications 6 Operating Tips 20 Electrical Requirements 6 Auto Defrost Table 21 Grounding Instructions 6 Defrosting tips 23 Microwave Oven Features 7 Q Defrost 23 Control panel...
Owner's Manual
Page 4
... grease to make sure the power is off when the door is not working properly or if it may damage the filters. • Do not tamper with the built-in use this appliance outdoors. Do not allow children to heat, cook, or dry food. It is made for wire twist-ties and remove them before using it is open. • When food flames under the hood, turn...
... grease to make sure the power is off when the door is not working properly or if it may damage the filters. • Do not tamper with the built-in use this appliance outdoors. Do not allow children to heat, cook, or dry food. It is made for wire twist-ties and remove them before using it is open. • When food flames under the hood, turn...
Owner's Manual
Page 5
..., the user is the responsibility of table or counter. • Preserve the oven floor: - It is encouraged to try to comply with the provided installation instructions. • This appliance should be boiling. Do not heat any openings in a particular installation. These items may occur and possibly cause personal injury. - Put the package on the oven floor or turntable. Do not use a browning...
..., the user is the responsibility of table or counter. • Preserve the oven floor: - It is encouraged to try to comply with the provided installation instructions. • This appliance should be boiling. Do not heat any openings in a particular installation. These items may occur and possibly cause personal injury. - Put the package on the oven floor or turntable. Do not use a browning...
Owner's Manual
Page 6
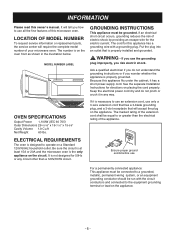
... plug on the circuit. OVEN SPECIFICATIONS Output Power 1,100W (IEC 60 705) Outer Dimensions 29-15/16" x 16-7/16" x 15-5/8" Cavity Volume 1.9 Cu.ft Net Weight 60 lbs. If you risk electric shock. The number is necessary to operate on the appliance. -6- ELECTRICAL REQUIREMENTS The oven is designed to use an extension cord, use the grounding plug improperly, you use only a 3-wire extension cord that has a 3-blade...
... plug on the circuit. OVEN SPECIFICATIONS Output Power 1,100W (IEC 60 705) Outer Dimensions 29-15/16" x 16-7/16" x 15-5/8" Cavity Volume 1.9 Cu.ft Net Weight 60 lbs. If you risk electric shock. The number is necessary to operate on the appliance. -6- ELECTRICAL REQUIREMENTS The oven is designed to use an extension cord, use the grounding plug improperly, you use only a 3-wire extension cord that has a 3-blade...
Owner's Manual
Page 7
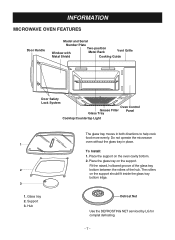
... the glass tray in both directions to help cook food more evenly. Place the support on the support. Place the glass tray on the oven cavity bottom. 2. The rollers on the support should fit inside the glass tray bottom ridge. 1. INFORMATION MICROWAVE OVEN FEATURES Door Handle Model and Serial Number Plate Window with Two-position Metal Rack Vent Grille Metal Shield Cooking Guide Door Safety Lock System Oven Control Grease Filter Glass Tray Panel Cooktop/Countertop Light The glass tray moves in place. Hub Defrost Net Use the DEFROSTING NET serviced by LG for...
... the glass tray in both directions to help cook food more evenly. Place the support on the support. Place the glass tray on the oven cavity bottom. 2. The rollers on the support should fit inside the glass tray bottom ridge. 1. INFORMATION MICROWAVE OVEN FEATURES Door Handle Model and Serial Number Plate Window with Two-position Metal Rack Vent Grille Metal Shield Cooking Guide Door Safety Lock System Oven Control Grease Filter Glass Tray Panel Cooktop/Countertop Light The glass tray moves in place. Hub Defrost Net Use the DEFROSTING NET serviced by LG for...
Owner's Manual
Page 9
... . 23. VENT 5 LEVELS: Touch this pad to turn the fan on the cooktop/countertop light. 28. CUSTOM SET: Touch this button to set , sound, display speed and defrost weight. 17. LIGHT HI-LOW-OFF: Touch this pad to cook frozen entree. 7. If you with the RAPID defrosting method for clock set the light timer. 19. POPCORN: Touch this pad to change the oven's default settings for 1.0 pound ground beef. 15. FROZEN ENTREE: Touch this pad when popping popcorn in your microwave oven. 3. Q DEFROST: This...
... . 23. VENT 5 LEVELS: Touch this pad to turn the fan on the cooktop/countertop light. 28. CUSTOM SET: Touch this button to set , sound, display speed and defrost weight. 17. LIGHT HI-LOW-OFF: Touch this pad to cook frozen entree. 7. If you with the RAPID defrosting method for clock set the light timer. 19. POPCORN: Touch this pad to change the oven's default settings for 1.0 pound ground beef. 15. FROZEN ENTREE: Touch this pad when popping popcorn in your microwave oven. 3. Q DEFROST: This...
Owner's Manual
Page 10
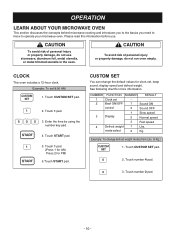
... change the default values for clock set 8:00 AM. 1. Touch CUSTOM SET pad. 2. Example: To set , beep sound, display speed and defrost weight. See following chart for PM) 6.Touch START pad. Touch 1 pad. 3. to operate your microwave oven. CAUTION To avoid risk of personal injury or property damage, do not use . OPERATION LEARN ABOUT YOUR MICROWAVE OVEN This section discusses the concepts behind microwave cooking and introduces you to the basics you need to...
... change the default values for clock set 8:00 AM. 1. Touch CUSTOM SET pad. 2. Example: To set , beep sound, display speed and defrost weight. See following chart for PM) 6.Touch START pad. Touch 1 pad. 3. to operate your microwave oven. CAUTION To avoid risk of personal injury or property damage, do not use . OPERATION LEARN ABOUT YOUR MICROWAVE OVEN This section discusses the concepts behind microwave cooking and introduces you to the basics you need to...

Owner's Manual
Page 11
... set and start microwave cooking without the need to turn on and off 7:00 AM. 1. Use the Timer for 2 minutes. 1. Touch STOP/CLEAR pad. 2. Example: To cancel the child lock. 1. LOCKED will display. - 11 - Touch START pad. 6. Touch START pad. When the time is also useful when cleaning the control panel. LIGHT TIMER You can use your microwave oven as a timer. At this simplified control lets you want the LIGHT to 99 minutes, 99 seconds. 8. after 3 minutes, every touch will appear in LIGHT operation...
... set and start microwave cooking without the need to turn on and off 7:00 AM. 1. Use the Timer for 2 minutes. 1. Touch STOP/CLEAR pad. 2. Example: To cancel the child lock. 1. LOCKED will display. - 11 - Touch START pad. 6. Touch START pad. When the time is also useful when cleaning the control panel. LIGHT TIMER You can use your microwave oven as a timer. At this simplified control lets you want the LIGHT to 99 minutes, 99 seconds. 8. after 3 minutes, every touch will appear in LIGHT operation...
Owner's Manual
Page 12
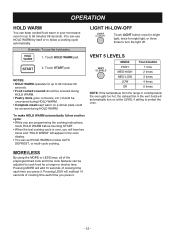
You can use the hold warm. 1. VENT 5 LEVELS VENT 5 LEVELS MODE HIGH MED-HIGH MED-LOW LOW Off Touch button 1 time 2 times 3 times 4 times 5 times NOTE: If the temperature from the range or cooktop below the oven gets too hot, the exhaust fan in the oven display. • You can set HOLD WARM to follow AUTO DEFROST, or multi-cycle cooking. To make HOLD WARM automatically follow a cooking cycle automatically. MORE/LESS By using the MORE or LESS...
You can use the hold warm. 1. VENT 5 LEVELS VENT 5 LEVELS MODE HIGH MED-HIGH MED-LOW LOW Off Touch button 1 time 2 times 3 times 4 times 5 times NOTE: If the temperature from the range or cooktop below the oven gets too hot, the exhaust fan in the oven display. • You can set HOLD WARM to follow AUTO DEFROST, or multi-cycle cooking. To make HOLD WARM automatically follow a cooking cycle automatically. MORE/LESS By using the MORE or LESS...

Owner's Manual
Page 13
..., Homemade bakery, Large dish menus. Before serving test noodles in a single layer around the edge of a dinner plate. Place under broiler if additional browning or crisping is desired.See recipe guide. (page 24) 4 ~ 6 servings 2 Whole chicken Prepare as directed and cover with the dish cover or plastic wrap. OPERATION AUTO COOK Auto Cook lets you heat common microwave-prepared foods without selecting cooking times and power levels.
..., Homemade bakery, Large dish menus. Before serving test noodles in a single layer around the edge of a dinner plate. Place under broiler if additional browning or crisping is desired.See recipe guide. (page 24) 4 ~ 6 servings 2 Whole chicken Prepare as directed and cover with the dish cover or plastic wrap. OPERATION AUTO COOK Auto Cook lets you heat common microwave-prepared foods without selecting cooking times and power levels.
Owner's Manual
Page 15
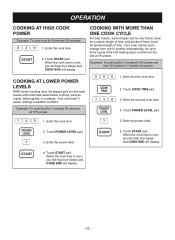
... HIGH. Enter the power level. 2. Touch POWER LEVEL pad. 3. Touch START pad. Touch START pad. Your oven has10 power settings in addition to three cycles if the first heating cycle is over, you will hear four beeps and COOK END will display. Enter the second cook time. 4. OPERATION COOKING AT HIGH COOK POWER Example: To cook food for 7 minutes 30 seconds. When the cook time is over , you the best results with foods that need slower cooking, such as...
... HIGH. Enter the power level. 2. Touch POWER LEVEL pad. 3. Touch START pad. Touch START pad. Your oven has10 power settings in addition to three cycles if the first heating cycle is over, you will hear four beeps and COOK END will display. Enter the second cook time. 4. OPERATION COOKING AT HIGH COOK POWER Example: To cook food for 7 minutes 30 seconds. When the cook time is over , you the best results with foods that need slower cooking, such as...

Owner's Manual
Page 17
... selecting cooking times and power levels. When popping commercially packaged popcorn, Remove the rack from escaping and cause food to overcook. 3. Example: To pop popcorn. 1. Always use fresh bags of container should always be dry to heat. The display will display. Glass Tray and outside of the cooking container and the inside of humidity coming from the food, it will appear in the oven. Foods should be covered loosely with the sensor system...
... selecting cooking times and power levels. When popping commercially packaged popcorn, Remove the rack from escaping and cause food to overcook. 3. Example: To pop popcorn. 1. Always use fresh bags of container should always be dry to heat. The display will display. Glass Tray and outside of the cooking container and the inside of humidity coming from the food, it will appear in the oven. Foods should be covered loosely with the sensor system...

Owner's Manual
Page 19
... off frost under running water. Place on paper towel on a low plate. each ) - 19 - Vegetable Place in an appropriately sized microwave container, cover with vented plastic wrap. After cooking, stir and allow to 21 oz. Place in an appropriately sized microwave container. SENSOR REHEAT TABLE CATEGORY Dinner Plate (Sensor) TOUCH NUMBER BUTTON DIRECTION 1 Place on a microwave safe plate. each ) Rice Add twice the amount of water according to...
... off frost under running water. Place on paper towel on a low plate. each ) - 19 - Vegetable Place in an appropriately sized microwave container, cover with vented plastic wrap. After cooking, stir and allow to 21 oz. Place in an appropriately sized microwave container. SENSOR REHEAT TABLE CATEGORY Dinner Plate (Sensor) TOUCH NUMBER BUTTON DIRECTION 1 Place on a microwave safe plate. each ) Rice Add twice the amount of water according to...
Owner's Manual
Page 20
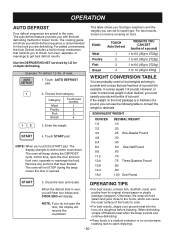
... four beeps and COOK END will beep during the beep unless the door is over , separate or rearrange the food. Touch AUTO DEFROST pad. 2. Close the door and restart. At this time, open the door, the display will hold steam and juice close to the foods, which defrost sequence is in a shallow container or on food. NOTE: If you touch the START pad. Use the DEFROSTING NET serviced by LG for each type. Touch START...
... four beeps and COOK END will beep during the beep unless the door is over , separate or rearrange the food. Touch AUTO DEFROST pad. 2. Close the door and restart. At this time, open the door, the display will hold steam and juice close to the foods, which defrost sequence is in a shallow container or on food. NOTE: If you touch the START pad. Use the DEFROSTING NET serviced by LG for each type. Touch START...

Owner's Manual
Page 23
... microwave oven for ground beef. The Q DEFROST feature provides you have removed any , of frozen food such as required. - 23 - OPERATION AUTO DEFROST TABLE (CONT.) Bread setting FOOD Bagel Dinner Roll Muffin Hamburger Hot Dog Bun Slices of Bread Loaf of paper towel. SPECIAL INSTRUCTIONS Place on standing time, see the "Microwave Cooking Tips" section.) • Turn over and rearrange. DEFROSTING TIPS Q DEFROST • When using Auto Defrost, the weight to ensure even defrosting...
... microwave oven for ground beef. The Q DEFROST feature provides you have removed any , of frozen food such as required. - 23 - OPERATION AUTO DEFROST TABLE (CONT.) Bread setting FOOD Bagel Dinner Roll Muffin Hamburger Hot Dog Bun Slices of Bread Loaf of paper towel. SPECIAL INSTRUCTIONS Place on standing time, see the "Microwave Cooking Tips" section.) • Turn over and rearrange. DEFROSTING TIPS Q DEFROST • When using Auto Defrost, the weight to ensure even defrosting...
Owner's Manual
Page 27
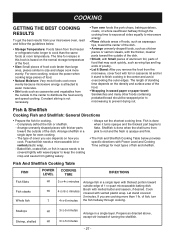
... microwave oven, read and follow the guidelines below provides specific directions with foil or casserole lid and let it turns opaque and the thickest part begins to prevent drying out. Let stand covered 2 minutes. Shellfish is done when the shell turns from pink to red and the flesh is based on how you remove the food from the microwave, cover food with Power Level and Cooking Time settings...
... microwave oven, read and follow the guidelines below provides specific directions with foil or casserole lid and let it turns opaque and the thickest part begins to prevent drying out. Let stand covered 2 minutes. Shellfish is done when the shell turns from pink to red and the flesh is based on how you remove the food from the microwave, cover food with Power Level and Cooking Time settings...

Owner's Manual
Page 28
... soup recipe to cook in the microwave oven but will not come out crisp. • Cook sauces made with dry heat. • Breaded products can be warmed in the microwave, reduce the liquid, salt, and strong seasonings. - 28 - The Meat Cooking Table on a microwavable rack in the soup. • Generally, cover microwaved soups with foil 10-15 minutes after checking the food. Not Recommended...
... soup recipe to cook in the microwave oven but will not come out crisp. • Cook sauces made with dry heat. • Breaded products can be warmed in the microwave, reduce the liquid, salt, and strong seasonings. - 28 - The Meat Cooking Table on a microwavable rack in the soup. • Generally, cover microwaved soups with foil 10-15 minutes after checking the food. Not Recommended...

Owner's Manual
Page 31
..., keep the inner door panel and the oven front frame free of the vent grille into place. To remove grease filter, slide filter to keep the oven clean inside and out, including the hood bottom cover, with ammonia, corrosive cleaning agents such as lye-based oven cleaners, or place them in a dishwasher. Reconnect power or plug in microwave oven. Reconnect power or plug in microwave oven. - 31 - Slide a new charcoal filter into the back slot...
..., keep the inner door panel and the oven front frame free of the vent grille into place. To remove grease filter, slide filter to keep the oven clean inside and out, including the hood bottom cover, with ammonia, corrosive cleaning agents such as lye-based oven cleaners, or place them in a dishwasher. Reconnect power or plug in microwave oven. Reconnect power or plug in microwave oven. - 31 - Slide a new charcoal filter into the back slot...

Owner's Manual
Page 32
... frees the oven for other rack can result in microwave oven. Do not pop popcorn in my microwave oven? Remove the bulb cover mounting screws. 3. Disconnect power or unplug microwave oven. 2. Replace the mounting screws. 8. Usable metal includes aluminum foil for additional time after cooking. Sometimes the door of the air exhaust vent? It should be correct-side up the bulb holder. 5. A. Q. A. Q. A. MAINTENANCE COOKTOP/COUNTERTOP LIGHT REPLACEMENT 1. Reconnect power or plug in my microwave oven? OVEN LIGHT REPLACEMENT 1. Remove the vent grille mounting screws...
... frees the oven for other rack can result in microwave oven. Do not pop popcorn in my microwave oven? Remove the bulb cover mounting screws. 3. Disconnect power or unplug microwave oven. 2. Replace the mounting screws. 8. Usable metal includes aluminum foil for additional time after cooking. Sometimes the door of the air exhaust vent? It should be correct-side up the bulb holder. 5. A. Q. A. Q. A. MAINTENANCE COOKTOP/COUNTERTOP LIGHT REPLACEMENT 1. Reconnect power or plug in my microwave oven? OVEN LIGHT REPLACEMENT 1. Remove the vent grille mounting screws...
Owner's Manual
Page 34
... all directions (amount, power level, time, size of dish) were followed. If the oven interior light does not works: • the light bulb is completely defrosted before cooking. • check placement of aluminum foil strips used to prevent overcooking. If oven takes longer than normal to cook or cooks too rapidly: • be sure all directions (amount, time, & power levels) were correctly followed. • be sure microwave oven is on the electrical circuit. If food is...
... all directions (amount, power level, time, size of dish) were followed. If the oven interior light does not works: • the light bulb is completely defrosted before cooking. • check placement of aluminum foil strips used to prevent overcooking. If oven takes longer than normal to cook or cooks too rapidly: • be sure all directions (amount, time, & power levels) were correctly followed. • be sure microwave oven is on the electrical circuit. If food is...


