
Owner's Manual
Page 1
website:http://www.lg.ca MICROWAVE OVEN OWNER'S MANUAL PLEASE READ THIS OWNER'S MANUAL THOROUGHLY BEFORE OPERATING. LMV2061SB LMV2061SW LMV2061SS P/NO.: 3828W5A4632 Printed in Korea
website:http://www.lg.ca MICROWAVE OVEN OWNER'S MANUAL PLEASE READ THIS OWNER'S MANUAL THOROUGHLY BEFORE OPERATING. LMV2061SB LMV2061SW LMV2061SS P/NO.: 3828W5A4632 Printed in Korea
Owner's Manual
Page 2
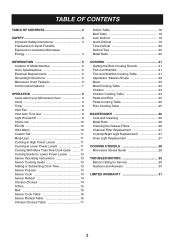
... SAFETY 3 Important Safety Instructions 3 Precautions to Avoid Possible Exposure to excessive Microwave Energy 4 INFORMATION 5 Location of Model Number 5 Oven Specifications 5 Electrical Requirements 5 Grounding Instructions 5 Microwave Oven Features 6 Control panel features 7 OPERATION 9 Learn about your Microwave Oven 9 Clock 9 Timer 9 Vent Fan 9 Vent Auto Time Set... 27 Cooktop/Night Light Replacement 27 Oven Light Replacement 27 COOKING UTENSILS 28 Microwave Utensil Guide 28 TROUBLESHOOTING 29 Before Calling for Service 29 Qustions and Answers 30 LIMITED WARRANTY 31 2
... SAFETY 3 Important Safety Instructions 3 Precautions to Avoid Possible Exposure to excessive Microwave Energy 4 INFORMATION 5 Location of Model Number 5 Oven Specifications 5 Electrical Requirements 5 Grounding Instructions 5 Microwave Oven Features 6 Control panel features 7 OPERATION 9 Learn about your Microwave Oven 9 Clock 9 Timer 9 Vent Fan 9 Vent Auto Time Set... 27 Cooktop/Night Light Replacement 27 Oven Light Replacement 27 COOKING UTENSILS 28 Microwave Utensil Guide 28 TROUBLESHOOTING 29 Before Calling for Service 29 Qustions and Answers 30 LIMITED WARRANTY 31 2
Owner's Manual
Page 3
...not store combustible items (bread, cookies, etc.) in the oven, because if lightning strikes the power lines it may cause the oven to excessive microwave energy. • Read all the instructions before placing the item in the oven. - Turn the oven off when the door is made for ... plastic, or other combustibles in this oven without close supervision. • Read and follow the specific PRECAUTIONS TO AVOID POSSIBLE EXPOSURE TO EXCESSIVE MICROWAVE ENERGY found on the hood or the filters. • Use care when cleaning the vent hood filters. Corrosive cleaning agents such as sulfide ...
...not store combustible items (bread, cookies, etc.) in the oven, because if lightning strikes the power lines it may cause the oven to excessive microwave energy. • Read all the instructions before placing the item in the oven. - Turn the oven off when the door is made for ... plastic, or other combustibles in this oven without close supervision. • Read and follow the specific PRECAUTIONS TO AVOID POSSIBLE EXPOSURE TO EXCESSIVE MICROWAVE ENERGY found on the hood or the filters. • Use care when cleaning the vent hood filters. Corrosive cleaning agents such as sulfide ...
Owner's Manual
Page 4
...qualified service personnel. Keep a browning dish at least 3/16 inch above floor. SAVE THESE INSTRUCTIONS PRECAUTIONS TO AVOID POSSIBLE EXPOSURE TO EXCESSIVE MICROWAVE ENERGY... (a) Do not attempt to operate this oven with any types of table or counter. • As with the door open ...appliance only in your oven only for the browning dish. Do not heat the oven floor excessively. - Do not cook anything directly on a microwavable dish. - Do not heat small-necked containers, such as syrup bottles. - These items may occur and possibly cause personal injury. - ...
...qualified service personnel. Keep a browning dish at least 3/16 inch above floor. SAVE THESE INSTRUCTIONS PRECAUTIONS TO AVOID POSSIBLE EXPOSURE TO EXCESSIVE MICROWAVE ENERGY... (a) Do not attempt to operate this oven with any types of table or counter. • As with the door open ...appliance only in your oven only for the browning dish. Do not heat the oven floor excessively. - Do not cook anything directly on a microwavable dish. - Do not heat small-necked containers, such as syrup bottles. - These items may occur and possibly cause personal injury. - ...
Owner's Manual
Page 5
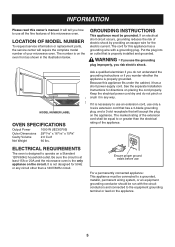
... ELECTRICAL REQUIREMENTS The oven is the only appliance on the circuit. Be sure the circuit is at least 15A or 20A and the microwave oven is designed to the equipment grounding terminal or lead on a Standard 120V/60Hz household outlet. The number is properly installed and ...grounded. For a permanently connected appliance: This appliance must be equal to use an extension cord, use all the fine features of your microwave oven. LOCATION OF MODEL NUMBER To request service information or replacement parts, the service center will accept the plug on placing the cord properly...
... ELECTRICAL REQUIREMENTS The oven is the only appliance on the circuit. Be sure the circuit is at least 15A or 20A and the microwave oven is designed to the equipment grounding terminal or lead on a Standard 120V/60Hz household outlet. The number is properly installed and ...grounded. For a permanently connected appliance: This appliance must be equal to use an extension cord, use all the fine features of your microwave oven. LOCATION OF MODEL NUMBER To request service information or replacement parts, the service center will accept the plug on placing the cord properly...
Owner's Manual
Page 6
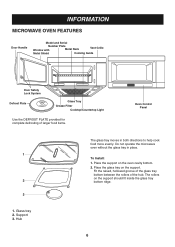
... Plate Glass Tray Grease Filter Cooktop/Countertop Light Use the DEFROST PLATE provided for complete defrosting of the hub. Glass tray 2. Do not operate the microwave oven without the glass tray in both directions to help cook food more evenly. The rollers on the support. Hub 6 Fit the raised, hollowed groove...
... Plate Glass Tray Grease Filter Cooktop/Countertop Light Use the DEFROST PLATE provided for complete defrosting of the hub. Glass tray 2. Do not operate the microwave oven without the glass tray in both directions to help cook food more evenly. The rollers on the support. Hub 6 Fit the raised, hollowed groove...
Owner's Manual
Page 7
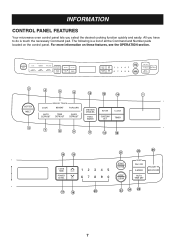
INFORMATION CONTROL PANEL FEATURES Your microwave oven control panel lets you have to do is a list of all the Command and Number pads located on these features, see the OPERATION section. 2 4 5 6 10 12 14 1 3 7 8 9 11 13 15 16 18 21 23 26 17 19 20 22 24 25 7 For more information on the control panel. The following is touch the necessary Command pad. All you select the desired cooking function quickly and easily.
INFORMATION CONTROL PANEL FEATURES Your microwave oven control panel lets you have to do is a list of all the Command and Number pads located on these features, see the OPERATION section. 2 4 5 6 10 12 14 1 3 7 8 9 11 13 15 16 18 21 23 26 17 19 20 22 24 25 7 For more information on the control panel. The following is touch the necessary Command pad. All you select the desired cooking function quickly and easily.
Owner's Manual
Page 8
... to cook depending on the amount of humidity coming from the food. 5. HOLD WARM: Touch this pad to keep hot, cooked foods warm in your microwave oven for sound, clock, disply speed, and defrost weight. 14. TIMER: Touch this pad to set the timer. 16. START/ENTER: Touch this pad to... to change the oven's default setting for up to turn on /off. 24. LIGHT HI/LOW/OFF: Touch this pad when popping popcorn in your microwave oven. POPCORN: Touch this pad to defrost most other frozen foods. 9. POWER LEVEL: Touch this pad to turn the fan on the cooktop/ countertop light...
... to cook depending on the amount of humidity coming from the food. 5. HOLD WARM: Touch this pad to keep hot, cooked foods warm in your microwave oven for sound, clock, disply speed, and defrost weight. 14. TIMER: Touch this pad to set the timer. 16. START/ENTER: Touch this pad to... to change the oven's default setting for up to turn on /off. 24. LIGHT HI/LOW/OFF: Touch this pad when popping popcorn in your microwave oven. POPCORN: Touch this pad to defrost most other frozen foods. 9. POWER LEVEL: Touch this pad to turn the fan on the cooktop/ countertop light...
Owner's Manual
Page 9
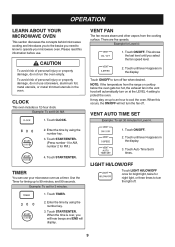
... This section discusses the concepts behind microwave cooking and introduces you to the basics you need to know to turn off fan when desired. Please read this occurs, the ON/OFF will .... NOTE: If the temperature from the cooking surface. Touch Auto Time Set 5 times. Touch CLOCK. Touch ON/OFF to operate your microwave oven as a timer. When this information before use your microwave oven. Touch START/ENTER. (Press number 1 for AM, number 2 for Level 4: 1. Touch START/ENTER. There are five speeds. Touch START...
... This section discusses the concepts behind microwave cooking and introduces you to the basics you need to know to turn off fan when desired. Please read this occurs, the ON/OFF will .... NOTE: If the temperature from the cooking surface. Touch Auto Time Set 5 times. Touch CLOCK. Touch ON/OFF to operate your microwave oven as a timer. When this information before use your microwave oven. Touch START/ENTER. (Press number 1 for AM, number 2 for Level 4: 1. Touch START/ENTER. There are five speeds. Touch START...
Owner's Manual
Page 10
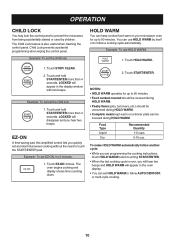
...HOLD WARM to follow a cooking cycle automatically. Touch STOP/ CLEAR. 2. Touch and hold START/ENTER more than 4 seconds. LOCKED will appear in your microwave oven for up to 90 minutes. • Food cooked covered should be covered during HOLD WARM. • Pastry items (pies, turnovers, etc.) should... be covered during HOLD WARM. for up to 90 minutes. OPERATION CHILD LOCK You may lock the control panel to prevent the microwave from being accidentally started or used by itself or to follow AUTO DEFROST, or multi-cycle cooking. 10 Example: To cancel the child lock....
...HOLD WARM to follow a cooking cycle automatically. Touch STOP/ CLEAR. 2. Touch and hold START/ENTER more than 4 seconds. LOCKED will appear in your microwave oven for up to 90 minutes. • Food cooked covered should be covered during HOLD WARM. • Pastry items (pies, turnovers, etc.) should... be covered during HOLD WARM. for up to 90 minutes. OPERATION CHILD LOCK You may lock the control panel to prevent the microwave from being accidentally started or used by itself or to follow AUTO DEFROST, or multi-cycle cooking. 10 Example: To cancel the child lock....
Owner's Manual
Page 12
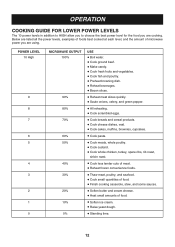
..., and the amount of food. ● Soften ice cream. ● Raise yeast dough. ● Standing time. 12 POWER LEVEL 10 High 9 8 7 6 5 4 3 2 1 0 MICROWAVE OUTPUT 100% 90% 80% 70% 60% 50% 40% 30% 20% 10% 0% USE ● Boil water. ● Cook ground beef. ● Make candy. ● Cook fresh... quantities of food. ● Finish cooking casserole, stew, and some sauces. ● Soften butter and cream cheese. ● Heat small amounts of microwave power you are using. OPERATION COOKING GUIDE FOR LOWER POWER LEVELS The 10 power levels in addition to HIGH allow you to choose the best...
..., and the amount of food. ● Soften ice cream. ● Raise yeast dough. ● Standing time. 12 POWER LEVEL 10 High 9 8 7 6 5 4 3 2 1 0 MICROWAVE OUTPUT 100% 90% 80% 70% 60% 50% 40% 30% 20% 10% 0% USE ● Boil water. ● Cook ground beef. ● Make candy. ● Cook fresh... quantities of food. ● Finish cooking casserole, stew, and some sauces. ● Soften butter and cream cheese. ● Heat small amounts of microwave power you are using. OPERATION COOKING GUIDE FOR LOWER POWER LEVELS The 10 power levels in addition to HIGH allow you to choose the best...
Owner's Manual
Page 13
... of the container should be dry to assure best cooking results. 3. For best results for each time you pop 3.0 and 3.5 ounce bags of the microwave oven are using the MORE+ or LESS- The glass tray and the outside of the cooking container and the inside of commercially packaged... time. If you press it. Do not open the door to cook food for best results. 4. Never use microwavable containers and cover them with the sensor system should always be covered loosely with microwavable plastic wrap, waxed paper, or a lid. 4. pads all of moisture turning into steam can be at normal...
... of the container should be dry to assure best cooking results. 3. For best results for each time you pop 3.0 and 3.5 ounce bags of the microwave oven are using the MORE+ or LESS- The glass tray and the outside of the cooking container and the inside of commercially packaged... time. If you press it. Do not open the door to cook food for best results. 4. Never use microwavable containers and cover them with the sensor system should always be covered loosely with microwavable plastic wrap, waxed paper, or a lid. 4. pads all of moisture turning into steam can be at normal...

Owner's Manual
Page 14
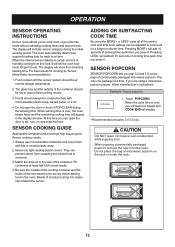
OPERATION SENSOR COOK Using SENSOR COOK lets you heat common microwave-prepared foods without needing to program times and Power levels. Example: To cook 6 ozs. Touch REHEAT. 2. Choose food category. Example: To cook rice. ...233;e Touch Pad Number 1 2 3 4 5 6 7 Amount 1 - 4 EA 1 - 4 cups 1 - 4 cups 1 - 4 cups 1 - 4 cups 1/2 - 2 cups 10 - 21 ozs When the cook time is over, you heat common microwave-prepared foods without needing to cook poultry (chicken wings, chicken nuggets, Spicy chicken and Mexican chicken) See the following table. SENSOR COOK has preset Cook...
OPERATION SENSOR COOK Using SENSOR COOK lets you heat common microwave-prepared foods without needing to program times and Power levels. Example: To cook 6 ozs. Touch REHEAT. 2. Choose food category. Example: To cook rice. ...233;e Touch Pad Number 1 2 3 4 5 6 7 Amount 1 - 4 EA 1 - 4 cups 1 - 4 cups 1 - 4 cups 1 - 4 cups 1/2 - 2 cups 10 - 21 ozs When the cook time is over, you heat common microwave-prepared foods without needing to cook poultry (chicken wings, chicken nuggets, Spicy chicken and Mexican chicken) See the following table. SENSOR COOK has preset Cook...

Owner's Manual
Page 16
...vent. 10 - 21 ozs. If not in a 1-2 quart casserole. Dinner Plate Place on a microwave safe plate. After cooking, stir and let stand 3 minutes. Use a microwave container large enough to stand for leftover pizza. Place on paper towel on a low plate. After cooking... for 3 minutes. 16 AMOUNT 1 - 3 slices (3 - 5 ozs. Cover with a fork and place on the vegetables. Place in shallow microwavable casserole. Cover with plastic wrap and vent. 1 - 4 cups Canned Vegetable Remove from outer display package. Casserole Cover dish containing the casserole with ...
...vent. 10 - 21 ozs. If not in a 1-2 quart casserole. Dinner Plate Place on a microwave safe plate. After cooking, stir and let stand 3 minutes. Use a microwave container large enough to stand for leftover pizza. Place on paper towel on a low plate. After cooking... for 3 minutes. 16 AMOUNT 1 - 3 slices (3 - 5 ozs. Cover with a fork and place on the vegetables. Place in shallow microwavable casserole. Cover with plastic wrap and vent. 1 - 4 cups Canned Vegetable Remove from outer display package. Casserole Cover dish containing the casserole with ...
Owner's Manual
Page 17
... under a broiler for a few minutes to taste • 1/2 cup green olives w/pimentos Place onions and peppers in an 8 X 8-inch glass dish or similar container and microwave for 4 servings) • 1/2 medium onion, chopped • 1/2 green bell pepper, diced • 1/2 cup frozen peas • 1/2 cup long grain rice • 1 cup water • 1/2 cup...
... under a broiler for a few minutes to taste • 1/2 cup green olives w/pimentos Place onions and peppers in an 8 X 8-inch glass dish or similar container and microwave for 4 servings) • 1/2 medium onion, chopped • 1/2 green bell pepper, diced • 1/2 cup frozen peas • 1/2 cup long grain rice • 1 cup water • 1/2 cup...
Owner's Manual
Page 18
...ozs. MELT TABLE CATEGORY Butter or Margarine DIRECTION Unwrap and place in microwavable container. Unwrap squares and place in microwavable container. Place in microwavable container. OPERATION SOFTEN TABLE CATEGORY Butter DIRECTION Unwrap and place in microwavable container. Place in microwavable container. Frozen juice will be soft enough to make scooping easier. ... of cooking to complete melting. Stir at the end of cycle to cover butter. Ice Cream Place container in microwavable container. Frozen juice Remove top. Cheese Use processed cheese food only.
...ozs. MELT TABLE CATEGORY Butter or Margarine DIRECTION Unwrap and place in microwavable container. Unwrap squares and place in microwavable container. Place in microwavable container. OPERATION SOFTEN TABLE CATEGORY Butter DIRECTION Unwrap and place in microwavable container. Place in microwavable container. Frozen juice will be soft enough to make scooping easier. ... of cooking to complete melting. Stir at the end of cycle to cover butter. Ice Cream Place container in microwavable container. Frozen juice Remove top. Cheese Use processed cheese food only.

Owner's Manual
Page 19
... defrost time. When defrosting, scrape off thawed meat when the beep sounds and continue defrosting. • Place foods in a shallow glass baking dish or a on a microwave roasting rack to 1.0 lb ROLL CAKE 2.
... defrost time. When defrosting, scrape off thawed meat when the beep sounds and continue defrosting. • Place foods in a shallow glass baking dish or a on a microwave roasting rack to 1.0 lb ROLL CAKE 2.
Owner's Manual
Page 20
...8226; The shape of property damage: Do not use rack to prevent cooking the food. • Rack MUST NOT touch metal walls or back of microwave oven. 2. The metal rack gives you extra space when cooking in a refrigerator-freezer that does not maintain a temperature of 5°F or below, ...areas of food with rack on floor of larger food items. Place the defrost plate on rack position. Rack must be defrosted directly on a microwave safe roasting rack. Foil causes arcing, which can use rack: DEFROST TIPS 1. Touch TIME DEFROST. 2. Use the rack only when cooking food ...
...8226; The shape of property damage: Do not use rack to prevent cooking the food. • Rack MUST NOT touch metal walls or back of microwave oven. 2. The metal rack gives you extra space when cooking in a refrigerator-freezer that does not maintain a temperature of 5°F or below, ...areas of food with rack on floor of larger food items. Place the defrost plate on rack position. Rack must be defrosted directly on a microwave safe roasting rack. Foil causes arcing, which can use rack: DEFROST TIPS 1. Touch TIME DEFROST. 2. Use the rack only when cooking food ...
Owner's Manual
Page 21
... 7 41/2-6 minutes Scallops HI Shrimp, shelled HI 31/2-5 minutes 31/2-5 minutes DIRECTIONS Arrange fish in sauce needs to be wrapped prior to microwaving to prevent drying out. If you are cooking more evenly. of fish, turn the fish halfway through the cooking time to expose all sides...outside edge of the dish. ● Shield, with vented plastic wrap. COOKING GETTING THE BEST COOKING RESULTS To get the best results from your microwave oven, read and follow the guidelines below. ● Storage Temperature: Foods taken from the freezer or refrigerator take longer to cook than 1 lb...
... 7 41/2-6 minutes Scallops HI Shrimp, shelled HI 31/2-5 minutes 31/2-5 minutes DIRECTIONS Arrange fish in sauce needs to be wrapped prior to microwaving to prevent drying out. If you are cooking more evenly. of fish, turn the fish halfway through the cooking time to expose all sides...outside edge of the dish. ● Shield, with vented plastic wrap. COOKING GETTING THE BEST COOKING RESULTS To get the best results from your microwave oven, read and follow the guidelines below. ● Storage Temperature: Foods taken from the freezer or refrigerator take longer to cook than 1 lb...
Owner's Manual
Page 22
...use . NOTE: Keep the foil at least 1 inch from the oven. Defrost completely. - Cooking Sauces: Tips and Techniques ● Use a microwavable casserole or glass measuring cup that thicker portions are best done in a conventional oven with dry heat. ● Breaded products can be warmed in ...● Stirring occasionally will not come out crisp. Use oven cooking bag for cooking. - Cover the meat with VENTED plastic wrap or a microwavable lid. ● Cover foods to retain moisture. Shield thin or bony portions with cornstarch or flour uncovered so you remove it cooks. - The...
...use . NOTE: Keep the foil at least 1 inch from the oven. Defrost completely. - Cooking Sauces: Tips and Techniques ● Use a microwavable casserole or glass measuring cup that thicker portions are best done in a conventional oven with dry heat. ● Breaded products can be warmed in ...● Stirring occasionally will not come out crisp. Use oven cooking bag for cooking. - Cover the meat with VENTED plastic wrap or a microwavable lid. ● Cover foods to retain moisture. Shield thin or bony portions with cornstarch or flour uncovered so you remove it cooks. - The...


