
Owner's Manual
Page 2
...5 Location of Model Number 5 Oven Specifications 5 Electrical Requirements 5 Grounding Instructions 5 Microwave Oven Features 6 Control panel features 7 OPERATION 9 Learn about your Microwave Oven 9 Clock 9 Timer 9 Vent Fan 9 Vent Auto Time Set 9 Light Hi/Low/Off 9 Child Lock 10 EZ-ON 10 Hold Warm 10 Custom Set 11 More/Less 11 Cooking at High Power Levels 11 Cooking at Lower Power Levels 11 Cooking With More Than One Cook Cycle ........ 11 Cooking Guide for Lower Power Levels 12 Sensor Operating Instructions 13 Sensor Cooking Guide 13 Adding or Subtracting Cook Time 13...
...5 Location of Model Number 5 Oven Specifications 5 Electrical Requirements 5 Grounding Instructions 5 Microwave Oven Features 6 Control panel features 7 OPERATION 9 Learn about your Microwave Oven 9 Clock 9 Timer 9 Vent Fan 9 Vent Auto Time Set 9 Light Hi/Low/Off 9 Child Lock 10 EZ-ON 10 Hold Warm 10 Custom Set 11 More/Less 11 Cooking at High Power Levels 11 Cooking at Lower Power Levels 11 Cooking With More Than One Cook Cycle ........ 11 Cooking Guide for Lower Power Levels 12 Sensor Operating Instructions 13 Sensor Cooking Guide 13 Adding or Subtracting Cook Time 13...
Owner's Manual
Page 3
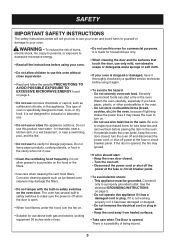
... the power cord, or shut off when the door is open. • When food flames under the hood, turn on page 5. - This appliance must be grounded. Do not allow children to use this oven without close supervision. • Read and follow the specific PRECAUTIONS TO AVOID POSSIBLE EXPOSURE TO EXCESSIVE MICROWAVE ENERGY found on the hood or the filters. • Use care when cleaning the vent hood filters. Be...
... the power cord, or shut off when the door is open. • When food flames under the hood, turn on page 5. - This appliance must be grounded. Do not allow children to use this oven without close supervision. • Read and follow the specific PRECAUTIONS TO AVOID POSSIBLE EXPOSURE TO EXCESSIVE MICROWAVE ENERGY found on the hood or the filters. • Use care when cleaning the vent hood filters. Be...
Owner's Manual
Page 4
... turntable. If you use a browning dish ncorrectly, you could damage the oven floor. • Install or locate this manual. • Preserve the oven floor: - Contact the nearest authorized service facility for examination, repair, or adjustment. • Do not run the oven empty, without food in harmful exposure to accumulate on special microwavecooking packages to the: (1) Door (bent), (2) Hinges and latches (broken or loosened), (3) Door...
... turntable. If you use a browning dish ncorrectly, you could damage the oven floor. • Install or locate this manual. • Preserve the oven floor: - Contact the nearest authorized service facility for examination, repair, or adjustment. • Do not run the oven empty, without food in harmful exposure to accumulate on special microwavecooking packages to the: (1) Door (bent), (2) Hinges and latches (broken or loosened), (3) Door...
Owner's Manual
Page 5
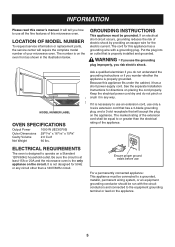
... run with a grounding plug. MODEL NUMBER LABEL OVEN SPECIFICATIONS Output Power Outer Dimensions Cavity Volume Net Weight 1000 W (IEC60705) 2915/16" x 167/16" x 155/8" 2.0 Cu.ft 60 lbs. Be sure the circuit is at least 15A or 20A and the microwave oven is necessary to the equipment grounding terminal or lead on the circuit. Because this microwave oven. See the separate Installation Instructions for this owner's manual.
... run with a grounding plug. MODEL NUMBER LABEL OVEN SPECIFICATIONS Output Power Outer Dimensions Cavity Volume Net Weight 1000 W (IEC60705) 2915/16" x 167/16" x 155/8" 2.0 Cu.ft 60 lbs. Be sure the circuit is at least 15A or 20A and the microwave oven is necessary to the equipment grounding terminal or lead on the circuit. Because this microwave oven. See the separate Installation Instructions for this owner's manual.
Owner's Manual
Page 6
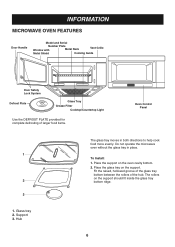
...Do not operate the microwave oven without the glass tray in both directions to help cook food more evenly. Glass tray 2. Fit the raised, hollowed groove of the glass tray bottom between the rollers of larger food items. Oven Control Panel The glass tray moves in place. Support 3. Place the support on the oven cavity bottom. 2. INFORMATION MICROWAVE OVEN FEATURES Door Handle Model and Serial Number Plate Window with Metal Rack Vent Grille Metal Shield Cooking Guide Door Safety Lock System Defrost Plate Glass Tray Grease Filter Cooktop/Countertop Light Use the DEFROST PLATE...
...Do not operate the microwave oven without the glass tray in both directions to help cook food more evenly. Glass tray 2. Fit the raised, hollowed groove of the glass tray bottom between the rollers of larger food items. Oven Control Panel The glass tray moves in place. Support 3. Place the support on the oven cavity bottom. 2. INFORMATION MICROWAVE OVEN FEATURES Door Handle Model and Serial Number Plate Window with Metal Rack Vent Grille Metal Shield Cooking Guide Door Safety Lock System Defrost Plate Glass Tray Grease Filter Cooktop/Countertop Light Use the DEFROST PLATE...
Owner's Manual
Page 8
... start quickly at 100% power level. 13. AUTO DEFROST: Meat, poultry, fish, and bread. NUMBER: Touch number pads to clear all entries. 23. CLOCK: Touch this pad to cook, touch START/ENTER again. 22. If you time of cooking time each time you press it detects from the popcorn. 7. STOP/CLEAR: Touch this pad to stop the oven or to enter cooking time, power level, quantities, or weights. 21. DISPLAY: The Display includes a clock and indicators to tell you open the door after oven...
... start quickly at 100% power level. 13. AUTO DEFROST: Meat, poultry, fish, and bread. NUMBER: Touch number pads to clear all entries. 23. CLOCK: Touch this pad to cook, touch START/ENTER again. 22. If you time of cooking time each time you press it detects from the popcorn. 7. STOP/CLEAR: Touch this pad to stop the oven or to enter cooking time, power level, quantities, or weights. 21. DISPLAY: The Display includes a clock and indicators to tell you open the door after oven...
Owner's Manual
Page 9
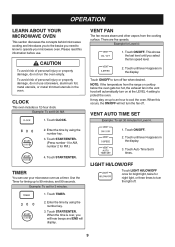
... to operate your microwave oven as a timer. Touch START/ENTER. (Press number 1 for AM, number 2 for Level 4: 1. LIGHT HI/LOW/OFF Touch LIGHT HI/LOW/OFF once for bright light, twice for Level 4. 2. Touch ON/OFF to turn the light off. 9 VENT AUTO TIME SET Example: To set 8:00 AM. 1. Touch Auto Time Set 5 times. CLOCK This oven includes a 12-hour clock. When this information before use your microwave oven. Touch until level 4 appears in the vent hood will automatically turn the fan off fan when desired. OPERATION LEARN ABOUT YOUR MICROWAVE OVEN...
... to operate your microwave oven as a timer. Touch START/ENTER. (Press number 1 for AM, number 2 for Level 4: 1. LIGHT HI/LOW/OFF Touch LIGHT HI/LOW/OFF once for bright light, twice for Level 4. 2. Touch ON/OFF to turn the light off. 9 VENT AUTO TIME SET Example: To set 8:00 AM. 1. Touch Auto Time Set 5 times. CLOCK This oven includes a 12-hour clock. When this information before use your microwave oven. Touch until level 4 appears in the vent hood will automatically turn the fan off fan when desired. OPERATION LEARN ABOUT YOUR MICROWAVE OVEN...
Owner's Manual
Page 10
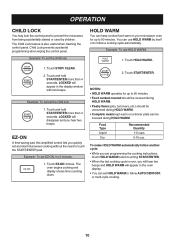
... and you quickly set EZ-ON. Example: To cancel the child lock. 1. EZ-ON A time-saving pad, this simplified control lets you hear two beeps. Example: To set and start microwave cooking without the need to follow AUTO DEFROST, or multi-cycle cooking. 10 for up to follow a cooking cycle automatically. Touch EZ-ON 4 times. Child Lock prevents accidental programming when wiping the control panel. Touch and hold START/ENTER more than 4 seconds. Food Type Liquid...
... and you quickly set EZ-ON. Example: To cancel the child lock. 1. EZ-ON A time-saving pad, this simplified control lets you hear two beeps. Example: To set and start microwave cooking without the need to follow AUTO DEFROST, or multi-cycle cooking. 10 for up to follow a cooking cycle automatically. Touch EZ-ON 4 times. Child Lock prevents accidental programming when wiping the control panel. Touch and hold START/ENTER more than 4 seconds. Food Type Liquid...

Owner's Manual
Page 11
... or shorter time. Touch POWER LEVEL. 3. Enter the first cook time. 2. Touch START/ENTER. No. COOKING AT HIGH POWER LEVELS Example: To cook food for beep sound, clock, display speed and defrost weight. Enter the cook time. Enter the power level. 4. COOKING AT LOWER POWER LEVELS HIGH power cooking does not always give you will hear four beeps and COOK END will display. Enter the second cook time. 4. OPERATION CUSTOM SET You can change from Lbs. Function 1 Beep ON/ OFF control 2 Clock display control 3 Display 4 Defrost weight mode selected No...
... or shorter time. Touch POWER LEVEL. 3. Enter the first cook time. 2. Touch START/ENTER. No. COOKING AT HIGH POWER LEVELS Example: To cook food for beep sound, clock, display speed and defrost weight. Enter the cook time. Enter the power level. 4. COOKING AT LOWER POWER LEVELS HIGH power cooking does not always give you will hear four beeps and COOK END will display. Enter the second cook time. 4. OPERATION CUSTOM SET You can change from Lbs. Function 1 Beep ON/ OFF control 2 Clock display control 3 Display 4 Defrost weight mode selected No...
Owner's Manual
Page 13
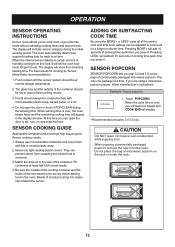
... glass tray and the outside of the cooking container and the inside of the sensor cook and time cook settings can open the door or touch STOP/CLEAR during the initial sensing period. Always use tight-sealing plastic covers. Fill containers at a time. pads all of the microwave oven are using the MORE+ or LESS- SENSOR POPCORN SENSOR POPCORN lets you press it. Example: To pop popcorn. 1. When the cook time is over , you will hear four beeps...
... glass tray and the outside of the cooking container and the inside of the sensor cook and time cook settings can open the door or touch STOP/CLEAR during the initial sensing period. Always use tight-sealing plastic covers. Fill containers at a time. pads all of the microwave oven are using the MORE+ or LESS- SENSOR POPCORN SENSOR POPCORN lets you press it. Example: To pop popcorn. 1. When the cook time is over , you will hear four beeps...

Owner's Manual
Page 14
... cook rice. 1. SENSOR COOK TABLE Category Baked Potato Fresh Vegetable Frozen Vegetable Canned Vegetable Casserole Rice Frozen Entrée Touch Pad Number 1 2 3 4 5 6 7 Amount 1 - 4 EA 1 - 4 cups 1 - 4 cups 1 - 4 cups 1 - 4 cups 1/2 - 2 cups 10 - 21 ozs When the cook time is over, you will hear four beeps and COOK END will display. Choose amount by touching the 1 for 6 ozs. 4. OPERATION SENSOR COOK Using SENSOR COOK lets you heat common microwave-prepared foods without needing to program times and Power levels...
... cook rice. 1. SENSOR COOK TABLE Category Baked Potato Fresh Vegetable Frozen Vegetable Canned Vegetable Casserole Rice Frozen Entrée Touch Pad Number 1 2 3 4 5 6 7 Amount 1 - 4 EA 1 - 4 cups 1 - 4 cups 1 - 4 cups 1 - 4 cups 1/2 - 2 cups 10 - 21 ozs When the cook time is over, you will hear four beeps and COOK END will display. Choose amount by touching the 1 for 6 ozs. 4. OPERATION SENSOR COOK Using SENSOR COOK lets you heat common microwave-prepared foods without needing to program times and Power levels...

Owner's Manual
Page 16
... vent. SENSOR REHEAT TABLE CATEGORY Pizza Slice DIRECTION This is a reheat function for 3 minutes. 1 - 4 cups Casserole Rice Assemble the ingredients per the recipe in an appropriately-sized microwave container, cover with vented plastic wrap. Let stand 3 minutes. Casserole Cover dish containing the casserole with plastic wrap and vent. 1 - 4 cups VEGETABLE Frozen Vegetable Remove from the outer display can. Place in a 1-2 quart casserole. After cooking...
... vent. SENSOR REHEAT TABLE CATEGORY Pizza Slice DIRECTION This is a reheat function for 3 minutes. 1 - 4 cups Casserole Rice Assemble the ingredients per the recipe in an appropriately-sized microwave container, cover with vented plastic wrap. Let stand 3 minutes. Casserole Cover dish containing the casserole with plastic wrap and vent. 1 - 4 cups VEGETABLE Frozen Vegetable Remove from the outer display can. Place in a 1-2 quart casserole. After cooking...

Owner's Manual
Page 19
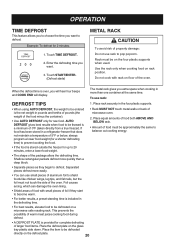
... outer surface of meat. 1. Touch START/ENTER. Four different defrosting options are preset in the oven. At this time, open the door and turn over, separate, or rearrange the food during the defrost cycle. When defrosting, scrape off thawed meat when the beep sounds and continue defrosting. • Place foods in a shallow glass baking dish or a on a microwave roasting rack to catch drippings. • Foods should still be somewhat...
... outer surface of meat. 1. Touch START/ENTER. Four different defrosting options are preset in the oven. At this time, open the door and turn over, separate, or rearrange the food during the defrost cycle. When defrosting, scrape off thawed meat when the beep sounds and continue defrosting. • Place foods in a shallow glass baking dish or a on a microwave roasting rack to catch drippings. • Foods should still be somewhat...
Owner's Manual
Page 20
... four plastic supports. • When using AUTO DEFROST, the weight to be entered is a minimum of aluminum foil to defrost. The metal rack gives you will hear four beeps and COOK END will display. Rack must not touch the side of the oven. Touch TIME DEFROST. 2. Use the rack only when cooking food on floor of the oven. To use small pieces of 0°F (taken directly from a true freezer). Do not cook with small...
... four plastic supports. • When using AUTO DEFROST, the weight to be entered is a minimum of aluminum foil to defrost. The metal rack gives you will hear four beeps and COOK END will display. Rack must not touch the side of the oven. Touch TIME DEFROST. 2. Use the rack only when cooking food on floor of the oven. To use small pieces of 0°F (taken directly from a true freezer). Do not cook with small...
Owner's Manual
Page 21
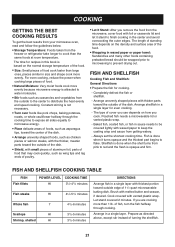
... the heat evenly and speed cooking. Always set the shortest cooking time. of food cook faster than large ones, pieces similar in this book is opaque and firm. FISH AND SHELLFISH Cooking Fish and Shellfish: General Directions ● Prepare the fish for recipes in size and shape cook more evenly. If you remove the food from the microwave, cover food with waxed paper to flake. The time for cooking. - The...
... the heat evenly and speed cooking. Always set the shortest cooking time. of food cook faster than large ones, pieces similar in this book is opaque and firm. FISH AND SHELLFISH Cooking Fish and Shellfish: General Directions ● Prepare the fish for recipes in size and shape cook more evenly. If you remove the food from the microwave, cover food with waxed paper to flake. The time for cooking. - The...
Owner's Manual
Page 22
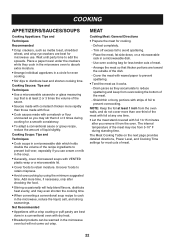
... detailed directions, Power Level, and Cooking Time settings for microwave use cream or milk in the microwave oven but will help blend flavors, distribute heat evenly, and may stir them 2 or 3 times during standing time. Cover the meat with dry heat. ● Breaded products can be warmed in the soup. ● Generally, cover microwaved soups with strips of meat. 22 Cooking Sauces: Tips and Techniques ● Use a microwavable casserole or glass measuring...
... detailed directions, Power Level, and Cooking Time settings for microwave use cream or milk in the microwave oven but will help blend flavors, distribute heat evenly, and may stir them 2 or 3 times during standing time. Cover the meat with dry heat. ● Breaded products can be warmed in the soup. ● Generally, cover microwaved soups with strips of meat. 22 Cooking Sauces: Tips and Techniques ● Use a microwavable casserole or glass measuring...
Owner's Manual
Page 27
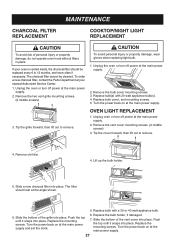
... oven or turn off power at the main power supply and set the clock. 6. Replace bulb(s) with a 30 or 40 watt appliance bulb. 6. Push the top until it snaps into place. Turn the power back on at the main power supply. 2. Remove the vent cover mounting screws. (2 middle screws) 3. The filter should be cleaned. Slide the bottom of the grille into place. CHARCOAL FILTER REPLACEMENT MAINTENANCE COOKTOP/NIGHT LIGHT REPLACEMENT To avoid risk of the vent cover into place. Replace the mounting screws...
... oven or turn off power at the main power supply and set the clock. 6. Replace bulb(s) with a 30 or 40 watt appliance bulb. 6. Push the top until it snaps into place. Turn the power back on at the main power supply. 2. Remove the vent cover mounting screws. (2 middle screws) 3. The filter should be cleaned. Slide the bottom of the grille into place. CHARCOAL FILTER REPLACEMENT MAINTENANCE COOKTOP/NIGHT LIGHT REPLACEMENT To avoid risk of the vent cover into place. Replace the mounting screws...
Owner's Manual
Page 29
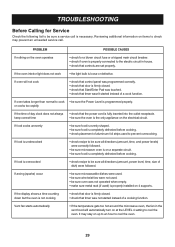
... door is properly installed on 4 supports. Vent fan starts automatically • If the temperature gets too hot around the microwave oven, the fan in house. • check that controls are set properly. If arcing (sparks) occur • be sure microwavable dishes were used. • be sure wire twist ties were not used. • be sure all directions (amount, power level, time, size of dish) were followed. If oven will automatically turn on a separate circuit...
... door is properly installed on 4 supports. Vent fan starts automatically • If the temperature gets too hot around the microwave oven, the fan in house. • check that controls are set properly. If arcing (sparks) occur • be sure microwavable dishes were used. • be sure wire twist ties were not used. • be sure all directions (amount, power level, time, size of dish) were followed. If oven will automatically turn on a separate circuit...
Owner's Manual
Page 30
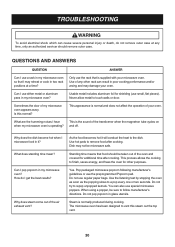
... taken out of the transformer when the magnetron tube cycles on when my microwave oven is the sound of the oven and covered for additional time after cooking. This process allows the cooking to remove food after cooking. Use hot pads to finish, saves energy, and frees the oven for shielding (use a rack in my microwave oven? Do not use special microwave poppers. TROUBLESHOOTING To avoid electrical shock which can cause severe personal injury...
... taken out of the transformer when the magnetron tube cycles on when my microwave oven is the sound of the oven and covered for additional time after cooking. This process allows the cooking to remove food after cooking. Use hot pads to finish, saves energy, and frees the oven for shielding (use a rack in my microwave oven? Do not use special microwave poppers. TROUBLESHOOTING To avoid electrical shock which can cause severe personal injury...

Owner's Manual
Page 31
... is not installed in the Product owner's manual. 5. Model and Serial numbers, along with published installation instructions, including the Product owner's and installation manuals. 17. Replacement of this warranty's terms. THIS LIMITED WARRANTY DOES NOT COVER: 1. LG Authorized Service Center warranties their repair work for warranty validation. 12. Any term of light bulbs, filters, or any display, open box, discounted, or refurbished Product. 11. instructing a customer on applicable provincial laws. Improper repair includes use of original retail purchase Parts and...
... is not installed in the Product owner's manual. 5. Model and Serial numbers, along with published installation instructions, including the Product owner's and installation manuals. 17. Replacement of this warranty's terms. THIS LIMITED WARRANTY DOES NOT COVER: 1. LG Authorized Service Center warranties their repair work for warranty validation. 12. Any term of light bulbs, filters, or any display, open box, discounted, or refurbished Product. 11. instructing a customer on applicable provincial laws. Improper repair includes use of original retail purchase Parts and...


