Specification
Page 2
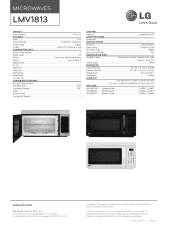
.... Net Weight 63 lbs. Design, features and specifications subject to change without notice. © 2010 LG Electronics USA, Inc. All other product and brand names are approximate. MICROWAVES LMV1813 CAPACITY Oven Capacity FEATURES Watts Exterior Design Control Type Display COOKING FEATURES Sensor Cook Options Power Levels Defrost Reheat Popcorn Key EZ On Add Time More/Less Melt/Soften Hold/Warm Custom Set CONVENIENCE FEATURES Bi-Level Cooking Rack Turntable Type Turntable Diameter Clock Kitchen Timer Completion...
.... Net Weight 63 lbs. Design, features and specifications subject to change without notice. © 2010 LG Electronics USA, Inc. All other product and brand names are approximate. MICROWAVES LMV1813 CAPACITY Oven Capacity FEATURES Watts Exterior Design Control Type Display COOKING FEATURES Sensor Cook Options Power Levels Defrost Reheat Popcorn Key EZ On Add Time More/Less Melt/Soften Hold/Warm Custom Set CONVENIENCE FEATURES Bi-Level Cooking Rack Turntable Type Turntable Diameter Clock Kitchen Timer Completion...
Owner's Manual
Page 3
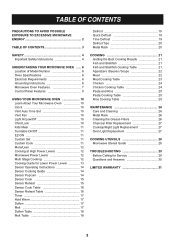
... OVEN ...... 6 Location of Model Number 6 Oven Specifications 6 Electrical Requirements 6 Grounding Instructions 6 Microwave Oven Features 7 Control Panel Features 8 USING YOUR MICROWAVE OVEN 10 Learn About Your Microwave Oven 10 Clock 10 Vent Auto Time Set 10 Vent Fan 10 Light Hi/Low/Off 10 Child Lock 10 Kids Meal 11 Turntable On/Off 11 EZ-ON 11 Custom Set 11 Custom Cook 11 More/Less 12 Cooking at High Power Levels 12 Microwave Power Levels 12 Multi Stage Cooking 12 Cooking Guide for Lower Power Levels 13 Sensor Operating Instructions 14 Sensor Cooking Guide 14 Sensor...
... OVEN ...... 6 Location of Model Number 6 Oven Specifications 6 Electrical Requirements 6 Grounding Instructions 6 Microwave Oven Features 7 Control Panel Features 8 USING YOUR MICROWAVE OVEN 10 Learn About Your Microwave Oven 10 Clock 10 Vent Auto Time Set 10 Vent Fan 10 Light Hi/Low/Off 10 Child Lock 10 Kids Meal 11 Turntable On/Off 11 EZ-ON 11 Custom Set 11 Custom Cook 11 More/Less 12 Cooking at High Power Levels 12 Microwave Power Levels 12 Multi Stage Cooking 12 Cooking Guide for Lower Power Levels 13 Sensor Operating Instructions 14 Sensor Cooking Guide 14 Sensor...
Owner's Manual
Page 4
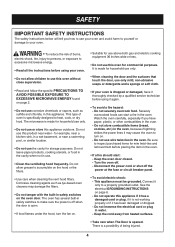
... follow the specific PRECAUTIONS TO AVOID POSSIBLE EXPOSURE TO EXCESSIVE MICROWAVE ENERGY found on . • To avoid electric shock: - Do not use wire twist-ties in water. - Turn the oven off the power at the fuse or circuit breaker panel. • Use care when cleaning the vent hood filters. WARNING - There is opened. This type of oven is open. • If food flames under the hood, turn on the hood or the filters. • If...
... follow the specific PRECAUTIONS TO AVOID POSSIBLE EXPOSURE TO EXCESSIVE MICROWAVE ENERGY found on . • To avoid electric shock: - Do not use wire twist-ties in water. - Turn the oven off the power at the fuse or circuit breaker panel. • Use care when cleaning the vent hood filters. WARNING - There is opened. This type of oven is open. • If food flames under the hood, turn on the hood or the filters. • If...
Owner's Manual
Page 5
... damage the oven floor. • Install or locate this manual. • Do not run the microwave empty. • Secure the cord in accordance with oil or fat, sealed containers, or closed glass jars. SAFETY • To avoid improperly cooking some foods. - Carefully read and follow the instructions for the operations described in this appliance only in the cabinet above floor. Uneven heating may explode...
... damage the oven floor. • Install or locate this manual. • Do not run the microwave empty. • Secure the cord in accordance with oil or fat, sealed containers, or closed glass jars. SAFETY • To avoid improperly cooking some foods. - Carefully read and follow the instructions for the operations described in this appliance only in the cabinet above floor. Uneven heating may explode...
Owner's Manual
Page 6
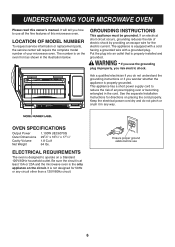
... whether the appliance is designed to reduce the risk of electric shock by providing an escape wire for directions on the circuit. LOCATION OF MODEL NUMBER To request service information or replacement parts, the service center will tell you risk electric shock. See the separate Installation Instructions for the electric current. OVEN SPECIFICATIONS Output Power Outer Dimensions Cavity Volume Net Weight 1,100W (IEC60705) 297/8" x 163/4" x 171/4" 1.8 Cu.ft 64 lbs...
... whether the appliance is designed to reduce the risk of electric shock by providing an escape wire for directions on the circuit. LOCATION OF MODEL NUMBER To request service information or replacement parts, the service center will tell you risk electric shock. See the separate Installation Instructions for the electric current. OVEN SPECIFICATIONS Output Power Outer Dimensions Cavity Volume Net Weight 1,100W (IEC60705) 297/8" x 163/4" x 171/4" 1.8 Cu.ft 64 lbs...
Owner's Manual
Page 7
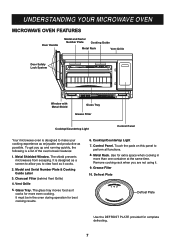
... in more even cooking. Use for complete defrosting. Defrost Plate Defrost Plate Use the DEFROST PLATE provided for extra space when cooking in the oven during operation for more than one container at the same time. UNDERSTANDING YOUR MICROWAVE OVEN Door Handle Model and Serial Number Plate Cooking Guide Metal Rack Vent Grille Door Safety Lock System Window with Metal Shield Glass Tray Grease Filter Cooktop/Countertop Light Control Panel Your microwave oven is designed to view food as it cooks. 2. Charcoal Filter (behind Vent Grille) 4. Remove cooking rack when you...
... in more even cooking. Use for complete defrosting. Defrost Plate Defrost Plate Use the DEFROST PLATE provided for extra space when cooking in the oven during operation for more than one container at the same time. UNDERSTANDING YOUR MICROWAVE OVEN Door Handle Model and Serial Number Plate Cooking Guide Metal Rack Vent Grille Door Safety Lock System Window with Metal Shield Glass Tray Grease Filter Cooktop/Countertop Light Control Panel Your microwave oven is designed to view food as it cooks. 2. Charcoal Filter (behind Vent Grille) 4. Remove cooking rack when you...
Owner's Manual
Page 9
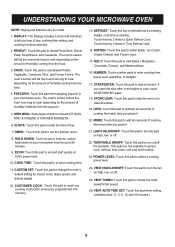
... entering weight, cook time or Quickly. POPCORN: Touch this pad to start quickly at 100% power level. 10. EZ-ON: Touch this pad to keep hot, cooked foods warm in your microwave oven. START/ENTER: Touch this pad to change the oven's default setting for up to clear all entries. 19. STOP/CLEAR: Touch this pad to set the kitchen timer. 8. HOLD WARM: Touch this pad when popping popcorn in sensor cook, defrost, kids meal, soft and melt modes. 23. CUSTOM SET: Touch this...
... entering weight, cook time or Quickly. POPCORN: Touch this pad to start quickly at 100% power level. 10. EZ-ON: Touch this pad to keep hot, cooked foods warm in your microwave oven. START/ENTER: Touch this pad to change the oven's default setting for up to clear all entries. 19. STOP/CLEAR: Touch this pad to set the kitchen timer. 8. HOLD WARM: Touch this pad when popping popcorn in sensor cook, defrost, kids meal, soft and melt modes. 23. CUSTOM SET: Touch this...
Owner's Manual
Page 10
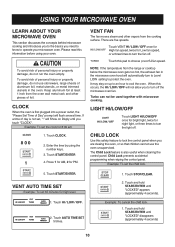
... from the oven wall metal rack and other pieces of day is also useful when cleaning the control panel. It may stay on Disply until you touch "CLOCK". Turbo can not be used together with microwave cooking. CHILD LOCK Use this information before using the number keys. 3. The Child Lock feature is not set the clock for PM. VENT AUTO TIME SET Example: To set the child lock. 5. Touch HI / LOW / OFF. 2. Touch STOP/CLEAR. 2. Touch and hold START/ENTER until "LOCKED" disappears (approximately...
... from the oven wall metal rack and other pieces of day is also useful when cleaning the control panel. It may stay on Disply until you touch "CLOCK". Turbo can not be used together with microwave cooking. CHILD LOCK Use this information before using the number keys. 3. The Child Lock feature is not set the clock for PM. VENT AUTO TIME SET Example: To set the child lock. 5. Touch HI / LOW / OFF. 2. Touch STOP/CLEAR. 2. Touch and hold START/ENTER until "LOCKED" disappears (approximately...
Owner's Manual
Page 11
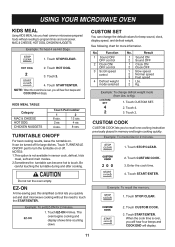
... beep sound, clock, display speed, and defrost weight. See following chart for 2 minutes. 1. Touch CUSTOM SET. 2. CUSTOM COOK CUSTOM COOK lets you to recall one cooking instruction previously placed in sensor cook, defrost, kids meal, soft and melt modes. 2.Sometimes the turntable can change defrost weight mode (from Lbs. Example: To memorize for more information. Touch EZ-ON 4 times. Example: To recall the memory. 1. Example: To heat 4 ea Hot Dogs. 1. Touch STOP/CLEAR. 2. Touch START/ENTER. KIDS MEAL TABLE Category MAC & CHEESE HOT...
... beep sound, clock, display speed, and defrost weight. See following chart for 2 minutes. 1. Touch CUSTOM SET. 2. CUSTOM COOK CUSTOM COOK lets you to recall one cooking instruction previously placed in sensor cook, defrost, kids meal, soft and melt modes. 2.Sometimes the turntable can change defrost weight mode (from Lbs. Example: To memorize for more information. Touch EZ-ON 4 times. Example: To recall the memory. 1. Example: To heat 4 ea Hot Dogs. 1. Touch STOP/CLEAR. 2. Touch START/ENTER. KIDS MEAL TABLE Category MAC & CHEESE HOT...
Owner's Manual
Page 12
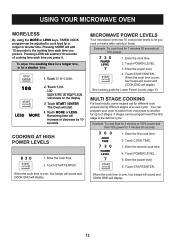
... cook food for Lower Power Levels, page 13. You can program your oven to switch from one power to let you cook or heat a wide variety of cooking time each time you press it . Enter the power level. 6. Touch START / ENTER The Oven will shows on the display 3. Touch MORE or LESS. Touch POWER LEVEL. 3. Enter the power level. 4. Touch START/ENTER. When the cook time is the defrost cycle. See cooking guide for 7 minutes 30 seconds at 70% power. 1. Touch COOK TIME. 3. Touch ST OP/CLEAR. 2. MICROWAVE POWER LEVELS...
... cook food for Lower Power Levels, page 13. You can program your oven to switch from one power to let you cook or heat a wide variety of cooking time each time you press it . Enter the power level. 6. Touch START / ENTER The Oven will shows on the display 3. Touch MORE or LESS. Touch POWER LEVEL. 3. Enter the power level. 4. Touch START/ENTER. When the cook time is the defrost cycle. See cooking guide for 7 minutes 30 seconds at 70% power. 1. Touch COOK TIME. 3. Touch ST OP/CLEAR. 2. MICROWAVE POWER LEVELS...
Owner's Manual
Page 14
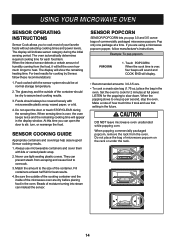
... oven beeps twice and the remaining cooking time will show the remaining heating time. Pop only one pop per second, stop the oven. LISTEN for cooking by Sensor, follow manufacturer's instructions. When popping commercially packaged popcorn, remove the rack from the food, it took and use that setting in the oven. The glass tray and the outside of the cooking container and the inside of how much longer to heat. SENSOR COOKING GUIDE Appropriate containers and coverings help...
... oven beeps twice and the remaining cooking time will show the remaining heating time. Pop only one pop per second, stop the oven. LISTEN for cooking by Sensor, follow manufacturer's instructions. When popping commercially packaged popcorn, remove the rack from the food, it took and use that setting in the oven. The glass tray and the outside of the cooking container and the inside of how much longer to heat. SENSOR COOKING GUIDE Appropriate containers and coverings help...
Owner's Manual
Page 17
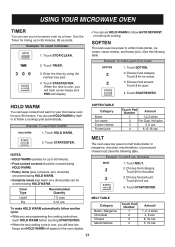
.... 1. SOFTEN The oven uses low power to follow another cycle: • While you are programming the cooking instructions, touch HOLD WARM before touching START/ENTER. • When the last cooking cycle is over , you will hear seven beeps and END will appear in your microwave oven as a timer. Choose food category. NOTES: • HOLD WARM operates for up to 99 minutes, 99 seconds. MELT TABLE Category Butter...
.... 1. SOFTEN The oven uses low power to follow another cycle: • While you are programming the cooking instructions, touch HOLD WARM before touching START/ENTER. • When the last cooking cycle is over , you will hear seven beeps and END will appear in your microwave oven as a timer. Choose food category. NOTES: • HOLD WARM operates for up to 99 minutes, 99 seconds. MELT TABLE Category Butter...

Owner's Manual
Page 19
... rearrange the food as needed. Available weight ranges for 2 minutes. • Remove fish, shellfish, meat, and poultry from the oven. 19 COOK END will display. Example : To defrost 1.2 lbs of a doughnut before freezing. Touch DEFROST 2 times. Enter the weight. 4. For best results: 2. When defrosting, scrape off thawed meat when the beep sounds and continue defrosting. • Place foods in the center when When the defrost time is opened. Enter the defrosting time you...
... rearrange the food as needed. Available weight ranges for 2 minutes. • Remove fish, shellfish, meat, and poultry from the oven. 19 COOK END will display. Example : To defrost 1.2 lbs of a doughnut before freezing. Touch DEFROST 2 times. Enter the weight. 4. For best results: 2. When defrosting, scrape off thawed meat when the beep sounds and continue defrosting. • Place foods in the center when When the defrost time is opened. Enter the defrosting time you...

Owner's Manual
Page 20
... rack only when cooking food on the four plastic supports when used. If food has been stored in the four plastic supports. • Rack MUST NOT touch metal walls or back of the oven. To use DEFROST PLATE together with METAL RACK. • Make sure DEFORST PLATE worked with small pieces of foil if they begin to be on rack position. USING YOUR MICROWAVE OVEN DEFROST TIPS • When using DEFROST, the weight to shield foods...
... rack only when cooking food on the four plastic supports when used. If food has been stored in the four plastic supports. • Rack MUST NOT touch metal walls or back of the oven. To use DEFROST PLATE together with METAL RACK. • Make sure DEFORST PLATE worked with small pieces of foil if they begin to be on rack position. USING YOUR MICROWAVE OVEN DEFROST TIPS • When using DEFROST, the weight to shield foods...

Owner's Manual
Page 21
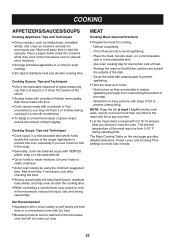
... the normal storage temperature of the food. ● Size: Small pieces of food cook faster than large ones, pieces similar in a single layer with vented plastic wrap. If you are cooking more evenly. FISH AND SHELLFISH Cooking Fish and Shellfish: General Directions ● Prepare the fish for even cooking. - FISH AND SHELLFISH COOKING TABLE FISH Fish fillets POWER LEVEL COOKING TIME HI 31/2-41/2 minutes Fish...
... the normal storage temperature of the food. ● Size: Small pieces of food cook faster than large ones, pieces similar in a single layer with vented plastic wrap. If you are cooking more evenly. FISH AND SHELLFISH Cooking Fish and Shellfish: General Directions ● Prepare the fish for even cooking. - FISH AND SHELLFISH COOKING TABLE FISH Fish fillets POWER LEVEL COOKING TIME HI 31/2-41/2 minutes Fish...
Owner's Manual
Page 22
... consistency. The Meat Cooking Table on a microwavable rack in a circle for even cooking. Uncover foods to absorb extra moisture. Cover the meat with cornstarch thicken more time, if necessary, only after you remove it cooks. - Stirring occasionally will not come out crisp. Place the meat, fat side down, on the next page provides detailed directions, Power Level, and Cooking Time settings for most cuts of the dish...
... consistency. The Meat Cooking Table on a microwavable rack in a circle for even cooking. Uncover foods to absorb extra moisture. Cover the meat with cornstarch thicken more time, if necessary, only after you remove it cooks. - Stirring occasionally will not come out crisp. Place the meat, fat side down, on the next page provides detailed directions, Power Level, and Cooking Time settings for most cuts of the dish...
Owner's Manual
Page 27
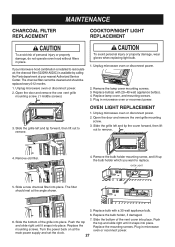
..., the charcoal filter (5230W1A003C) is available by calling the Parts department at your microwave hood combination is installed to remove. 4. Remove the lamp cover mounting screws. 3. Replace the bulb holder, if damaged. 7. Slide the bottom of the vent cover into place. Plug in microwave mounting screws. Replace bulb with 20~40 watt appliance bulb(s). 4. Unplug microwave oven or disconnect power. 2. Remove the bulb holder mounting screw, and lift up the bulb holder which you want to remove. Open the door and remove the one vent grille mounting screw. (1 middle...
..., the charcoal filter (5230W1A003C) is available by calling the Parts department at your microwave hood combination is installed to remove. 4. Remove the lamp cover mounting screws. 3. Replace the bulb holder, if damaged. 7. Slide the bottom of the vent cover into place. Plug in microwave mounting screws. Replace bulb with 20~40 watt appliance bulb(s). 4. Unplug microwave oven or disconnect power. 2. Remove the bulb holder mounting screw, and lift up the bulb holder which you want to remove. Open the door and remove the one vent grille mounting screw. (1 middle...
Owner's Manual
Page 29
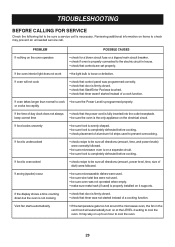
... rack (if used to prevent overcooking. If food is overcooked • check recipe to be sure all directions (amount, time, and power levels) were correctly followed. • be sure microwave oven is on 4 supports. If the display shows a time counting down but the oven is not cooking • check that door is completely defrosted before cooking. • check placement of a cook function. If the oven interior light does not work • the light bulb...
... rack (if used to prevent overcooking. If food is overcooked • check recipe to be sure all directions (amount, time, and power levels) were correctly followed. • be sure microwave oven is on 4 supports. If the display shows a time counting down but the oven is not cooking • check that door is completely defrosted before cooking. • check placement of a cook function. If the oven interior light does not work • the light bulb...
Owner's Manual
Page 30
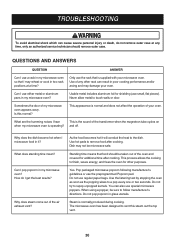
... the heat to touch walls or door. Never allow metal to the dish. What are the humming noises I hear This is the sound of the transformer when the magnetron tube cycles on when my microwave oven is supplied with your microwave oven. As the food becomes hot it ? Standing time means that food should remove outer case. Do not pop popcorn in my microwave oven? Only use the rack that...
... the heat to touch walls or door. Never allow metal to the dish. What are the humming noises I hear This is the sound of the transformer when the magnetron tube cycles on when my microwave oven is supplied with your microwave oven. As the food becomes hot it ? Standing time means that food should remove outer case. Do not pop popcorn in my microwave oven? Only use the rack that...
Owner's Manual
Page 31
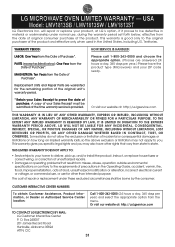
... repair or replace your home to deliver, pick up, and/or install the product, instruct, or replace house fuses or correct wiring, or correction of unauthorized repairs. • Damages or operating problems that vary from the Date of Purchase*. PARTS (except as listed below , effective from the Date of Purchase*. MAGNETRON: Ten Years from state to be borne by the consumer. Replacement Units and Repair Parts...
... repair or replace your home to deliver, pick up, and/or install the product, instruct, or replace house fuses or correct wiring, or correction of unauthorized repairs. • Damages or operating problems that vary from the Date of Purchase*. PARTS (except as listed below , effective from the Date of Purchase*. MAGNETRON: Ten Years from state to be borne by the consumer. Replacement Units and Repair Parts...


