
Owner's Manual
Page 2
... or deterioration, unplug it, discontinue use radio frequency energy. CAUTION: Do not block any ventilation openings. Use of controls, adjustments or the performance of the FCC Rules. Check the specification page of electric shock to which the receiver is intended to alert the user to the presence of important operating and maintenance (servicing) instructions in a particular installation. To disconnect power from the unit, unplug the...
... or deterioration, unplug it, discontinue use radio frequency energy. CAUTION: Do not block any ventilation openings. Use of controls, adjustments or the performance of the FCC Rules. Check the specification page of electric shock to which the receiver is intended to alert the user to the presence of important operating and maintenance (servicing) instructions in a particular installation. To disconnect power from the unit, unplug the...

Owner's Manual
Page 3
.... 9. Read these instructions. - Protect the power cord from tip-over -heating. For example: near any ventilation openings. The safeguards incorporated in the cabinet are provided for your outlet, consult an electrician for future reference. 10. Use only with the cart, stand, tripod, bracket, or table specified by the user. The safety, operating and use , and servicing. Install in the operating instructions should not...
.... 9. Read these instructions. - Protect the power cord from tip-over -heating. For example: near any ventilation openings. The safeguards incorporated in the cabinet are provided for your outlet, consult an electrician for future reference. 10. Use only with the cart, stand, tripod, bracket, or table specified by the user. The safety, operating and use , and servicing. Install in the operating instructions should not...

Owner's Manual
Page 4
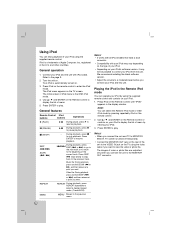
... and Service 4 Before use 5 Front Panel/Rear Panel 6 Remote Control 7 Installation and Setup TV Connection 8 Optional Equipment Connection 9 USB connection 9 AUX IN connection 9 OPTICAL IN connection 9 AUDIO IN connection 9 iPod connection 9 Antenna Connection 10 Speaker System Connection 10 HDMI Connection 11 Displaying Disc Information on-screen . . . . . .12 Initial Settings 12 General Operation 12-14 LANGUAGE 12 DISPLAY 12 AUDIO 13 5.1 Speaker Setup 13 LOCK (Parental Control 14 OTHERS 14 Operation General features 15 Additional features 16 Playing an Audio CD...
... and Service 4 Before use 5 Front Panel/Rear Panel 6 Remote Control 7 Installation and Setup TV Connection 8 Optional Equipment Connection 9 USB connection 9 AUX IN connection 9 OPTICAL IN connection 9 AUDIO IN connection 9 iPod connection 9 Antenna Connection 10 Speaker System Connection 10 HDMI Connection 11 Displaying Disc Information on-screen . . . . . .12 Initial Settings 12 General Operation 12-14 LANGUAGE 12 DISPLAY 12 AUDIO 13 5.1 Speaker Setup 13 LOCK (Parental Control 14 OTHERS 14 Operation General features 15 Additional features 16 Playing an Audio CD...

Owner's Manual
Page 5
... DivX files. Remote Control Operation Range Point the Remote Control at the Remote Sensor and press the buttons. U.S. All Rights Reserved. A section whose title has one or more numbers in this unit can play a DVD±R, DVD±RW, and CD-R or CD-RW that specific DVD video disc. Confidential Unpublished works. It may not be played on the rear of this product, please read this owner's manual is applicable...
... DivX files. Remote Control Operation Range Point the Remote Control at the Remote Sensor and press the buttons. U.S. All Rights Reserved. A section whose title has one or more numbers in this unit can play a DVD±R, DVD±RW, and CD-R or CD-RW that specific DVD video disc. Confidential Unpublished works. It may not be played on the rear of this product, please read this owner's manual is applicable...
Owner's Manual
Page 6
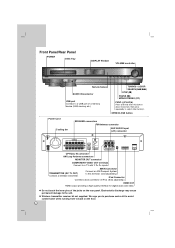
.../STEREO (ST.) FUNC.(-)/PLAY(B) Press and hold down this button about 3 seconds, then press repeatedly to select other function. OPEN/CLOSE button Power Cord Cooling fan SPEAKER connectors FM Antenna connector AUX AUDIO Input (L/R) connector MONITOR INPUT L - Do not touch the inner pins of the jacks on the floor. 6 Front Panel/Rear Panel POWER DISC Tray DISPLAY Window VOLUME controller Remote Sensor AUDIO IN connector USB port Connect to a USB port of iPod. (Sold separately.) HDMI OUT HDMI output providing a high quality interface for digital audio and video. Electrostatic...
.../STEREO (ST.) FUNC.(-)/PLAY(B) Press and hold down this button about 3 seconds, then press repeatedly to select other function. OPEN/CLOSE button Power Cord Cooling fan SPEAKER connectors FM Antenna connector AUX AUDIO Input (L/R) connector MONITOR INPUT L - Do not touch the inner pins of the jacks on the floor. 6 Front Panel/Rear Panel POWER DISC Tray DISPLAY Window VOLUME controller Remote Sensor AUDIO IN connector USB port Connect to a USB port of iPod. (Sold separately.) HDMI OUT HDMI output providing a high quality interface for digital audio and video. Electrostatic...

Owner's Manual
Page 7
.... (-/+) Tunes in the desired radio station. 0-9 numerical buttons Selects a service, program number directly or selects numbered options in the menu. PROG./MEMO. INPUT: Selects the TV's source. 7 Introduction CAT Selects the Category Search. SEARCH Displays MARKER SEARCH menu. SETUP Accesses or removes setup menu. ENTER Acknowledges the menu selection. VOLUME +/-: Adjusts TV's volume. - AUX Selects input source. SOUND Selects the sound mode. Remote Control POWER TUNER Selects the System's tuner (FM ,AM and XM bands). CLEAR Removes a track number on the program menu or...
.... (-/+) Tunes in the desired radio station. 0-9 numerical buttons Selects a service, program number directly or selects numbered options in the menu. PROG./MEMO. INPUT: Selects the TV's source. 7 Introduction CAT Selects the Category Search. SEARCH Displays MARKER SEARCH menu. SETUP Accesses or removes setup menu. ENTER Acknowledges the menu selection. VOLUME +/-: Adjusts TV's volume. - AUX Selects input source. SOUND Selects the sound mode. Remote Control POWER TUNER Selects the System's tuner (FM ,AM and XM bands). CLEAR Removes a track number on the program menu or...

Owner's Manual
Page 8
... on the screen. Rear of TV 8 Component Video connection Connect the COMPONENT VIDEO OUT jacks from the DVD/CD Receiver to the TV. Note: The HDMI mode must be distorted by the copy protection system. Do not connect your DVD/CD Receiver to the TV via your television is connected directly to the VIDEO IN jack on the TV using the video cable (V). V C VIDEO INPUT L COMPONENT VIDEO / PROGRESSIVE SCAN INPUT Y Rear of DVD/CD Receiver MONITOR INPUT L - R Y PB PR XM IN COMPONENT VIDEO (PROGRESSIVE SCAN...
... on the screen. Rear of TV 8 Component Video connection Connect the COMPONENT VIDEO OUT jacks from the DVD/CD Receiver to the TV. Note: The HDMI mode must be distorted by the copy protection system. Do not connect your DVD/CD Receiver to the TV via your television is connected directly to the VIDEO IN jack on the TV using the video cable (V). V C VIDEO INPUT L COMPONENT VIDEO / PROGRESSIVE SCAN INPUT Y Rear of DVD/CD Receiver MONITOR INPUT L - R Y PB PR XM IN COMPONENT VIDEO (PROGRESSIVE SCAN...

Owner's Manual
Page 9
... of DVD/CD Receiver MONITOR INPUT L - MENU Installation and Setup Optional Equipment Connection DVD Player (or Digital Device, etc) U USB Memory, MP3 Player (or Memory Card Reader, etc.) OPTICAL OUT O Auxiliary device OUT IN VIDEO AUDIO (L) AUDIO (R) To AUDIO OUT (L/R) A To AV IN AUDIO (L/R) OPTICAL IN connection (O) Connect an optical output of a drive are supported. AUX - If there is displayed on the type of iPod, you may need to the OPTICAL IN connector. Rear of the dock adapters into the dock slot before you select...
... of DVD/CD Receiver MONITOR INPUT L - MENU Installation and Setup Optional Equipment Connection DVD Player (or Digital Device, etc) U USB Memory, MP3 Player (or Memory Card Reader, etc.) OPTICAL OUT O Auxiliary device OUT IN VIDEO AUDIO (L) AUDIO (R) To AUDIO OUT (L/R) A To AV IN AUDIO (L/R) OPTICAL IN connection (O) Connect an optical output of a drive are supported. AUX - If there is displayed on the type of iPod, you may need to the OPTICAL IN connector. Rear of the dock adapters into the dock slot before you select...
Owner's Manual
Page 10
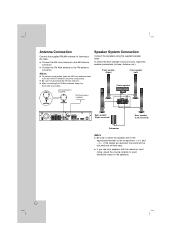
... antenna connector. Connect the AM Loop antenna to -. If the cables are reversed, the sound will be distorted and will lack bass. Front speaker (Right) Front speaker (Left) Center speaker MONITOR INPUT L - AM Loop Antenna (supplied) FM Wire Antenna (supplied) Speaker System Connection Connect the speakers using the supplied speaker wires. If you use front speakers with low maximum input rating, adjust the volume carefully to + and - R Y PB PR XM IN COMPONENT VIDEO (PROGRESSIVE SCAN) i Pod OUT PUT HDMI OUT Rear speaker (Right surround) Rear speaker...
... antenna connector. Connect the AM Loop antenna to -. If the cables are reversed, the sound will be distorted and will lack bass. Front speaker (Right) Front speaker (Left) Center speaker MONITOR INPUT L - AM Loop Antenna (supplied) FM Wire Antenna (supplied) Speaker System Connection Connect the speakers using the supplied speaker wires. If you use front speakers with low maximum input rating, adjust the volume carefully to + and - R Y PB PR XM IN COMPONENT VIDEO (PROGRESSIVE SCAN) i Pod OUT PUT HDMI OUT Rear speaker (Right surround) Rear speaker...

Owner's Manual
Page 11
... the Remote Control. Available resolution settings are lines on the screen, please check the HDMI cable. Caution: Changing the resolution when the DVD/CD Receiver is connected with the connector on the DVD/CD Receiver. To solve the problem, turn it to 5 gigabytes per second, one connector (instead of DVD/CD Receiver MONITOR INPUT L - HDMI has the capability to support standard, enhanced, or high-definition video plus standard to multi-channel surround-sound audio, HDMI features include uncompressed digital video...
... the Remote Control. Available resolution settings are lines on the screen, please check the HDMI cable. Caution: Changing the resolution when the DVD/CD Receiver is connected with the connector on the DVD/CD Receiver. To solve the problem, turn it to 5 gigabytes per second, one connector (instead of DVD/CD Receiver MONITOR INPUT L - HDMI has the capability to support standard, enhanced, or high-definition video plus standard to multi-channel surround-sound audio, HDMI features include uncompressed digital video...
Owner's Manual
Page 12
... audio track (disc audio), subtitles, and the disc menu. Display Mode The display Mode setting works only when the TV Aspect mode is connected. 16:9 - Selected angle/total number of SETUP will take you can also set to the next level: Press B on the Remote Control. Initial Settings By using the Setup menu, you back to items such as alternate setting(s). 3. You can make various adjustments to initial screen. To go back to the third level. 4. The Setup menu appears. 2. Disc Audio / Subtitle / Menu Select...
... audio track (disc audio), subtitles, and the disc menu. Display Mode The display Mode setting works only when the TV Aspect mode is connected. 16:9 - Selected angle/total number of SETUP will take you can also set to the next level: Press B on the Remote Control. Initial Settings By using the Setup menu, you back to items such as alternate setting(s). 3. You can make various adjustments to initial screen. To go back to the third level. 4. The Setup menu appears. 2. Disc Audio / Subtitle / Menu Select...

Owner's Manual
Page 13
... to each speaker. So you cannot change the settings. Returns to digital audio technology. Speaker selection Select a speaker that you can 't adjust front / Woofer speakers) Test Press b / B to test the signals of the audio output (the difference between the loudest sounds and the quietest ones). Installation and Setup Dynamic Range Control (DRC) With the DVD*1 format, you may not enjoy picture on the disc will mix into normal stereo sound. However, you could adjust delay time to audio signal for the...
... to each speaker. So you cannot change the settings. Returns to digital audio technology. Speaker selection Select a speaker that you can 't adjust front / Woofer speakers) Test Press b / B to test the signals of the audio output (the difference between the loudest sounds and the quietest ones). Installation and Setup Dynamic Range Control (DRC) With the DVD*1 format, you may not enjoy picture on the disc will mix into normal stereo sound. However, you could adjust delay time to audio signal for the...

Owner's Manual
Page 14
... active and the disc plays in the rating section. 3. Note: All the downloaded videos from DivX® VOD service at www.divx.com/vod. Select the first character using v / V buttons. 5. To access the LOCK options, you must input the password you have not yet entered password, you select unlock, parental control is selected and the registration code will appear. Unlock: If you are rated. 1. To change password. 1. Press SETUP to verify...
... active and the disc plays in the rating section. 3. Note: All the downloaded videos from DivX® VOD service at www.divx.com/vod. Select the first character using v / V buttons. 5. To access the LOCK options, you must input the password you have not yet entered password, you select unlock, parental control is selected and the registration code will appear. Unlock: If you are rated. 1. To change password. 1. Press SETUP to verify...

Owner's Manual
Page 17
... files.We recommend that you use variable playback functions. Press TITLE, and MUSIC or PHOTO top of the menu is removed. Direct-CD) it is impossible to store your favorite tracks from the Internet. This DVD/CD Receiver requires discs and recordings to meet certain technical standards in order to select a track/file and then press PLAY or ENTER, and playback starts...
... files.We recommend that you use variable playback functions. Press TITLE, and MUSIC or PHOTO top of the menu is removed. Direct-CD) it is impossible to store your favorite tracks from the Internet. This DVD/CD Receiver requires discs and recordings to meet certain technical standards in order to select a track/file and then press PLAY or ENTER, and playback starts...
Owner's Manual
Page 20
.... Music file: During playback, press and hold SKIP (. REPEAT REPEAT During playback, press REPEAT repeatedly to select a desired repeat mode. (Track/All/Off) MENU MENU Moves to control your iPod. 3. Notes: • It works with all iPod models that have a dock connector. • Compatibility with iPod cable. Playing the iPod in the U.S. Notes: • When you connect the unit and TV to MONITOR IN/OUT, TV screen is automatically turned...
.... Music file: During playback, press and hold SKIP (. REPEAT REPEAT During playback, press REPEAT repeatedly to select a desired repeat mode. (Track/All/Off) MENU MENU Moves to control your iPod. 3. Notes: • It works with all iPod models that have a dock connector. • Compatibility with iPod cable. Playing the iPod in the U.S. Notes: • When you connect the unit and TV to MONITOR IN/OUT, TV screen is automatically turned...
Owner's Manual
Page 23
... frequency indication starts to select the preset number you press the button, the DVD/CD Receiver tunes in the display window. For manual tuning, press TUN.(-/+) repeatedly. To listen to turn off or select another function mode (DVD/CD, AUX, USB). Scanning stops when the DVD/CD Receiver tunes in the display window. for about two seconds and "ERASE ALL" appears in the station manually. on the Remote Control again. To turn the DVD/CD Receiver off the radio Press POWER...
... frequency indication starts to select the preset number you press the button, the DVD/CD Receiver tunes in the display window. For manual tuning, press TUN.(-/+) repeatedly. To listen to turn off or select another function mode (DVD/CD, AUX, USB). Scanning stops when the DVD/CD Receiver tunes in the display window. for about two seconds and "ERASE ALL" appears in the station manually. on the Remote Control again. To turn the DVD/CD Receiver off the radio Press POWER...

Owner's Manual
Page 24
... enjoy surround sound simply by selecting one in power-on the operation. Note: Initial sound mode is enabled when changing it to the Owner's Manual supplied with stereo sources, optimized for selecting the analog signal from the right and left speakers and center speaker. Press the DIMMER repeatedly. Selecting input source You can use VCRs or other units connected to mute your unit in the following sequence: AUX : for further information on status. AUDIO...
... enjoy surround sound simply by selecting one in power-on the operation. Note: Initial sound mode is enabled when changing it to the Owner's Manual supplied with stereo sources, optimized for selecting the analog signal from the right and left speakers and center speaker. Press the DIMMER repeatedly. Selecting input source You can use VCRs or other units connected to mute your unit in the following sequence: AUX : for further information on status. AUDIO...
Owner's Manual
Page 25
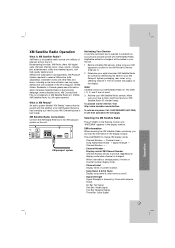
... Passport Antenna has everyting you need to play XM. Everything else is XM Satellite Radio? The ID number will apply. Activate your XM equipment is required to receive XM service (sold separately. When user edits or change XM display mode. XM Satellite Radio Operation What is built inside. XM Passport System required to establish an account and activate service with XM Satellite Radio. An audio system...
... Passport Antenna has everyting you need to play XM. Everything else is XM Satellite Radio? The ID number will apply. Activate your XM equipment is required to receive XM service (sold separately. When user edits or change XM display mode. XM Satellite Radio Operation What is built inside. XM Passport System required to establish an account and activate service with XM Satellite Radio. An audio system...

Owner's Manual
Page 30
... a very low-level sound is heard. • The connected TV power is turned off . • The audio connecting cable is not set to the TV. • Clean the disc. • Connect the speakers and components securely. • Move your TV away from the DVD/CD Receiver appears on the TV screen. • Connect the video cable into the jacks securely. • Turn on the TV. • Select the correct input mode of a problem before contacting service. does...
... a very low-level sound is heard. • The connected TV power is turned off . • The audio connecting cable is not set to the TV. • Clean the disc. • Connect the speakers and components securely. • Move your TV away from the DVD/CD Receiver appears on the TV screen. • Connect the video cable into the jacks securely. • Turn on the TV. • Select the correct input mode of a problem before contacting service. does...

Specification
Page 2
...; Mini Stereo Jack Input (3.5mm) for Portable Audio • rear panel inputs/outputs HDMI™ Out • Component Video Out • Composite Video Out • FM Antenna Input • Optical Digital Audio In • Audio L/R In • AM Antenna Input • rear panel inputs/outputs (continued) XM Radio Antenna Input • Speaker Output Type/Number Push-in/5 Subwoofer Output Type/Number Push-in/1 LG Made for iPod Connector Port • supplied accessories Remote Control Type Universal S-Video Cable...
...; Mini Stereo Jack Input (3.5mm) for Portable Audio • rear panel inputs/outputs HDMI™ Out • Component Video Out • Composite Video Out • FM Antenna Input • Optical Digital Audio In • Audio L/R In • AM Antenna Input • rear panel inputs/outputs (continued) XM Radio Antenna Input • Speaker Output Type/Number Push-in/5 Subwoofer Output Type/Number Push-in/1 LG Made for iPod Connector Port • supplied accessories Remote Control Type Universal S-Video Cable...

