Owner's Manual (English)
Page 2
...Check the specification page of the National Electric Code (U.S.A.). When installing the product, ensure that the plug is : Marketed and Distributed by LG Electronics U.S.A., Inc., 1000 Sylvan Avenue, Englewood Cliffs, NJ. REGULATORY INFORMATION: FCC Part 15 This epuipment has been tested and found ...off and on, the user is provided to call the cable TV system installer's attention to the point of the following measures: • Reorient or relocate the receiving antenna. • Increase the separation between the product and receiver. • Connect the product into an outlet on a bed,...
...Check the specification page of the National Electric Code (U.S.A.). When installing the product, ensure that the plug is : Marketed and Distributed by LG Electronics U.S.A., Inc., 1000 Sylvan Avenue, Englewood Cliffs, NJ. REGULATORY INFORMATION: FCC Part 15 This epuipment has been tested and found ...off and on, the user is provided to call the cable TV system installer's attention to the point of the following measures: • Reorient or relocate the receiving antenna. • Increase the separation between the product and receiver. • Connect the product into an outlet on a bed,...
Owner's Manual (English)
Page 9
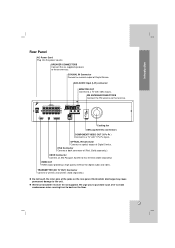
... 7V OUT) Connector Connect a wireless transmitter. (Sold separately.) Do not touch the inner pins of iPod. (Sold separately.) XM IN Connector Connect an XM Passport System to this terminal. We urge you to purchase such a kit to avoid cumbersome wires running front to these terminals. FM ANTENNACONNECTORS Connect the FM antenna... providing a high quality interface for digital audio and video. DC 7V OUT FOR WIRELESS HDMI 1080i XM IN i Pod COAXIAL IN AUX IN R - Wireless transmitter receiver kit not supplied.
... 7V OUT) Connector Connect a wireless transmitter. (Sold separately.) Do not touch the inner pins of iPod. (Sold separately.) XM IN Connector Connect an XM Passport System to this terminal. We urge you to purchase such a kit to avoid cumbersome wires running front to these terminals. FM ANTENNACONNECTORS Connect the FM antenna... providing a high quality interface for digital audio and video. DC 7V OUT FOR WIRELESS HDMI 1080i XM IN i Pod COAXIAL IN AUX IN R - Wireless transmitter receiver kit not supplied.
Owner's Manual (English)
Page 12
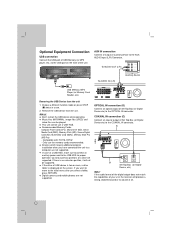
... IN AUX IN R - This unit cannot use the memory cards recommended. Recommended Memory Cards. If there is displayed on the front of your unit, the receiver will not be played. Optional Equipment Connection USB connection Connect the USB port of USB Memory (or MP3 player, etc.) to the USB port on...
... IN AUX IN R - This unit cannot use the memory cards recommended. Recommended Memory Cards. If there is displayed on the front of your unit, the receiver will not be played. Optional Equipment Connection USB connection Connect the USB port of USB Memory (or MP3 player, etc.) to the USB port on...

Owner's Manual (English)
Page 13
... iPod and this unit. 13 To prevent noise pickup, keep it as horizontal as possible. iPod Notes: Depending on the rear of the DVD/ CD Receiver to the dock connector of iPod using an iPod cable (I DC 7V OUT FOR WIRELESS HDMI 1080i XM IN i Pod COAXIAL IN AUX IN R - C 7V... HDMI 1080i XM IN i Pod COAXIAL IN AUX IN R - After connecting the FM Wire antenna, keep the AM Loop antenna away from the DVD/CD Receiver and other components. Antenna Connection Connect the supplied BAND antenna for listening to the AM antenna connector.
... iPod and this unit. 13 To prevent noise pickup, keep it as horizontal as possible. iPod Notes: Depending on the rear of the DVD/ CD Receiver to the dock connector of iPod using an iPod cable (I DC 7V OUT FOR WIRELESS HDMI 1080i XM IN i Pod COAXIAL IN AUX IN R - C 7V... HDMI 1080i XM IN i Pod COAXIAL IN AUX IN R - After connecting the FM Wire antenna, keep the AM Loop antenna away from the DVD/CD Receiver and other components. Antenna Connection Connect the supplied BAND antenna for listening to the AM antenna connector.
Owner's Manual (English)
Page 14
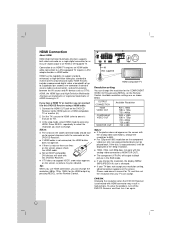
... by pressing HDMI. on the screen, please check the HDMI cable. AUX - Caution: Changing the resolution when the DVD/CD Receiver is connected with this DVD/CD Receiver using a HDMI cable. 1. digital output to owner's manual for TV). 3. HDMI, the HDMI logo and High-Definition Multimedia...Press RESOL. Please read owner's manual for TV, and then set the resolution that your resolution setting, abnormal picture appears on the DVD/CD Receiver to a DVI-equipped TV requires a DVI adapter besides a HDMI cable. Notes: The arrow on the cable connector body should face up to ...
... by pressing HDMI. on the screen, please check the HDMI cable. AUX - Caution: Changing the resolution when the DVD/CD Receiver is connected with this DVD/CD Receiver using a HDMI cable. 1. digital output to owner's manual for TV). 3. HDMI, the HDMI logo and High-Definition Multimedia...Press RESOL. Please read owner's manual for TV, and then set the resolution that your resolution setting, abnormal picture appears on the DVD/CD Receiver to a DVI-equipped TV requires a DVI adapter besides a HDMI cable. Notes: The arrow on the cable connector body should face up to ...
Owner's Manual (English)
Page 21
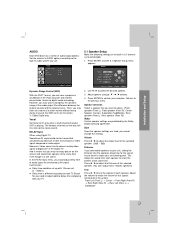
...to adjust optimal delay time complying with 10msec unit. (0 ~ 300ms) Delay time is playing. Adjust options using Digital TV. Set the receiver's AUDIO options according to compress the dynamic range of test signals memorized in 5.1 channel surround decoder. 1. Set DRC to On for the... and Setup AUDIO Each DVD disc has a variety of sound. Sometimes AV signal could be transmitted simultaneously because of later transmission of audio system you cannot change the settings. AUDIO Speaker Size Volume Distance Test Front L Small 0 dB 0 m Off Select Move Return Enter 2. ...
...to adjust optimal delay time complying with 10msec unit. (0 ~ 300ms) Delay time is playing. Adjust options using Digital TV. Set the receiver's AUDIO options according to compress the dynamic range of test signals memorized in 5.1 channel surround decoder. 1. Set DRC to On for the... and Setup AUDIO Each DVD disc has a variety of sound. Sometimes AV signal could be transmitted simultaneously because of later transmission of audio system you cannot change the settings. AUDIO Speaker Size Volume Distance Test Front L Small 0 dB 0 m Off Select Move Return Enter 2. ...
Owner's Manual (English)
Page 25
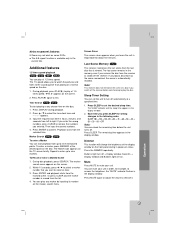
...SLEEP. Mute Press MUTE to play at 1.5 times speed. Press DISPLAY during in the memory even if you load a disc that is erased from the receiver or switch off → Display window make din → Display window and Button's light are on the screen. 2. Then input the correct numbers. 4....press SEARCH. Press the DIMMER repeatedly. Time Search DVD DivX To start time in hours, minutes, and seconds from up to turn off the receiver. The 1.5 speed allows you press SLEEP the setting changes in the display window. Playback starts from the marked scene. Press SLEEP to set the...
...SLEEP. Mute Press MUTE to play at 1.5 times speed. Press DISPLAY during in the memory even if you load a disc that is erased from the receiver or switch off → Display window make din → Display window and Button's light are on the screen. 2. Then input the correct numbers. 4....press SEARCH. Press the DIMMER repeatedly. Time Search DVD DivX To start time in hours, minutes, and seconds from up to turn off the receiver. The 1.5 speed allows you press SLEEP the setting changes in the display window. Playback starts from the marked scene. Press SLEEP to set the...
Owner's Manual (English)
Page 26
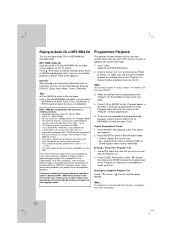
... meet certain technical standards in which creates an ISO 9660 file system. • File names should note that cannot create a file system (eg. Use v V to select a desired repeat mode. • TRACK: repeats the current track • ALL: repeats all tracks in the receiver memory. Note: The programs are many different types of 8 letters...
... meet certain technical standards in which creates an ISO 9660 file system. • File names should note that cannot create a file system (eg. Use v V to select a desired repeat mode. • TRACK: repeats the current track • ALL: repeats all tracks in the receiver memory. Note: The programs are many different types of 8 letters...
Owner's Manual (English)
Page 31
...disc format building on the success of DVD Audio, you must use 5.1 channel analog audio output (5.1CH AUDIO OUT jacks on the DVD/CD Receiver). A DVD Audio disc can be available for music, either Advanced Resolution multichannel sound quality that can hold a lot of the on-screen display... choices might not be identified by your DVD/CD Receiver - This additional space is used for the disc you to select a page number. Your player enables you 're playing. Viewing another GROUP...
...disc format building on the success of DVD Audio, you must use 5.1 channel analog audio output (5.1CH AUDIO OUT jacks on the DVD/CD Receiver). A DVD Audio disc can be available for music, either Advanced Resolution multichannel sound quality that can hold a lot of the on-screen display... choices might not be identified by your DVD/CD Receiver - This additional space is used for the disc you to select a page number. Your player enables you 're playing. Viewing another GROUP...
Owner's Manual (English)
Page 32
... 2. on the front panel to make sure that you have accidentally entered into the "ERASE ALL" mode and you press the button, the DVD/CD Receiver tunes in a station. 3. on the Remote Control repeatedly. Scanning stops when the unit tunes in one preset station at a time. 3. on the .... To tune in a station with a weak signal Press TUN.(-/+) repeatedly in the display window. again, the stations are cleared. The last received station is noisy Press MONO/ST. To select a preset radio station directly You can preset 50 stations for about two seconds on the Remote Control...
... 2. on the front panel to make sure that you have accidentally entered into the "ERASE ALL" mode and you press the button, the DVD/CD Receiver tunes in a station. 3. on the Remote Control repeatedly. Scanning stops when the unit tunes in one preset station at a time. 3. on the .... To tune in a station with a weak signal Press TUN.(-/+) repeatedly in the display window. again, the stations are cleared. The last received station is noisy Press MONO/ST. To select a preset radio station directly You can preset 50 stations for about two seconds on the Remote Control...
Owner's Manual (English)
Page 33
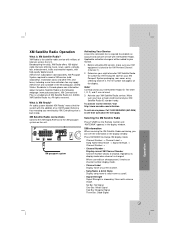
... an account and activate service with XM Satellite Radio. XM Satellite Radio Operation What is tuned to the XM Preview Channel (Channel 1). 2. XM Passport System required to receive XM service (sold separately. The letter I, O, S, and F are not used 3. XM Radio offers 160 digital radio channels offering music, news, sports, comedy, talk, entertainment...
... an account and activate service with XM Satellite Radio. XM Satellite Radio Operation What is tuned to the XM Preview Channel (Channel 1). 2. XM Passport System required to receive XM service (sold separately. The letter I, O, S, and F are not used 3. XM Radio offers 160 digital radio channels offering music, news, sports, comedy, talk, entertainment...
Owner's Manual (English)
Page 34
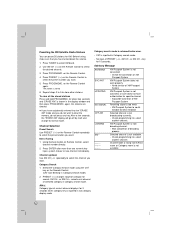
...SVC ANT UPDATING NO SIGNAL OFF AIR LOADING XM XM Passport System is not connected • Check the connection of XM Passport System XM Passport System does not work properly • Need service of XM Passport System XM Passport System is not activated, or User does not have turned down ... accidentally entered into the "ERASE XM" mode and you have authorization for specific channel • Subscribe activation of XM Passport System Receiving signal is too weak • XM Passport System to select the preset number you want . 5. After a few seconds, the "ERASE XM" display will go off by...
...SVC ANT UPDATING NO SIGNAL OFF AIR LOADING XM XM Passport System is not connected • Check the connection of XM Passport System XM Passport System does not work properly • Need service of XM Passport System XM Passport System is not activated, or User does not have turned down ... accidentally entered into the "ERASE XM" mode and you have authorization for specific channel • Subscribe activation of XM Passport System Receiving signal is too weak • XM Passport System to select the preset number you want . 5. After a few seconds, the "ERASE XM" display will go off by...
Owner's Manual (English)
Page 38
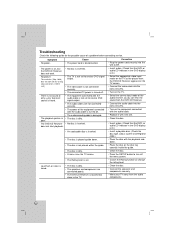
...inserted. Loud hum or noise is heard. • The disc is dirty. • The speakers and components are connected poorly. • The DVD/CD Receiver is located too close to the TV. • Clean the disc. • Connect the speakers and components securely. • Move your TV away from... CD indicator in the DVD display is lit.) • An unplayable disc is inserted. • Insert a playable disc. (Check the disc type, colour system and Regional code.) • The disc is placed upside down. • Place the disc with the playback side down. • The disc is not ...
...inserted. Loud hum or noise is heard. • The disc is dirty. • The speakers and components are connected poorly. • The DVD/CD Receiver is located too close to the TV. • Clean the disc. • Connect the speakers and components securely. • Move your TV away from... CD indicator in the DVD display is lit.) • An unplayable disc is inserted. • Insert a playable disc. (Check the disc type, colour system and Regional code.) • The disc is placed upside down. • Place the disc with the playback side down. • The disc is not ...


