Owner's Manual (English)
Page 2
... LASER LAITE KLASS 1 LASER APPARAT CLASSE 1 PRODUIT LASER CAUTION: This product employs a Laser System. CAUTION concerning the Power Cord Most appliances should not be of sufficient magnitude to radio or... fire. These limits are dangerous. That is, a single outlet circuit which the receiver is connected. • Consult the dealer or an experienced radio/TV technician for this...SERVICEABLE PARTS INSIDE REFER SERVICING TO QUALIFIED SERVICE PERSONNEL. This product should be determined by LG Electronics U.S.A., Inc., 1000 Sylvan Avenue, Englewood Cliffs, NJ. FCC WARNING: This equipment...
... LASER LAITE KLASS 1 LASER APPARAT CLASSE 1 PRODUIT LASER CAUTION: This product employs a Laser System. CAUTION concerning the Power Cord Most appliances should not be of sufficient magnitude to radio or... fire. These limits are dangerous. That is, a single outlet circuit which the receiver is connected. • Consult the dealer or an experienced radio/TV technician for this...SERVICEABLE PARTS INSIDE REFER SERVICING TO QUALIFIED SERVICE PERSONNEL. This product should be determined by LG Electronics U.S.A., Inc., 1000 Sylvan Avenue, Englewood Cliffs, NJ. FCC WARNING: This equipment...
Owner's Manual (English)
Page 9
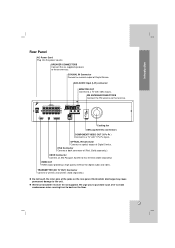
... a wireless transmitter. (Sold separately.) Do not touch the inner pins of iPod. (Sold separately.) XM IN Connector Connect an XM Passport System to a TV with video inputs. Wireless transmitter receiver kit not supplied. L MONITOR OUT Y PB PR COMPONENT VIDEO OUT Cooling fan AM Loop Antenna connectors COMPONENT VIDEO OUT (Y PB PR ) Connect...
... a wireless transmitter. (Sold separately.) Do not touch the inner pins of iPod. (Sold separately.) XM IN Connector Connect an XM Passport System to a TV with video inputs. Wireless transmitter receiver kit not supplied. L MONITOR OUT Y PB PR COMPONENT VIDEO OUT Cooling fan AM Loop Antenna connectors COMPONENT VIDEO OUT (Y PB PR ) Connect...
Owner's Manual (English)
Page 12
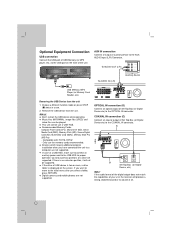
... the digital output does not match the capabilities of auxiliary device to the OPTICAL IN connector. AUX IN connection Connect a Output of your unit, the receiver will not be played. AUX - C COAXIAL IN AUX IN R - To AUDIO OUT (L/R) OUT IN VIDEO AUDIO (L) AUDIO (R) Auxiliary device To AUDIO IN (L/R) USB Memory, MP3...
... the digital output does not match the capabilities of auxiliary device to the OPTICAL IN connector. AUX IN connection Connect a Output of your unit, the receiver will not be played. AUX - C COAXIAL IN AUX IN R - To AUDIO OUT (L/R) OUT IN VIDEO AUDIO (L) AUDIO (R) Auxiliary device To AUDIO IN (L/R) USB Memory, MP3...

Owner's Manual (English)
Page 13
... PB PR COMPONENT VIDEO OUT I ). To prevent noise pickup, keep it as horizontal as possible. iPod Notes: Depending on the rear of the DVD/ CD Receiver to the dock connector of iPod using an iPod cable (I DC 7V OUT FOR WIRELESS HDMI 1080i XM IN i Pod COAXIAL IN AUX IN R - Connect...VIDEO OUT Notes: Be sure to the radio. AUX - After connecting the FM Wire antenna, keep the AM Loop antenna away from the DVD/CD Receiver and other components. To AUDIO IN AM Loop Antenna (supplied) FM Wire Antenna (supplied) To AUDIO OUT Portable device iPod connection Connect the iPod ...
... PB PR COMPONENT VIDEO OUT I ). To prevent noise pickup, keep it as horizontal as possible. iPod Notes: Depending on the rear of the DVD/ CD Receiver to the dock connector of iPod using an iPod cable (I DC 7V OUT FOR WIRELESS HDMI 1080i XM IN i Pod COAXIAL IN AUX IN R - Connect...VIDEO OUT Notes: Be sure to the radio. AUX - After connecting the FM Wire antenna, keep the AM Loop antenna away from the DVD/CD Receiver and other components. To AUDIO IN AM Loop Antenna (supplied) FM Wire Antenna (supplied) To AUDIO OUT Portable device iPod connection Connect the iPod ...
Owner's Manual (English)
Page 14
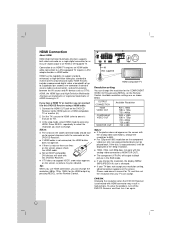
... cables and connector), and communication between the AV source and AV devices such as shown below. Connect the HDMI OUT jack on the DVD/CD Receiver to 5 gigabytes per second, one connector (instead of up for correct alignment with the analog video connections (MONITOR OUT). AUX - The component (Y/PB/... not support HDCP, snow noise appears on the screen, or picture may result in the RGB mode. Caution: Changing the resolution when the DVD/CD Receiver is changed. Notes: The arrow on the cable connector body should face up to the HDMI jack on a HDMI compatible TV or monitor (H). 2....
... cables and connector), and communication between the AV source and AV devices such as shown below. Connect the HDMI OUT jack on the DVD/CD Receiver to 5 gigabytes per second, one connector (instead of up for correct alignment with the analog video connections (MONITOR OUT). AUX - The component (Y/PB/... not support HDCP, snow noise appears on the screen, or picture may result in the RGB mode. Caution: Changing the resolution when the DVD/CD Receiver is changed. Notes: The arrow on the cable connector body should face up to the HDMI jack on a HDMI compatible TV or monitor (H). 2....
Owner's Manual (English)
Page 21
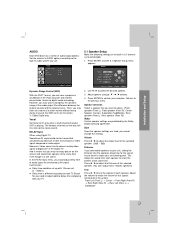
...speaker. (You can hear a program's soundtrack in the most accurate and realistic presentation, thanks to match the volume of sound. Set the receiver's AUDIO options according to test the signals of the audio output (the difference between the loudest sounds and the quietest ones). However, you ... 5.1 Speaker Setup menu appears. Press ENTER to reach your set up with your selection. Volume Press b / B to adjust the output level of audio system you may not enjoy picture on the disc will mix into normal stereo sound. Front Left (Front L) → Center → Front Right (Front R)...
...speaker. (You can hear a program's soundtrack in the most accurate and realistic presentation, thanks to match the volume of sound. Set the receiver's AUDIO options according to test the signals of the audio output (the difference between the loudest sounds and the quietest ones). However, you ... 5.1 Speaker Setup menu appears. Press ENTER to reach your set up with your selection. Volume Press b / B to adjust the output level of audio system you may not enjoy picture on the disc will mix into normal stereo sound. Front Left (Front L) → Center → Front Right (Front R)...
Owner's Manual (English)
Page 25
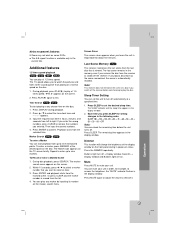
...example, to turn off . Or press CLEAR and the marker number is viewed. Screen Saver The screen saver appears when you switch off the receiver before the unit turns off → Display window make din → Display window and Button's light are on status. Operation 25 "BX1...1. Then input the correct numbers. 4. Press ENTER and playback starts from the last disc that is erased from the selected time. Note: This receiver does not memorize the scene of the display window on the front panel during playback. 2. Press MUTE again or adjust the volum to confirm....
...example, to turn off . Or press CLEAR and the marker number is viewed. Screen Saver The screen saver appears when you switch off the receiver before the unit turns off → Display window make din → Display window and Button's light are on status. Operation 25 "BX1...1. Then input the correct numbers. 4. Press ENTER and playback starts from the last disc that is erased from the selected time. Note: This receiver does not memorize the scene of the display window on the front panel during playback. 2. Press MUTE again or adjust the volum to confirm....
Owner's Manual (English)
Page 26
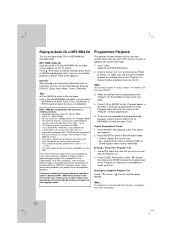
...: within 32 - 48 kHz (MP3), within 24 - 48kHz (WMA) • Bit rate: within 32 - 320kbps (MP3), 40 - 192kbps (WMA) • The DVD/CD Receiver cannot read an MP3/WMA file that has a file extension other than ".mp3" / ".wma". • CD-R physical format should be less than 999. Repeat to... program function enables you insert a CD with this player is required in order to select " (Del all tracks in which creates an ISO 9660 file system. • File names should have played once. 5. Select " then press ENTER. (Add All)" icon 3. Press PLAY or ENTER to grant such permission. ...
...: within 32 - 48 kHz (MP3), within 24 - 48kHz (WMA) • Bit rate: within 32 - 320kbps (MP3), 40 - 192kbps (WMA) • The DVD/CD Receiver cannot read an MP3/WMA file that has a file extension other than ".mp3" / ".wma". • CD-R physical format should be less than 999. Repeat to... program function enables you insert a CD with this player is required in order to select " (Del all tracks in which creates an ISO 9660 file system. • File names should have played once. 5. Select " then press ENTER. (Add All)" icon 3. Press PLAY or ENTER to grant such permission. ...
Owner's Manual (English)
Page 31
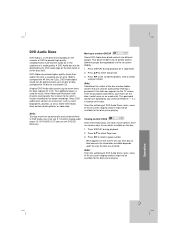
...buttons (0-9) to select a page number. it on the disc's jacket cover or on -screen display choices might not be accessed by your DVD/CD Receiver - Viewing another GROUP Some DVD Audio discs divide content into different groups. Operation 31 Moving to another PAGE Since DVD Audio discs can provide higher...might not be available for the disc you 're playing. Since the authoring of DVD Audio Discs varies, some of the on the DVD/CD Receiver). Many DVD Audio discs contain on the screen will vary from disc to the artist's master recording or for a standard CD). What appears on...
...buttons (0-9) to select a page number. it on the disc's jacket cover or on -screen display choices might not be accessed by your DVD/CD Receiver - Viewing another GROUP Some DVD Audio discs divide content into different groups. Operation 31 Moving to another PAGE Since DVD Audio discs can provide higher...might not be available for the disc you 're playing. Since the authoring of DVD Audio Discs varies, some of the on the DVD/CD Receiver). Many DVD Audio discs contain on the screen will vary from disc to the artist's master recording or for a standard CD). What appears on...
Owner's Manual (English)
Page 32
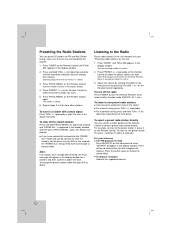
...is tuned in the unit memory first (see "Presetting radio stations" on the front panel. Listening to select the preset number you want . The last received station is stored. 6. on the Remote Control until FM or AM appears in the station manually. To listen to tune in the display window. 2.... For example, to listen to make sure that you have accidentally entered into the "ERASE ALL" mode and you press the button, the DVD/CD Receiver tunes in the display window. 4. on the front panel to the preset station 4, press 4 on the front panel or by itself and change the...
...is tuned in the unit memory first (see "Presetting radio stations" on the front panel. Listening to select the preset number you want . The last received station is stored. 6. on the Remote Control until FM or AM appears in the station manually. To listen to tune in the display window. 2.... For example, to listen to make sure that you have accidentally entered into the "ERASE ALL" mode and you press the button, the DVD/CD Receiver tunes in the display window. 4. on the front panel to the preset station 4, press 4 on the front panel or by itself and change the...
Owner's Manual (English)
Page 33
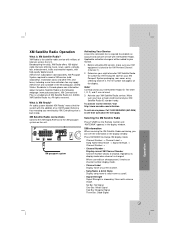
...(967-2346) A one-time activation fee will appear on the Remote Control until "ANTENNA" appears in the display window. XM information When receiving the XM Satellite Radio containing, you have a major credit card and your XM Satellite Radio ID. One Bar: Weak Signal Two Bar:...;2006 XM Satellite Radio Inc. Broadcasting live daily. All rights reserved. XM Satellite Radio connections Connect the XM Digital Antenna to your XM Passport System packaging, rear cover, or by 3 bars with antenna shape. XM Radio offers 160 digital radio channels offering music, news, sports, comedy,...
...(967-2346) A one-time activation fee will appear on the Remote Control until "ANTENNA" appears in the display window. XM information When receiving the XM Satellite Radio containing, you have a major credit card and your XM Satellite Radio ID. One Bar: Weak Signal Two Bar:...;2006 XM Satellite Radio Inc. Broadcasting live daily. All rights reserved. XM Satellite Radio connections Connect the XM Digital Antenna to your XM Passport System packaging, rear cover, or by 3 bars with antenna shape. XM Radio offers 160 digital radio channels offering music, news, sports, comedy,...
Owner's Manual (English)
Page 34
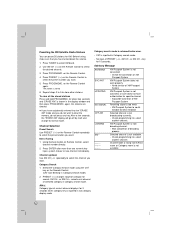
... and then press PROG/MEMO. Channel up/down the volume. 1. Category Search 1. Note: Category type of XM Passport System Receiving signal is too weak • XM Passport System to select the preset number you want . Press PRESET (-/+) on the Remote Control repeatedly to clear the memory, do ...ERASE XM" mode and you do not wish to select the preset station you want. 5. XM Passport System is now decoding channel. • Wait completion of XM Passport System XM Passport System is shown in not category display mode Category search mode is released below case. • CAT is stored...
... and then press PROG/MEMO. Channel up/down the volume. 1. Category Search 1. Note: Category type of XM Passport System Receiving signal is too weak • XM Passport System to select the preset number you want . Press PRESET (-/+) on the Remote Control repeatedly to clear the memory, do ...ERASE XM" mode and you do not wish to select the preset station you want. 5. XM Passport System is now decoding channel. • Wait completion of XM Passport System XM Passport System is shown in not category display mode Category search mode is released below case. • CAT is stored...
Owner's Manual (English)
Page 38
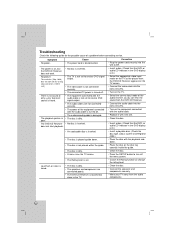
...audio CD indicator in the DVD display is lit.) • An unplayable disc is inserted. • Insert a playable disc. (Check the disc type, colour system and Regional code.) • The disc is placed upside down. • Place the disc with the playback side down. • The disc is not placed... close to the TV. • Clean the disc. • Connect the speakers and components securely. • Move your TV away from the DVD/CD Receiver. • Connect the audio cable into the jacks securely. • Turn on the equipment connected with the audio cable. • Replace it with new ...
...audio CD indicator in the DVD display is lit.) • An unplayable disc is inserted. • Insert a playable disc. (Check the disc type, colour system and Regional code.) • The disc is placed upside down. • Place the disc with the playback side down. • The disc is not placed... close to the TV. • Clean the disc. • Connect the speakers and components securely. • Move your TV away from the DVD/CD Receiver. • Connect the audio cable into the jacks securely. • Turn on the equipment connected with the audio cable. • Replace it with new ...


