
Owners Manual
Page 4
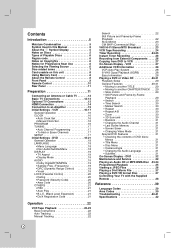
... a JPEG Files 36 Playing a DivX Movie File 37 Playing a DVD VR format Disc 37 Controlling Your TV with the Supplied Remote 38 Reference 39 Language Codes 39 Area Codes 39 Troubleshooting 40-41 Specifications 42 Operation 22 VCR Tape Playback 22-23 Basic Instructions ... SETUP 17 Initial Settings - Contents Introduction 5 Moisture Condensation 5 Symbol Used in this unit 8 Using Memory Card 8 About the Remote Control 8 Front Panel 9 Remote Control 10 Rear Panel 11 Preparation 11 Connecting an Antenna or Cable TV 12 Basic TV Connections 12-13 Optional TV Connections 13...
... a JPEG Files 36 Playing a DivX Movie File 37 Playing a DVD VR format Disc 37 Controlling Your TV with the Supplied Remote 38 Reference 39 Language Codes 39 Area Codes 39 Troubleshooting 40-41 Specifications 42 Operation 22 VCR Tape Playback 22-23 Basic Instructions ... SETUP 17 Initial Settings - Contents Introduction 5 Moisture Condensation 5 Symbol Used in this unit 8 Using Memory Card 8 About the Remote Control 8 Front Panel 9 Remote Control 10 Rear Panel 11 Preparation 11 Connecting an Antenna or Cable TV 12 Basic TV Connections 12-13 Optional TV Connections 13...
Owners Manual
Page 8
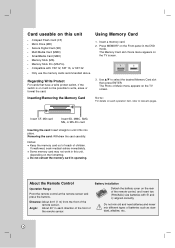
..., etc. 8 Angle: About 30° in operating. Press MEMORY on each direction of the front of the remote sensor. About the Remote Control Operation Range Point the remote control at the remote sensor and press the buttons. Insert CF, MD card Insert SD, MMC, SMC, MS, or MS-Pro card... Stick Pro (MS-Pro) • Compatible with 3 and # aligned correctly. Insert a memory card. 2. Distance: About 23 ft (7 m) from the front of the remote control, and insert two (R03/AAA) size batteries with : FAT 12, FAT 16, or FAT 32 • Only use the memory cards recommended above. Battery...
..., etc. 8 Angle: About 30° in operating. Press MEMORY on each direction of the front of the remote sensor. About the Remote Control Operation Range Point the remote control at the remote sensor and press the buttons. Insert CF, MD card Insert SD, MMC, SMC, MS, or MS-Pro card... Stick Pro (MS-Pro) • Compatible with 3 and # aligned correctly. Insert a memory card. 2. Distance: About 23 ft (7 m) from the front of the remote control, and insert two (R03/AAA) size batteries with : FAT 12, FAT 16, or FAT 32 • Only use the memory cards recommended above. Battery...

Owners Manual
Page 9
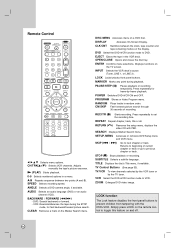
... quick successions to go to search backward. - k DVD/VCR (output select) Select one of an external source (Audio system, TV/Monitor, Another VCR). o Remote Sensor Point the DVD+VCR remote control here. p z (REC) button Starts recording. Press and hold button for fast backward picture search. e Cassette Compartment (VCR deck) Insert a video cassette...
... quick successions to go to search backward. - k DVD/VCR (output select) Select one of an external source (Audio system, TV/Monitor, Another VCR). o Remote Sensor Point the DVD+VCR remote control here. p z (REC) button Starts recording. Press and hold button for fast backward picture search. e Cassette Compartment (VCR deck) Insert a video cassette...
Owners Manual
Page 10
... LOCK Locks/unlocks front panel buttons. INPUT Selects the VCR deck's source (Tuner, LINE 1, or LINE 2). CLEAR Removes a mark on the remote control to DVD. REC/ITR (z) Starts recording. RETURN (O) Removes the setup menu, displays the video CD with the DVD+VCR. SEARCH Displays ... VCR Select the DVD+VCR function mode to VCR. DISPLAY Accesses On-Screen Display. TITLE Displays the disc's Title menu, if available. Remote Control b B v V Selects menu options. Fast forwards picture search through 30 seconds of current chapter or track or go to next ...
... LOCK Locks/unlocks front panel buttons. INPUT Selects the VCR deck's source (Tuner, LINE 1, or LINE 2). CLEAR Removes a mark on the remote control to DVD. REC/ITR (z) Starts recording. RETURN (O) Removes the setup menu, displays the video CD with the DVD+VCR. SEARCH Displays ... VCR Select the DVD+VCR function mode to VCR. DISPLAY Accesses On-Screen Display. TITLE Displays the disc's Title menu, if available. Remote Control b B v V Selects menu options. Fast forwards picture search through 30 seconds of current chapter or track or go to next ...
Owners Manual
Page 16
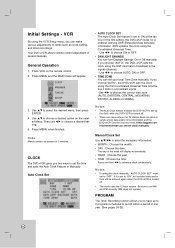
... Services) information. VCR By using the DST information broadcast in a broadcast signal. -Use b/B to set your local Time Zone manually. Your DVD+VCR allows remote control adjustment of the week will be entered again when the DVD+VCR is set the clock manually. If you two ways to choose the... choose AUTO, ON or OFF. • TIME ZONE You can turn Daylight Savings On or Off manually. Be sure to choose a desired option on the remote control. 2. Use v/V to set up to 8 programs scheduled to record within a period of one year. (See pages 24-25). 16 Auto Clock Set Notes: ...
... Services) information. VCR By using the DST information broadcast in a broadcast signal. -Use b/B to set your local Time Zone manually. Your DVD+VCR allows remote control adjustment of the week will be entered again when the DVD+VCR is set the clock manually. If you two ways to choose the... choose AUTO, ON or OFF. • TIME ZONE You can turn Daylight Savings On or Off manually. Be sure to choose a desired option on the remote control. 2. Use v/V to set up to 8 programs scheduled to record within a period of one year. (See pages 24-25). 16 Auto Clock Set Notes: ...
Owners Manual
Page 18
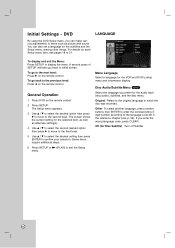
... the second desired option then press B to move to the previous level: Press b on each Setup menu item, see p. 39). For details on the remote control. To go to initial screen. The screen shows the current setting for the subtitles and the Setup menu, among other things. Use v / V to...4digit number according to the language code list in which the disc was recorded. Press DVD on the remote control. The Setup menu appears. 3. If you back to the next level: Press B on the remote control. 2. Initial Settings - To go back to the second level. Disc Audio/Subtitle/Menu DVD ...
... the second desired option then press B to move to the previous level: Press b on each Setup menu item, see p. 39). For details on the remote control. To go to initial screen. The screen shows the current setting for the subtitles and the Setup menu, among other things. Use v / V to...4digit number according to the language code list in which the disc was recorded. Press DVD on the remote control. The Setup menu appears. 3. If you back to the next level: Press B on the remote control. 2. Initial Settings - To go back to the second level. Disc Audio/Subtitle/Menu DVD ...
Owners Manual
Page 22
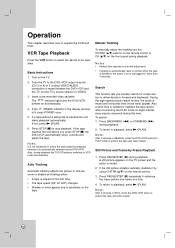
... to advance the video picture one frame at a time. 4. Manual Tracking To manually adjust the tracking use the CH/TRK (v/V) buttons on the remote control or CH (v/V) on the remote control. 3. Press PAUSE/STEP (X) during this time. Press PAUSE/STEP (X) repeatedly to protect the tape and video heads. 22 Still Picture and...
... to advance the video picture one frame at a time. 4. Manual Tracking To manually adjust the tracking use the CH/TRK (v/V) buttons on the remote control or CH (v/V) on the remote control. 3. Press PAUSE/STEP (X) during this time. Press PAUSE/STEP (X) repeatedly to protect the tape and video heads. 22 Still Picture and...
Owners Manual
Page 23
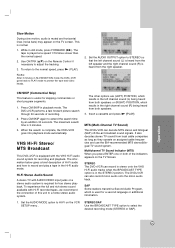
... mono audio onto the mono audio track. SAP Some stations transmit a Second Audio Program, which results in the STEREO position. Use CH/TRK (v/V) on the Remote Control if necessary to select the desired recording mode (STEREO or SAP). Set the AUDIO OUTPUT option to a home stereo audio system. 1. The information below...
... mono audio onto the mono audio track. SAP Some stations transmit a Second Audio Program, which results in the STEREO position. Use CH/TRK (v/V) on the Remote Control if necessary to select the desired recording mode (STEREO or SAP). Set the AUDIO OUTPUT option to a home stereo audio system. 1. The information below...
Owners Manual
Page 29
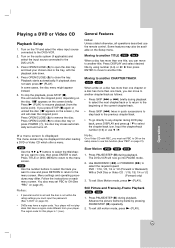
... Motion DVD VCD DivX 1. To exit Slow Motion mode, press N (PLAY). If playback does not start . Notes: Unless stated otherwise, all operations described use the remote control. To stop the playback, press STOP (x). You also may also be displayed first after loading a DVD or Video CD which offer a menu. In some...
... Motion DVD VCD DivX 1. To exit Slow Motion mode, press N (PLAY). If playback does not start . Notes: Unless stated otherwise, all operations described use the remote control. To stop the playback, press STOP (x). You also may also be displayed first after loading a DVD or Video CD which offer a menu. In some...
Owners Manual
Page 36
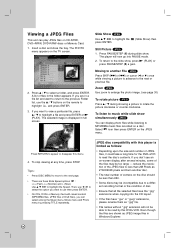
... ENTER. 3. Viewing a JPEG Files This unit can play JPEG files on a disc. Zoom JPEG Use zoom to enlarge the photo image. (see an on the remote to rotate the picture clockwise or counter clockwise. If you want to appear or disappear this player is displayed in the folder appears. If you...
... ENTER. 3. Viewing a JPEG Files This unit can play JPEG files on a disc. Zoom JPEG Use zoom to enlarge the photo image. (see an on the remote to rotate the picture clockwise or counter clockwise. If you want to appear or disappear this player is displayed in the folder appears. If you...
Owners Manual
Page 38
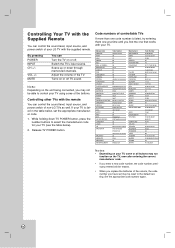
Controlling other TVs with the remote You can control the sound level, input source, and power switch of the TV. VOL +/- Adjust the volume of non-LG TVs as well. While holding down through memorized channels. MUTE You can Turn the TV on or off . Switch the TV's input source. If your ... listed, try entering them one at a time until you have set the appropriate manufacturer code. 1. Turns on or off TV sound. Note: Depending on your LG TV with the supplied remote. Code numbers of the buttons. Release TV POWER button.
Controlling other TVs with the remote You can control the sound level, input source, and power switch of the TV. VOL +/- Adjust the volume of non-LG TVs as well. While holding down through memorized channels. MUTE You can Turn the TV on or off . Switch the TV's input source. If your ... listed, try entering them one at a time until you have set the appropriate manufacturer code. 1. Turns on or off TV sound. Note: Depending on your LG TV with the supplied remote. Code numbers of the buttons. Release TV POWER button.

Owners Manual
Page 41
.... Clean the disc. When using a DVD, first press the DVD button. Set clock to select LINE input channel (LINE1 or LINE2). The remote control does not work properly. Reprogram Timer. Symptom The DVD+VCR does not start playback. The disc is not set to DVD+VCR is not... pointed at the remote sensor of the DVD+VCR. indicator light does not appear after programming timer. Remove the obstacle. Timer recording is not shown. Eject the ...
.... Clean the disc. When using a DVD, first press the DVD button. Set clock to select LINE input channel (LINE1 or LINE2). The remote control does not work properly. Reprogram Timer. Symptom The DVD+VCR does not start playback. The disc is not set to DVD+VCR is not... pointed at the remote sensor of the DVD+VCR. indicator light does not appear after programming timer. Remove the obstacle. Timer recording is not shown. Eject the ...
Owners Manual
Page 42
.../UHF/CATV) 1 V (p-p) 75 ohms, sync negative, RCA jack x 2 -6.0 dBm more than 95 dB (DVD/CD) Accessories: Video cable x 1, Audio cable (L/R) x 1, RF 75-ohm Coaxial Cable x 1, Remote control x 1, Batteries (R03/AAA) x 2 • Design and specifications are subject to -noise ratio Dynamic range Channel separation Four head helical scan azimuth system 12-hour...
.../UHF/CATV) 1 V (p-p) 75 ohms, sync negative, RCA jack x 2 -6.0 dBm more than 95 dB (DVD/CD) Accessories: Video cable x 1, Audio cable (L/R) x 1, RF 75-ohm Coaxial Cable x 1, Remote control x 1, Batteries (R03/AAA) x 2 • Design and specifications are subject to -noise ratio Dynamic range Channel separation Four head helical scan azimuth system 12-hour...


