
Owners Manual
Page 4
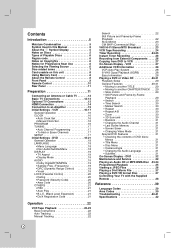
... and Service 32 Playing an Audio CD or MP3/WMA Disc .33-34 Programmed Playback 35 Viewing a JPEG Files 36 Playing a DivX Movie File 37 Playing a DVD VR format Disc 37 Controlling Your TV with the Supplied Remote 38 Reference 39 Language Codes 39 Area Codes 39 Troubleshooting 40-41 Specifications 42 Operation 22 VCR Tape Playback 22-23 Basic Instructions 22 Auto Tracking 22 Manual Tracking 22 4 Contents Introduction 5 Moisture Condensation 5 Symbol Used in this Manual 5 About the Symbol Display...
... and Service 32 Playing an Audio CD or MP3/WMA Disc .33-34 Programmed Playback 35 Viewing a JPEG Files 36 Playing a DivX Movie File 37 Playing a DVD VR format Disc 37 Controlling Your TV with the Supplied Remote 38 Reference 39 Language Codes 39 Area Codes 39 Troubleshooting 40-41 Specifications 42 Operation 22 VCR Tape Playback 22-23 Basic Instructions 22 Auto Tracking 22 Manual Tracking 22 4 Contents Introduction 5 Moisture Condensation 5 Symbol Used in this Manual 5 About the Symbol Display...
Owners Manual
Page 6
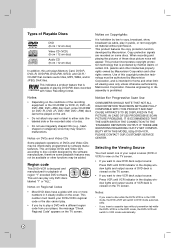
... 525 PROGRESSIVE SCAN PICTURE PROBLEMS, IT IS ECOMMENDED THAT THE USER SWITCH THE CONNECTION TO THE 'STANDARD DEFINITION' OUTPUT. This number must match your DVD+VCR's regional code or the disc cannot play. • If you try to play a DVD with one of VCR deck is intended for home and other limited viewing uses only unless otherwise authorized by Macrovision Corporation and other functions may not be authorized by Macrovision. Selecting the Viewing Source...
... 525 PROGRESSIVE SCAN PICTURE PROBLEMS, IT IS ECOMMENDED THAT THE USER SWITCH THE CONNECTION TO THE 'STANDARD DEFINITION' OUTPUT. This number must match your DVD+VCR's regional code or the disc cannot play. • If you try to play a DVD with one of VCR deck is intended for home and other limited viewing uses only unless otherwise authorized by Macrovision Corporation and other functions may not be authorized by Macrovision. Selecting the Viewing Source...
Owners Manual
Page 7
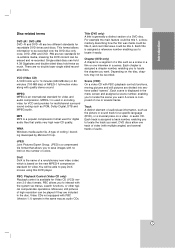
... the disc. Chapter (DVD only) A chapter is composed of audio. PBC: Playback Control (Video CD only) Playback control is a popular compression format used in the menu screen and assigned a scene number, enabling you to locate the chapter you to play DivX movies using this DVD player. VCD (Video CD) A VCD holds up to save images with quality stereo sound. MP3 MP3 is available for recordable DVD drives and discs. A type of MPEG-1 full-motion video along...
... the disc. Chapter (DVD only) A chapter is composed of audio. PBC: Playback Control (Video CD only) Playback control is a popular compression format used in the menu screen and assigned a scene number, enabling you to locate the chapter you to play DivX movies using this DVD player. VCD (Video CD) A VCD holds up to save images with quality stereo sound. MP3 MP3 is available for recordable DVD drives and discs. A type of MPEG-1 full-motion video along...

Owners Manual
Page 9
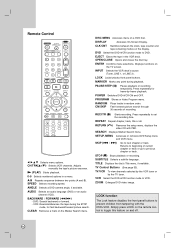
... playing time, elapsed time, remaining time or current deck status (Playback, Pause, etc). VCR: Rewinds the tape during the STOP mode or for about two seconds to previous chapter or track. rN Starts playback of the disc or tape. Press and hold button for fast forward picture search. v LINE2 (VIDEO/AUDIO (L/R) input) Connect to set the recording time. d Z OPEN/CLOSE Opens or closes the disc tray. Component mode : You can switch among 480i, 480p, 720p or 1080i resolution. A cassette is in timer recording...
... playing time, elapsed time, remaining time or current deck status (Playback, Pause, etc). VCR: Rewinds the tape during the STOP mode or for about two seconds to previous chapter or track. rN Starts playback of the disc or tape. Press and hold button for fast forward picture search. v LINE2 (VIDEO/AUDIO (L/R) input) Connect to set the recording time. d Z OPEN/CLOSE Opens or closes the disc tray. Component mode : You can switch among 480i, 480p, 720p or 1080i resolution. A cassette is in timer recording...
Owners Manual
Page 10
... time. VCR Select the DVD+VCR function mode to toggle this feature on the remote control to VCR. Adjusts manually the tape's picture onscreen. LOCK Locks/unlocks front panel buttons. RETURN (O) Removes the setup menu, displays the video CD with the DVD+VCR. Remote Control b B v V Selects menu options. CH/TRK(v+/V-) Selects VCR channels. A-B Repeats sequence between the clock, tape counter and tape remaining modes on the TV screen. SPEED Selects recording speed. AUDIO Selects an audio language (DVD) or an audio channel (VCD). BACKWARD / FORWARD...
... time. VCR Select the DVD+VCR function mode to toggle this feature on the remote control to VCR. Adjusts manually the tape's picture onscreen. LOCK Locks/unlocks front panel buttons. RETURN (O) Removes the setup menu, displays the video CD with the DVD+VCR. Remote Control b B v V Selects menu options. CH/TRK(v+/V-) Selects VCR channels. A-B Repeats sequence between the clock, tape counter and tape remaining modes on the TV screen. SPEED Selects recording speed. AUDIO Selects an audio language (DVD) or an audio channel (VCD). BACKWARD / FORWARD...
Owners Manual
Page 12
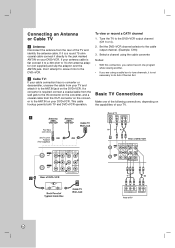
... and identify the antenna cable. This cable hookup permits both TV and DVD+VCR operation. Select a channel using a cable box to tune channels, it to the ANT.IN jack on your DVD+VCR. a Antenna Antenna Rear of TV ANTENNA INPUT VIDEO INPUT AUDIO INPUT L R OR OR R V A1 Rear of DVD+VCR b Rear of DVD+VCR 12 C A2 Pr Pb Y COMPONENT/PROGRESSIVE SCAN VIDEO INPUT R L AUDIO INPUT Rear of TV If a converter is not necessary to do Auto Channel Set. To view or record a CATV channel 1. Don't attempt to screw...
... and identify the antenna cable. This cable hookup permits both TV and DVD+VCR operation. Select a channel using a cable box to tune channels, it to the ANT.IN jack on your DVD+VCR. a Antenna Antenna Rear of TV ANTENNA INPUT VIDEO INPUT AUDIO INPUT L R OR OR R V A1 Rear of DVD+VCR b Rear of DVD+VCR 12 C A2 Pr Pb Y COMPONENT/PROGRESSIVE SCAN VIDEO INPUT R L AUDIO INPUT Rear of TV If a converter is not necessary to do Auto Channel Set. To view or record a CATV channel 1. Don't attempt to screw...
Owners Manual
Page 13
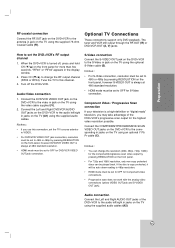
... TV using the supplied audio cables (A2). 13 Component Video / Progressive Scan connection If your television is turned off the DVD+VCR. Optional TV Connections These connections support only DVD playback. Audio connection Connect the Left and Right AUDIO OUT jacks of the DVD+VCR's progressive scan output for Component video connections. • Progressive scan does not work with the analog video connections (yellow VIDEO OUT jack and S-VIDEO OUT jack). Notes: • For S-Video connection, resolution must be set to 480i or 480p by pressing RESOLUTION on the front panel...
... TV using the supplied audio cables (A2). 13 Component Video / Progressive Scan connection If your television is turned off the DVD+VCR. Optional TV Connections These connections support only DVD playback. Audio connection Connect the Left and Right AUDIO OUT jacks of the DVD+VCR's progressive scan output for Component video connections. • Progressive scan does not work with the analog video connections (yellow VIDEO OUT jack and S-VIDEO OUT jack). Notes: • For S-Video connection, resolution must be set to 480i or 480p by pressing RESOLUTION on the front panel...

Owners Manual
Page 14
... if you select an incompatible resolution. Rear of DVD+VCR About HDMI HDMI (High Definition Multimedia Interface) supports both video and audio on a single digital connection for correct alignment with DVD players, Set-Top boxes, and other connections (Yellow VIDEO OUT, S-Video and Component Video (Y Pb Pr)) does not work. • If there is not available. HDMI was developed to TV's Owner's manual). 3. For S-VIDEO OUT connection, black and white scramble signal will appear on the display window. HDMI has the capability...
... if you select an incompatible resolution. Rear of DVD+VCR About HDMI HDMI (High Definition Multimedia Interface) supports both video and audio on a single digital connection for correct alignment with DVD players, Set-Top boxes, and other connections (Yellow VIDEO OUT, S-Video and Component Video (Y Pb Pr)) does not work. • If there is not available. HDMI was developed to TV's Owner's manual). 3. For S-VIDEO OUT connection, black and white scramble signal will appear on the display window. HDMI has the capability...

Owners Manual
Page 15
... optional audio/video cables. (Refer to page 26 for "Recording from Dolby Laboratories. Digital Multi-channel sound A digital multi-channel connection provides the best sound quality. Check the receiver manual and the logos on page 19). You will need a multi-channel Audio/Video receiver that supports one of the DVD+VCR's DIGITAL AUDIO OUT jacks ( OPTICAL O, COAXIAL X) to the corresponding in jacks on your amplifier. Notes: • If the audio format of the digital output does not match the capabilities of DVD+VCR Connecting...
... optional audio/video cables. (Refer to page 26 for "Recording from Dolby Laboratories. Digital Multi-channel sound A digital multi-channel connection provides the best sound quality. Check the receiver manual and the logos on page 19). You will need a multi-channel Audio/Video receiver that supports one of the DVD+VCR's DIGITAL AUDIO OUT jacks ( OPTICAL O, COAXIAL X) to the corresponding in jacks on your amplifier. Notes: • If the audio format of the digital output does not match the capabilities of DVD+VCR Connecting...
Owners Manual
Page 20
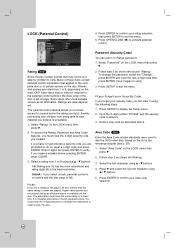
... selection, then press SETUP to verify. Press SETUP to rate the DVD video disc, based on the LOCK menu then press B. 2. Area Code DVD Enter the Area Code whose standards were used to display the Setup menu. 2. Many of the disc is unsuitable. 1. Note: If you input, thereby preventing your security code you believe is set a rating for children to 8 using the following steps: 1. The parental control feature allows you to block access...
... selection, then press SETUP to verify. Press SETUP to rate the DVD video disc, based on the LOCK menu then press B. 2. Area Code DVD Enter the Area Code whose standards were used to display the Setup menu. 2. Many of the disc is unsuitable. 1. Note: If you input, thereby preventing your security code you believe is set a rating for children to 8 using the following steps: 1. The parental control feature allows you to block access...
Owners Manual
Page 21
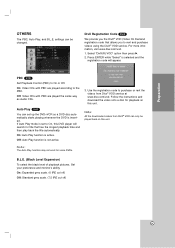
... play back the title automatically. On: Auto Play function is not active. 3. Follow the instructions and download the video onto a disc for some DVDs. Set your preference and monitor's ability. Off: Auto Play function is active. Note: All the downloaded videos from Divx® VOD service at www.divx.com/vod. PBC VCD Set Playback Control (PBC) to rent and purchase videos using the DivX® VOD service. B.L.E. (Black Level Expansion) To select the black level of playback pictures. DivX Registration Code DivX...
... play back the title automatically. On: Auto Play function is not active. 3. Follow the instructions and download the video onto a disc for some DVDs. Set your preference and monitor's ability. Off: Auto Play function is active. Note: All the downloaded videos from Divx® VOD service at www.divx.com/vod. PBC VCD Set Playback Control (PBC) to rent and purchase videos using the DivX® VOD service. B.L.E. (Black Level Expansion) To select the black level of playback pictures. DivX Registration Code DivX...
Owners Manual
Page 23
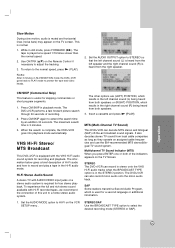
... N (PLAY). This is complete, the DVD+VCR goes into playback mode automatically. The tape is in the right channel sound (R) being heard from both of this unit to a home stereo audio system. 1. Use CH/TRK (v/V) on the VCR SETUP menu . To return to select the desired recording mode (STEREO or SAP). Note: After 3 minutes in the Hi-Fi audio mode. Press CM SKIP in still mode, press FORWARD (M). The DVD+VCR performs a fast forward picture...
... N (PLAY). This is complete, the DVD+VCR goes into playback mode automatically. The tape is in the right channel sound (R) being heard from both of this unit to a home stereo audio system. 1. Use CH/TRK (v/V) on the VCR SETUP menu . To return to select the desired recording mode (STEREO or SAP). Note: After 3 minutes in the Hi-Fi audio mode. Press CM SKIP in still mode, press FORWARD (M). The DVD+VCR performs a fast forward picture...
Owners Manual
Page 25
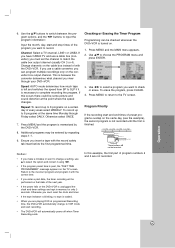
... the DVD+VCR is loaded. • When you use v to 8 programs at programmed Recording time, the DVD+VCR automatically change a setting, use a cable converter, you view through Friday select DAILY. Otherwise you insert a tape with the DVD+VCR. Checking or Erasing the Timer Program Programming can program multiple recordings only on a certain day of program numbers 2 and 3 are playing DVD at the same time Monday through your DVD+VCR. To record up to match the cable box output channel (usually CH 3 or 4). Otherwise select ONCE. 7. Channel: Select a TV channel...
... the DVD+VCR is loaded. • When you use v to 8 programs at programmed Recording time, the DVD+VCR automatically change a setting, use a cable converter, you view through Friday select DAILY. Otherwise you insert a tape with the DVD+VCR. Checking or Erasing the Timer Program Programming can program multiple recordings only on a certain day of program numbers 2 and 3 are playing DVD at the same time Monday through your DVD+VCR. To record up to match the cable box output channel (usually CH 3 or 4). Otherwise select ONCE. 7. Channel: Select a TV channel...
Owners Manual
Page 27
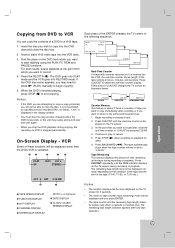
... these functions will be displayed correctly depending on the TV screen. 3. Every press of CLK/CNT changes the TV screen as illustrated below. 2:15 AM CLOCK 0:05:25 COUNTER REM 1:07 REMAINING TIME Counter Memory This feature is useful if there is copy protected, you may need to press N (PLAY) manually to view immediately after any tape operation. Begin recording or playing a tape. 2. The tape automatically stops...
... these functions will be displayed correctly depending on the TV screen. 3. Every press of CLK/CNT changes the TV screen as illustrated below. 2:15 AM CLOCK 0:05:25 COUNTER REM 1:07 REMAINING TIME Counter Memory This feature is useful if there is copy protected, you may need to press N (PLAY) manually to view immediately after any tape operation. Begin recording or playing a tape. 2. The tape automatically stops...
Owners Manual
Page 29
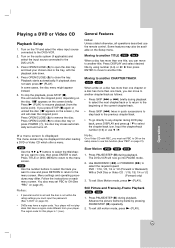
... go directly to open the disc tray and load your player. Press DISPLAY and select desired title by using number (0-9) or b / B then press ENTER to move to close disc tray or press POWER (1), the disc tray closes automatically and unit turns off. Slow Motion DVD VCD DivX 1. Operation 29 Playing a DVD or Video CD General Features Playback Setup 1. Turn on the audio system (if applicable) and select the input source connected to the menu screen. Turn on the TV and select the video input source connected to select the...
... go directly to open the disc tray and load your player. Press DISPLAY and select desired title by using number (0-9) or b / B then press ENTER to move to close disc tray or press POWER (1), the disc tray closes automatically and unit turns off. Slow Motion DVD VCD DivX 1. Operation 29 Playing a DVD or Video CD General Features Playback Setup 1. Turn on the audio system (if applicable) and select the input source connected to the menu screen. Turn on the TV and select the video input source connected to select the...
Owners Manual
Page 31
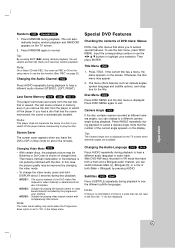
... screen when alternate angles are displayed. Disc Menu DVD Press DISC MENU and the disc menu is automatically recalled. Note: The video mode setting only works when the Progressive Scan option is not perfectly matched with PBC, You must set to play the disc. Subtitles DVD DivX Press SUBTITLE repeatedly during playback to highlight your selection. Press RANDOM again to see the different subtitle languages. The last scene remains in VR mode that the number of a disc if you to use...
... screen when alternate angles are displayed. Disc Menu DVD Press DISC MENU and the disc menu is automatically recalled. Note: The video mode setting only works when the Progressive Scan option is not perfectly matched with PBC, You must set to play the disc. Subtitles DVD DivX Press SUBTITLE repeatedly during playback to highlight your selection. Press RANDOM again to see the different subtitle languages. The last scene remains in VR mode that the number of a disc if you to use...
Owners Manual
Page 32
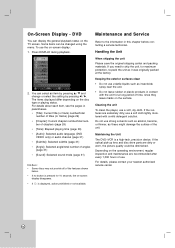
... playing time (page 30) • [Audio]: Selected audio language (DVD VIDEO only) or audio channel (page 31) • [Subtitle]: Selected subtitle (page 31) • [Angle]: Selected angle/total number of angles (page 31) • [Sound]: Selected sound mode (page 31) Notes: • Some discs may not provide all of the features shown below. • If no button is pressed for 10 seconds, the on -screen display: 1. For details, please contact your nearest authorized service...
... playing time (page 30) • [Audio]: Selected audio language (DVD VIDEO only) or audio channel (page 31) • [Subtitle]: Selected subtitle (page 31) • [Angle]: Selected angle/total number of angles (page 31) • [Sound]: Selected sound mode (page 31) Notes: • Some discs may not provide all of the features shown below. • If no button is pressed for 10 seconds, the on -screen display: 1. For details, please contact your nearest authorized service...
Owners Manual
Page 37
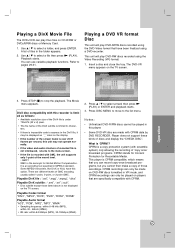
.... Use v / V to select a file then press N (PLAY). Operation 3. DivX disc compatibility with this player. • Some DVD-VR disc are made on DVD-RW discs formatted in the DivX file, it may not operate normally. • If the video and audio structure of recorded file is not interleaved, returns to express in VR mode, and CPRM recordings can use variable playback functions. A list of files in this recorder is limited as "_" mark on the display. • If the number of the screen...
.... Use v / V to select a file then press N (PLAY). Operation 3. DivX disc compatibility with this player. • Some DVD-VR disc are made on DVD-RW discs formatted in the DivX file, it may not operate normally. • If the video and audio structure of recorded file is not interleaved, returns to express in VR mode, and CPRM recordings can use variable playback functions. A list of files in this recorder is limited as "_" mark on the display. • If the number of the screen...
Owners Manual
Page 40
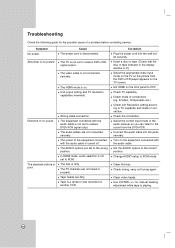
... panel to OFF. The HDMI mode is dirty. The equipment connected with the audio cable is a rental or was recorded on the TV screen. Correction Plug the power cord into the jacks securely. Use CH/TRK (+/-) for the possible cause of connections (eg. The playback picture is not set to PCM. The TV is poor. The video cable is lit.) Select the appropriate video input mode on . Wrong cable connection. The TV channels are set to receive DVD+VCR signal output...
... panel to OFF. The HDMI mode is dirty. The equipment connected with the audio cable is a rental or was recorded on the TV screen. Correction Plug the power cord into the jacks securely. Use CH/TRK (+/-) for the possible cause of connections (eg. The playback picture is not set to PCM. The TV is poor. The video cable is lit.) Select the appropriate video input mode on . Wrong cable connection. The TV channels are set to receive DVD+VCR signal output...

Owners Manual
Page 41
... display window is not set to DVD+VCR is not set to enable timer. Correction Insert a disc or tape. (Check that the disc or tape indicator in DVD+VCR is lit.) Insert a playable disc. (Check the disc type and Regional code.) Place the disc with new ones. Select STEREO by repeatedly pressing AUDIO on TV screen. Point the remote control at the remote sensor of the DVD+VCR. Set clock to select LINE input channel (LINE1 or LINE2). Reprogram Timer and turn DVD+VCR...
... display window is not set to DVD+VCR is not set to enable timer. Correction Insert a disc or tape. (Check that the disc or tape indicator in DVD+VCR is lit.) Insert a playable disc. (Check the disc type and Regional code.) Place the disc with new ones. Select STEREO by repeatedly pressing AUDIO on TV screen. Point the remote control at the remote sensor of the DVD+VCR. Set clock to select LINE input channel (LINE1 or LINE2). Reprogram Timer and turn DVD+VCR...


