
User Guide
Page 2
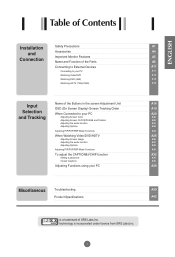
.../1080i) A15 Input Selection and Tracking Name of the Buttons in the screen Adjustment Unit OSD (On Screen Display) Screen Tracking Order When Connected to your PC Adjusting Screen Color Adjusting Screen CLOCK/PHASE and Position Adjusting the audio function Adjusting Options Adjusting PIP/POP/PBP Mode Functions When Watching Video/DVD/HDTV Adjusting Screen Image Adjusting the audio function Adjusting Options Adjusting PIP/POP/PBP Mode Functions To adjust the CAPTION&VCHIP function Setting a password Closed Captions Adjusting Functions using your PC A16...
.../1080i) A15 Input Selection and Tracking Name of the Buttons in the screen Adjustment Unit OSD (On Screen Display) Screen Tracking Order When Connected to your PC Adjusting Screen Color Adjusting Screen CLOCK/PHASE and Position Adjusting the audio function Adjusting Options Adjusting PIP/POP/PBP Mode Functions When Watching Video/DVD/HDTV Adjusting Screen Image Adjusting the audio function Adjusting Options Adjusting PIP/POP/PBP Mode Functions To adjust the CAPTION&VCHIP function Setting a password Closed Captions Adjusting Functions using your PC A16...

User Guide
Page 4
... the power cord with a grounding terminal designed for exclusive use the monitor for a long time, unplug the power cable from the monitor. - Precautions in use. - A2 Use a power bar with excessive force or put heavy objects on the wall. You may be electrocuted due to use with wet hands. ENGLISH Electrical Power Related Precautions Warning Make sure to connect the power cable to turn off . - Do not touch the power plug with...
... the power cord with a grounding terminal designed for exclusive use the monitor for a long time, unplug the power cable from the monitor. - Precautions in use. - A2 Use a power bar with excessive force or put heavy objects on the wall. You may be electrocuted due to use with wet hands. ENGLISH Electrical Power Related Precautions Warning Make sure to connect the power cable to turn off . - Do not touch the power plug with...
User Guide
Page 8
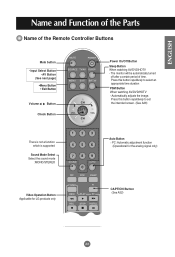
... the Remote Controller Buttons Mute button • Input Select Button • AV Button (See next page) •Menu Button • Exit Button Volume Button Check Button BRT.W Power On/Off Button Sleep Button When watching AV/DVD/HDTV - Press this button repetitively to set the intended screen. (See A26) There is not a function which is supported Sound Mode Select Select the sound mode : MONO/STEREO Video Operation Button Applicable for LG products only Auto Button PC: Automatic adjustment function (Operational for the analog signal...
... the Remote Controller Buttons Mute button • Input Select Button • AV Button (See next page) •Menu Button • Exit Button Volume Button Check Button BRT.W Power On/Off Button Sleep Button When watching AV/DVD/HDTV - Press this button repetitively to set the intended screen. (See A26) There is not a function which is supported Sound Mode Select Select the sound mode : MONO/STEREO Video Operation Button Applicable for LG products only Auto Button PC: Automatic adjustment function (Operational for the analog signal...
User Guide
Page 12
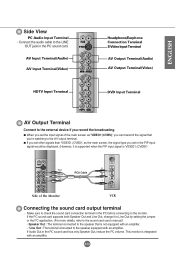
...)') R Red White RCA Cable W Yellow Y Side of the main screen as the main screen, the signal type you record the broadcasting. If the PC sound card supports both Speaker Out and Line Out, change it is supported when the PIP input signal is not equipped with an amplifier. - *Line Out : The terminal connected to the AV output terminal. ENGLISH Side View PC Audio Input Terminal - AV Input Terminal(Audio) AV Input Terminal(Video...
...)') R Red White RCA Cable W Yellow Y Side of the main screen as the main screen, the signal type you record the broadcasting. If the PC sound card supports both Speaker Out and Line Out, change it is supported when the PIP input signal is not equipped with an amplifier. - *Line Out : The terminal connected to the AV output terminal. ENGLISH Side View PC Audio Input Terminal - AV Input Terminal(Audio) AV Input Terminal(Video...

User Guide
Page 13
... of all, see if the computer, monitor and the peripherals are turned off. B When connecting with the DSub signal input cable. (IBM compatible PC) C When connecting with the DVI signal input cable. PC A PC MAC B C Macintosh Adapter (Optional) Use the standard Macintosh adapter since an incompatible adaptor is available in the market. (Different signaling system) Connect the power cord. A11 Rear side of the monitor. Connecting to External Devices When Connecting to a wall outlet.
... of all, see if the computer, monitor and the peripherals are turned off. B When connecting with the DSub signal input cable. (IBM compatible PC) C When connecting with the DVI signal input cable. PC A PC MAC B C Macintosh Adapter (Optional) Use the standard Macintosh adapter since an incompatible adaptor is available in the market. (Different signaling system) Connect the power cord. A11 Rear side of the monitor. Connecting to External Devices When Connecting to a wall outlet.

User Guide
Page 15
... Input Select button on the remote controller to External Devices When watching Video/DVD Connect the video cable as shown in the below figure and then connect the power cord (See page A11). Or, press the SOURCE button at the front side of the Monitor Video/DVD B When connecting with a S-Video cable. • Select VIDEO 2 (S-Video). BRT.W A When connecting with a proper color match. (Video - Connecting to select the input signal. A When connecting with an RCA cable. • Connect the input...
... Input Select button on the remote controller to External Devices When watching Video/DVD Connect the video cable as shown in the below figure and then connect the power cord (See page A11). Or, press the SOURCE button at the front side of the Monitor Video/DVD B When connecting with a S-Video cable. • Select VIDEO 2 (S-Video). BRT.W A When connecting with a proper color match. (Video - Connecting to select the input signal. A When connecting with an RCA cable. • Connect the input...

User Guide
Page 16
Press the Input Select button on the remote controller to select the input signal. ENGLISH When watching DVD (480i) Connect the video/audio cable as shown in the below figure and then, connect the power cord (See page A11). • Connect the input terminal with a DVD/audio cable. • Select DVD (Y, Cb, Cr) A14 BRT.W When connecting with a proper color match. Or, press the SOURCE button at the front side of the Monitor R W R B G DVD Select an input signal. Audio Cable Red (optional) White Red Blue Green DVD Cable (optional) Side of the monitor.
Press the Input Select button on the remote controller to select the input signal. ENGLISH When watching DVD (480i) Connect the video/audio cable as shown in the below figure and then, connect the power cord (See page A11). • Connect the input terminal with a DVD/audio cable. • Select DVD (Y, Cb, Cr) A14 BRT.W When connecting with a proper color match. Or, press the SOURCE button at the front side of the Monitor R W R B G DVD Select an input signal. Audio Cable Red (optional) White Red Blue Green DVD Cable (optional) Side of the monitor.
User Guide
Page 17
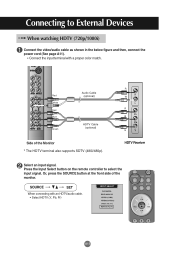
... connecting with a proper color match. Red White Red Blue Green Audio Cable (optional) HDTV Cable (optional) Side of the monitor. Press the Input Select button on the remote controller to External Devices When watching HDTV (720p/1080i) Connect the video/audio cable as shown in the below figure and then, connect the power cord (See page A11). • Connect the input terminal with an HDTV/audio cable. • Select HDTV (Y, Pb, Pr) A15 Connecting to select the input signal...
... connecting with a proper color match. Red White Red Blue Green Audio Cable (optional) HDTV Cable (optional) Side of the monitor. Press the Input Select button on the remote controller to External Devices When watching HDTV (720p/1080i) Connect the video/audio cable as shown in the below figure and then, connect the power cord (See page A11). • Connect the input terminal with an HDTV/audio cable. • Select HDTV (Y, Pb, Pr) A15 Connecting to select the input signal...

User Guide
Page 18
...; Use this indicator color changes to amber. OSD Select Adjust Button • Use the button to select an icon or adjust the setting in the Screen Adjustment Unit ENGLISH Power Button • Press the button to turn it off. A16 MENU Button • Use this button to show/hide the OSD (On Screen Display) menu screen. Press the button again to turn on the power. Selecting and Adjusting the Screen Name of the PC signal (DSUB/DVI). • Adjust the volume. Power LED • This Indicator lights up green...
...; Use this indicator color changes to amber. OSD Select Adjust Button • Use the button to select an icon or adjust the setting in the Screen Adjustment Unit ENGLISH Power Button • Press the button to turn it off. A16 MENU Button • Use this button to show/hide the OSD (On Screen Display) menu screen. Press the button again to turn on the power. Selecting and Adjusting the Screen Name of the PC signal (DSUB/DVI). • Adjust the volume. Power LED • This Indicator lights up green...

User Guide
Page 19
...) DVI digital signal 15-pin D-Sub analog signal Composite video S-Video DVD HD television • The unit that DSUB] • The current signal and mode information will be displayed. PAGE A32 A17 Selecting and Adjusting the Screen Name of the Buttons in the Screen Adjustment Unit AUTO/SELECT Button [For DSUB signal] • Select the icon to adjust on /off the monitor. OSD Lock/Unlock Button Menu button + Use this button to lock/unlock the OSD screen adjustment with the 'KEY LOCK' tab. Main Power Switch...
...) DVI digital signal 15-pin D-Sub analog signal Composite video S-Video DVD HD television • The unit that DSUB] • The current signal and mode information will be displayed. PAGE A32 A17 Selecting and Adjusting the Screen Name of the Buttons in the Screen Adjustment Unit AUTO/SELECT Button [For DSUB signal] • Select the icon to adjust on /off the monitor. OSD Lock/Unlock Button Menu button + Use this button to lock/unlock the OSD screen adjustment with the 'KEY LOCK' tab. Main Power Switch...
User Guide
Page 22
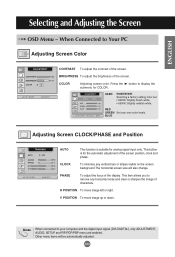
... focus of the screen position, clock and phase. BLUE Adjusting Screen CLOCK/PHASE and Position AUTO This function is for COLOR. CLOCK To minimize any horizontal noise and clear or sharpen the image of characters. V POSITION To move image left or right. Other menu items will also change. H POSITION To move image up or down. BRIGHTNESS To adjust the brightness of the screen. COLOR Adjusting screen color. RED GREEN Set your computer and the digital input signal (DVI-DIGITAL), only ADJUSTMENT, AUDIO, SETUP and PIP...
... focus of the screen position, clock and phase. BLUE Adjusting Screen CLOCK/PHASE and Position AUTO This function is for COLOR. CLOCK To minimize any horizontal noise and clear or sharpen the image of characters. V POSITION To move image left or right. Other menu items will also change. H POSITION To move image up or down. BRIGHTNESS To adjust the brightness of the screen. COLOR Adjusting screen color. RED GREEN Set your computer and the digital input signal (DVI-DIGITAL), only ADJUSTMENT, AUDIO, SETUP and PIP...

User Guide
Page 25
... of the source. Use the buttons to adjust the item to display the submenu for PIP. PIP CONTRAST Adjust PIP screen contrast. PIP TINT Adjust the PIP screen tint. * The sub-menu can be adjusted. PIP SHARPNESS Adjust PIP screen sharpness. A23 PIP SOUND PIP SWAP PIP POSITION Adjust the PIP screen position. PIP BRIGHTNESS Adjust PIP screen brightness. Selecting and Adjusting the Screen Adjusting PIP/POP/PBP Mode (Multiple Screen) Functions To adjust the PIP(PICTURE IN PICTURE) of the screen DVI DIGITAL PIP...
... of the source. Use the buttons to adjust the item to display the submenu for PIP. PIP CONTRAST Adjust PIP screen contrast. PIP TINT Adjust the PIP screen tint. * The sub-menu can be adjusted. PIP SHARPNESS Adjust PIP screen sharpness. A23 PIP SOUND PIP SWAP PIP POSITION Adjust the PIP screen position. PIP BRIGHTNESS Adjust PIP screen brightness. Selecting and Adjusting the Screen Adjusting PIP/POP/PBP Mode (Multiple Screen) Functions To adjust the PIP(PICTURE IN PICTURE) of the screen DVI DIGITAL PIP...

User Guide
Page 26
... disabled if the POP screen input is a PC signal. Adjust POP screen sharpness. POP SOUND POP SWAP To turn the POP sound on/off. Adjust the POP screen color. POP IMAGE To adjust the image of the input signal. Note The 'POP IMAGE' menu will be adjusted. POP SOURCE To select an input signal for POP IMAGE. Press the button to the desired level. ENGLISH Adjusting PIP/POP/PBP Mode (Multiple Screen) Functions To adjust the POP(PICTURE OUT PICTURE) of the screen DVI DIGITAL...
... disabled if the POP screen input is a PC signal. Adjust POP screen sharpness. POP SOUND POP SWAP To turn the POP sound on/off. Adjust the POP screen color. POP IMAGE To adjust the image of the input signal. Note The 'POP IMAGE' menu will be adjusted. POP SOURCE To select an input signal for POP IMAGE. Press the button to the desired level. ENGLISH Adjusting PIP/POP/PBP Mode (Multiple Screen) Functions To adjust the POP(PICTURE OUT PICTURE) of the screen DVI DIGITAL...

User Guide
Page 27
... IMAGE' menu will be adjusted. A25 Use the buttons to adjust the item to display the submenu for PBP. PBP SIZE To adjust the size of the PBP screen. (FULL/4:3) PBP IMAGE To adjust the image of the source. Adjust PBP screen brightness. Press the button to the desired level. Adjust PBP screen sharpness. Adjust the PBP screen tint. * The sub-menu can be disabled if the PBP screen input is a PC signal. PBP SOUND PBP SWAP To turn the...
... IMAGE' menu will be adjusted. A25 Use the buttons to adjust the item to display the submenu for PBP. PBP SIZE To adjust the size of the PBP screen. (FULL/4:3) PBP IMAGE To adjust the image of the source. Adjust PBP screen brightness. Press the button to the desired level. Adjust PBP screen sharpness. Adjust the PBP screen tint. * The sub-menu can be disabled if the PBP screen input is a PC signal. PBP SOUND PBP SWAP To turn the...

User Guide
Page 32
... IMAGE To adjust the image of the POP screen; POP CONTRAST Adjust POP screen contrast. POP BRIGHTNESS Adjust POP screen brightness. * The sub-menu can be disabled if the POP screen input is video. Note The 'POP IMAGE' menu will be adjusted. Use the buttons to adjust the item to the type of the input signal. Press the button to display the submenu for POP. POP SOUND POP SWAP To turn the POP sound on/off. A30 To switch the main-screen...
... IMAGE To adjust the image of the POP screen; POP CONTRAST Adjust POP screen contrast. POP BRIGHTNESS Adjust POP screen brightness. * The sub-menu can be disabled if the POP screen input is video. Note The 'POP IMAGE' menu will be adjusted. Use the buttons to adjust the item to the type of the input signal. Press the button to display the submenu for POP. POP SOUND POP SWAP To turn the POP sound on/off. A30 To switch the main-screen...
User Guide
Page 34
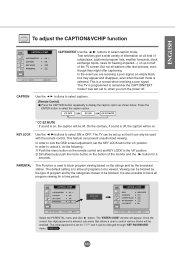
... a time period. KEY LOCK Use the buttons to select caption mode. In order to lock the OSD screen adjustment, set the KEY LOCK tab to the 'on up so that allows a user to the 'off' position. 2) Simultaenously push the menu button on , the caption will be set KEY LOCK to control various blocks will appear. The 'ENTER CODE' window will be changed through 'SET PASSWORD' menu. In the event you turn the power off , the...
... a time period. KEY LOCK Use the buttons to select caption mode. In order to lock the OSD screen adjustment, set the KEY LOCK tab to the 'on up so that allows a user to the 'off' position. 2) Simultaenously push the menu button on , the caption will be set KEY LOCK to control various blocks will appear. The 'ENTER CODE' window will be changed through 'SET PASSWORD' menu. In the event you turn the power off , the...
User Guide
Page 36
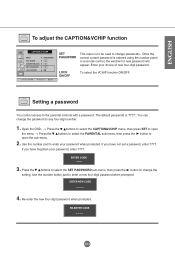
... using the number panel in a remote control, the window for new password will appear. Use the number pad to enter your choice of new four-digit password. Setting a password You control access to 2. A34 Once the correct current password is '7777'. LOCK ON/OFF To select the VCHIP function ON/OFF. ENGLISH To adjust the CAPTION&VCHIP function SET PASSWORD This menu is to be used to change the password to any four-digit number. 1. Open the OSD...
... using the number panel in a remote control, the window for new password will appear. Use the number pad to enter your choice of new four-digit password. Setting a password You control access to 2. A34 Once the correct current password is '7777'. LOCK ON/OFF To select the VCHIP function ON/OFF. ENGLISH To adjust the CAPTION&VCHIP function SET PASSWORD This menu is to be used to change the password to any four-digit number. 1. Open the OSD...
User Guide
Page 41
... resolution D-Sub : 1280x1024 @60Hz DVI-D : 1280x1024 @60Hz Does the 'CHECK SIGNAL CABLE' message appear? • The signal cable between PC and monitor is not connected. Does the power LED is turned on? • See if the power switch is turned on , power LED is green but the screen appears extremely dark. • Adjust brightness ( ) and contrast ( ) again. Did you install the driver? • Install the monitor driver, which is provided with the monitor, or download it from the PC (video card...
... resolution D-Sub : 1280x1024 @60Hz DVI-D : 1280x1024 @60Hz Does the 'CHECK SIGNAL CABLE' message appear? • The signal cable between PC and monitor is not connected. Does the power LED is turned on? • See if the power switch is turned on , power LED is green but the screen appears extremely dark. • Adjust brightness ( ) and contrast ( ) again. Did you install the driver? • Install the monitor driver, which is provided with the monitor, or download it from the PC (video card...
User Guide
Page 42
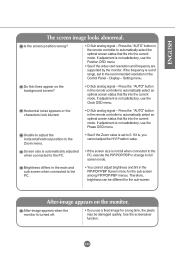
... horizontal/vertical position in the remote controller to automatically select the optimal screen status that fits into the current mode. After-image appears when the monitor is set to automatically select an optimal screen status that fits into the current mode. Setting menu. Is the screen position wrong? • D-Sub analog signal - Screen size is automatically adjusted when connected to the PC. • If the screen size is not satisfactory, use the Position OSD menu. • See if the video card resolution and frequency...
... horizontal/vertical position in the remote controller to automatically select the optimal screen status that fits into the current mode. After-image appears when the monitor is set to automatically select an optimal screen status that fits into the current mode. Setting menu. Is the screen position wrong? • D-Sub analog signal - Screen size is automatically adjusted when connected to the PC. • If the screen size is not satisfactory, use the Position OSD menu. • See if the video card resolution and frequency...

User Guide
Page 43
... use . Troubleshooting The audio function does not work . Screen color is set to more than 24 bits (true color) Select Control Panel - No sound? • See if the audio cable is connected properly. • Adjust the volume. • See if the sound is abnormal. It is too low. • Adjust the volume. Sound is not a malfunction of colors to On in Windows. Do black spots appear on the screen? • Several pixels (red, green, white or black color) may not work...
... use . Troubleshooting The audio function does not work . Screen color is set to more than 24 bits (true color) Select Control Panel - No sound? • See if the audio cable is connected properly. • Adjust the volume. • See if the sound is abnormal. It is too low. • Adjust the volume. Sound is not a malfunction of colors to On in Windows. Do black spots appear on the screen? • Several pixels (red, green, white or black color) may not work...


