
Owner's Manual
Page 7
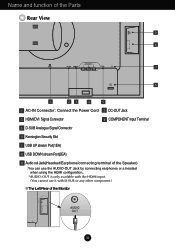
Name and function of the Parts Rear View 9 8 OUT AUDIO 2 1 COMPONENT AC-IN DC-OUT HDMI/DVI Y PB PR D-SUB 7 6 1 23 4 5 1 AC-IN Connector : Connect the Power Cord 2 DC-OUT Jack 3 HDMI/DVI Signal Connector 4 COMPONENT Input Terminal 5 D-SUB Analogue Signal Connector 6 Kensington Security Slot 7 USB UP stream Port(1EA) 8 USB DOWN stream...
Name and function of the Parts Rear View 9 8 OUT AUDIO 2 1 COMPONENT AC-IN DC-OUT HDMI/DVI Y PB PR D-SUB 7 6 1 23 4 5 1 AC-IN Connector : Connect the Power Cord 2 DC-OUT Jack 3 HDMI/DVI Signal Connector 4 COMPONENT Input Terminal 5 D-SUB Analogue Signal Connector 6 Kensington Security Slot 7 USB UP stream Port(1EA) 8 USB DOWN stream...
Owner's Manual
Page 8
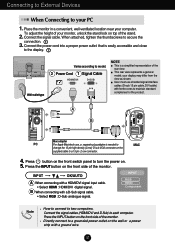
... row connector. 4. Connect the 1 power cord into a proper power outlet that is easily accessible and close to the display. 2 DC-OUT HDMI/DVI COMPONENT Y PB PR D-SUB Wall-outlet type 1 2 AUDIO OUT Varies according to model. 2 Power Cord 1 Signal Cable NOTE This is needed ... rear view represents a general model; A B Mac adapter PC For Apple Macintosh use shielded signal interface cables (D-sub 15 pin cable, DVI cable) with ferrite cores to maintain standard compliance for the product. Connecting to External Devices When Connecting to your monitor, unlock the stand...
... row connector. 4. Connect the 1 power cord into a proper power outlet that is easily accessible and close to the display. 2 DC-OUT HDMI/DVI COMPONENT Y PB PR D-SUB Wall-outlet type 1 2 AUDIO OUT Varies according to model. 2 Power Cord 1 Signal Cable NOTE This is needed ... rear view represents a general model; A B Mac adapter PC For Apple Macintosh use shielded signal interface cables (D-sub 15 pin cable, DVI cable) with ferrite cores to maintain standard compliance for the product. Connecting to External Devices When Connecting to your monitor, unlock the stand...
Owner's Manual
Page 9
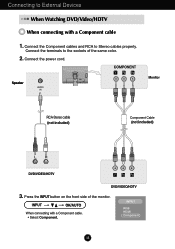
.../Video/HDTV When connecting with a Component cable. • Select Component. Connect the terminals to the sockets of the monitor. Speaker AUDIO IN DC-OUT HDMI/DVI COMPONENT Y PB PR D-SUB 1 2 AUDIO OUT PB PR PB PR Monitor RCA-Stereo cable (not included) Component Cable (not included) DVD/VIDEO/HDTV PB PR...
.../Video/HDTV When connecting with a Component cable. • Select Component. Connect the terminals to the sockets of the monitor. Speaker AUDIO IN DC-OUT HDMI/DVI COMPONENT Y PB PR D-SUB 1 2 AUDIO OUT PB PR PB PR Monitor RCA-Stereo cable (not included) Component Cable (not included) DVD/VIDEO/HDTV PB PR...
Owner's Manual
Page 10
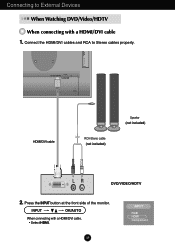
Connecting to Stereo cables properly. INPUT OK/AUTO When connecting with a HDMI/DVI cable 1. A9 INPUT RGB HDMI Component Connect the HDMI/DVI cables and RCA to External Devices When Watching DVD/Video/HDTV When connecting with a HDMI/DVI cable. • Select HDMI. COMPONENT DC-OUT HDMI/DVI Y PB PR D-SUB OUT AUDIO 2 1 HDMI/DVI cable RCA-Stereo cable (not included) Speaker (not included) DVD/VIDEO/HDTV 2. Press the INPUT button at the front side of the monitor.
Connecting to Stereo cables properly. INPUT OK/AUTO When connecting with a HDMI/DVI cable 1. A9 INPUT RGB HDMI Component Connect the HDMI/DVI cables and RCA to External Devices When Watching DVD/Video/HDTV When connecting with a HDMI/DVI cable. • Select HDMI. COMPONENT DC-OUT HDMI/DVI Y PB PR D-SUB OUT AUDIO 2 1 HDMI/DVI cable RCA-Stereo cable (not included) Speaker (not included) DVD/VIDEO/HDTV 2. Press the INPUT button at the front side of the monitor.
Owner's Manual
Page 11
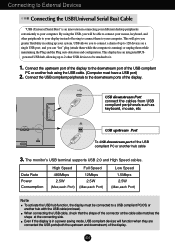
... matches the shape at the connecting side. USB downstream Port connect the cables from USB compliant peripherals such as keyboard, mouse, etc OUT AUDIO 2 1 MI/DVI COMPONENT Y PB PR D-SUB USB upstream Port To USB downstream port of the display. This display has an integrated BUSpowered USB hub, allowing up to...
... matches the shape at the connecting side. USB downstream Port connect the cables from USB compliant peripherals such as keyboard, mouse, etc OUT AUDIO 2 1 MI/DVI COMPONENT Y PB PR D-SUB USB upstream Port To USB downstream port of the display. This display has an integrated BUSpowered USB hub, allowing up to...
Owner's Manual
Page 12
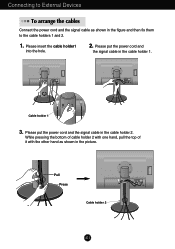
... shown in the figure and then fix them to the cable holders 1 and 2. 1. OUT AUDIO 2 1 Pull Press Cable holder 2 DC-OUT HDMI/DVI COMPONENT Y PB PR D-SUB A11 Please put the power cord and the signal cable in the cable holder 1. Please insert the cable holder1 into the... and the signal cable in the cable holder 2. OUT AUDIO OUT AUDIO 2 2 1 1 DC-OUT HDMI/DVI COMPONENT Y PB PR D-SUB DC-OUT HDMI/DVI COMPONENT Y PB PR D-SUB C DC-OUT HDMI/DVI Y Cable holder 1 3. Connecting to External Devices To arrange the cables Connect the power cord and the signal ...
... shown in the figure and then fix them to the cable holders 1 and 2. 1. OUT AUDIO 2 1 Pull Press Cable holder 2 DC-OUT HDMI/DVI COMPONENT Y PB PR D-SUB A11 Please put the power cord and the signal cable in the cable holder 1. Please insert the cable holder1 into the... and the signal cable in the cable holder 2. OUT AUDIO OUT AUDIO 2 2 1 1 DC-OUT HDMI/DVI COMPONENT Y PB PR D-SUB DC-OUT HDMI/DVI COMPONENT Y PB PR D-SUB C DC-OUT HDMI/DVI Y Cable holder 1 3. Connecting to External Devices To arrange the cables Connect the power cord and the signal ...
Owner's Manual
Page 13
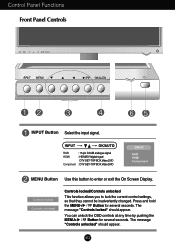
INPUT OK/AUTO RGB HDMI Component : 15-pin D-SUB analogue signal : HDMI/DVI digital signal DTV SET-TOP BOX,Video,DVD : DTV SET-TOP BOX,Video,DVD INPUT RGB HDMI Component MENU Button Use this button to lock ...
INPUT OK/AUTO RGB HDMI Component : 15-pin D-SUB analogue signal : HDMI/DVI digital signal DTV SET-TOP BOX,Video,DVD : DTV SET-TOP BOX,Video,DVD INPUT RGB HDMI Component MENU Button Use this button to lock ...
Owner's Manual
Page 14
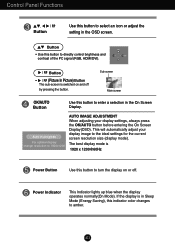
... amber. If the display is 1920 x 1200@60Hz Power Button Use this button to directly control brightness and contrast of the PC signal (RGB, HDMI/DVI). Button • (Picture In Picture) Button The sub-screen is switched on or off by pressing the button. This will automatically adjust your display image...
... amber. If the display is 1920 x 1200@60Hz Power Button Use this button to directly control brightness and contrast of the PC signal (RGB, HDMI/DVI). Button • (Picture In Picture) Button The sub-screen is switched on or off by pressing the button. This will automatically adjust your display image...

Owner's Manual
Page 26
... (Automatic) 56 - 75 Hz (Automatic) Separate Sync., Composite SOG (Sync On Green), Digital(HDCP) Video Input Signal Input Input Form 15 pin D-Sub Connector HDMI/DVI connector(Digital), Component RGB Analog (0.7 Vp-p/ 75 ohm), Digital Resolution Max Recommend Analog : VESA 1920 x 1200 @60Hz Digital : VESA 1920 x 1200 @60Hz VESA 1920 x 1200...
... (Automatic) 56 - 75 Hz (Automatic) Separate Sync., Composite SOG (Sync On Green), Digital(HDCP) Video Input Signal Input Input Form 15 pin D-Sub Connector HDMI/DVI connector(Digital), Component RGB Analog (0.7 Vp-p/ 75 ohm), Digital Resolution Max Recommend Analog : VESA 1920 x 1200 @60Hz Digital : VESA 1920 x 1200 @60Hz VESA 1920 x 1200...
Owner's Manual
Page 28
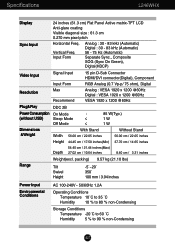
Specifications L246WHX Display Sync Input 24 inches (61.3 cm) Flat Panel Active matrix-TFT LCD Anti-glare coating Visible diagonal size : 61.3 cm 0.270 mm pixel pitch ... (Automatic) 56 - 75 Hz (Automatic) Separate Sync., Composite SOG (Sync On Green), Digital(HDCP) Video Input Signal Input Input Form 15 pin D-Sub Connector HDMI/DVI connector(Digital), Component RGB Analog (0.7 Vp-p/ 75 ohm), Digital Resolution Max Recommend Analog : VESA 1920 x 1200 @60Hz Digital : VESA 1920 x 1200 @60Hz VESA 1920 x 1200...
Specifications L246WHX Display Sync Input 24 inches (61.3 cm) Flat Panel Active matrix-TFT LCD Anti-glare coating Visible diagonal size : 61.3 cm 0.270 mm pixel pitch ... (Automatic) 56 - 75 Hz (Automatic) Separate Sync., Composite SOG (Sync On Green), Digital(HDCP) Video Input Signal Input Input Form 15 pin D-Sub Connector HDMI/DVI connector(Digital), Component RGB Analog (0.7 Vp-p/ 75 ohm), Digital Resolution Max Recommend Analog : VESA 1920 x 1200 @60Hz Digital : VESA 1920 x 1200 @60Hz VESA 1920 x 1200...


