
Owner's Manual
Page 4
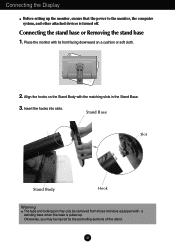
... its front facing downward on the Stand Body with a standing base when the base is pulled up the monitor, ensure that the power to the monitor, the computer system, and other attached devices is turned off. Stand Base Slot Stand Body Hook Warning The tape and locking pin may be ...removed from those monitors equipped with the matching slots in the Stand Base. 3. Align the hooks on a cushion or soft cloth. 2. Connecting the stand base or Removing the ...
... its front facing downward on the Stand Body with a standing base when the base is pulled up the monitor, ensure that the power to the monitor, the computer system, and other attached devices is turned off. Stand Base Slot Stand Body Hook Warning The tape and locking pin may be ...removed from those monitors equipped with the matching slots in the Stand Base. 3. Align the hooks on a cushion or soft cloth. 2. Connecting the stand base or Removing the ...
Owner's Manual
Page 5
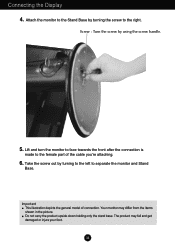
... the cable you're attaching. 6. Do not carry the product upside down holding only the stand base. Attach the monitor to the Stand Base by turning to the left to separate the monitor and Stand Base. The product may differ from the items shown in the picture. Connecting the Display 4. Take the... screw out by turning the screw to the female part of connection. A4 Screw : Turn the screw by using the screw handle. 5. Your monitor may fall and get damaged or injure your foot.
... the cable you're attaching. 6. Do not carry the product upside down holding only the stand base. Attach the monitor to the Stand Base by turning to the left to separate the monitor and Stand Base. The product may differ from the items shown in the picture. Connecting the Display 4. Take the... screw out by turning the screw to the female part of connection. A4 Screw : Turn the screw by using the screw handle. 5. Your monitor may fall and get damaged or injure your foot.
Owner's Manual
Page 6
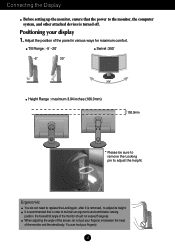
... 3.94 inches (100.0mm) 100.0mm * Please be sure to remove the Locking pin to the monitor, the computer system, and other attached devices is turned off. Connecting the Display Before setting up the monitor, ensure that in order to adjust its height. Adjust the position of the panel in between the... head of the monitor and the stand body. It is removed, to maintain an ergonomic and comfortable viewing position, the forward tilt angle of the screen, do not need ...
... 3.94 inches (100.0mm) 100.0mm * Please be sure to remove the Locking pin to the monitor, the computer system, and other attached devices is turned off. Connecting the Display Before setting up the monitor, ensure that in order to adjust its height. Adjust the position of the panel in between the... head of the monitor and the stand body. It is removed, to maintain an ergonomic and comfortable viewing position, the forward tilt angle of the screen, do not need ...
Owner's Manual
Page 7
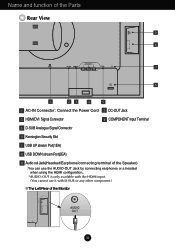
... configuration.. *AUDIO-OUT is only available with the HDMI input. (You cannot use it with D-SUB or any other component.) The Left Rear of the Monitor OUT AUDIO 2 1 AUDIO OUT UB A6
... configuration.. *AUDIO-OUT is only available with the HDMI input. (You cannot use it with D-SUB or any other component.) The Left Rear of the Monitor OUT AUDIO 2 1 AUDIO OUT UB A6
Owner's Manual
Page 8
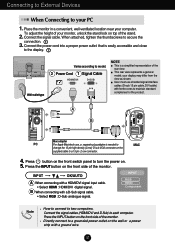
... signal input cable. • Select HDMI : HDMI/DVI digital signal. INPUT RGB HDMI Component Note How to connect to your monitor, unlock the stand lock on the front side of the monitor. Connect the signal cable. your computer. INPUT OK/AUTO A When connecting with a D-Sub signal cable. • Select RGB :..., a separate plug adapter is needed to MAC change the 15 pin high density (3 row) D-sub VGA connector on the front side of the monitor. Press the INPUT button on the supplied cable to secure the 3. Connect the signal cables (HDMI/DVI and D-Sub) to each computer.
... signal input cable. • Select HDMI : HDMI/DVI digital signal. INPUT RGB HDMI Component Note How to connect to your monitor, unlock the stand lock on the front side of the monitor. Connect the signal cable. your computer. INPUT OK/AUTO A When connecting with a D-Sub signal cable. • Select RGB :..., a separate plug adapter is needed to MAC change the 15 pin high density (3 row) D-sub VGA connector on the front side of the monitor. Press the INPUT button on the supplied cable to secure the 3. Connect the signal cables (HDMI/DVI and D-Sub) to each computer.
Owner's Manual
Page 9
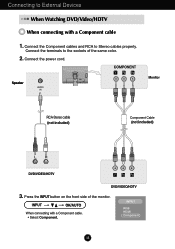
Speaker AUDIO IN DC-OUT HDMI/DVI COMPONENT Y PB PR D-SUB 1 2 AUDIO OUT PB PR PB PR Monitor RCA-Stereo cable (not included) Component Cable (not included) DVD/VIDEO/HDTV PB PR PB PR DVD/VIDEO/HDTV 3. Connect the power cord. Press the ...; Select Component. INPUT RGB HDMI Component A8 Connect the terminals to Stereo cables properly. Connect the Component cables and RCA to the sockets of the monitor.
Speaker AUDIO IN DC-OUT HDMI/DVI COMPONENT Y PB PR D-SUB 1 2 AUDIO OUT PB PR PB PR Monitor RCA-Stereo cable (not included) Component Cable (not included) DVD/VIDEO/HDTV PB PR PB PR DVD/VIDEO/HDTV 3. Connect the power cord. Press the ...; Select Component. INPUT RGB HDMI Component A8 Connect the terminals to Stereo cables properly. Connect the Component cables and RCA to the sockets of the monitor.
Owner's Manual
Page 10
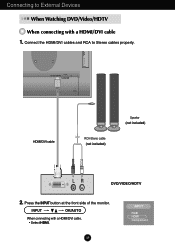
INPUT OK/AUTO When connecting with a HDMI/DVI cable 1. Press the INPUT button at the front side of the monitor. Connecting to Stereo cables properly. Connect the HDMI/DVI cables and RCA to External Devices When Watching DVD/Video/HDTV When connecting with a HDMI/DVI cable. • Select HDMI. COMPONENT DC-OUT HDMI/DVI Y PB PR D-SUB OUT AUDIO 2 1 HDMI/DVI cable RCA-Stereo cable (not included) Speaker (not included) DVD/VIDEO/HDTV 2. A9 INPUT RGB HDMI Component
INPUT OK/AUTO When connecting with a HDMI/DVI cable 1. Press the INPUT button at the front side of the monitor. Connecting to Stereo cables properly. Connect the HDMI/DVI cables and RCA to External Devices When Watching DVD/Video/HDTV When connecting with a HDMI/DVI cable. • Select HDMI. COMPONENT DC-OUT HDMI/DVI Y PB PR D-SUB OUT AUDIO 2 1 HDMI/DVI cable RCA-Stereo cable (not included) Speaker (not included) DVD/VIDEO/HDTV 2. A9 INPUT RGB HDMI Component
Owner's Manual
Page 11
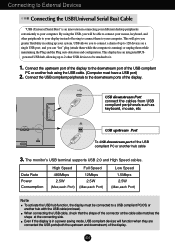
... give you to it. 1. Connect the upstream port of the display to the downstream port of having to 120 devices on a single USB port; The monitor's USB terminal supports USB 2.0 and High Speed cables. When connecting the USB cable, check that the shape of the display. A10 USB allows you greater...
... give you to it. 1. Connect the upstream port of the display to the downstream port of having to 120 devices on a single USB port; The monitor's USB terminal supports USB 2.0 and High Speed cables. When connecting the USB cable, check that the shape of the display. A10 USB allows you greater...
Owner's Manual
Page 19
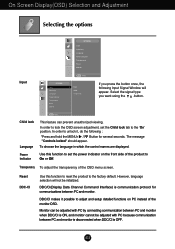
...the front side of the OSD menu screen. Child lock Language Power indicator This feature can be adjusted with PC because communication between PC and monitor. To choose the language in which the control names are displayed. The message "Controls locked" should appear. Reset DDC-CI Use this .... In order to lock the OSD screen adjustment, set the Child lock tab to set the power indicator on PC instead of the monitor OSD. On Screen Display(OSD) Selection and Adjustment Selecting the options Input Input Child lock Language Power indicator Transparency Reset DDC-CI Input ...
...the front side of the OSD menu screen. Child lock Language Power indicator This feature can be adjusted with PC because communication between PC and monitor. To choose the language in which the control names are displayed. The message "Controls locked" should appear. Reset DDC-CI Use this .... In order to lock the OSD screen adjustment, set the Child lock tab to set the power indicator on PC instead of the monitor OSD. On Screen Display(OSD) Selection and Adjustment Selecting the options Input Input Child lock Language Power indicator Transparency Reset DDC-CI Input ...
Owner's Manual
Page 25
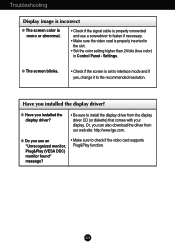
... driver from the display driver CD (or diskette) that comes with your display. G Do you installed the display driver? Settings. Have you see an "Unrecognized monitor, Plug&Play (VESA DDC) monitor found" message? • Make sure to check if the video card supports Plug&Play function.
... driver from the display driver CD (or diskette) that comes with your display. G Do you installed the display driver? Settings. Have you see an "Unrecognized monitor, Plug&Play (VESA DDC) monitor found" message? • Make sure to check if the video card supports Plug&Play function.
Owner's Manual
Page 31
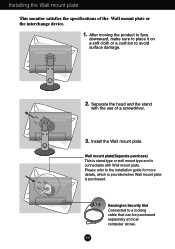
... provided when Wall mount plate is connectable with the use of the Wall mount plate or the interchange device. 1. Installing the Wall mount plate This monitor satisfies the specifications of a screwdriver. 3.
... provided when Wall mount plate is connectable with the use of the Wall mount plate or the interchange device. 1. Installing the Wall mount plate This monitor satisfies the specifications of a screwdriver. 3.


