

User Guide
Page 3
...a bathtub, washbowl, kitchen sink, laundry tub, in a fire hazard. On Disposal The fluorescent lamp used under any mode except the recommended resolution, some afterimages. Displays are blocked, built-up heat can cause failures which to obtain the best image quality for a long time as Red...the display near a swimming pool. On Cleaning Unplug the display before cleaning the face of mercury. A2 Do not use the recommended resolution to transport the unit. If these openings are provided with ventilation openings in its original material. Do not press the LCD screen with...
...a bathtub, washbowl, kitchen sink, laundry tub, in a fire hazard. On Disposal The fluorescent lamp used under any mode except the recommended resolution, some afterimages. Displays are blocked, built-up heat can cause failures which to obtain the best image quality for a long time as Red...the display near a swimming pool. On Cleaning Unplug the display before cleaning the face of mercury. A2 Do not use the recommended resolution to transport the unit. If these openings are provided with ventilation openings in its original material. Do not press the LCD screen with...
User Guide
Page 8
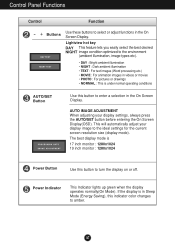
Control Panel Functions Control Function - + Buttons Use these buttons to the ideal settings for the current screen resolution size (display mode). This will automatically adjust your display settings, always press the AUTO/SET button before entering the On Screen Display(OSD). A7 If ...
Control Panel Functions Control Function - + Buttons Use these buttons to the ideal settings for the current screen resolution size (display mode). This will automatically adjust your display settings, always press the AUTO/SET button before entering the On Screen Display(OSD). A7 If ...
User Guide
Page 15
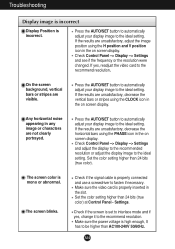
... to automatically adjust your display image to fasten if necessary. Check Control Panel --> Display --> Settings and see if the frequency or the resolution were changed. If the results are not clearly portrayed. Check if the screen is properly connected and use a screwdriver to the ideal setting... the PHASE icon in the slot. Check Control Panel --> Display --> Settings and adjust the display to the recommended resolution or adjust the display image to the recommend resolution. Make sure the video card is high enough, It has to the ideal setting. The screen blinks. Settings....
... to automatically adjust your display image to fasten if necessary. Check Control Panel --> Display --> Settings and see if the frequency or the resolution were changed. If the results are not clearly portrayed. Check if the screen is properly connected and use a screwdriver to the ideal setting... the PHASE icon in the slot. Check Control Panel --> Display --> Settings and adjust the display to the recommended resolution or adjust the display image to the recommend resolution. Make sure the video card is high enough, It has to the ideal setting. The screen blinks. Settings....
User Guide
Page 17
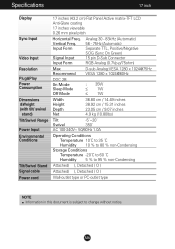
Vertical Freq. Specifications 17 inch Display Sync Input Video Input Resolution Plug&Play Power Consumption Dimensions &Weight (with tilt/ swivel stand) Tilt/Swivel Range Power Input Environmental Conditions Tilt/Swivel Stand Signal cable Power cord 17 ...
Vertical Freq. Specifications 17 inch Display Sync Input Video Input Resolution Plug&Play Power Consumption Dimensions &Weight (with tilt/ swivel stand) Tilt/Swivel Range Power Input Environmental Conditions Tilt/Swivel Stand Signal cable Power cord 17 ...
User Guide
Page 18
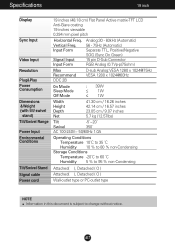
Specifications 19 inch Display Sync Input Video Input Resolution Plug&Play Power Consumption Dimensions &Weight (with tilt/ swivel stand) Tilt/Swivel Range Power Input Environmental Conditions Tilt/Swivel Stand Signal cable Power cord 19 ...
Specifications 19 inch Display Sync Input Video Input Resolution Plug&Play Power Consumption Dimensions &Weight (with tilt/ swivel stand) Tilt/Swivel Range Power Input Environmental Conditions Tilt/Swivel Stand Signal cable Power cord 19 ...

User Guide
Page 19
Specifications Preset Modes (Resolution) Display Modes (Resolution) 1 VGA 640 x 350 2 VGA 720 x 400 3 VGA 640 x 480 4 VESA 640 x 480 5 VESA 800 x 600 6 VESA 800 x 600 7 MAC 832 x 624 8 VESA 1024 x 768 9 VESA 1024 x 768 10 MAC 1152 x 870 11 VESA 1152 x 900 12 VESA 1280 x 1024 13 VESA 1280 x 1024 Horizontal Freq. (kHz) 31.469 31.468 31.469 37.500 37.879 46.875 49.725 48.363 60.023 68.681 61.805 63.981 79.976 Indicator MODE On Mode Sleep Mode Off Mode LED Color green amber Off Vertical Freq. (Hz) 70 70 60 75 60 75 75 60 75 75 65 60 75 A18
Specifications Preset Modes (Resolution) Display Modes (Resolution) 1 VGA 640 x 350 2 VGA 720 x 400 3 VGA 640 x 480 4 VESA 640 x 480 5 VESA 800 x 600 6 VESA 800 x 600 7 MAC 832 x 624 8 VESA 1024 x 768 9 VESA 1024 x 768 10 MAC 1152 x 870 11 VESA 1152 x 900 12 VESA 1280 x 1024 13 VESA 1280 x 1024 Horizontal Freq. (kHz) 31.469 31.468 31.469 37.500 37.879 46.875 49.725 48.363 60.023 68.681 61.805 63.981 79.976 Indicator MODE On Mode Sleep Mode Off Mode LED Color green amber Off Vertical Freq. (Hz) 70 70 60 75 60 75 75 60 75 75 65 60 75 A18
Service Manual
Page 3
...;min., -70°(Typ) Right : +60°min., +70°(Typ) Top :+45°min., +60°(Typ) Bottom : -50°min., -60°(Typ) 2-2. Resolution D-sub Analog : 1280 x 1024@75Hz 5. CONTENTS SPECIFICATIONS ...2 PRECAUTIONS ...3 TIMING CHART ...7 DISASSEMBLY ...8 BLOCK DIAGRAM ...9 DESCRIPTION OF BLOCK DIAGRAM...10 ADJUSTMENT ...12 SERVICE OSD ...13 TROUBLESHOOTING GUIDE...
...;min., -70°(Typ) Right : +60°min., +70°(Typ) Top :+45°min., +60°(Typ) Bottom : -50°min., -60°(Typ) 2-2. Resolution D-sub Analog : 1280 x 1024@75Hz 5. CONTENTS SPECIFICATIONS ...2 PRECAUTIONS ...3 TIMING CHART ...7 DISASSEMBLY ...8 BLOCK DIAGRAM ...9 DESCRIPTION OF BLOCK DIAGRAM...10 ADJUSTMENT ...12 SERVICE OSD ...13 TROUBLESHOOTING GUIDE...

Service Manual
Page 11
... a pixel clock. MICOM Part. And this part consists of module. 3. The Scaler gets the video signal converted analog to digital, interpolates input to 1280 X 1024 resolution signal and outputs 8-bit R, G, B signal to 135MHz. This part consists of the one 3.3V, and one 1.8V regulators to AC 700Vrms and operates back-light...
... a pixel clock. MICOM Part. And this part consists of module. 3. The Scaler gets the video signal converted analog to digital, interpolates input to 1280 X 1024 resolution signal and outputs 8-bit R, G, B signal to 135MHz. This part consists of the one 3.3V, and one 1.8V regulators to AC 700Vrms and operates back-light...


