
Owner's Manual
Page 1
ENGLISH OWNER'S MANUAL LED LCD MONITOR Please read this manual carefully before operating your set and retain it for future reference. LED LCD MONITOR MODELS E1960S/E1960T E2060S/E2060T E2260S/E2260T/E2260V E2360S/E2360T/E2360V www.lg.com
ENGLISH OWNER'S MANUAL LED LCD MONITOR Please read this manual carefully before operating your set and retain it for future reference. LED LCD MONITOR MODELS E1960S/E1960T E2060S/E2060T E2260S/E2260T/E2260V E2360S/E2360T/E2360V www.lg.com
Owner's Manual
Page 4
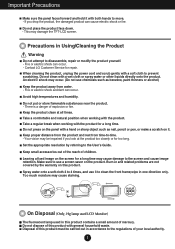
... product and rest from water. - Do not dispose of this product contains a small amount of your local authority. 3 On Disposal (Only, Hg lamp used LCD Monitor) The fluorescent lamp used in and related problems are not covered by referring to disassemble, repair or modify the product yourself. - Do not place the...
... product and rest from water. - Do not dispose of this product contains a small amount of your local authority. 3 On Disposal (Only, Hg lamp used LCD Monitor) The fluorescent lamp used in and related problems are not covered by referring to disassemble, repair or modify the product yourself. - Do not place the...
Owner's Manual
Page 5
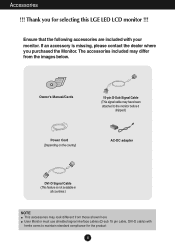
The accessories included may look different from the images below. Ensure that the following accessories are included with ferrite cores to the monitor before it shipped.) Power Cord (Depending on the country) AC-DC adapter DVI-D Signal Cable (This feature is missing, please contact the dealer ... Manual/Cards 15-pin D-Sub Signal Cable (This signal cable may have been attached to maintain standard compliance for selecting this LGE LED LCD monitor !!! Accessories !!! If an accessory is not available in all countries.) NOTE This accessories may differ from those shown here User...
The accessories included may look different from the images below. Ensure that the following accessories are included with ferrite cores to the monitor before it shipped.) Power Cord (Depending on the country) AC-DC adapter DVI-D Signal Cable (This feature is missing, please contact the dealer ... Manual/Cards 15-pin D-Sub Signal Cable (This signal cable may have been attached to maintain standard compliance for selecting this LGE LED LCD monitor !!! Accessories !!! If an accessory is not available in all countries.) NOTE This accessories may differ from those shown here User...
Owner's Manual
Page 6
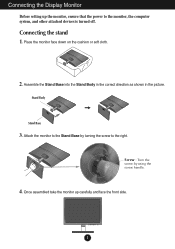
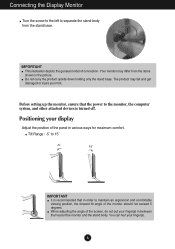
Attach the monitor to the Stand Base by using the screw handle. 4. Place the monitor face down on the cushion or soft cloth. 2. Assemble the Stand Base into the Stand Body in the correct direction as shown in the picture. Screw : Turn the screw by turning the screw to the monitor, the computer system, and other attached devices is turned off. Stand Body Stand Base 3. Connecting the Display Monitor Before setting up carefully and face the front side. 5 Once assembled take the monitor up the monitor, ensure that the power to the right. Connecting the stand 1.
Attach the monitor to the Stand Base by using the screw handle. 4. Place the monitor face down on the cushion or soft cloth. 2. Assemble the Stand Base into the Stand Body in the correct direction as shown in the picture. Screw : Turn the screw by turning the screw to the monitor, the computer system, and other attached devices is turned off. Stand Body Stand Base 3. Connecting the Display Monitor Before setting up carefully and face the front side. 5 Once assembled take the monitor up the monitor, ensure that the power to the right. Connecting the stand 1.
Owner's Manual
Page 7
... the screw to the left to maintain an ergonomic and comfortable viewing position, the forward tilt angle of the monitor and the stand body. Your monitor may fall and get damaged or injure your display Adjust the position of connection. The product may differ from the stand base. Positioning... Range : -5˚ to 15˚ -5 15 IMPORTANT It is recommended that the power to the monitor, the computer system, and other attached devices is turned off. Before setting up the monitor, ensure that in order to separate the stand body from the items shown in between the head of...
... the screw to the left to maintain an ergonomic and comfortable viewing position, the forward tilt angle of the monitor and the stand body. Your monitor may fall and get damaged or injure your display Adjust the position of connection. The product may differ from the stand base. Positioning... Range : -5˚ to 15˚ -5 15 IMPORTANT It is recommended that the power to the monitor, the computer system, and other attached devices is turned off. Before setting up the monitor, ensure that in order to separate the stand body from the items shown in between the head of...
Owner's Manual
Page 8
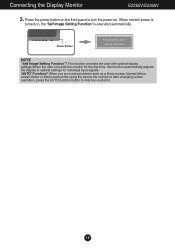
... by turning in the direction of the rear view. This function provides the user with optimal display settings.When the user connects the monitor for the first time, this function automatically adjusts the display to optimal settings for Macintosh A Mac Adapter : Apple Macintosh needs a ...separate plug adaptor to change the 15-pin supplied D-sub Cable (2 rows) to the monitor, the computer system, and other attached devices is a simplified representation of the arrow as a blurry screen, blurred letters, screen flicker or tilted ...
... by turning in the direction of the rear view. This function provides the user with optimal display settings.When the user connects the monitor for the first time, this function automatically adjusts the display to optimal settings for Macintosh A Mac Adapter : Apple Macintosh needs a ...separate plug adaptor to change the 15-pin supplied D-sub Cable (2 rows) to the monitor, the computer system, and other attached devices is a simplified representation of the arrow as a blurry screen, blurred letters, screen flicker or tilted ...
Owner's Manual
Page 9
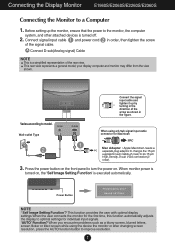
... signal input cable connector for individual input signals. 'AUTO' Function? This rear view represents a general model; When using the device the monitor or after changing screen resolution, press the AUTO function button to turn the power on , the 'Self Image Setting Function' is executed ... Self Image Setting Function'? Varies according to a Computer 1. Press the power button on the front panel to improve resolution. 8 When monitor power is turned off. 2. Before setting up by turning in the figure. This function provides the user with optimal display settings.When ...
... signal input cable connector for individual input signals. 'AUTO' Function? This rear view represents a general model; When using the device the monitor or after changing screen resolution, press the AUTO function button to turn the power on , the 'Self Image Setting Function' is executed ... Self Image Setting Function'? Varies according to a Computer 1. Press the power button on the front panel to improve resolution. 8 When monitor power is turned off. 2. Before setting up by turning in the figure. This function provides the user with optimal display settings.When ...
Owner's Manual
Page 10
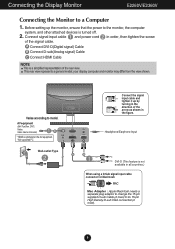
... NOTE This is optimized on the AV equipment. * Not supported PC Wall-outlet Type Connect the signal input cable and tighten it up the monitor, ensure that the power to model. AV equipment (Set-Top Box, DVD, Video, Video Game Console) * HDMI is a simplified representation of... 2. Varies according to the monitor, the computer system, and other attached devices is not available in the figure. Connect signal input cable 1 and power cord 2 in order, then tighten the screw of the rear view. Connecting the Display Monitor E2260V/E2360V Connecting the Monitor to its 15-pin High Density...
... NOTE This is optimized on the AV equipment. * Not supported PC Wall-outlet Type Connect the signal input cable and tighten it up the monitor, ensure that the power to model. AV equipment (Set-Top Box, DVD, Video, Video Game Console) * HDMI is a simplified representation of... 2. Varies according to the monitor, the computer system, and other attached devices is not available in the figure. Connect signal input cable 1 and power cord 2 in order, then tighten the screw of the rear view. Connecting the Display Monitor E2260V/E2360V Connecting the Monitor to its 15-pin High Density...
Owner's Manual
Page 11
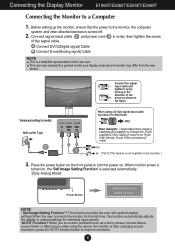
... , the 'Self Image Setting Function' is executed automatically. Power Button NOTE ' Self Image Setting Function'? Connecting the Display Monitor E2260V/E2360V 3. This function provides the user with optimal display settings.When the user connects the monitor for individual input signals. 'AUTO' Function? When you encounter problems such as a blurry screen, blurred letters, screen...
... , the 'Self Image Setting Function' is executed automatically. Power Button NOTE ' Self Image Setting Function'? Connecting the Display Monitor E2260V/E2360V 3. This function provides the user with optimal display settings.When the user connects the monitor for individual input signals. 'AUTO' Function? When you encounter problems such as a blurry screen, blurred letters, screen...
Owner's Manual
Page 20
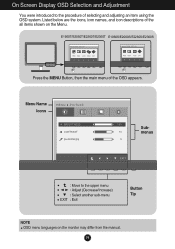
Menu Name Icons Submenus Move to the procedure of selecting and adjusting an item using the OSD system. Listed below are the icons, icon names, and icon descriptions of the OSD appears. On Screen Display OSD Selection and Adjustment You were introduced to the upper menu Adjust (Decrease/Increase) Select another sub-menu Exit Button Tip NOTE OSD menu languages on the Menu. E1960T/E2060T/E2260T/E2360T E1960S/E2060S/E2260S/E2360S Press the MENU Button, then the main menu of the all items shown on the monitor may differ from the manual. 19
Menu Name Icons Submenus Move to the procedure of selecting and adjusting an item using the OSD system. Listed below are the icons, icon names, and icon descriptions of the OSD appears. On Screen Display OSD Selection and Adjustment You were introduced to the upper menu Adjust (Decrease/Increase) Select another sub-menu Exit Button Tip NOTE OSD menu languages on the Menu. E1960T/E2060T/E2260T/E2360T E1960S/E2060S/E2260S/E2360S Press the MENU Button, then the main menu of the all items shown on the monitor may differ from the manual. 19
Owner's Manual
Page 21
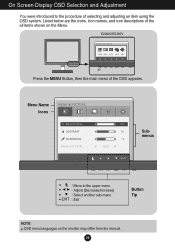
On Screen Display OSD Selection and Adjustment You were introduced to the upper menu Adjust (Decrease/Increase) Select another sub-menu Exit Button Tip NOTE OSD menu languages on the Menu. Listed below are the icons, icon names, and icon descriptions of selecting and adjusting an item using the OSD system. E2260V/E2360V Press the MENU Button, then the main menu of the OSD appears. Menu Name Icons Submenus Move to the procedure of the all items shown on the monitor may differ from the manual. 20
On Screen Display OSD Selection and Adjustment You were introduced to the upper menu Adjust (Decrease/Increase) Select another sub-menu Exit Button Tip NOTE OSD menu languages on the Menu. Listed below are the icons, icon names, and icon descriptions of selecting and adjusting an item using the OSD system. E2260V/E2360V Press the MENU Button, then the main menu of the OSD appears. Menu Name Icons Submenus Move to the procedure of the all items shown on the monitor may differ from the manual. 20
Owner's Manual
Page 22
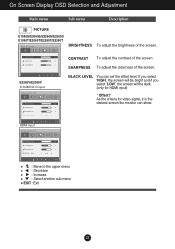
E2260V/E2360V D-SUB/DVI-D input CONTRAST To adjust the contrast of the screen. On Screen Display OSD Selection and Adjustment Main menu Sub menu Description E1960S/E2060S/...', the screen will be bright and if you select 'LOW', the screen will be dark. (only for video signal, it is the darkest screen the monitor can set the offset level.
E2260V/E2360V D-SUB/DVI-D input CONTRAST To adjust the contrast of the screen. On Screen Display OSD Selection and Adjustment Main menu Sub menu Description E1960S/E2060S/...', the screen will be bright and if you select 'LOW', the screen will be dark. (only for video signal, it is the darkest screen the monitor can set the offset level.
Owner's Manual
Page 23
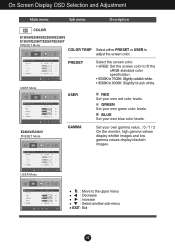
.../E2260T/E2360T PRESET Mode COLOR TEMP Select either PRESET or USER to 9300K: Slightly bluish white. E2260V/E2360V PRESET Mode GAMMA Set your own green color levels. GREEN Set your own gamma value. : 0 / 1 / 2 On the monitor, high gamma values display whitish images and low gamma values display blackish images. RED Set your...
.../E2260T/E2360T PRESET Mode COLOR TEMP Select either PRESET or USER to 9300K: Slightly bluish white. E2260V/E2360V PRESET Mode GAMMA Set your own green color levels. GREEN Set your own gamma value. : 0 / 1 / 2 On the monitor, high gamma values display whitish images and low gamma values display blackish images. RED Set your...
Owner's Manual
Page 26
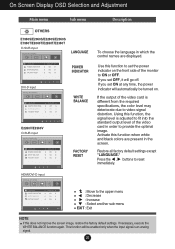
...function, the signal level is adjusted to fit into the standard output level of the video card in the screen. If the output of the monitor to reset immediately. This function will be turned on the front side of the video card is an analog signal. 25 HDMI/DVI-D input :... Adjustment Main menu Sub menu Description E1960S/E2060S/E2260S/E2360S E1960T/E2060T/E2260T/E2360T D-SUB input LANGUAGE POWER INDICATOR DVI-D input WHITE BALANCE E2260V/E2360V D-SUB input FACTORY RESET To choose the language in which the control names are present in order to provide the optimal image. Use this...
...function, the signal level is adjusted to fit into the standard output level of the video card in the screen. If the output of the monitor to reset immediately. This function will be turned on the front side of the video card is an analog signal. 25 HDMI/DVI-D input :... Adjustment Main menu Sub menu Description E1960S/E2060S/E2260S/E2360S E1960T/E2060T/E2260T/E2360T D-SUB input LANGUAGE POWER INDICATOR DVI-D input WHITE BALANCE E2260V/E2360V D-SUB input FACTORY RESET To choose the language in which the control names are present in order to provide the optimal image. Use this...

Owner's Manual
Page 27
E1960T/E2060T/E2260T/E2360T E2260V/E2360V E1960S/E2060S/E2260S/E2360S Press the MODE Button, then the main menu of selecting and adjusting an item using the OSD system. Listed below are the icons, icon names, and icon descriptions of the all items shown on the monitor may differ from the manual. 26 Menu Name Icons Submenus Move to the procedure of the OSD appears. On Screen Display OSD Selection and Adjustment You were introduced to the upper menu Move Select another sub-menu Exit Button Tip NOTE OSD (On Screen Display) menu languages on the Menu.
E1960T/E2060T/E2260T/E2360T E2260V/E2360V E1960S/E2060S/E2260S/E2360S Press the MODE Button, then the main menu of selecting and adjusting an item using the OSD system. Listed below are the icons, icon names, and icon descriptions of the all items shown on the monitor may differ from the manual. 26 Menu Name Icons Submenus Move to the procedure of the OSD appears. On Screen Display OSD Selection and Adjustment You were introduced to the upper menu Move Select another sub-menu Exit Button Tip NOTE OSD (On Screen Display) menu languages on the Menu.
Owner's Manual
Page 31
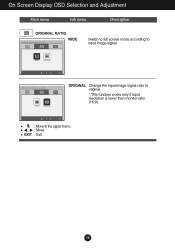
ORIGINAL Change the input image signal ratio to original. * This function works only if input resolution is lower than monitor ratio (16:9). : Move to input image signal. On Screen Display OSD Selection and Adjustment Main menu Sub menu Description WIDE Switch to full screen mode according to the upper menu , : Move EXIT : Exit 30
ORIGINAL Change the input image signal ratio to original. * This function works only if input resolution is lower than monitor ratio (16:9). : Move to input image signal. On Screen Display OSD Selection and Adjustment Main menu Sub menu Description WIDE Switch to full screen mode according to the upper menu , : Move EXIT : Exit 30
Owner's Manual
Page 35
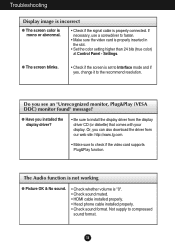
...installed the display driver? • Be sure to check if the video card supports Plug&Play function. Or, you see an "Unrecognized monitor, Plug&Play (VESA DDC) monitor found" message? The Audio function is not working G Picture OK & No sound. • Check whether volume is properly connected. If... necessary, use a screwdriver to the recommend resolution. Do you can also download the driver from our web site: http://www.lg.com. &#...
...installed the display driver? • Be sure to check if the video card supports Plug&Play function. Or, you see an "Unrecognized monitor, Plug&Play (VESA DDC) monitor found" message? The Audio function is not working G Picture OK & No sound. • Check whether volume is properly connected. If... necessary, use a screwdriver to the recommend resolution. Do you can also download the driver from our web site: http://www.lg.com. &#...

Specification
Page 1
... before. You won't believe your eyes. Imagine anything you wanted HDTV in a monitor display and it a monitor? The ultra slim width of dark scenes or dull colors? The ultimate in LG Monitor displays is the reason you might want in the first place. This stunning picture is... now available with the E60. Truly a marvel, it superior picture quality over standard HDTV. LED MONITOR E2360V 23" CLASS 23.0" diagonal HIGHLIGHTS LED ...
... before. You won't believe your eyes. Imagine anything you wanted HDTV in a monitor display and it a monitor? The ultra slim width of dark scenes or dull colors? The ultimate in LG Monitor displays is the reason you might want in the first place. This stunning picture is... now available with the E60. Truly a marvel, it superior picture quality over standard HDTV. LED MONITOR E2360V 23" CLASS 23.0" diagonal HIGHLIGHTS LED ...
Specification
Page 2
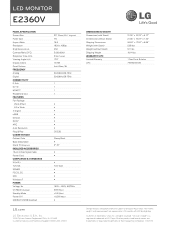
LED MONITOR E2360V PANEL SPECIFICATION Screen Size 23" Class (23.0" diagonal) Panel Type TN Aspect Ratio 16:9 Resolution 1920 x 1080p Brightness (cd/m2) 250 Contrast Ratio (DFC) 5,000,...
LED MONITOR E2360V PANEL SPECIFICATION Screen Size 23" Class (23.0" diagonal) Panel Type TN Aspect Ratio 16:9 Resolution 1920 x 1080p Brightness (cd/m2) 250 Contrast Ratio (DFC) 5,000,...


