
Owner's Manual
Page 2
... of thunder and lightning, never touch the power cord and signal cable because it can be left unattended for this unit is connected to the AC wall outlet, it is to product and damage the display. Overloaded AC outlets and extension cords are no user serviceable components inside , even when the power is used as this display. When the display is certified by the applicable...
... of thunder and lightning, never touch the power cord and signal cable because it can be left unattended for this unit is connected to the AC wall outlet, it is to product and damage the display. Overloaded AC outlets and extension cords are no user serviceable components inside , even when the power is used as this display. When the display is certified by the applicable...
Owner's Manual
Page 3
... to the screen and cause image burn-in a wet basement, or near water such as Red, Green or Blue spots on the product. Place the display in a built-in a fire hazard. Do not use the recommended resolution to move. If these openings are provided with both hands to obtain the best image quality for your finger for repair. Important Precautions On Installation Do...
... to the screen and cause image burn-in a wet basement, or near water such as Red, Green or Blue spots on the product. Place the display in a built-in a fire hazard. Do not use the recommended resolution to move. If these openings are provided with both hands to obtain the best image quality for your finger for repair. Important Precautions On Installation Do...
Owner's Manual
Page 6
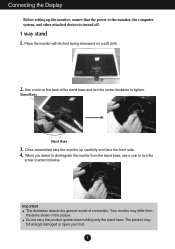
... stand base. Important This illustration depicts the general model of the stand base and turn the screw counterclockwise. Your monitor may fall and get damaged or injure your foot. 5 Connecting the Display Before setting up carefully and face the front side. 4. Once assembled take the monitor up the monitor, ensure that the power to tighten. Stand Body Stand Base 3. The product may differ from the stand base, use a coin to turn the screw...
... stand base. Important This illustration depicts the general model of the stand base and turn the screw counterclockwise. Your monitor may fall and get damaged or injure your foot. 5 Connecting the Display Before setting up carefully and face the front side. 4. Once assembled take the monitor up the monitor, ensure that the power to tighten. Stand Body Stand Base 3. The product may differ from the stand base, use a coin to turn the screw...

Owner's Manual
Page 7
... keep pressing the button.If you don't press the button, it will damage the product.) When limited tilt degree, the button is turned off. 2 way stand 1. Press the button as shown, and pull the stand body up or down a little. 6 Connecting the Display Before setting up the monitor, ensure that the power to the monitor, the computer system, and other attached devices is not working, pull stand...
... keep pressing the button.If you don't press the button, it will damage the product.) When limited tilt degree, the button is turned off. 2 way stand 1. Press the button as shown, and pull the stand body up or down a little. 6 Connecting the Display Before setting up the monitor, ensure that the power to the monitor, the computer system, and other attached devices is not working, pull stand...

Owner's Manual
Page 9
...(s) in between the head of the monitor and the stand body. Tilt Range : -5˚ to maintain an ergonomic and comfortable viewing position, the forward tilt angle of the monitor should not exceed 5 degrees. 8 Positioning your display After installation, adjust the angle as shown below. * With stand base Adjust the position of the monitor. Connecting the Display Before setting up the monitor, ensure that the power to the monitor, the computer system, and other...
...(s) in between the head of the monitor and the stand body. Tilt Range : -5˚ to maintain an ergonomic and comfortable viewing position, the forward tilt angle of the monitor should not exceed 5 degrees. 8 Positioning your display After installation, adjust the angle as shown below. * With stand base Adjust the position of the monitor. Connecting the Display Before setting up the monitor, ensure that the power to the monitor, the computer system, and other...
Owner's Manual
Page 11
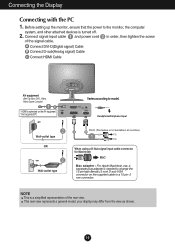
... the signal cable. Headphone/Earphone Input DVI-D (This feature is not available in order, then tighten the screw of the rear view. Connecting the Display Connecting with the PC 1. your display may differ from the view as shown. 10 Before setting up the monitor, ensure that the power to model. Connect signal input cable 1 and power cord 2 in all countries.) When using a D-Sub signal input cable connector for Macintosh Mac adapter : For Apple Macintosh use, a separate plug adapter is optimized on the supplied cable...
... the signal cable. Headphone/Earphone Input DVI-D (This feature is not available in order, then tighten the screw of the rear view. Connecting the Display Connecting with the PC 1. your display may differ from the view as shown. 10 Before setting up the monitor, ensure that the power to model. Connect signal input cable 1 and power cord 2 in all countries.) When using a D-Sub signal input cable connector for Macintosh Mac adapter : For Apple Macintosh use, a separate plug adapter is optimized on the supplied cable...
Owner's Manual
Page 12
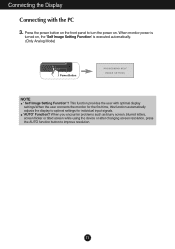
...letters, screen flicker or tilted screen while using the device or after changing screen resolution, press the AUTO function button to turn the power on. Press the power button on , the 'Self Image Setting Function' is executed automatically. (Only Analog Mode) Power Button NOTE ' Self Image Setting Function'? This function provides the user with the PC 3. Connecting the Display Connecting with optimal display settings.When the user connects the monitor for the first time, this function automatically adjusts the display to optimal settings for individual input signals. 'AUTO' Function...
...letters, screen flicker or tilted screen while using the device or after changing screen resolution, press the AUTO function button to turn the power on. Press the power button on , the 'Self Image Setting Function' is executed automatically. (Only Analog Mode) Power Button NOTE ' Self Image Setting Function'? This function provides the user with the PC 3. Connecting the Display Connecting with optimal display settings.When the user connects the monitor for the first time, this function automatically adjusts the display to optimal settings for individual input signals. 'AUTO' Function...
Owner's Manual
Page 13
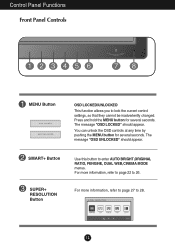
... the MENU button for several seconds. SUPER+ RESOLUTION Button For more information, refer to page 22 to 28. 12 Press and hold the MENU button for several seconds. SMART+ Button Use this button to lock the current control settings, so that they cannot be inadvertently changed. Control Panel Functions Front Panel Controls MENU Button OSD LOCKED/UNLOCKED This function allows you to enter AUTO BRIGHT,ORIGINAL RATIO, FENGINE, DUAL WEB,CINEMA MODE menus. The message "OSD LOCKED...
... the MENU button for several seconds. SUPER+ RESOLUTION Button For more information, refer to page 22 to 28. 12 Press and hold the MENU button for several seconds. SMART+ Button Use this button to lock the current control settings, so that they cannot be inadvertently changed. Control Panel Functions Front Panel Controls MENU Button OSD LOCKED/UNLOCKED This function allows you to enter AUTO BRIGHT,ORIGINAL RATIO, FENGINE, DUAL WEB,CINEMA MODE menus. The message "OSD LOCKED...
Owner's Manual
Page 14
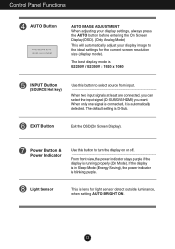
... Sleep Mode (Energy Saving), the power indicator is D-Sub. The default setting is blinking purple. EXIT Button Exit the OSD(On Screen Display). Light Sensor This is E2250V / E2350V : 1920 x 1080 INPUT Button (SOURCE Hot key) Use this button to turn the display on or off. When two input signals at least are connected, you can select the input signal (D-SUB/DVI/HDMI) you want. Control Panel Functions AUTO Button AUTO IMAGE ADJUSTMENT When adjusting your display settings, always press the AUTO button before entering the On Screen Display(OSD). (Only Analog Mode...
... Sleep Mode (Energy Saving), the power indicator is D-Sub. The default setting is blinking purple. EXIT Button Exit the OSD(On Screen Display). Light Sensor This is E2250V / E2350V : 1920 x 1080 INPUT Button (SOURCE Hot key) Use this button to turn the display on or off. When two input signals at least are connected, you can select the input signal (D-SUB/DVI/HDMI) you want. Control Panel Functions AUTO Button AUTO IMAGE ADJUSTMENT When adjusting your display settings, always press the AUTO button before entering the On Screen Display(OSD). (Only Analog Mode...
Owner's Manual
Page 16
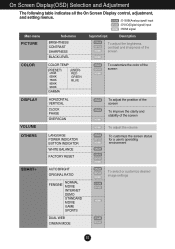
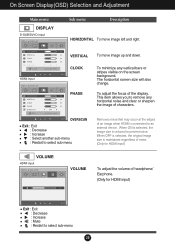
... : DVI-D(Digital signal) input HDMI : HDMI signal Main menu PICTURE Sub-menu BRIGHTNESS CONTRAST SHARPNESS BLACK LEVEL Supported input Description DSUB DVI-D HDMI To adjust the brightness, contrast and sharpness of the screen HDMI COLOR COLOR TEMP (PRESET) sRGB 6500K 7500K 8500K 9300K GAMMA (USER) RED GREEN BLUE DSUB DVI-D HDMI To customize the color of the screen DISPLAY VOLUME HORIZONTAL VERTICAL CLOCK PHASE OVERSCAN DSUB DSUB HDMI HDMI To adjust the position of the screen To improve the clarity and stability of the screen To adjust the volume OTHERS SMART+ LANGUAGE POWER...
... : DVI-D(Digital signal) input HDMI : HDMI signal Main menu PICTURE Sub-menu BRIGHTNESS CONTRAST SHARPNESS BLACK LEVEL Supported input Description DSUB DVI-D HDMI To adjust the brightness, contrast and sharpness of the screen HDMI COLOR COLOR TEMP (PRESET) sRGB 6500K 7500K 8500K 9300K GAMMA (USER) RED GREEN BLUE DSUB DVI-D HDMI To customize the color of the screen DISPLAY VOLUME HORIZONTAL VERTICAL CLOCK PHASE OVERSCAN DSUB DSUB HDMI HDMI To adjust the position of the screen To improve the clarity and stability of the screen To adjust the volume OTHERS SMART+ LANGUAGE POWER...

Owner's Manual
Page 19
... sub-menu 18 On Screen Display(OSD) Selection and Adjustment Main menu Sub menu Description D-SUB/DVI-D input HDMI input BRIGHTNESS To adjust the brightness of the screen. If you select 'HIGH', the screen will be bright and if you select 'LOW', the screen will be dark. (only for video signal, it is the darkest screen the monitor can set the offset level. SHARPNESS To adjust the clearness of the screen. CONTRAST To adjust the contrast of the screen.
... sub-menu 18 On Screen Display(OSD) Selection and Adjustment Main menu Sub menu Description D-SUB/DVI-D input HDMI input BRIGHTNESS To adjust the brightness of the screen. If you select 'HIGH', the screen will be bright and if you select 'LOW', the screen will be dark. (only for video signal, it is the darkest screen the monitor can set the offset level. SHARPNESS To adjust the clearness of the screen. CONTRAST To adjust the contrast of the screen.
Owner's Manual
Page 21
... selected, the original image size is reduced to an external device. CLOCK PHASE To minimize any horizontal noise and clear or sharpen the image of the display. This item allows you to select sub-menu 20 The horizontal screen size will also change. On Screen Display(OSD) Selection and Adjustment Main menu Sub menu Description D-SUB/DVI-D input HORIZONTAL To move image up and down. HDMI input VERTICAL To move image left and right.
... selected, the original image size is reduced to an external device. CLOCK PHASE To minimize any horizontal noise and clear or sharpen the image of the display. This item allows you to select sub-menu 20 The horizontal screen size will also change. On Screen Display(OSD) Selection and Adjustment Main menu Sub menu Description D-SUB/DVI-D input HORIZONTAL To move image up and down. HDMI input VERTICAL To move image left and right.

Owner's Manual
Page 22
... screen. If necessary, execute the WHITE BALANCE function again. On Screen Display(OSD) Selection and Adjustment Main menu Sub menu Description HDMI/DVI-D input D-SUB input LANGUAGE POWER INDICATOR BUTTON INDICATOR WHITE BALANCE Exit : Exit : Decrease : Increase : Select another sub-menu : Restart to select sub-menu FACTORY RESET To choose the language in order to provide the optimal image. Using this function to set ON, it will be turned on the front side of the monitor to video signal...
... screen. If necessary, execute the WHITE BALANCE function again. On Screen Display(OSD) Selection and Adjustment Main menu Sub menu Description HDMI/DVI-D input D-SUB input LANGUAGE POWER INDICATOR BUTTON INDICATOR WHITE BALANCE Exit : Exit : Decrease : Increase : Select another sub-menu : Restart to select sub-menu FACTORY RESET To choose the language in order to provide the optimal image. Using this function to set ON, it will be turned on the front side of the monitor to video signal...
Owner's Manual
Page 27
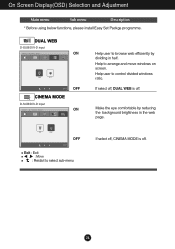
Help to browse web efficiently by reducing the background brightness in half. OFF If select off, DUAL WEB is off . D-SUB/DVI-D input D-SUB/DVI-D input ON Help user to arrange and move windows on screen. OFF Exit : Exit , : Move : Restart to control divided windows ratio. ON Make the eye comfortable by dividing in the web page. Help user to select sub-menu If select off, CINEMA MODE is off . 26 On Screen Display(OSD) Selection and Adjustment Main menu Sub menu Description * Before using below functions, please install Easy Set Packge programme.
Help to browse web efficiently by reducing the background brightness in half. OFF If select off, DUAL WEB is off . D-SUB/DVI-D input D-SUB/DVI-D input ON Help user to arrange and move windows on screen. OFF Exit : Exit , : Move : Restart to control divided windows ratio. ON Make the eye comfortable by dividing in the web page. Help user to select sub-menu If select off, CINEMA MODE is off . 26 On Screen Display(OSD) Selection and Adjustment Main menu Sub menu Description * Before using below functions, please install Easy Set Packge programme.
Owner's Manual
Page 30
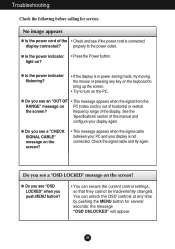
... the Power button. See the 'Specifications' section of the • Check and see a "OSD LOCKED" message on PC (video card) is in power saving mode, try again. G Do you see if the power cord is not connected. No image appears G Is the power cord of this manual and configure your display is connected display connected? light on the screen? • This message appears when the signal cable between your PC and your display again. frequency range of horizontal or vertical the screen...
... the Power button. See the 'Specifications' section of the • Check and see a "OSD LOCKED" message on PC (video card) is in power saving mode, try again. G Do you see if the power cord is not connected. No image appears G Is the power cord of this manual and configure your display is connected display connected? light on the screen? • This message appears when the signal cable between your PC and your display again. frequency range of horizontal or vertical the screen...
Owner's Manual
Page 31
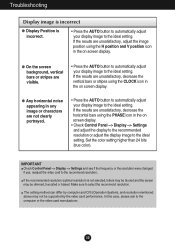
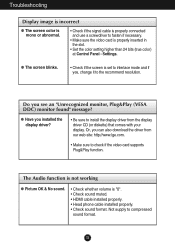
If yes, readjust the video card to select the recommend resolution. Make sure to the recommend resolution. Set the color setting higher than 24 bits (true color). G On the screen background, vertical bars or stripes are not clearly portrayed. • Press the AUTO button to automatically adjust your display image to the ideal setting. IMPORTANT Check Control Panel --> Display --> Settings and see if the frequency or the resolution were changed. Troubleshooting Display image is incorrect G Display Position is not selected, letters...
If yes, readjust the video card to select the recommend resolution. Make sure to the recommend resolution. Set the color setting higher than 24 bits (true color). G On the screen background, vertical bars or stripes are not clearly portrayed. • Press the AUTO button to automatically adjust your display image to the ideal setting. IMPORTANT Check Control Panel --> Display --> Settings and see if the frequency or the resolution were changed. Troubleshooting Display image is incorrect G Display Position is not selected, letters...
Owner's Manual
Page 32
...; Make sure the video card is properly inserted in the slot. • Set the color setting higher than 24 bits (true color) at Control Panel - Troubleshooting Display image is incorrect G The screen color is mono or abnormal. • Check if the signal cable is properly connected and use a screwdriver to compressed sound format. 31 G Have you see an "Unrecognized monitor, Plug&Play (VESA DDC) monitor found" message? Settings. Or, you can also download the driver from the display driver...
...; Make sure the video card is properly inserted in the slot. • Set the color setting higher than 24 bits (true color) at Control Panel - Troubleshooting Display image is incorrect G The screen color is mono or abnormal. • Check if the signal cable is properly connected and use a screwdriver to compressed sound format. 31 G Have you see an "Unrecognized monitor, Plug&Play (VESA DDC) monitor found" message? Settings. Or, you can also download the driver from the display driver...
Owner's Manual
Page 33
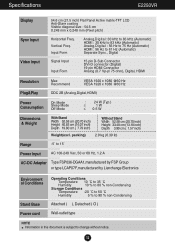
... (Automatic) Analog,Digital : 56 Hz to 75 Hz (Automatic) HDMI : 56 Hz to change without notice. 32 Specifications E2250VR Display Sync Input Video Input 54.6 cm (21.5 inch) Flat Panel Active matrix-TFT LCD Anti-Glare coating Visible diagonal size : 54.6 cm 0.248 mm x 0.248 mm (Pixel pitch) Horizontal Freq. packing) 2.9 kg (6.39 lb) Range -5˚ to 15˚ Power Input AC 100-240 Vac, 50 or 60 Hz, 1.2 A AC-DC Adapter Type...
... (Automatic) Analog,Digital : 56 Hz to 75 Hz (Automatic) HDMI : 56 Hz to change without notice. 32 Specifications E2250VR Display Sync Input Video Input 54.6 cm (21.5 inch) Flat Panel Active matrix-TFT LCD Anti-Glare coating Visible diagonal size : 54.6 cm 0.248 mm x 0.248 mm (Pixel pitch) Horizontal Freq. packing) 2.9 kg (6.39 lb) Range -5˚ to 15˚ Power Input AC 100-240 Vac, 50 or 60 Hz, 1.2 A AC-DC Adapter Type...
Owner's Manual
Page 34
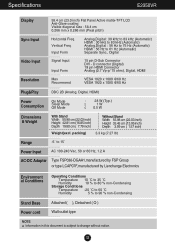
... HDMI Connector Analog (0.7 Vp-p/ 75 ohm), Digital, HDMI Resolution Max Recommend VESA 1920 x 1080 @60 Hz VESA 1920 x 1080 @60 Hz Plug&Play DDC 2B (Analog, Digital, HDMI) Power Consumption On Mode Sleep Mode Off Mode : 28 W (Typ.) ≤ 1 W ≤ 0.5 W Dimensions & Weight With Stand Width 55.98 cm (22.03 inch) Height 42.81 cm (16.85 inch) Depth 19.80 cm ( 7.79 inch) Weight(excl. Specifications E2350VR Display 58.4 cm (23.0 inch) Flat Panel Active matrix-TFT LCD...
... HDMI Connector Analog (0.7 Vp-p/ 75 ohm), Digital, HDMI Resolution Max Recommend VESA 1920 x 1080 @60 Hz VESA 1920 x 1080 @60 Hz Plug&Play DDC 2B (Analog, Digital, HDMI) Power Consumption On Mode Sleep Mode Off Mode : 28 W (Typ.) ≤ 1 W ≤ 0.5 W Dimensions & Weight With Stand Width 55.98 cm (22.03 inch) Height 42.81 cm (16.85 inch) Depth 19.80 cm ( 7.79 inch) Weight(excl. Specifications E2350VR Display 58.4 cm (23.0 inch) Flat Panel Active matrix-TFT LCD...
Owner's Manual
Page 35
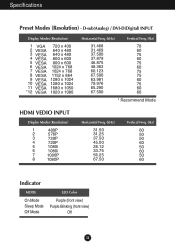
... 67.500 60 * Recommend Mode HDMI VEDIO INPUT Display Modes (Resolution) 1 480P 2 576P 3 720P 4 720P 5 1080i 6 1080i 7 1080P 8 1080P Horizontal Freq. (kHz) 31.50 31.25 37.50 45.00 28.12 33.75 56.25 67.50 Vertical Freq. (Hz) 60 50 50 60 50 60 50 60 Indicator MODE On Mode Sleep Mode Off Mode LED Color Purple (front view) Purple Blinking (front view) Off 34
... 67.500 60 * Recommend Mode HDMI VEDIO INPUT Display Modes (Resolution) 1 480P 2 576P 3 720P 4 720P 5 1080i 6 1080i 7 1080P 8 1080P Horizontal Freq. (kHz) 31.50 31.25 37.50 45.00 28.12 33.75 56.25 67.50 Vertical Freq. (Hz) 60 50 50 60 50 60 50 60 Indicator MODE On Mode Sleep Mode Off Mode LED Color Purple (front view) Purple Blinking (front view) Off 34


