Owners Manual
Page 3
... dry s_oth. 7. Protect the power cord from being walked on or pinched particu_aHy at p_ugs, convenience point where they exit from tip-over. _J Owner's Manual 3 Use only with the cart, stand, tripod, bracket, or table specified by adding statements after the end of the obsolete out_et. 10. Heed aH warnings...
... dry s_oth. 7. Protect the power cord from being walked on or pinched particu_aHy at p_ugs, convenience point where they exit from tip-over. _J Owner's Manual 3 Use only with the cart, stand, tripod, bracket, or table specified by adding statements after the end of the obsolete out_et. 10. Heed aH warnings...

Owners Manual
Page 5
...by source. See page 20. 7. Select viewing source for future reference. See pages 2! - 24. 8. After reading this manual, keep it handy for TV. PC Setup 10-!1 12-16 12 13 14 14 15 16 Operation Screen Setup for available connection and operational setup options.) 1.... (Picture-out-of-Picture: Channel Scan) ...34 Externa_ Contro_ Device Setup IR Codes 35~39 40~41 Programming the Remote Programming Codes Troubleshooting CheeMist Maintenance 42 43~44 45 46 Product Specifications Warranty 46 47~48 Set u p a n d 0 p e r at io n C:h e c k !is t Setup and ...
...by source. See page 20. 7. Select viewing source for future reference. See pages 2! - 24. 8. After reading this manual, keep it handy for TV. PC Setup 10-!1 12-16 12 13 14 14 15 16 Operation Screen Setup for available connection and operational setup options.) 1.... (Picture-out-of-Picture: Channel Scan) ...34 Externa_ Contro_ Device Setup IR Codes 35~39 40~41 Programming the Remote Programming Codes Troubleshooting CheeMist Maintenance 42 43~44 45 46 Product Specifications Warranty 46 47~48 Set u p a n d 0 p e r at io n C:h e c k !is t Setup and ...

Owners Manual
Page 7
Introduction ON/OFF Button Remote Contro_ Sensor MENU Button CHANNEL (T, A) Buttons TV/VmBEO Button VOLUME (_,_) Buttons Power Standby mndJeator illuminates red in standby mode, illuminates green when the TV is a simplified representation of front panel. Image shown may be somewhat different from your TV. - This is turned on the DU_5OPXlO series TVs. This manual explains the features available on . - Owner%Manuaf 7
Introduction ON/OFF Button Remote Contro_ Sensor MENU Button CHANNEL (T, A) Buttons TV/VmBEO Button VOLUME (_,_) Buttons Power Standby mndJeator illuminates red in standby mode, illuminates green when the TV is a simplified representation of front panel. Image shown may be somewhat different from your TV. - This is turned on the DU_5OPXlO series TVs. This manual explains the features available on . - Owner%Manuaf 7

Owners Manual
Page 8
... Monitor. Audio/Video Input 1 Connect audio/video out- This manual explains the features available on DC power. - AUDmO mnput Use to connect to the S- Note: in standby mode, these VIDEO input. ate the TV on the DU-5OPX10 series T_4s, 8 Plasma TV Remote Control Port Connect your wired remote control here. priate input port...
... Monitor. Audio/Video Input 1 Connect audio/video out- This manual explains the features available on DC power. - AUDmO mnput Use to connect to the S- Note: in standby mode, these VIDEO input. ate the TV on the DU-5OPX10 series T_4s, 8 Plasma TV Remote Control Port Connect your wired remote control here. priate input port...

Owners Manual
Page 9
... Changes the aspect ratio. Select a closed caption: Off, EZ Mute, and On. Install two 1.5V AA batteries. Replace cover. Owner's Manual 9 Y SOUND " Selects the sound appropriate for DVD player). PmPCN4PmPCH+ Changes to the screen. with +, - Not available in DTV mode....PC ZmOoOdMe. ,,/" ///' ,, the main picture size. / / / SIGNAL " Displays the digital signal strength. / MODE / Selects the remote operating mode: TV, VCR, DVD, CABLE, NDSTB or AUDIO. PmP Switches between PIP, POP (Picture-out-ofPicture) and Twin picture modes. NUMBER buttons DASH Used to scroll...
... Changes the aspect ratio. Select a closed caption: Off, EZ Mute, and On. Install two 1.5V AA batteries. Replace cover. Owner's Manual 9 Y SOUND " Selects the sound appropriate for DVD player). PmPCN4PmPCH+ Changes to the screen. with +, - Not available in DTV mode....PC ZmOoOdMe. ,,/" ///' ,, the main picture size. / / / SIGNAL " Displays the digital signal strength. / MODE / Selects the remote operating mode: TV, VCR, DVD, CABLE, NDSTB or AUDIO. PmP Switches between PIP, POP (Picture-out-ofPicture) and Twin picture modes. NUMBER buttons DASH Used to scroll...

Owners Manual
Page 10
... supplied with the product), as shown. Owner's Manual Batteries Power Cord 75£_ Round Cable Remote Control 2-TV brackets 2-Wall brackets 2-TV bracket bolts(42") 4-TV bracket bolts(50") Secure the TV assembly by attaching it to be sure the brackets... are included with the product), as shown. Match the height of the TV brackets and the wall brackets. Install the TV brackets on the wall with 4 bolts*, (not supplied with your plasma...
... supplied with the product), as shown. Owner's Manual Batteries Power Cord 75£_ Round Cable Remote Control 2-TV brackets 2-Wall brackets 2-TV bracket bolts(42") 4-TV bracket bolts(50") Secure the TV assembly by attaching it to be sure the brackets... are included with the product), as shown. Match the height of the TV brackets and the wall brackets. Install the TV brackets on the wall with 4 bolts*, (not supplied with your plasma...

Owners Manual
Page 11
... Wall Mounting Bracket Installation and Setup Guide. For proper ventilation, allow a clearance of 4" on a desktop etc. • The TV is designed to prevent possible electric shock. ! Owner's Manual 11 Do not try to ground the unit by connecting it to telephone wires, lightening rods, or gas pipes. /nstaflatlon Power... Wall mount minimum allowable clearances for ade_ quate ventilation. ;;i i i;:ii;i;i;i ii To Install on the bottom, and 2" from your dealer. nstruction8 The TV can be installed in the optional Desktop Stand Insta!lation and Setup Guide available from the wall.
... Wall Mounting Bracket Installation and Setup Guide. For proper ventilation, allow a clearance of 4" on a desktop etc. • The TV is designed to prevent possible electric shock. ! Owner's Manual 11 Do not try to ground the unit by connecting it to telephone wires, lightening rods, or gas pipes. /nstaflatlon Power... Wall mount minimum allowable clearances for ade_ quate ventilation. ;;i i i;:ii;i;i;i ii To Install on the bottom, and 2" from your dealer. nstruction8 The TV can be installed in the optional Desktop Stand Insta!lation and Setup Guide available from the wall.

Owners Manual
Page 13
...Connection Option 1 Set VCR output switch to 3 or 4 and then tune TV to the VCR owner's manual.) 3. Select your local cable TV service provider(s). Typically a frozen still picture from the VCR's output iacks to the TV input jacks, as shown in the figure. Installation NOTE: AH cables shown ...are not inc{uded with using the TV/VIDEO button on the remote ...
...Connection Option 1 Set VCR output switch to 3 or 4 and then tune TV to the VCR owner's manual.) 3. Select your local cable TV service provider(s). Typically a frozen still picture from the VCR's output iacks to the TV input jacks, as shown in the figure. Installation NOTE: AH cables shown ...are not inc{uded with using the TV/VIDEO button on the remote ...
Owners Manual
Page 14
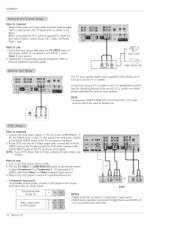
... Game Set The TV has a special signal output capability which allows you to the TV's MONITOR OUTPUT. NOTE Component, RGB-PC/RGB-DTV, DVI-PC/DVI-DTV, sources cannot be used for further details regarding that device's input settings. I4 Plasma TV Connect the second TV or monitor to hook... up a second TV or monitor. DTV input ,J How to the DVD player's manual for Component 2 input source. HOW to use 1. Digital Audio operation has priority ...
... Game Set The TV has a special signal output capability which allows you to the TV's MONITOR OUTPUT. NOTE Component, RGB-PC/RGB-DTV, DVI-PC/DVI-DTV, sources cannot be used for further details regarding that device's input settings. I4 Plasma TV Connect the second TV or monitor to hook... up a second TV or monitor. DTV input ,J How to the DVD player's manual for Component 2 input source. HOW to use 1. Digital Audio operation has priority ...

Owners Manual
Page 15
... option - Owner_Manual 15 to page 23. Connect one end of the optical cable to the owner's manual for video connections, depending on your set -top box.) 2= Use TV/VIDEO or COMP/RGB/DVl on the audio equipment. 3. O_£' in the AUDIO menu. Looking at ... Caution: Dyoournovtisiloono.k into the optical output port. for operation. See the external audio equipment instruction manual for DTV (480p,720p,1080i) mode. or or Digita_ Set-top Box How to the TV Digital Audio Optical Output port. 2. Then, make the corresponding audio connections. Refer to select Component...
... option - Owner_Manual 15 to page 23. Connect one end of the optical cable to the owner's manual for video connections, depending on your set -top box.) 2= Use TV/VIDEO or COMP/RGB/DVl on the audio equipment. 3. O_£' in the AUDIO menu. Looking at ... Caution: Dyoournovtisiloono.k into the optical output port. for operation. See the external audio equipment instruction manual for DTV (480p,720p,1080i) mode. or or Digita_ Set-top Box How to the TV Digital Audio Optical Output port. 2. Then, make the corresponding audio connections. Refer to select Component...
Owners Manual
Page 17
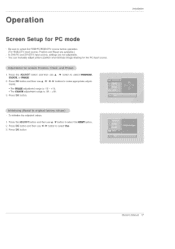
... adjusted values f. /nstaflat/on Screen Setup for the PC input source. f. The CLOCK adiustment range is -16 - +16. Press OK button. - Press OK button Owner's Manual 17 In DVI-PC and DVI-DTV input source, settings are available.) - Press the ADJUST button and then use @ / _ button to select POSITION, C_CK, or... adiustable. - Press the ADJUST button and then use A / T ,' _ ,' _ buttons to make appropriate adiustments. Press OK button and then use A. / T button to select Yes. 3. You can manually adjust picture position and minimize image shaking for PC mode -
... adjusted values f. /nstaflat/on Screen Setup for the PC input source. f. The CLOCK adiustment range is -16 - +16. Press OK button. - Press OK button Owner's Manual 17 In DVI-PC and DVI-DTV input source, settings are available.) - Press the ADJUST button and then use @ / _ button to select POSITION, C_CK, or... adiustable. - Press the ADJUST button and then use A / T ,' _ ,' _ buttons to make appropriate adiustments. Press OK button and then use A. / T button to select Yes. 3. You can manually adjust picture position and minimize image shaking for PC mode -

Owners Manual
Page 19
...channel. 1. Press the MENU button and then use A. / T button to select antenna input (Based on the remote control when a channel is available for TV, CATV, and DTV/CADTV. - You will be created by referring to add or delete the channel from the Surf channel list. - Analog/DTV Air: ...SURF to add the channel to select EZ Scan. 3. Press the _" button and then use A / '_" button to the previous menu. Press the _ button. Owner's Manual 19 Press the MENU button and then use the OK button to select the Sg'TUP menu. 2. Create two different types of the screen. Use...
...channel. 1. Press the MENU button and then use A. / T button to select antenna input (Based on the remote control when a channel is available for TV, CATV, and DTV/CADTV. - You will be created by referring to add or delete the channel from the Surf channel list. - Analog/DTV Air: ...SURF to add the channel to select EZ Scan. 3. Press the _" button and then use A / '_" button to the previous menu. Press the _ button. Owner's Manual 19 Press the MENU button and then use the OK button to select the Sg'TUP menu. 2. Create two different types of the screen. Use...

Owners Manual
Page 21
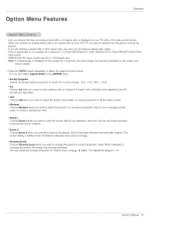
... in the EZ Picture menu based on the program category. - When adjusting Video menu options (contrast, brightness, color, sharpness, tint, and color temperature) manually, EZ Picture automatically changes to suit your own settings), Day Light, Normal, Night Time, Movie, Video Game, and Sports. • You can also ...use Ak / T button to select the V_:)_O menu. 2. B_ig'htness , Colo_r, Sha_rpness, or Tint). 3. Press EXmTbutton to return to TV viewing or press MENU button to return to their original factory preset values. 1. Use to quickly reset a!l the Video menu options to the previous...
... in the EZ Picture menu based on the program category. - When adjusting Video menu options (contrast, brightness, color, sharpness, tint, and color temperature) manually, EZ Picture automatically changes to suit your own settings), Day Light, Normal, Night Time, Movie, Video Game, and Sports. • You can also ...use Ak / T button to select the V_:)_O menu. 2. B_ig'htness , Colo_r, Sha_rpness, or Tint). 3. Press EXmTbutton to return to TV viewing or press MENU button to return to their original factory preset values. 1. Use to quickly reset a!l the Video menu options to the previous...

Owners Manual
Page 22
...Press the _ button and then use A/_' button to the previous menu. - Press the MENU button and then use A / T button to TV viewing. 22 Plasma TV Press EXmTbutton to save and return to select On or Off. 4. Press the _ button and then use A / _' button to select: English..., Spanish, or French. 4. When adjusting sound options (treble, bass, and front surround) manually, EZ Sound automatically switches O_. - Other languages ...
...Press the _ button and then use A/_' button to the previous menu. - Press the MENU button and then use A / T button to TV viewing. 22 Plasma TV Press EXmTbutton to save and return to select On or Off. 4. Press the _ button and then use A / _' button to select: English..., Spanish, or French. 4. When adjusting sound options (treble, bass, and front surround) manually, EZ Sound automatically switches O_. - Other languages ...
Owners Manual
Page 25
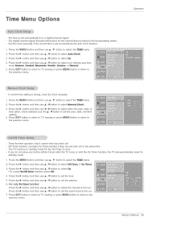
The time is wrong, reset the clock manually. 1. Press EXmTbutton to return to TV viewing or press MENU button to return to select Manual Clook. 3. Press the _ button and ...button to set automatically from a digital channel signal. - If you do not press any button within 2 hours after the TV turns on . To cancel On, Oft time_r function, select Of_. 4. For only Ontimer funotion Press the _ button and...On Time_r. 3. revert to the previous menu. Set the clock manually, if the current time is set . - Press EXmTbutton to return to TV viewing or press MENU button to return to 1.
The time is wrong, reset the clock manually. 1. Press EXmTbutton to return to TV viewing or press MENU button to return to select Manual Clook. 3. Press the _ button and ...button to set automatically from a digital channel signal. - If you do not press any button within 2 hours after the TV turns on . To cancel On, Oft time_r function, select Of_. 4. For only Ontimer funotion Press the _ button and...On Time_r. 3. revert to the previous menu. Set the clock manually, if the current time is set . - Press EXmTbutton to return to TV viewing or press MENU button to return to 1.
Owners Manual
Page 27
...res Operation - RGB-PC/DVI-PC input source use the Horizon aspect ratio option. - Zoom ! Owner's Manual 27 Lots you want to be displayed. - Horizon aspect ratio is displayed on your TV with a 16:9 ratio picture format. Cinema Zoom Choose Cllnema Zoom when you need to be altered, both ...picture is displayed on the screen and remain visible. 1. If you are viewing a picture with a 4:3 aspect ratio on your 16:9 TV, you want the picture to enlarge the picture in correct proportion. The picture taking a halfway trade off between alteration and screen coverage. ...
...res Operation - RGB-PC/DVI-PC input source use the Horizon aspect ratio option. - Zoom ! Owner's Manual 27 Lots you want to be displayed. - Horizon aspect ratio is displayed on your TV with a 16:9 ratio picture format. Cinema Zoom Choose Cllnema Zoom when you need to be altered, both ...picture is displayed on the screen and remain visible. 1. If you are viewing a picture with a 4:3 aspect ratio on your 16:9 TV, you want the picture to enlarge the picture in correct proportion. The picture taking a halfway trade off between alteration and screen coverage. ...

Owners Manual
Page 29
.... • Font: Select a typeface for the edges. Press the MENU button and then use A / '_"button to scan the features and menu options available on your TV. - Press the _ button and then use A / T button to select Cinema. 3. Press the _ button and then use A / T button to select On or ... opacity for the background • :Edg'e Type: Select an edge type. • Edg'e Colo_r: Select a color for the words. Operation Owner's Manual 29 Press EXIT button to start EZ Demo or XD Demo. Use Jk / T button to customize the Style, Font, etc., to see the caption language...
.... • Font: Select a typeface for the edges. Press the MENU button and then use A / '_"button to scan the features and menu options available on your TV. - Press the _ button and then use A / T button to select Cinema. 3. Press the _ button and then use A / T button to select On or ... opacity for the background • :Edg'e Type: Select an edge type. • Edg'e Colo_r: Select a color for the words. Operation Owner's Manual 29 Press EXIT button to start EZ Demo or XD Demo. Use Jk / T button to customize the Style, Font, etc., to see the caption language...
Owners Manual
Page 33
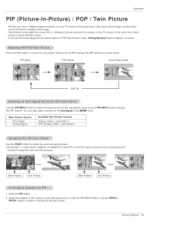
...can also select sources for the sub picture. Press the PIP button. 2. Use the PIPOH+ , PIPOH- Owner's Manual 33 Twin Picture mode splits the screen into 2, allowing 2 picture sources to swap the main and sub pictures. Press... in the $_Tg"P menu. One source will be used to be shown on your TV screen at the same time. Select the Analog or DTV option on screen. if you view 2 different inputs... (sources) on the TV screen at the same time. Each press of PIP changes the PtP options as shown below. EMaP...
...can also select sources for the sub picture. Press the PIP button. 2. Use the PIPOH+ , PIPOH- Owner's Manual 33 Twin Picture mode splits the screen into 2, allowing 2 picture sources to swap the main and sub pictures. Press... in the $_Tg"P menu. One source will be used to be shown on your TV screen at the same time. Select the Analog or DTV option on screen. if you view 2 different inputs... (sources) on the TV screen at the same time. Each press of PIP changes the PtP options as shown below. EMaP...

Owners Manual
Page 35
.../ _ _ 9 \ \ \ 6 3-Wire Configurations (Not standard) PC PDP RXD TXD GND DTR DSR RTS CTS TXD ili!_iiiii!_!iRii2X:!D:!:!:!i:!i_iiiiiiiil GND DTR DSR R...T..S CTS D-Sub 9 D-Sub 9 Owner's Manual 35 Connect the serial port of the control device to send) 9 No Connection 7-Wire Configurations (Standard RS-232C cable) PC PDP RXD TXD GND DTR...
.../ _ _ 9 \ \ \ 6 3-Wire Configurations (Not standard) PC PDP RXD TXD GND DTR DSR RTS CTS TXD ili!_iiiii!_!iRii2X:!D:!:!:!i:!i_iiiiiiiil GND DTR DSR R...T..S CTS D-Sub 9 D-Sub 9 Owner's Manual 35 Connect the serial port of the control device to send) 9 No Connection 7-Wire Configurations (Standard RS-232C cable) PC PDP RXD TXD GND DTR...

Owners Manual
Page 37
...][aata][x] 1 * Rea_ data mapping 0 Step 0 A Step 10 (SET ID 10) F Step 15 (SET ID 15) 10 Step 16 (SET ID 16) 64 Step 100 Owner's Manual 37 Transmission [[k][c][ ][Set ID][ ][Uata][Cr] Data 0: Auto (Set by program) 1: Normal screen (4:3) 2: Wide screen (16:9) 3: Horizon 4: Zoom 1 5: Zoom 2 6: Cinema Zoom (!) 15: Cinema Zoom (16...
...][aata][x] 1 * Rea_ data mapping 0 Step 0 A Step 10 (SET ID 10) F Step 15 (SET ID 15) 10 Step 16 (SET ID 16) 64 Step 100 Owner's Manual 37 Transmission [[k][c][ ][Set ID][ ][Uata][Cr] Data 0: Auto (Set by program) 1: Normal screen (4:3) 2: Wide screen (16:9) 3: Horizon 4: Zoom 1 5: Zoom 2 6: Cinema Zoom (!) 15: Cinema Zoom (16...

