
Owner's Manual (English)
Page 1
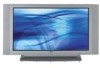
...-saving guidelines issued by the U.S. A.,Inc. P/NO : 38289U0527F (0707-REV08) Printed in Korea LCD TV MODELS: 32LC2D 32LC2DU 37LC2D 42LC2D PLASMA TV MODELS: 42PC3D 42PC3DC 42PC3DV 50PC3D 60PC1D 60PC1DC OWNER'S MANUAL Internet Home Page : http://www.lge.com http://www.lg.ca http://www.lgcommercial.com ENERGYSTAR is a set of the set . As an ENERGY...
...-saving guidelines issued by the U.S. A.,Inc. P/NO : 38289U0527F (0707-REV08) Printed in Korea LCD TV MODELS: 32LC2D 32LC2DU 37LC2D 42LC2D PLASMA TV MODELS: 42PC3D 42PC3DC 42PC3DV 50PC3D 60PC1D 60PC1DC OWNER'S MANUAL Internet Home Page : http://www.lge.com http://www.lg.ca http://www.lgcommercial.com ENERGYSTAR is a set of the set . As an ENERGY...

Owner's Manual (English)
Page 3
Read these instructions. 3. Owner's Manual 2. Follow all warnings. 4. Do not install near water. 6. Only use this apparatus to dripping or splashing and no objects filled with liquids, such as radiators, ...
Read these instructions. 3. Owner's Manual 2. Follow all warnings. 4. Do not install near water. 6. Only use this apparatus to dripping or splashing and no objects filled with liquids, such as radiators, ...
Owner's Manual (English)
Page 4
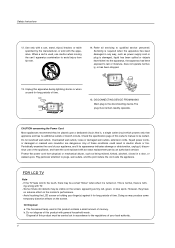
... wire insulation are dangerous. Pay particular attention to rain or moisture, does not operate normally, or has been dropped. 13. If the TV feels cold to the touch, there may produce some temporary distortion effects on . ing wrong with the apparatus. Disposal of time. Servicing... closed in accordance to be carried out in a door, or walked upon a dedicated circuit; Check the specification page of this owner's manual to the regulations of your finger(s) against it , discontinue use caution when moving the cart / apparatus combination to qualified service personnel. FOR LCD...
... wire insulation are dangerous. Pay particular attention to rain or moisture, does not operate normally, or has been dropped. 13. If the TV feels cold to the touch, there may produce some temporary distortion effects on . ing wrong with the apparatus. Disposal of time. Servicing... closed in accordance to be carried out in a door, or walked upon a dedicated circuit; Check the specification page of this owner's manual to the regulations of your finger(s) against it , discontinue use caution when moving the cart / apparatus combination to qualified service personnel. FOR LCD...

Owner's Manual (English)
Page 5
... 33 34 35 35~36 37 38 39 40 41 41~42 43 43 Turning on the TV Volume Adjustment Channel Selection On Screen Menus Language Selection On Screen Menus Selection and Adjustment EZ Scan (Channel Search) Manual Scan Channel Edit DTV Signal Strength Input Source Input Label Auto ...Picture Control(EZ Picture) Color Temperature Control XD Advanced-Cinema 3:2 Mode / Black Level Video Reset Audio Language Auto Sound Control(EZ Sound) Manual Sound Control (EZ Sound-User option) Balance TV Speakers On/Off Setup...
... 33 34 35 35~36 37 38 39 40 41 41~42 43 43 Turning on the TV Volume Adjustment Channel Selection On Screen Menus Language Selection On Screen Menus Selection and Adjustment EZ Scan (Channel Search) Manual Scan Channel Edit DTV Signal Strength Input Source Input Label Auto ...Picture Control(EZ Picture) Color Temperature Control XD Advanced-Cinema 3:2 Mode / Black Level Video Reset Audio Language Auto Sound Control(EZ Sound) Manual Sound Control (EZ Sound-User option) Balance TV Speakers On/Off Setup...
Owner's Manual (English)
Page 6
Contents Operation Time Menu Options Option Menu Features Lock Menu Options 44 44 45 45 46 47 48 49 49 50 51~52 Manual Clock Setup Auto Clock Setup On/Off Timer Setup Sleep Timer Auto Off Aspect Ratio Control Caption/Text Caption Option Low Power (42PC3D/3DC/3DV, 50PC3D, 60PC1D/1DC Only) ISM (Image Sticking Minimization) Method (42PC3D/3DC/3DV, 50PC3D, 60PC1D/1DC Only) Parental Lock Setup 53~58 59~60 61 62~63 64~65 65 66~67 External Control Device Setup IR Codes Programming the Remote Programming Codes Troubleshooting Checklist Maintenance Product Specifications Reference 6
Contents Operation Time Menu Options Option Menu Features Lock Menu Options 44 44 45 45 46 47 48 49 49 50 51~52 Manual Clock Setup Auto Clock Setup On/Off Timer Setup Sleep Timer Auto Off Aspect Ratio Control Caption/Text Caption Option Low Power (42PC3D/3DC/3DV, 50PC3D, 60PC1D/1DC Only) ISM (Image Sticking Minimization) Method (42PC3D/3DC/3DV, 50PC3D, 60PC1D/1DC Only) Parental Lock Setup 53~58 59~60 61 62~63 64~65 65 66~67 External Control Device Setup IR Codes Programming the Remote Programming Codes Troubleshooting Checklist Maintenance Product Specifications Reference 6

Owner's Manual (English)
Page 7
... Introduction Accessories Ensure that excessive power may cause scratch or discoloration. Bolts 4-RING SPACER Polishing Cloth Polish the TV with your TV. Please be cautious of the exterior. TV AUDIO PO CABMLEODDEVD 1.5VMENU GUIDE ENTER STB DAY+ RATIO TIMER EXIT VOL MUTE CC PAGE INFO 1 FAV ... Do not wipe roughly when removing stain. Stand Installation for the product. Power Cord 75Ω Round Cable Owner's Manual TV INPUT TV AUDIO POWER DAY - User must use shielded signal interface cables(D-sub 15 pin cable) with ferrite cores to maintain standard...
... Introduction Accessories Ensure that excessive power may cause scratch or discoloration. Bolts 4-RING SPACER Polishing Cloth Polish the TV with your TV. Please be cautious of the exterior. TV AUDIO PO CABMLEODDEVD 1.5VMENU GUIDE ENTER STB DAY+ RATIO TIMER EXIT VOL MUTE CC PAGE INFO 1 FAV ... Do not wipe roughly when removing stain. Stand Installation for the product. Power Cord 75Ω Round Cable Owner's Manual TV INPUT TV AUDIO POWER DAY - User must use shielded signal interface cables(D-sub 15 pin cable) with ferrite cores to maintain standard...

Owner's Manual (English)
Page 13
Introduction TV INPUT POWER TV AUDIO DVD MODE CABLE INPUT VCR STB BRIGHT - MUTE G p.29 Switches the sound on the viewing environment. SAP Selects MTS sound: Mono, Stereo, and SAP .../decreases the sound level. EZ SOUND G p.41 Selects the sound appropriate for DVD player). CHANNEL UP/DOWN Selects available channels found with EZ scan and Manual scan. ADJUST Adjusts screen position, size, and phase in PC mode. 13 FAV Use to scroll the Favorite channels. MENU BRIGHT + ENTER EXIT TIMER RATIO...
Introduction TV INPUT POWER TV AUDIO DVD MODE CABLE INPUT VCR STB BRIGHT - MUTE G p.29 Switches the sound on the viewing environment. SAP Selects MTS sound: Mono, Stereo, and SAP .../decreases the sound level. EZ SOUND G p.41 Selects the sound appropriate for DVD player). CHANNEL UP/DOWN Selects available channels found with EZ scan and Manual scan. ADJUST Adjusts screen position, size, and phase in PC mode. 13 FAV Use to scroll the Favorite channels. MENU BRIGHT + ENTER EXIT TIMER RATIO...
Owner's Manual (English)
Page 19
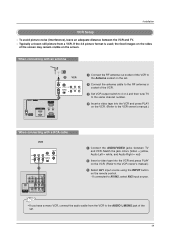
...2 Connect the antenna cable to the RF antenna in socket of the VCR. 3 Set VCR output switch to 3 or 4 and then tune TV to the VCR owner's manual.) VCR ANT IN OUT S-VIDEO (R) AUDIO (L) VIDEO OUTPUT SWITCH IN 34 VIDEO AUDIO ANT OUT 1 OPTICAL DIGITAL AUDIO ( ) VIDEOS-VIDEO ...VIDEOAUDIO AUDIO OUT 1 Connect the AUDIO/VIDEO jacks between the VCR and TV. - When connecting with an antenna 2 VCR ANT IN ANT OUT...
...2 Connect the antenna cable to the RF antenna in socket of the VCR. 3 Set VCR output switch to 3 or 4 and then tune TV to the VCR owner's manual.) VCR ANT IN OUT S-VIDEO (R) AUDIO (L) VIDEO OUTPUT SWITCH IN 34 VIDEO AUDIO ANT OUT 1 OPTICAL DIGITAL AUDIO ( ) VIDEOS-VIDEO ...VIDEOAUDIO AUDIO OUT 1 Connect the AUDIO/VIDEO jacks between the VCR and TV. - When connecting with an antenna 2 VCR ANT IN ANT OUT...

Owner's Manual (English)
Page 20
...input source. 3 Operate the corresponding external equipment. Refer to external equipment operating guide. • This TV finds the connected input sources automatically for AV1, AV2, Component 1-2, RGB, HDMI1/DVI and HDMI2 ...AV Source Setup Camcorder Video Game Set 1 L AUDIO R VIDEO 1 Connect the AUDIO/VIDEO jacks between TV and external equipment. Installation COMPONENT IN AV OUT AV IN 1 VIDEO AUDIO OPTICAL DIGITAL AUDIO S-VIDEO VIDEO... the VCR. (Refer to the VCR owner's manual.) 4 Select AV1 input source with using the INPUT button on the set. The picture quality is ...
...input source. 3 Operate the corresponding external equipment. Refer to external equipment operating guide. • This TV finds the connected input sources automatically for AV1, AV2, Component 1-2, RGB, HDMI1/DVI and HDMI2 ...AV Source Setup Camcorder Video Game Set 1 L AUDIO R VIDEO 1 Connect the AUDIO/VIDEO jacks between TV and external equipment. Installation COMPONENT IN AV OUT AV IN 1 VIDEO AUDIO OPTICAL DIGITAL AUDIO S-VIDEO VIDEO... the VCR. (Refer to the VCR owner's manual.) 4 Select AV1 input source with using the INPUT button on the set. The picture quality is ...
Owner's Manual (English)
Page 21
... remote control. 3 Refer to set the output resolution appropriately. VIDEO AUDIO COMPONENT IN AV OUT AV IN 1 OPTICAL DIGITAL AUDIO OUT S-VIDEO VIDEO ( ) AUDIO • TV can receive the video and audio signal simultaneously with using the INPUT button on the remote control. - VIDEO AUDIO DVD Setup When connecting with a S-Video... the DVD output resolution will be automatically set to 1280x720p. • If the DVD does not support Auto HDMI, you need to the DVD player's manual for operating instructions. If connected to AV IN2, select AV 2 input source. 5 Refer to the DVD player...
... remote control. 3 Refer to set the output resolution appropriately. VIDEO AUDIO COMPONENT IN AV OUT AV IN 1 OPTICAL DIGITAL AUDIO OUT S-VIDEO VIDEO ( ) AUDIO • TV can receive the video and audio signal simultaneously with using the INPUT button on the remote control. - VIDEO AUDIO DVD Setup When connecting with a S-Video... the DVD output resolution will be automatically set to 1280x720p. • If the DVD does not support Auto HDMI, you need to the DVD player's manual for operating instructions. If connected to AV IN2, select AV 2 input source. 5 Refer to the DVD player...
Owner's Manual (English)
Page 22
... the INPUT button on DVD player Y PB PR Y Pb OPTICAL Y B-Y DIGITALAUDIO Y OUT Cb Y PB Pr R-Y S-VIDEO VIDEO Cr PR ( ) AUDIO 22 Component ports on the TV Video output ports on the remote control. - COMPONENT IN AV OUT AV IN 1 • Component Input ports VIDEO AUDIO To get better picture quality, connect... of the DVD to the component input ports as shown below. If connected to COMPONENT IN 2, select Component 2 input source. 5 Refer to the DVD player's manual for operating instructions.
... the INPUT button on DVD player Y PB PR Y Pb OPTICAL Y B-Y DIGITALAUDIO Y OUT Cb Y PB Pr R-Y S-VIDEO VIDEO Cr PR ( ) AUDIO 22 Component ports on the TV Video output ports on the remote control. - COMPONENT IN AV OUT AV IN 1 • Component Input ports VIDEO AUDIO To get better picture quality, connect... of the DVD to the component input ports as shown below. If connected to COMPONENT IN 2, select Component 2 input source. 5 Refer to the DVD player's manual for operating instructions.

Owner's Manual (English)
Page 23
...Cable signals without an external digital set -top box or other digital external device, refer to 1280x720p. If connected to set . This TV can receive the video and audio signal simultaneously using the INPUT button on the set the output resolution appro- Installation HDSTB Setup - .../DVI or HDMI2 input source with using the INPUT button on the remote control. 3 Turn on the digital set-top box. (Refer to the owner's manual for the digita(ClONTsROLe&StER-VtICoE) p box.) 4 Select Component 1 input source with a Component cable RS-232C IN (CONTROL & SERVICE) Digital Set-top Box B R ...
...Cable signals without an external digital set -top box or other digital external device, refer to 1280x720p. If connected to set . This TV can receive the video and audio signal simultaneously using the INPUT button on the set the output resolution appro- Installation HDSTB Setup - .../DVI or HDMI2 input source with using the INPUT button on the remote control. 3 Turn on the digital set-top box. (Refer to the owner's manual for the digita(ClONTsROLe&StER-VtICoE) p box.) 4 Select Component 1 input source with a Component cable RS-232C IN (CONTROL & SERVICE) Digital Set-top Box B R ...

Owner's Manual (English)
Page 24
To get the best picture quality, adjust the output resolution of the digital set-top box to the owner's manual for the d(PCi)gital set-top box.) REMORTEGBAIUNDIO IN CONTROL IN (RGB/DVI) 4 Select HDMI1/DVI input source with a HDMI to DVI cable SERVICE HDMI ...
To get the best picture quality, adjust the output resolution of the digital set-top box to the owner's manual for the d(PCi)gital set-top box.) REMORTEGBAIUNDIO IN CONTROL IN (RGB/DVI) 4 Select HDMI1/DVI input source with a HDMI to DVI cable SERVICE HDMI ...
Owner's Manual (English)
Page 25
... IN AV OUT AV IN 1 VIDEO AUDIO OPTICAL DIGITAL AUDIO OUT S-VIDEO VIDEO (MONO) AUDIO 1 Connect the second TV or monitor to the TV's AV OUT jacks. 2 See the Operating Manual of the optical cable to p.43) CAUTION Do not look into the optical output port. When connecting with external audio... equipments, such as amplifiers or speakers, please turn the TV speakers off. (Refer to the digital audio optical input on the audio equipment. 3 ...
... IN AV OUT AV IN 1 VIDEO AUDIO OPTICAL DIGITAL AUDIO OUT S-VIDEO VIDEO (MONO) AUDIO 1 Connect the second TV or monitor to the TV's AV OUT jacks. 2 See the Operating Manual of the optical cable to p.43) CAUTION Do not look into the optical output port. When connecting with external audio... equipments, such as amplifiers or speakers, please turn the TV speakers off. (Refer to the digital audio optical input on the audio equipment. 3 ...
Owner's Manual (English)
Page 27
When Source Devices connected with HDMI/DVI Input, output TV SET Resolution (480p, 720p, 1080i) and TV SET Display fit EIA/CEA-861-B Specification to the Manual of HDMI/DVI Source Devices or contact your service center. 4. If not, refer to Screen. If noise is clear. The synchronization input form for... with HDMI/DVI Input, output PC Resolution (VGA, SVGA, XGA, WXGA), Position and Size may be changed, change the refresh rate to the Manual of TV SET and contact an PC graphics card service center. 3. In case HDMI/DVI Source Devices is in PC, HDMI/DVI mode. The fixed image ...
When Source Devices connected with HDMI/DVI Input, output TV SET Resolution (480p, 720p, 1080i) and TV SET Display fit EIA/CEA-861-B Specification to the Manual of HDMI/DVI Source Devices or contact your service center. 4. If not, refer to Screen. If noise is clear. The synchronization input form for... with HDMI/DVI Input, output PC Resolution (VGA, SVGA, XGA, WXGA), Position and Size may be changed, change the refresh rate to the Manual of TV SET and contact an PC graphics card service center. 3. In case HDMI/DVI Source Devices is in PC, HDMI/DVI mode. The fixed image ...

Owner's Manual (English)
Page 30
...Advanced Video Reset Lock System Set Password Block Channel Movie Rating TV Rating-Children TV Rating-General Input Block Audio Language EZ Sound Balance TV Speaker Aspect Ratio Caption/Text Caption Option Language ISM Method Low Power Auto Clock Manual Clock Off Timer On Timer Sleep Timer Auto Off •... Your TV's OSD (On Screen Display) may differ slightly from what is shown in this manual. 30 Press the MENU button and then D / E button to...
...Advanced Video Reset Lock System Set Password Block Channel Movie Rating TV Rating-Children TV Rating-General Input Block Audio Language EZ Sound Balance TV Speaker Aspect Ratio Caption/Text Caption Option Language ISM Method Low Power Auto Clock Manual Clock Off Timer On Timer Sleep Timer Auto Off •... Your TV's OSD (On Screen Display) may differ slightly from what is shown in this manual. 30 Press the MENU button and then D / E button to...
Owner's Manual (English)
Page 31
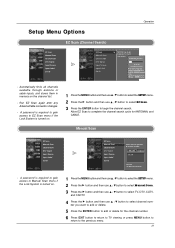
... the G button and then use D / E button to select channel number you to the EZ scan screen. TV Ch.20 0 channel(s) found Press to delete the channel. - Setup Menu Options Operation EZ Scan (Channel Search) EZ Scan Manual Scan Channel Edit DTV Signal Input Source Input Label Set ID EZ Scan...button and then use D / E button to select the SETUP menu. 2 Press the G button and then use D / E button to select Manual Scan. 3 Press the G button and then use D / E button to select TV, DTV, CATV, and CADTV. 4 Press the G button and then use D / E button to select EZ Scan. 3 Press the ENTER ...
... the G button and then use D / E button to select channel number you to the EZ scan screen. TV Ch.20 0 channel(s) found Press to delete the channel. - Setup Menu Options Operation EZ Scan (Channel Search) EZ Scan Manual Scan Channel Edit DTV Signal Input Source Input Label Set ID EZ Scan...button and then use D / E button to select the SETUP menu. 2 Press the G button and then use D / E button to select Manual Scan. 3 Press the G button and then use D / E button to select TV, DTV, CATV, and CADTV. 4 Press the G button and then use D / E button to select EZ Scan. 3 Press the ENTER ...
Owner's Manual (English)
Page 32
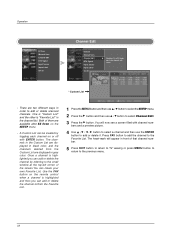
... menu. 32 A Custom List can create your own Favorite List. You will appear in front of that channel number. 5 Press EXIT button to return to TV viewing or press MENU button to return to the small window at the top-left corner of them are displayed in black color, and the... with channel num- Press FAV button to add the channel to the channel edit screen. - Operation EZ Scan Manual Scan Channel Edit DTV Signal Input Source Input Label Set ID Channel Edit EZ Scan Manual Scan Channel Edit DTV Signal Input Source Input Label Set ID G Selection ( G or ) leads you to the...
... menu. 32 A Custom List can create your own Favorite List. You will appear in front of that channel number. 5 Press EXIT button to return to TV viewing or press MENU button to return to the small window at the top-left corner of them are displayed in black color, and the... with channel num- Press FAV button to add the channel to the channel edit screen. - Operation EZ Scan Manual Scan Channel Edit DTV Signal Input Source Input Label Set ID Channel Edit EZ Scan Manual Scan Channel Edit DTV Signal Input Source Input Label Set ID G Selection ( G or ) leads you to the...
Owner's Manual (English)
Page 33
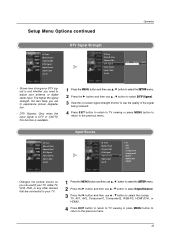
... signal is DTV or CADTV, this function is and whether you can watch your TV, cable TV, VCR, DVD, or any other devices that are to the previous menu. Setup Menu Options continued Operation EZ Scan Manual Scan Channel Edit DTV Signal Input Source Input Label Set ID DTV Signal Strength EZ... picture source so you need to the previous menu. 33 EZ Scan Manual Scan Channel Edit DTV Signal Input Source Input Label Set ID Input Source EZ Scan Manual Scan Channel Edit DTV Signal Input Source Input Label Set ID TV AV1 AV2 Component1 Component2 G RGB-PC HDMI1/DVI HDMI2 - Shows how...
... signal is DTV or CADTV, this function is and whether you can watch your TV, cable TV, VCR, DVD, or any other devices that are to the previous menu. Setup Menu Options continued Operation EZ Scan Manual Scan Channel Edit DTV Signal Input Source Input Label Set ID DTV Signal Strength EZ... picture source so you need to the previous menu. 33 EZ Scan Manual Scan Channel Edit DTV Signal Input Source Input Label Set ID Input Source EZ Scan Manual Scan Channel Edit DTV Signal Input Source Input Label Set ID TV AV1 AV2 Component1 Component2 G RGB-PC HDMI1/DVI HDMI2 - Shows how...

Owner's Manual (English)
Page 34
...- 2, Component1-2, RGB-PC, HDMI1/DVI or HDMI2. 4 Press the F / G button to select the label. 5 Press EXIT button to return to TV viewing or press MENU button to return to the previous menu. 34 Operation EZ Scan Manual Scan Channel Edit DTV Signal Input Source Input Label Set ID Input Label EZ Scan... Manual Scan Channel Edit DTV Signal Input Source Input Label Set ID AV1 Cable Box AV2 VCR Component1 DVD Component2 Set ...
...- 2, Component1-2, RGB-PC, HDMI1/DVI or HDMI2. 4 Press the F / G button to select the label. 5 Press EXIT button to return to TV viewing or press MENU button to return to the previous menu. 34 Operation EZ Scan Manual Scan Channel Edit DTV Signal Input Source Input Label Set ID Input Label EZ Scan... Manual Scan Channel Edit DTV Signal Input Source Input Label Set ID AV1 Cable Box AV2 VCR Component1 DVD Component2 Set ...

