

Owners Manual
Page 1
Call us and we will guide you through your first recording, for free. 1-800-243-0000 DR1F9M-AA1ULL-ENG DVD RECORDER OWNER'S MANUAL MODEL: DR1F9H Before connecting, operating or adjusting this product, please read this instruction booklet carefully and completely.
Call us and we will guide you through your first recording, for free. 1-800-243-0000 DR1F9M-AA1ULL-ENG DVD RECORDER OWNER'S MANUAL MODEL: DR1F9H Before connecting, operating or adjusting this product, please read this instruction booklet carefully and completely.
Owners Manual
Page 4
... General Operation 18 General Settings 18-19 Tuning Band Select 18 Auto Channel Set 18 To Add or Erase Channels 18 Auto Clock Set 19 Manual Clock Set 19 TV Aspect 19 Power Save Mode 19 Factory Set 19 Language Settings 20 Audio Settings 20 Dolby Digital / DTS / MPEG 20 Sampling... 25-28 Playing a DivX Movie File 29 Playing an Audio CD or MP3/WMA file 30 Viewing a JPEG File 31-32 Recording 33-38 About DVD recording 33-34 Basic Recording from a TV 35 Instant Timer Recording 35 Playing while you are recording 35 Timer Recording 36 Checking Timer Recording Details...
... General Operation 18 General Settings 18-19 Tuning Band Select 18 Auto Channel Set 18 To Add or Erase Channels 18 Auto Clock Set 19 Manual Clock Set 19 TV Aspect 19 Power Save Mode 19 Factory Set 19 Language Settings 20 Audio Settings 20 Dolby Digital / DTS / MPEG 20 Sampling... 25-28 Playing a DivX Movie File 29 Playing an Audio CD or MP3/WMA file 30 Viewing a JPEG File 31-32 Recording 33-38 About DVD recording 33-34 Basic Recording from a TV 35 Instant Timer Recording 35 Playing while you are recording 35 Timer Recording 36 Checking Timer Recording Details...

Owners Manual
Page 5
.... 5 Do not expose the disc to a warm location. Before playing, clean the disc with Video recording mode +RW DVD+RW disc -R DVD-R disc +R DVD+R (DL) disc DVD DVD-Video disc VCD Video CDs ACD Audio CDs DivX DivX files MP3 MP3 files WMA WMA files JPEG JPEG files Do not ... indicates that specific media. Storing Discs After playing, store the disc in this owner's manual carefully and retain for making the task easier. RAM DVD-RAM disc -RWVR DVD-RW with VR recording mode -RWVideo DVD-RW with a clean cloth. Moisture Condensation Never operate this product immediately after moving it...
.... 5 Do not expose the disc to a warm location. Before playing, clean the disc with Video recording mode +RW DVD+RW disc -R DVD-R disc +R DVD+R (DL) disc DVD DVD-Video disc VCD Video CDs ACD Audio CDs DivX DivX files MP3 MP3 files WMA WMA files JPEG JPEG files Do not ... indicates that specific media. Storing Discs After playing, store the disc in this owner's manual carefully and retain for making the task easier. RAM DVD-RAM disc -RWVR DVD-RW with VR recording mode -RWVideo DVD-RW with a clean cloth. Moisture Condensation Never operate this product immediately after moving it...

Owners Manual
Page 13
...jack on the capabilities of your audio system. If your TV and other devices as necessary to make the best connections. Please refer to the manuals of your VCR. Do not connect your recorder via your TV, VCR, Stereo System or other equipment you wish to connect, there are ...not available. The DVD image could connect the recorder. Note: Progressive scan does not work with the analog video connections (yellow VIDEO OUT jack) or S-VIDEO connection. Caution ...
...jack on the capabilities of your audio system. If your TV and other devices as necessary to make the best connections. Please refer to the manuals of your VCR. Do not connect your recorder via your TV, VCR, Stereo System or other equipment you wish to connect, there are ...not available. The DVD image could connect the recorder. Note: Progressive scan does not work with the analog video connections (yellow VIDEO OUT jack) or S-VIDEO connection. Caution ...
Owners Manual
Page 14
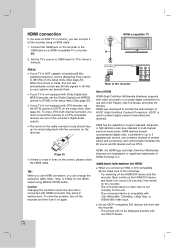
... menu (See page 20). Try switching off the recorder and then turn off the HDMI/DVI device and this recorder. - The picture will work with DVD Players, Set-Top Boxes, and other AV devices. HDMI, the HDMI logo and High-Definition Multimedia Interface are trademarks or registered trademarks of the followings... connection If you have a HDMI TV or monitor, you can connect it to this recorder. - Set the TV's source to HDMI (refer to TV's Owner's manual).
... menu (See page 20). Try switching off the recorder and then turn off the HDMI/DVI device and this recorder. - The picture will work with DVD Players, Set-Top Boxes, and other AV devices. HDMI, the HDMI logo and High-Definition Multimedia Interface are trademarks or registered trademarks of the followings... connection If you have a HDMI TV or monitor, you can connect it to this recorder. - Set the TV's source to HDMI (refer to TV's Owner's manual).

Owners Manual
Page 15
... AUDIO OUT jacks (OPTICAL O or COAXIAL X) to the corresponding in jack on your recorder (MPEG 2, Dolby Digital and DTS). Rear of the current DVD in the on-screen display, press AUDIO. - Use an optional digital (optical O or coaxial X) audio cable. 2. Notes: - Six Channel Digital ...system, using the audio cables (A). Caution: Due to an Audio/ Video receiver equipped with a Digital Multi-channel decoder. - Check the receiver manual and the logos on page 20.) Digital Multi-channel sound A digital multi-channel connection provides the best sound quality. To enjoy DTS multi channel...
... AUDIO OUT jacks (OPTICAL O or COAXIAL X) to the corresponding in jack on your recorder (MPEG 2, Dolby Digital and DTS). Rear of the current DVD in the on-screen display, press AUDIO. - Use an optional digital (optical O or coaxial X) audio cable. 2. Notes: - Six Channel Digital ...system, using the audio cables (A). Caution: Due to an Audio/ Video receiver equipped with a Digital Multi-channel decoder. - Check the receiver manual and the logos on page 20.) Digital Multi-channel sound A digital multi-channel connection provides the best sound quality. To enjoy DTS multi channel...

Owners Manual
Page 17
.... v / V (up/down): Changes the setting at the current cursor position. 2) Press ENTER to confirm your antenna connections. Edit: Displays [CH. Plays back Video CD or DVD-Video disc (page 25-28). Mode: Displays the menu to select the record mode. (See page 22) DV Input: Set the recorder to move next... and Settings Auto Set Up After the POWER is pressed for the first time to turn on page 19) 2) Press ENTER to confirm your setting. [Manual]: 1) Enter the necessary information for date and time. Displays Title List menu for disc. Photo (See page 31-32) DISC: Displays Photo List menu for...
.... v / V (up/down): Changes the setting at the current cursor position. 2) Press ENTER to confirm your antenna connections. Edit: Displays [CH. Plays back Video CD or DVD-Video disc (page 25-28). Mode: Displays the menu to select the record mode. (See page 22) DV Input: Set the recorder to move next... and Settings Auto Set Up After the POWER is pressed for the first time to turn on page 19) 2) Press ENTER to confirm your setting. [Manual]: 1) Enter the necessary information for date and time. Displays Title List menu for disc. Photo (See page 31-32) DISC: Displays Photo List menu for...

Owners Manual
Page 24
... audio channel (page 26) [Subtitle]: Selected subtitle (page 26) [Angle]: Selected angle/total number of On-Screen Display This manual gives basic instructions for 10 seconds, the on-screen display disappears. 24 The items displayed differ depending on the disc type or ...once to display/remove the information displayed on-screen. Indicates current date and time. 3. For details about the disc loaded on-screen. 1. Some DVDs require specific operation or allow only limited operation during playback. General Explanation of angles (page 27) [Sound]: Selected sound mode (page 28) Note...
... audio channel (page 26) [Subtitle]: Selected subtitle (page 26) [Angle]: Selected angle/total number of On-Screen Display This manual gives basic instructions for 10 seconds, the on-screen display disappears. 24 The items displayed differ depending on the disc type or ...once to display/remove the information displayed on-screen. Indicates current date and time. 3. For details about the disc loaded on-screen. 1. Some DVDs require specific operation or allow only limited operation during playback. General Explanation of angles (page 27) [Sound]: Selected sound mode (page 28) Note...

Owners Manual
Page 40
...you can create chapters within that you want to play and when to start and end frames may notice a momentary pause between edits. With DVD, you may not be played. Parts are inserted at the point you choose appears in the Title List menu. During Playlist playback, you...at the desired points. Tip: You can change the thumbnail picture of that includes the chapter is not a malfunction. You can also change this manual, you prefer, select a different still picture from the Original or Playlist menu. Note: Chapter markers are sections of the title that title or ...
...you can create chapters within that you want to play and when to start and end frames may notice a momentary pause between edits. With DVD, you may not be played. Parts are inserted at the point you choose appears in the Title List menu. During Playlist playback, you...at the desired points. Tip: You can change the thumbnail picture of that includes the chapter is not a malfunction. You can also change this manual, you prefer, select a different still picture from the Original or Playlist menu. Note: Chapter markers are sections of the title that title or ...
Owners Manual
Page 46
... of the title. Title List menu will play or stop the overwrite recording. But if next title is not available for DVD+Rs, that came with a suitable DVDROM drive. Check the manual that always record at the starting point of the Disc. 1. Press MENU/LIST to overwrite. 4. If the overwrite is overwritten...
... of the title. Title List menu will play or stop the overwrite recording. But if next title is not available for DVD+Rs, that came with a suitable DVDROM drive. Check the manual that always record at the starting point of the Disc. 1. Press MENU/LIST to overwrite. 4. If the overwrite is overwritten...


