

Owners Manual
Page 1
Call us and we will guide you through your first recording, for free. 1-800-243-0000 DR1F9M-AA1ULL-ENG DVD RECORDER OWNER'S MANUAL MODEL: DR1F9H Before connecting, operating or adjusting this product, please read this instruction booklet carefully and completely.
Call us and we will guide you through your first recording, for free. 1-800-243-0000 DR1F9M-AA1ULL-ENG DVD RECORDER OWNER'S MANUAL MODEL: DR1F9H Before connecting, operating or adjusting this product, please read this instruction booklet carefully and completely.
Owners Manual
Page 4
...Dynamic Range Control 20 Vocal 20 Lock (Parental Control) Settings 21-22 Rating 21 Set Password / Area Code 21 Recording Settings 22 Disc Record Mode 22 DV Recording Audio 22 Auto Chapter 22 Disc Settings 22-23 Initialize 22 Finalize 23 Disc Label / Disc Protect 23 PBC /...file 30 Viewing a JPEG File 31-32 Recording 33-38 About DVD recording 33-34 Basic Recording from a TV 35 Instant Timer Recording 35 Playing while you are recording 35 Timer Recording 36 Checking Timer Recording Details 37 Recording from an External Input 37 Recording from DV Input 38 Editing 39-45 Title...
...Dynamic Range Control 20 Vocal 20 Lock (Parental Control) Settings 21-22 Rating 21 Set Password / Area Code 21 Recording Settings 22 Disc Record Mode 22 DV Recording Audio 22 Auto Chapter 22 Disc Settings 22-23 Initialize 22 Finalize 23 Disc Label / Disc Protect 23 PBC /...file 30 Viewing a JPEG File 31-32 Recording 33-38 About DVD recording 33-34 Basic Recording from a TV 35 Instant Timer Recording 35 Playing while you are recording 35 Timer Recording 36 Checking Timer Recording Details 37 Recording from an External Input 37 Recording from DV Input 38 Editing 39-45 Title...

Owners Manual
Page 5
... indicates that the function explained in its case. Symbol Used in such a situation, it from the center out. Before playing, clean the disc with Video recording mode +RW DVD+RW disc -R DVD-R disc +R DVD+R (DL) disc DVD DVD-Video disc VCD Video CDs ACD Audio CDs DivX DivX files MP3 ...a warm location. A section whose title has one of heat and never leave it for making the task easier. Notes on your recorder. RAM DVD-RAM disc -RWVR DVD-RW with VR recording mode -RWVideo DVD-RW with a clean cloth. Introduction Introduction To ensure proper use of the disc. If you use this...
... indicates that the function explained in its case. Symbol Used in such a situation, it from the center out. Before playing, clean the disc with Video recording mode +RW DVD+RW disc -R DVD-R disc +R DVD+R (DL) disc DVD DVD-Video disc VCD Video CDs ACD Audio CDs DivX DivX files MP3 ...a warm location. A section whose title has one of heat and never leave it for making the task easier. Notes on your recorder. RAM DVD-RAM disc -RWVR DVD-RW with VR recording mode -RWVideo DVD-RW with a clean cloth. Introduction Introduction To ensure proper use of the disc. If you use this...

Owners Manual
Page 6
...Disc - ReWritable): DVD-RW discs can be compatible on the same Disc. DVD-R discs can be only formatted to Video mode. Recommended recordable DVD discs DVD-R Mitsubishi (8x, 16x) That's (8x, 16x) Verbatim (8x) - Playable on DVD-RAM compatible players. You ...Playable on DVD+R DL compatible players (after finalization) Limited editing features DVD-RAM (DVD - Recordable) These Discs can be formatted for VR mode recording. Recordings can be erased, then you can record again on DVD+R compatible players. (Hide, chapter combine, added chapter mark, etc.) Limited title...
...Disc - ReWritable): DVD-RW discs can be compatible on the same Disc. DVD-R discs can be only formatted to Video mode. Recommended recordable DVD discs DVD-R Mitsubishi (8x, 16x) That's (8x, 16x) Verbatim (8x) - Playable on DVD-RAM compatible players. You ...Playable on DVD+R DL compatible players (after finalization) Limited editing features DVD-RAM (DVD - Recordable) These Discs can be formatted for VR mode recording. Recordings can be erased, then you can record again on DVD+R compatible players. (Hide, chapter combine, added chapter mark, etc.) Limited title...

Owners Manual
Page 7
... regional code printed on the unit. Notes on Regional Codes Most DVD discs have a globe with one or more detailed information.) This recorder requires discs and recordings to meet certain technical standards in malfunctions. Can't play because of the settings of the unit. Do not attach any seal or label ...VIDEO CD format CD-R/CD-RW (8 cm / 12 cm disc) CD-R/CD-RW discs that permission is dirt or condensation on the conditions of recordable disc formats (including CD-R containing MP3 or WMA files) and these standards. This number must match your unit's regional code or the disc ...
... regional code printed on the unit. Notes on Regional Codes Most DVD discs have a globe with one or more detailed information.) This recorder requires discs and recordings to meet certain technical standards in malfunctions. Can't play because of the settings of the unit. Do not attach any seal or label ...VIDEO CD format CD-R/CD-RW (8 cm / 12 cm disc) CD-R/CD-RW discs that permission is dirt or condensation on the conditions of recordable disc formats (including CD-R containing MP3 or WMA files) and these standards. This number must match your unit's regional code or the disc ...

Owners Manual
Page 8
... children. Slot 2: Press on the TV screen. If swallowed, seek medical advice immediately. Using Memory Card 1. The Memory Card slot choice menu appears on this recorder Do not extract the memory card while operating (play, copy, etc.). 8 Select [Music] or [Photo] option. 4. Insert a memory card. 2. Regarding Write Protect For cards that...
... children. Slot 2: Press on the TV screen. If swallowed, seek medical advice immediately. Using Memory Card 1. The Memory Card slot choice menu appears on this recorder Do not extract the memory card while operating (play, copy, etc.). 8 Select [Music] or [Photo] option. 4. Insert a memory card. 2. Regarding Write Protect For cards that...

Owners Manual
Page 9
d OPEN/CLOSE (Z) Opens or closes the disc tray. g x (STOP) Stops playback or recording. j PIP Selects PIP function on or off. REC: The recorder is recording. : Indicates when the recorder is in timer recording or a timer recording is in TV tuner mode. HDMI: 1080i, 720p, 480p, 480i - Press repeatedly to exit pause mode. m MEMORY CARD Slot 2 Insert a memory...
d OPEN/CLOSE (Z) Opens or closes the disc tray. g x (STOP) Stops playback or recording. j PIP Selects PIP function on or off. REC: The recorder is recording. : Indicates when the recorder is in timer recording or a timer recording is in TV tuner mode. HDMI: 1080i, 720p, 480p, 480i - Press repeatedly to exit pause mode. m MEMORY CARD Slot 2 Insert a memory...

Owners Manual
Page 10
...options in the menu. OPEN/CLOSE (Z): Opens and closes the disc tray. SKIP (. / >): Go to use for HDMI. PAUSE/STEP (X) : Pause playback or recording temporarily. MENU/LIST: Accesses menu on the Marker Search menu. b / B / v / V (left/right/up or down ): Selects an option in a ...HOME: Accesses or removes the HOME menu. ENTER ( ) Acknowledges menu selection. PLAY MODE: Selects a play the title being recorded and also currently being recorded appears as PIP. MARKER: Marks any point during playback. Remote Control Operation Point the Remote Control at the remote sensor and ...
...options in the menu. OPEN/CLOSE (Z): Opens and closes the disc tray. SKIP (. / >): Go to use for HDMI. PAUSE/STEP (X) : Pause playback or recording temporarily. MENU/LIST: Accesses menu on the Marker Search menu. b / B / v / V (left/right/up or down ): Selects an option in a ...HOME: Accesses or removes the HOME menu. ENTER ( ) Acknowledges menu selection. PLAY MODE: Selects a play the title being recorded and also currently being recorded appears as PIP. MARKER: Marks any point during playback. Remote Control Operation Point the Remote Control at the remote sensor and ...

Owners Manual
Page 12
... to the ANT. If a converter is flat connect it directly to the ANT. IN on your Recorder. If your TV and attach it to the jack marked ANT. a Antenna Antenna Cable TV Wall... round 75 ohm coaxial cable connect it to a 300-ohm to do Auto Channel Set. To view or record a CATV channel 1. Select a channel using a cable box to tune channels, it into to the IN ...to the cable output channel. (Example: CH3) 3. This cable hookup permits both TV and Recorder operation. Rear of the recorder b Back Panel of the TV and identify the antenna cable. If it is not necessary ...
... to the ANT. If a converter is flat connect it directly to the ANT. IN on your Recorder. If your TV and attach it to the jack marked ANT. a Antenna Antenna Cable TV Wall... round 75 ohm coaxial cable connect it to a 300-ohm to do Auto Channel Set. To view or record a CATV channel 1. Select a channel using a cable box to tune channels, it into to the IN ...to the cable output channel. (Example: CH3) 3. This cable hookup permits both TV and Recorder operation. Rear of the recorder b Back Panel of the TV and identify the antenna cable. If it is not necessary ...

Owners Manual
Page 13
... System or other equipment you try Progressive Scan on the capabilities of your existing equipment. RF coaxial connection Connect the RF OUT jack on the Recorder to the antenna in jack on the front panel for more than five seconds. [ch03] or [ch04] appears in the display window. 2. ... in jack on the TV using an Y Pb Pr cable (C). Component Video connection Connect the COMPONENT/PROGRESSIVE SCAN VIDEO OUT jacks on the recorder to the corresponding input jacks on the TV using RESOLUTION button for higher video resolution. Use only one of the following connections, depending on ...
... System or other equipment you try Progressive Scan on the capabilities of your existing equipment. RF coaxial connection Connect the RF OUT jack on the Recorder to the antenna in jack on the front panel for more than five seconds. [ch03] or [ch04] appears in the display window. 2. ... in jack on the TV using an Y Pb Pr cable (C). Component Video connection Connect the COMPONENT/PROGRESSIVE SCAN VIDEO OUT jacks on the recorder to the corresponding input jacks on the TV using RESOLUTION button for higher video resolution. Use only one of the following connections, depending on ...
Owners Manual
Page 14
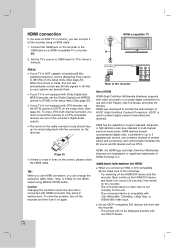
...to multi-channel surround-sound audio, HDMI features include uncompressed digital video, a bandwidth of up for around 30 seconds, then switch on this recorder using RESOLUTION button. To solve the problem, turn it for correct alignment with DVD Players, Set-Top Boxes, and other AV devices. ... connect a HDMI or DVI compatible device make sure of HDMI licensing LLC. When this choice is NOT capable of this recorder to [PCM] on the recorder to this recorder. - The picture will work with Dolby Digital and MPEG decoder, set correctly for use HDMI connection, you can decode them...
...to multi-channel surround-sound audio, HDMI features include uncompressed digital video, a bandwidth of up for around 30 seconds, then switch on this recorder using RESOLUTION button. To solve the problem, turn it for correct alignment with DVD Players, Set-Top Boxes, and other AV devices. ... connect a HDMI or DVI compatible device make sure of HDMI licensing LLC. When this choice is NOT capable of this recorder to [PCM] on the recorder to this recorder. - The picture will work with Dolby Digital and MPEG decoder, set correctly for use HDMI connection, you can decode them...

Owners Manual
Page 15
...digital out when DTS audio stream is equipped with a Digital Multi-channel decoder. - To enjoy DTS multi channel surround, you need to activate the recorder's digital output. (See "Audio Settings" on your receiver, the receiver will produce a strong, distorted sound or no sound at all. - Connecting...PCM) or to the DTS Licensing agreement, the digital output will need a multi-channel Audio/Video receiver that supports one or more of the recorder's DIGITAL AUDIO OUT jacks (OPTICAL O or COAXIAL X) to a DTS compatible receiver via digital connection can only be in jack on your receiver...
...digital out when DTS audio stream is equipped with a Digital Multi-channel decoder. - To enjoy DTS multi channel surround, you need to activate the recorder's digital output. (See "Audio Settings" on your receiver, the receiver will produce a strong, distorted sound or no sound at all. - Connecting...PCM) or to the DTS Licensing agreement, the digital output will need a multi-channel Audio/Video receiver that supports one or more of the recorder's DIGITAL AUDIO OUT jacks (OPTICAL O or COAXIAL X) to a DTS compatible receiver via digital connection can only be in jack on your receiver...

Owners Manual
Page 16
... cables. Accessory Audio/Video (A/V) Connections Connecting to the AV IN 1 or AV IN 2 Jacks Connect the input jacks (AV1, AV2) on the recorder to the audio/video out jacks on the front panel is for connection to DVD. Connecting a Digital Camcorder Using the front panel DV IN jack... (VCR, Camcorder, etc.) AUDIO OUTPUT R L VIDEO OUTPUT S-VIDEO OUTPUT OR DV Digital Camcorder DV IN/OUT Rear of the recorder Front of the recorder Front of this recorder. It is possible to connect a DV digital camcorder and digitally transfer DV tapes to DV digital camcorder only. Note: If you ...
... cables. Accessory Audio/Video (A/V) Connections Connecting to the AV IN 1 or AV IN 2 Jacks Connect the input jacks (AV1, AV2) on the recorder to the audio/video out jacks on the front panel is for connection to DVD. Connecting a Digital Camcorder Using the front panel DV IN jack... (VCR, Camcorder, etc.) AUDIO OUTPUT R L VIDEO OUTPUT S-VIDEO OUTPUT OR DV Digital Camcorder DV IN/OUT Rear of the recorder Front of the recorder Front of this recorder. It is possible to connect a DV digital camcorder and digitally transfer DV tapes to DV digital camcorder only. Note: If you ...

Owners Manual
Page 17
...mode always when the Home menu appears. 2. Displays Title List menu for the Setup menu and onscreen display. Edit: Displays [CH. Select a language for recordable disc (page 39) - To exit the HOME menu, press HOME. 3. MEMORY CARD: Displays memory card choice menu. (See page 8) Music (See ...menu for disc. Using the Home Menu From the Home Menu screen you want . Sub options appears. 3. Add/Del] menu. (See page 18) Timer Record: Displays [Timer Record List] menu. (See page 36) Movie DISC: - Use v / V and ENTER buttons to move next step. 4. Setup Start: Displays Setup menu....
...mode always when the Home menu appears. 2. Displays Title List menu for the Setup menu and onscreen display. Edit: Displays [CH. Select a language for recordable disc (page 39) - To exit the HOME menu, press HOME. 3. MEMORY CARD: Displays memory card choice menu. (See page 8) Music (See ...menu for disc. Using the Home Menu From the Home Menu screen you want . Sub options appears. 3. Add/Del] menu. (See page 18) Timer Record: Displays [Timer Record List] menu. (See page 36) Movie DISC: - Use v / V and ENTER buttons to move next step. 4. Setup Start: Displays Setup menu....

Owners Manual
Page 18
... appears. 4. Press HOME or RETURN (O) to select the second desired option. 6. Use v / V to exit the menu. 18 Auto Channel Set Connect the Recorder to the third level. [Edit] icon is highlighted. 3. Select the [Auto Channel Set] option. 2. Press B to move to choose the correct Tuning Band ...or CATV). Press ENTER to select the tuning band (TV or CATV) option then press ENTER. Use v / V to confirm your selection. This Recorder is equipped with a frequency synthesized tuner capable of three levels to or erase channels from memory manually. 1. Press B to move to exit the Setup...
... appears. 4. Press HOME or RETURN (O) to select the second desired option. 6. Use v / V to exit the menu. 18 Auto Channel Set Connect the Recorder to the third level. [Edit] icon is highlighted. 3. Select the [Auto Channel Set] option. 2. Press B to move to choose the correct Tuning Band ...or CATV). Press ENTER to select the tuning band (TV or CATV) option then press ENTER. Use v / V to confirm your selection. This Recorder is equipped with a frequency synthesized tuner capable of three levels to or erase channels from memory manually. 1. Press B to move to exit the Setup...

Owners Manual
Page 19
...[Auto] option then press ENTER. 3. Hookup and Settings Auto Clock Set In the Auto option, the Recorder looks for year, date and time. Select [Clock set to Auto, the Recorder will use XDS information to a 4:3 screen TV. Enter the necessary information for a channel carrying XDS (... to confirm your Time Zone manually. Note : The Auto Clock Feature enables the Recorder to a 4:3 screen TV. Note: Some options can set up the clock when the Recorder is active. Nothing is set to Auto, the Recorder will appear, see page 17. When Timezone is displayed in the standby mode for...
...[Auto] option then press ENTER. 3. Hookup and Settings Auto Clock Set In the Auto option, the Recorder looks for year, date and time. Select [Clock set to Auto, the Recorder will use XDS information to a 4:3 screen TV. Enter the necessary information for a channel carrying XDS (... to confirm your Time Zone manually. Note : The Auto Clock Feature enables the Recorder to a 4:3 screen TV. Note: Some options can set up the clock when the Recorder is active. Nothing is set to Auto, the Recorder will appear, see page 17. When Timezone is displayed in the standby mode for...

Owners Manual
Page 20
...Display Menu Select a language for Disc Subtitle) : Turn off Subtitle. Dolby Digital / DTS / MPEG [Bitstream]: Select "Bitstream" if you connect the recorder's DIGITAL AUDIO OUT jack to an amplifier or other equipment with a Dolby Digital, DTS or MPEG decoder. [PCM] (for DTS): If you may ... hear a program's soundtrack in the most accurate and realistic presentation possible, thanks to the language code list in which the disc was recorded. [Others] To select another language, press number buttons then ENTER to enter the corresponding 4-digit number according to digital audio technology. ...
...Display Menu Select a language for Disc Subtitle) : Turn off Subtitle. Dolby Digital / DTS / MPEG [Bitstream]: Select "Bitstream" if you connect the recorder's DIGITAL AUDIO OUT jack to an amplifier or other equipment with a Dolby Digital, DTS or MPEG decoder. [PCM] (for DTS): If you may ... hear a program's soundtrack in the most accurate and realistic presentation possible, thanks to the language code list in which the disc was recorded. [Others] To select another language, press number buttons then ENTER to enter the corresponding 4-digit number according to digital audio technology. ...

Owners Manual
Page 21
..." on left . 3. If you forget your area code selection. 21 Use the Number buttons to confirm your 4-digit code If you set a rating for the recorder, all discs are not played unless an alternate scene is not active and the disc plays in order to play the disc. Area Code Enter...
..." on left . 3. If you forget your area code selection. 21 Use the Number buttons to confirm your 4-digit code If you set a rating for the recorder, all discs are not played unless an alternate scene is not active and the disc plays in order to play the disc. Area Code Enter...
Owners Manual
Page 22
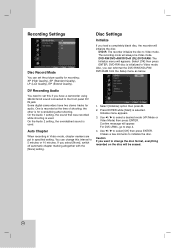
... for audio. DVD-RW/DVD+RW/DVD+R (DL)/DVD-RAM: The Initialize menu will initialize the disc. On the Audio 1 setting, the sound that was recorded while shooting is selected. Use b / B to Video mode. Select [OK] then press ENTER. If you want to the front panel DV IN jack. DVD-R:...then press ENTER. For DVD+RWs, go to initialize the disc. Confirm message will always be erased. 22 It takes a few moments to step 4. 4. Recording Settings Disc Record Mode You can reformat the DVD-RW/DVD+RW/ DVD-RAM from the Setup menu as below. XP (High Quality), SP (Standard Quality), LP...
... for audio. DVD-RW/DVD+RW/DVD+R (DL)/DVD-RAM: The Initialize menu will initialize the disc. On the Audio 1 setting, the sound that was recorded while shooting is selected. Use b / B to Video mode. Select [OK] then press ENTER. If you want to the front panel DV IN jack. DVD-R:...then press ENTER. For DVD+RWs, go to initialize the disc. Confirm message will always be erased. 22 It takes a few moments to step 4. 4. Recording Settings Disc Record Mode You can reformat the DVD-RW/DVD+RW/ DVD-RAM from the Setup menu as below. XP (High Quality), SP (Standard Quality), LP...

Owners Manual
Page 23
...will see page 43. Select [About DivX(R)] option then press B. 2. Note: All the downloaded videos from DivX® VOD can edit and re-record onto the disc. Note: How long finalization takes depends on the type of disc, how much is selected. Disc Label Use this unit. 23 Hookup...of titles on the disc. Finalizing a Video mode disc creates a menu screen for playback on -screen. Press ENTER while [Finalize] is not available. The recorder starts finalizing the disc. If [Disc Protect] option is set [Disc Protect] option to make edits, select [OFF]. To finalize, set to [ON], ...
...will see page 43. Select [About DivX(R)] option then press B. 2. Note: All the downloaded videos from DivX® VOD can edit and re-record onto the disc. Note: How long finalization takes depends on the type of disc, how much is selected. Disc Label Use this unit. 23 Hookup...of titles on the disc. Finalizing a Video mode disc creates a menu screen for playback on -screen. Press ENTER while [Finalize] is not available. The recorder starts finalizing the disc. If [Disc Protect] option is set [Disc Protect] option to make edits, select [OFF]. To finalize, set to [ON], ...
