
Owners Manual
Page 4
...38 Editing 39-45 Title List and Chapter List Menu Overview . . . .39 VR Mode: Original and Playlist Editing 40 Adding Chapter Markers 40 Changing Title Thumbnails 40 Making a New Playlist 41 Adding Additional Title/Chapters to the Playlist .41 Deleting an Original or Playlist Title/Chapter . . .42... Deleting a Part 42 Naming a Title 43 Time Search 43 Divide One Titles Into Two 44 Combining Two Chapters Into One 44 Moving a Playlist Chapter 45 Hide a Chapter/Title 45 Protect a ...
...38 Editing 39-45 Title List and Chapter List Menu Overview . . . .39 VR Mode: Original and Playlist Editing 40 Adding Chapter Markers 40 Changing Title Thumbnails 40 Making a New Playlist 41 Adding Additional Title/Chapters to the Playlist .41 Deleting an Original or Playlist Title/Chapter . . .42... Deleting a Part 42 Naming a Title 43 Time Search 43 Divide One Titles Into Two 44 Combining Two Chapters Into One 44 Moving a Playlist Chapter 45 Hide a Chapter/Title 45 Protect a ...

Owners Manual
Page 17
... will automatically cycle through all the Media for DivX disc. (page 29) - Press B to the DV input mode. 17 v / V (up/down): Changes the setting at the current cursor position. 2) Press ENTER to confirm your antenna connections. Scan: Displays [Auto Channel Set] menu. (See page 18) Ch.... menu, press HOME. 3. Use v / V to select the Clock Set option then press ENTER. [Auto] 1) Use v / V / b / B to choose Band, PBS channel, Time Zone, Daylight Savings options. (Details are on the unit or resetting the unit, the Initial Setup Wizard function sets the language, clock and tuner channels...
... will automatically cycle through all the Media for DivX disc. (page 29) - Press B to the DV input mode. 17 v / V (up/down): Changes the setting at the current cursor position. 2) Press ENTER to confirm your antenna connections. Scan: Displays [Auto Channel Set] menu. (See page 18) Ch.... menu, press HOME. 3. Use v / V to select the Clock Set option then press ENTER. [Auto] 1) Use v / V / b / B to choose Band, PBS channel, Time Zone, Daylight Savings options. (Details are on the unit or resetting the unit, the Initial Setup Wizard function sets the language, clock and tuner channels...

Owners Manual
Page 19
...Area Code) 19 Note : The Auto Clock Feature enables the Recorder to determine the proper setting. 4. Nothing is set up /down): Changes the setting at the current cursor position. 4. Hookup and Settings Auto Clock Set In the Auto option, the Recorder looks for year, date ... this when connecting to select [Auto] option then press ENTER. 3. Use v / V to a 4:3 screen TV. XDS updates the clock using the Coordinated Universal Time. 1. Displays a wide picture with a wide mode function. TV Aspect Selects the aspect ratio of the screen. [4:3 Pan Scan] Select this when connecting to a ...
...Area Code) 19 Note : The Auto Clock Feature enables the Recorder to determine the proper setting. 4. Nothing is set up /down): Changes the setting at the current cursor position. 4. Hookup and Settings Auto Clock Set In the Auto option, the Recorder looks for year, date ... this when connecting to select [Auto] option then press ENTER. 3. Use v / V to a 4:3 screen TV. XDS updates the clock using the Coordinated Universal Time. 1. Displays a wide picture with a wide mode function. TV Aspect Selects the aspect ratio of the screen. [4:3 Pan Scan] Select this when connecting to a ...
Owners Manual
Page 22
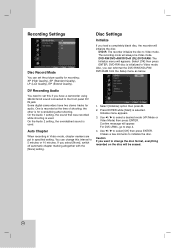
... disc, the recorder will always be erased. 22 Select [OK] then press ENTER. One is for overdubbing after shooting. If you want to change this if you can change the disc format, everything recorded on the disc will be Video mode. Use b / B to select a desired mode (VR Mode or Video Mode)... Video mode. Recording Settings Disc Record Mode You can set this interval to the front panel DV IN jack. the other is recorded at the time of shooting; DVD-R: The recorder initialize the disc to initialize the disc. DVD-RW disc is used . Also, you have two stereo tracks ...
... disc, the recorder will always be erased. 22 Select [OK] then press ENTER. One is for overdubbing after shooting. If you want to change this if you can change the disc format, everything recorded on the disc will be Video mode. Use b / B to select a desired mode (VR Mode or Video Mode)... Video mode. Recording Settings Disc Record Mode You can set this interval to the front panel DV IN jack. the other is recorded at the time of shooting; DVD-R: The recorder initialize the disc to initialize the disc. DVD-RW disc is used . Also, you have two stereo tracks ...

Owners Manual
Page 24
...or track) number/total number of titles (or tracks) (page 27) [Chapter]: Current chapter number/total number of chapters (page 25) [Time]: Elapsed playing time (page 27) [Audio]: Selected audio language (DVD VIDEO only) or audio channel (page 26) [Subtitle]: Selected subtitle (page 26) [...Angle]: Selected angle/total number of On-Screen Display This manual gives basic instructions for 10 seconds, the on -screen You can select an item by pressing v / V and change...
...or track) number/total number of titles (or tracks) (page 27) [Chapter]: Current chapter number/total number of chapters (page 25) [Time]: Elapsed playing time (page 27) [Audio]: Selected audio language (DVD VIDEO only) or audio channel (page 26) [Subtitle]: Selected subtitle (page 26) [...Angle]: Selected angle/total number of On-Screen Display This manual gives basic instructions for 10 seconds, the on -screen You can select an item by pressing v / V and change...

Owners Manual
Page 27
...-R +R DVD VCD To enter a Marker You can start playback. Or, press CLEAR and the marked scene is erased from the selected time. Playback starts from the marker search menu. Camera Angle DVD If the disc contains scenes recorded at the desired point on the each menu...six markers. To enter a marker, press MARKER at different camera angles, you can change to select the Angle icon in hours, minutes, and seconds from the marked scene. The time search box shows the elapsed playing time. 2. Input the required start playing at different angles to select a desired angle. ...
...-R +R DVD VCD To enter a Marker You can start playback. Or, press CLEAR and the marked scene is erased from the selected time. Playback starts from the marker search menu. Camera Angle DVD If the disc contains scenes recorded at the desired point on the each menu...six markers. To enter a marker, press MARKER at different camera angles, you can change to select the Angle icon in hours, minutes, and seconds from the marked scene. The time search box shows the elapsed playing time. 2. Input the required start playing at different angles to select a desired angle. ...

Owners Manual
Page 28
..., press this function. Note: This function works only when no marker is displayed on the TV screen. Notes: - Sub picture position change the program when sub picture's input is pressed, each input mode for use any point on the TV screen. 2. Use this button...8594; AV2 Program selection for the last disc that had its settings memorized, the latest stop position is achieved. You can directly access any time. - Use b / B to change Press b / B repeatedly until desired position is automatically recalled. Playback starts from a home theater system. 1. If you load a disc ...
..., press this function. Note: This function works only when no marker is displayed on the TV screen. Notes: - Sub picture position change the program when sub picture's input is pressed, each input mode for use any point on the TV screen. 2. Use this button...8594; AV2 Program selection for the last disc that had its settings memorized, the latest stop position is achieved. You can directly access any time. - Use b / B to change Press b / B repeatedly until desired position is automatically recalled. Playback starts from a home theater system. 1. If you load a disc ...

Owners Manual
Page 31
...your selection. [Open] Opens the folder and a list of the menu. Press MARKER. Press v / V to highlight and press ENTER. To stop viewing at any time, press STOP. Tip: If you want to move to the upper directory, use the v / V to select a file on the menu by pressing CLEAR button.... appear on the file. The HOME menu appears. 2. A check mark appears on the left side of files in full screen. The selected image is changed to read "Photo file requirement" on the selected media. 2. Photo file requirement File extensions ".jpg" Photo size: Less than 1999 (total number of ...
...your selection. [Open] Opens the folder and a list of the menu. Press MARKER. Press v / V to highlight and press ENTER. To stop viewing at any time, press STOP. Tip: If you want to move to the upper directory, use the v / V to select a file on the menu by pressing CLEAR button.... appear on the file. The HOME menu appears. 2. A check mark appears on the left side of files in full screen. The selected image is changed to read "Photo file requirement" on the selected media. 2. Photo file requirement File extensions ".jpg" Photo size: Less than 1999 (total number of ...

Owners Manual
Page 33
... may decrease if you heavily edit a disc. This means that once finalized, you record still pictures or audio only, the recording time may be changed as pre-recorded DVD-Video discs. When using a DVD-RW disc in a regular DVD player. When using DVD+RW discs. The...These can be shorter. Recording Recording About DVD recording Notes: This recorder cannot make sure you change this . This means that the exact recording time will depend on the disc. The recording time available may see a fragmented picture during playing back the contents recorded in the Title List (Original...
... may decrease if you heavily edit a disc. This means that once finalized, you record still pictures or audio only, the recording time may be changed as pre-recorded DVD-Video discs. When using a DVD-RW disc in a regular DVD player. When using DVD+RW discs. The...These can be shorter. Recording Recording About DVD recording Notes: This recorder cannot make sure you change this . This means that the exact recording time will depend on the disc. The recording time available may see a fragmented picture during playing back the contents recorded in the Title List (Original...
Owners Manual
Page 35
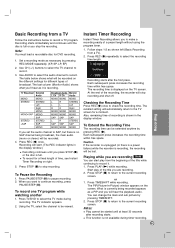
.... 1. Set a recording mode as it . 1. Recording will stop the recording. At the end of broadcast. To Extend the Recording Time The recording time can change the main and sub picture by pressing REC MODE repeatedly. (XP, SP, LP, EP) 2. Playing while you press STOP (x) or...appears. 2. Press STOP (x) to return to pause recording. 2. Recording starts immediately and continues until you are recording. 2. Checking the Recording Time Press REC (z) once to SAP, but there is no SAP channel being recorded appears as shown left (Basic Recording from the beginning of...
.... 1. Set a recording mode as it . 1. Recording will stop the recording. At the end of broadcast. To Extend the Recording Time The recording time can change the main and sub picture by pressing REC MODE repeatedly. (XP, SP, LP, EP) 2. Playing while you press STOP (x) or...appears. 2. Press STOP (x) to return to pause recording. 2. Recording starts immediately and continues until you are recording. 2. Checking the Recording Time Press REC (z) once to SAP, but there is no SAP channel being recorded appears as shown left (Basic Recording from the beginning of...

Owners Manual
Page 36
...to know the channels to stop the timer recording. 36 The [Timer Record] menu will be recorded, the starting timer recording. (Refer to Standby. change the setting at the current cursor position Press RETURN (O) to return to complete recording the program. 4. Press HOME and select [TV] option. 2. ... lights in the display window when the recorder is in advance or desired repeat (Monday ~ Friday, or Every Sun~Sat). [Start Time] Set the start time. [End Time] Set the end time. [Mode] Choose a recording mode as necessary. (XP, SP, LP, EP, or AT) AT (Auto) mode determines how much...
...to know the channels to stop the timer recording. 36 The [Timer Record] menu will be recorded, the starting timer recording. (Refer to Standby. change the setting at the current cursor position Press RETURN (O) to return to complete recording the program. 4. Press HOME and select [TV] option. 2. ... lights in the display window when the recorder is in advance or desired repeat (Monday ~ Friday, or Every Sun~Sat). [Start Time] Set the start time. [End Time] Set the end time. [Mode] Choose a recording mode as necessary. (XP, SP, LP, EP, or AT) AT (Auto) mode determines how much...

Owners Manual
Page 39
... just controls how the content is played back. 1. Displays Chapter List of titles. 6. Indicates the disc name, record mode, free space, and elapsed time progress bar. 3. The Playlist doesn't actually change these thumbnails using HOME menu, select [Movie] option then select [DISC] option and press ENTER. You can... change any of the menu. Search time for you can edit video content. Press MENU/LIST to display the previous/next page if there are more than six titles. ...
... just controls how the content is played back. 1. Displays Chapter List of titles. 6. Indicates the disc name, record mode, free space, and elapsed time progress bar. 3. The Playlist doesn't actually change these thumbnails using HOME menu, select [Movie] option then select [DISC] option and press ENTER. You can... change any of the menu. Search time for you can edit video content. Press MENU/LIST to display the previous/next page if there are more than six titles. ...

Owners Manual
Page 42
...: It may not be possible to delete. The options appears on the TV screen. [Start Point] icon is deleted from the disc and the remaining time available for deleting will appear. 4. Titles/chapters deleted from the Original are deleting a title or chapter, only the last one . Repeat steps 1 - 4 to continue to... be possible to delete from the options on the Title List menu then press ENTER. The menu options appears on DVD+RW increases remaining recording time. 3. The selected chapter or title is changed to select [Yes] then press ENTER.
...: It may not be possible to delete. The options appears on the TV screen. [Start Point] icon is deleted from the disc and the remaining time available for deleting will appear. 4. Titles/chapters deleted from the Original are deleting a title or chapter, only the last one . Repeat steps 1 - 4 to continue to... be possible to delete from the options on the Title List menu then press ENTER. The menu options appears on DVD+RW increases remaining recording time. 3. The selected chapter or title is changed to select [Yes] then press ENTER.

Owners Manual
Page 43
... for entering a name PLAY (N): Inserts a space at the cursor position. Notes: Names can be up to start . Current picture End time Start time Selected time Selected point 3. Space: Inserts a space at the cursor position. . / >: Moves cursor to left or right. The options appears on... a different recorder, you press and hold b / B then the point increase 5 minute step. 4. Press RETURN (O) repeatedly to change keyboard type. If ...
... for entering a name PLAY (N): Inserts a space at the cursor position. Notes: Names can be up to start . Current picture End time Start time Selected time Selected point 3. Space: Inserts a space at the cursor position. . / >: Moves cursor to left or right. The options appears on... a different recorder, you press and hold b / B then the point increase 5 minute step. 4. Press RETURN (O) repeatedly to change keyboard type. If ...

Owners Manual
Page 51
... Power consumption Dimensions (approx.) Mass (approx.) Operating temperature Operating humidity Television system Recording format Recording Recording format Recordable media Recordable time Video recording format Sampling frequency Compression format Audio recording format Sampling frequency Compression format Playback Frequency response Inputs Signal-to-noise ratio ... 0 dB), 600 Ω, RCA jack (L, R) x 1 Reference Accessory: Video cable 1 RF Coaxial Cable 1 Batteries 2 Audio cable (L, R 1 Remote control 1 Design and specifications are subject to change without notice. 51
... Power consumption Dimensions (approx.) Mass (approx.) Operating temperature Operating humidity Television system Recording format Recording Recording format Recordable media Recordable time Video recording format Sampling frequency Compression format Audio recording format Sampling frequency Compression format Playback Frequency response Inputs Signal-to-noise ratio ... 0 dB), 600 Ω, RCA jack (L, R) x 1 Reference Accessory: Video cable 1 RF Coaxial Cable 1 Batteries 2 Audio cable (L, R 1 Remote control 1 Design and specifications are subject to change without notice. 51


