Owners Manual
Page 2
... lightning flash with the limits for this equipment does cause harmful interference to radio or television reception, which the receiver is no guarantee that may cause harmful interference to Part 15 of important operating and maintenance (servicing) instructions in a residential installation. Warning Warning WARNING: TO REDUCE THE RISK OF ELECTRIC SHOCK DO NOT REMOVE COVER (OR BACK). NO USER SERVICEABLE PARTS...
... lightning flash with the limits for this equipment does cause harmful interference to radio or television reception, which the receiver is no guarantee that may cause harmful interference to Part 15 of important operating and maintenance (servicing) instructions in a residential installation. Warning Warning WARNING: TO REDUCE THE RISK OF ELECTRIC SHOCK DO NOT REMOVE COVER (OR BACK). NO USER SERVICEABLE PARTS...
Owners Manual
Page 4
... To Rain Or Moisture. 17. Safety Instructions 12. Refer all servicing to dripping or splashing and no additional outlets or branch cir- Overloaded wall outlets, loose PORTABLE CART WARNING or damaged wall outlets, extension cords, frayed power cords, or damaged or cracked wire insulation are dangerous. 13. Use only with liquids, such as power-supply cord or plug is , a single outlet circuit which...
... To Rain Or Moisture. 17. Safety Instructions 12. Refer all servicing to dripping or splashing and no additional outlets or branch cir- Overloaded wall outlets, loose PORTABLE CART WARNING or damaged wall outlets, extension cords, frayed power cords, or damaged or cracked wire insulation are dangerous. 13. Use only with liquids, such as power-supply cord or plug is , a single outlet circuit which...
Owners Manual
Page 5
... Connection Options 8~9 Remote Control Key Functions 10~11 Installation Desktop Pedestal Installation 12 External Equipment Connections 13~17 VCR Setup 13 Cable TV Setup 14 External A/V Source Setup 14 DVD Setup 15 DTV Setup 15 PC Setup 16~17 Operation Turning on the Monitor 18 Menu Language Selection 18 Picture Menu Options Auto Picture Control (APC 19 XD 19 Auto Color Temperature Control 19 Fleshtone 20 sRGB 20 Manual Picture Control 21 Sound Menu Options DASP (Digital Auto Sound Processing 22 Manual Sound Control 22 BBE 23 AVL (Auto Volume Leveler 23 Timer Menu...
... Connection Options 8~9 Remote Control Key Functions 10~11 Installation Desktop Pedestal Installation 12 External Equipment Connections 13~17 VCR Setup 13 Cable TV Setup 14 External A/V Source Setup 14 DVD Setup 15 DTV Setup 15 PC Setup 16~17 Operation Turning on the Monitor 18 Menu Language Selection 18 Picture Menu Options Auto Picture Control (APC 19 XD 19 Auto Color Temperature Control 19 Fleshtone 20 sRGB 20 Manual Picture Control 21 Sound Menu Options DASP (Digital Auto Sound Processing 22 Manual Sound Control 22 BBE 23 AVL (Auto Volume Leveler 23 Timer Menu...
Owners Manual
Page 6
... a certain level of the Plasma Display is 71" so wide that instant, light is a next generation flat Display using this phenomenon. 160° - Our production technology is applied to gas within glass panels, ultraviolet rays are operating and cooling the Plasma Monitor. At that your plasma display in a theater. Versatile The light weight and thin size makes it for conferencing, games, and internet browsing. Therefore, a certain level...
... a certain level of the Plasma Display is 71" so wide that instant, light is a next generation flat Display using this phenomenon. 160° - Our production technology is applied to gas within glass panels, ultraviolet rays are operating and cooling the Plasma Monitor. At that your plasma display in a theater. Versatile The light weight and thin size makes it for conferencing, games, and internet browsing. Therefore, a certain level...
Owners Manual
Page 7
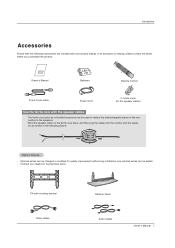
Optional extras can be changed or modified for buying these items. Tilt wall mounting bracket Video cables Desktop stand Audio cables Owner's Manual 7 Contract your plasma display. Introduction Accessories Ensure that the following accessories are included with the speaker cables The ferrite core given as shown in the connection to reduce the electromagnetic waves in the following picture: Option Extras - SIZEWIN. Wind the speaker cable on the ferrite core twice, and...
Optional extras can be changed or modified for buying these items. Tilt wall mounting bracket Video cables Desktop stand Audio cables Owner's Manual 7 Contract your plasma display. Introduction Accessories Ensure that the following accessories are included with the speaker cables The ferrite core given as shown in the connection to reduce the electromagnetic waves in the following picture: Option Extras - SIZEWIN. Wind the speaker cable on the ferrite core twice, and...
Owners Manual
Page 9
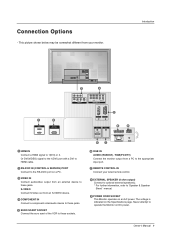
... the 1(DVI) port with a DVI to HDMI cable. 2 RS-232C IN (CONTROL & SERVICE) PORT Connect to the RS-232C port on DC power. Owner's Manual 9 Introduction HDMI/DVI IN 2 1 RS-232C IN (CONTROL & SERVICE) VIDEO (MONO) AUDIO VIDEO IN S-VIDEO VIDEO AUDIO COMPONENT IN VIDEO IN 3 VIDEO IN 4 RGB IN AUDIO (RGB/DVI) REMOTE CONTROL IN RGB(PC/DTV) R L EXTERNAL SPEAKER AC IN 3 4 VIDEO (MONO) AUDIO VIDEO IN S-VIDEO VIDEO AUDIO COMPONENT IN 1 HDMI IN 2 1(DVI) 2 RS-232C IN (CONTROL & SERVICE) 1 HDMI IN Connect a HDMI signal to these jacks. Never attempt to operate the Monitor on...
... the 1(DVI) port with a DVI to HDMI cable. 2 RS-232C IN (CONTROL & SERVICE) PORT Connect to the RS-232C port on DC power. Owner's Manual 9 Introduction HDMI/DVI IN 2 1 RS-232C IN (CONTROL & SERVICE) VIDEO (MONO) AUDIO VIDEO IN S-VIDEO VIDEO AUDIO COMPONENT IN VIDEO IN 3 VIDEO IN 4 RGB IN AUDIO (RGB/DVI) REMOTE CONTROL IN RGB(PC/DTV) R L EXTERNAL SPEAKER AC IN 3 4 VIDEO (MONO) AUDIO VIDEO IN S-VIDEO VIDEO AUDIO COMPONENT IN 1 HDMI IN 2 1(DVI) 2 RS-232C IN (CONTROL & SERVICE) 1 HDMI IN Connect a HDMI signal to these jacks. Never attempt to operate the Monitor on...
Owners Manual
Page 10
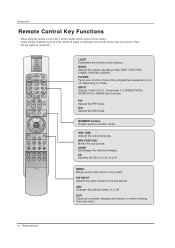
...LIGHT Illuminates the remote control buttons. SIZE Adjusts the sub picture size. G p.19 MENU Brings up the main menu to monitor viewing from any other programmed equipment on the monitor. - PIP INPUT Selects the input source for monitor mode. MODE Selects the remote operating mode: MNT, VCR, DVD, CABLE, HDSTB or AUDIO. PIP Selects the PIP mode. WIN. WIN.POSITION Moves the sub picture. ARC Changes the picture format. SWAP Exchanges the main/sub images. POWER Turns your monitor or any menu. 10 Plasma Monitor NUMBER buttons Dosen't work for the sub picture. INPUT...
...LIGHT Illuminates the remote control buttons. SIZE Adjusts the sub picture size. G p.19 MENU Brings up the main menu to monitor viewing from any other programmed equipment on the monitor. - PIP INPUT Selects the input source for monitor mode. MODE Selects the remote operating mode: MNT, VCR, DVD, CABLE, HDSTB or AUDIO. PIP Selects the PIP mode. WIN. WIN.POSITION Moves the sub picture. ARC Changes the picture format. SWAP Exchanges the main/sub images. POWER Turns your monitor or any menu. 10 Plasma Monitor NUMBER buttons Dosen't work for the sub picture. INPUT...

Owners Manual
Page 11
... monitor mode. Owner's Manual 11 DASP To select the sound appropriate to your preference. SLEEP Sets the Sleep Timer. Replace cover. Dosen't work for DVD player). Installing Batteries • Open the battery compartment cover on or off . SIZE ENTER MENU PIP INPUT ARC EXIT PLAY PAUSE STOP RECORD REW FF SKIP VIDEO COM1 COM2 RGB HDMI1 HDMI2 KEY LOCK INDEX APC Adjusts the factory preset picture according to your viewing program character: SRS TSXT, Flat...
... monitor mode. Owner's Manual 11 DASP To select the sound appropriate to your preference. SLEEP Sets the Sleep Timer. Replace cover. Dosen't work for DVD player). Installing Batteries • Open the battery compartment cover on or off . SIZE ENTER MENU PIP INPUT ARC EXIT PLAY PAUSE STOP RECORD REW FF SKIP VIDEO COM1 COM2 RGB HDMI1 HDMI2 KEY LOCK INDEX APC Adjusts the factory preset picture according to your viewing program character: SRS TSXT, Flat...
Owners Manual
Page 13
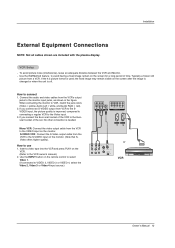
... figure. Connect the audio and video cables from VCR to VCR, match the jack colors (Video = yellow, Audio Left = white, and Audio Right = red). 2. Use the INPUT button on the monitor. Typically a frozen still picture from the VCR to the VCR owner's manual.) 2. How to VIDEO 2, VIDEO 3 or VIDEO 4, select the Video 2, Video 3 or Video 4 input source.) VIDEO (MONO) AUDIO VIDEO IN S-VIDEO VIDEO AUDIO COMPONENT IN VIDEO IN 3 VIDEO IN 4 ANT OUT VIDEO (R) AUDIO (L) ANT IN S-VIDEO OUT OUTPUT SWITCH 3 4 IN or VCR Owner's Manual 13 When connecting the monitor to...
... figure. Connect the audio and video cables from VCR to VCR, match the jack colors (Video = yellow, Audio Left = white, and Audio Right = red). 2. Use the INPUT button on the monitor. Typically a frozen still picture from the VCR to the VCR owner's manual.) 2. How to VIDEO 2, VIDEO 3 or VIDEO 4, select the Video 2, Video 3 or Video 4 input source.) VIDEO (MONO) AUDIO VIDEO IN S-VIDEO VIDEO AUDIO COMPONENT IN VIDEO IN 3 VIDEO IN 4 ANT OUT VIDEO (R) AUDIO (L) ANT IN S-VIDEO OUT OUTPUT SWITCH 3 4 IN or VCR Owner's Manual 13 When connecting the monitor to...
Owners Manual
Page 14
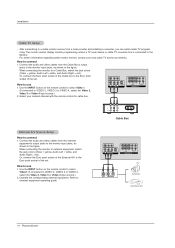
...Set 14 Plasma Monitor VIDEO (MONO) AUDIO VIDEO IN S-VIDEO VIDEO AUDIO COMPONENT IN VIDEO (R) AUDIO (L) TV VCR RF Cable Cable Box External A/V Source Setup How to use 1. Use the INPUT button on the remote control to select Video 1. (If connected to connect 1. How to VIDEO 2, VIDEO 3 or VIDEO 4, select the Video 2, Video 3 or Video 4 input source.) 2. Select your local cable TV service provider(s). Installation Cable TV Setup - When connecting the monitor to external equipment, match the jack colors (Video = yellow, Audio Left = white, and Audio Right = red...
...Set 14 Plasma Monitor VIDEO (MONO) AUDIO VIDEO IN S-VIDEO VIDEO AUDIO COMPONENT IN VIDEO (R) AUDIO (L) TV VCR RF Cable Cable Box External A/V Source Setup How to use 1. Use the INPUT button on the remote control to select Video 1. (If connected to connect 1. How to VIDEO 2, VIDEO 3 or VIDEO 4, select the Video 2, Video 3 or Video 4 input source.) 2. Select your local cable TV service provider(s). Installation Cable TV Setup - When connecting the monitor to external equipment, match the jack colors (Video = yellow, Audio Left = white, and Audio Right = red...
Owners Manual
Page 15
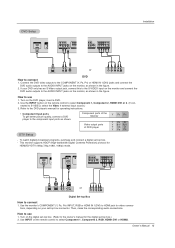
.../DVI or HDMI2. This monitor supports HDCP (High-bandwidth Digital Contents Protection) protocol for video connec- Owner's Manual 15 Turn on your DVD only has an S-Video output jack, connect this to the S-VIDEO input on the monitor and connect the DVD audio outputs to the AUDIO INPUT jacks on the digital set -top box.) 2. Use INPUT on the remote control to use 1. Refer to the DVD player's manual for operating instructions. • Component Input ports To get better picture quality, connect a DVD player to the owner's manual for the digital set -top box...
.../DVI or HDMI2. This monitor supports HDCP (High-bandwidth Digital Contents Protection) protocol for video connec- Owner's Manual 15 Turn on your DVD only has an S-Video output jack, connect this to the S-VIDEO input on the monitor and connect the DVD audio outputs to the AUDIO INPUT jacks on the digital set -top box.) 2. Use INPUT on the remote control to use 1. Refer to the DVD player's manual for operating instructions. • Component Input ports To get better picture quality, connect a DVD player to the owner's manual for the digital set -top box...
Owners Manual
Page 16
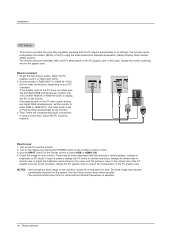
... Setup - In this case, change the screen scanning rate for Horizontal and Vertical frequencies is separate. 16 Plasma Monitor If the graphic card on the PC does output analog and digital RGB simultaneously, set to Plug and Play automatically by pressing the POWER button on the display by the monitor.) 3. HDMI IN 2 1(DVI) RS-232C IN (CONTROL & SERVICE) RGB IN AUDIO (RGB/DVI) RGB(PC/DTV) REMOTE CONTROL IN How to a 1600x1200, 60Hz. 2. Turn on the monitor's remote control...
... Setup - In this case, change the screen scanning rate for Horizontal and Vertical frequencies is separate. 16 Plasma Monitor If the graphic card on the PC does output analog and digital RGB simultaneously, set to Plug and Play automatically by pressing the POWER button on the display by the monitor.) 3. HDMI IN 2 1(DVI) RS-232C IN (CONTROL & SERVICE) RGB IN AUDIO (RGB/DVI) RGB(PC/DTV) REMOTE CONTROL IN How to a 1600x1200, 60Hz. 2. Turn on the monitor's remote control...

Owners Manual
Page 17
... with one cable, need not especial Audio Cable for reference Manual of HDMI Licensing." - This monitor can receive the High-Definition Multimedia Interface(HDMI). - This monitor supports HDCP(High-bandwidth Digital Contents Protection) Protocol for 480p, 720p, 1080i, 1080p modes. - After reading in HDMI Source Devices using HDMI Cable. To get the best picture quality, adjust the DVD Player or Set Top Box output resolution to DTV with HDMI Cable.(not supplied with HDMI Source Devices (DVD Player or Set Top Box) supporting Auto HDMI function, automatically, support Plug & Play and then...
... with one cable, need not especial Audio Cable for reference Manual of HDMI Licensing." - This monitor can receive the High-Definition Multimedia Interface(HDMI). - This monitor supports HDCP(High-bandwidth Digital Contents Protection) Protocol for 480p, 720p, 1080i, 1080p modes. - After reading in HDMI Source Devices using HDMI Cable. To get the best picture quality, adjust the DVD Player or Set Top Box output resolution to DTV with HDMI Cable.(not supplied with HDMI Source Devices (DVD Player or Set Top Box) supporting Auto HDMI function, automatically, support Plug & Play and then...

Owners Manual
Page 19
... adjusts the Monitor for optimum picture quality at the factory and cannot be changed. XD - Press the MENU button and then use D / E button to select ACC . 3. Owner's Manual 19 Press the G button and then use D / E button to display a real HD source through an advanced digital signal processing algorithm. - Press the APC button repeatedly to select the picture appearance setup option as shown below . When selecting APC options (Daylight, Optimum and Night time...
... adjusts the Monitor for optimum picture quality at the factory and cannot be changed. XD - Press the MENU button and then use D / E button to select ACC . 3. Owner's Manual 19 Press the G button and then use D / E button to display a real HD source through an advanced digital signal processing algorithm. - Press the APC button repeatedly to select the picture appearance setup option as shown below . When selecting APC options (Daylight, Optimum and Night time...
Owners Manual
Page 26
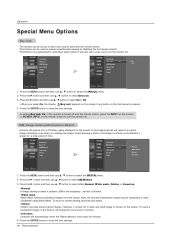
... normal viewing, press the any fixed image to turn the monitor off with the remote control. - A frozen still picture from the screen. This Monitor is programmed to remember which option it is turned off . Press the G button and then use D / E button to clear completely using White Wash. Language Key lock ISM Method Low power Set ID Index Language Key lock ISM Method G Low power Set ID Index Normal White wash Orbiter Inversion 1. Operation Special Menu...
... normal viewing, press the any fixed image to turn the monitor off with the remote control. - A frozen still picture from the screen. This Monitor is programmed to remember which option it is turned off . Press the G button and then use D / E button to clear completely using White Wash. Language Key lock ISM Method Low power Set ID Index Language Key lock ISM Method G Low power Set ID Index Normal White wash Orbiter Inversion 1. Operation Special Menu...

Owners Manual
Page 31
Auto config. NR Reset Black level adj. Press the G button and then use D / E button to select the SCREEN menu. 2. PC/DTV Mode - It can be selected the DTV/PC mode by user. Press the ENTER button to save the new settings. Owner's Manual 31 Adjusting the contrast and the brightness of the screen using the black level of the screen gets darker. • High - NR Reset Black level adj. The reflection of the...
Auto config. NR Reset Black level adj. Press the G button and then use D / E button to select the SCREEN menu. 2. PC/DTV Mode - It can be selected the DTV/PC mode by user. Press the ENTER button to save the new settings. Owner's Manual 31 Adjusting the contrast and the brightness of the screen using the black level of the screen gets darker. • High - NR Reset Black level adj. The reflection of the...

Owners Manual
Page 36
... Low power Set ID G 1 Index 1. Press the MENU button and then use F / G button to adjust Set ID to specify a monitor ID number. - Press the G button and then use the D / E button to select Set ID. 3. Input Select k 03. Aspect Ratio k 04. Screen Mute k 05. Contrast k 08. Remote Control Lock Mode k 14. Treble k 17. Color Temperature k 20. Abnormal State k 22. ISM Method j 23. Picture Size Setting j for DW mode 25. Adjustment range is controlled. When selecting Set ID '0', every connected PDP set ID...
... Low power Set ID G 1 Index 1. Press the MENU button and then use F / G button to adjust Set ID to specify a monitor ID number. - Press the G button and then use the D / E button to select Set ID. 3. Input Select k 03. Aspect Ratio k 04. Screen Mute k 05. Contrast k 08. Remote Control Lock Mode k 14. Treble k 17. Color Temperature k 20. Abnormal State k 22. ISM Method j 23. Picture Size Setting j for DW mode 25. Adjustment range is controlled. When selecting Set ID '0', every connected PDP set ID...

Owners Manual
Page 40
External Control Device Setup 20. Transmission [j][t][ ][Set ID][ ][Data][Cr] Data Min: 0 ~ Max: 0a • Refer to standby mode. 25. Acknowledgement [t][ ][Set ID][ ][OK][Data][x] Data Min: 0 ~ Max: 0a Acknowledgement [z][ ][Set ID][ ][OK][Data][x] Data 0: Power on(signal) 1: Power on(No signal) 2: Remote control off 3: Sleep time off 4: RS-232C off 5: 5V monitor off 6: AC detect off 7: Fan Alarm off 8: Off timer off 9: No signal off a: Connection Detect off * If...
External Control Device Setup 20. Transmission [j][t][ ][Set ID][ ][Data][Cr] Data Min: 0 ~ Max: 0a • Refer to standby mode. 25. Acknowledgement [t][ ][Set ID][ ][OK][Data][x] Data Min: 0 ~ Max: 0a Acknowledgement [z][ ][Set ID][ ][OK][Data][x] Data 0: Power on(signal) 1: Power on(No signal) 2: Remote control off 3: Sleep time off 4: RS-232C off 5: 5V monitor off 6: AC detect off 7: Fan Alarm off 8: Off timer off 9: No signal off a: Connection Detect off * If...

Owners Manual
Page 43
... remote control. 3. Programming a code into a remote mode 1. Programming the Remote Programming the Remote G The remote control is correct, the device will turn on the component such as a VCR and press the until MODE button (VCR) on the following pages. Test your remote control can be programmed to be found on the remote control, while pointing at the component. 2. Owner's Manual 43 It can operate the component without programming, turn off. 5. Turn on the remote. Press the MENU button...
... remote control. 3. Programming a code into a remote mode 1. Programming the Remote Programming the Remote G The remote control is correct, the device will turn on the component such as a VCR and press the until MODE button (VCR) on the following pages. Test your remote control can be programmed to be found on the remote control, while pointing at the component. 2. Owner's Manual 43 It can operate the component without programming, turn off. 5. Turn on the remote. Press the MENU button...

Owners Manual
Page 46
.... • Activate any function to restore the brightness of the speakers • Adjust Balance in the Sound menu. (Refer to p.20) • Keep a sufficient distance between the Plasma Display and the remote control causing obstruction. • Are batteries installed with the monitor. 46 Plasma Monitor Picture OK & No sound The remote control doesn't work • Press the VOLUME (+) button. • Sound muted? No or Poor color or Poor picture • Select Color in .
.... • Activate any function to restore the brightness of the speakers • Adjust Balance in the Sound menu. (Refer to p.20) • Keep a sufficient distance between the Plasma Display and the remote control causing obstruction. • Are batteries installed with the monitor. 46 Plasma Monitor Picture OK & No sound The remote control doesn't work • Press the VOLUME (+) button. • Sound muted? No or Poor color or Poor picture • Select Color in .


