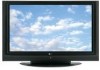
Owners Manual
Page 5
... Instructions Accessories Controls Connection Options 12~13 Remote Control Key Functions Installation External Equipment Connections Basic operation Setup Menu Options Video Menu Options Audio Menu Options 14 15 16~17 18 19~20 20 21~22 23~24 25 25 26~28 Attaching the TV to a wall Desktop Pedestal Installation Basic Connection... 29 29 29 30 31 31 32 33 33 34 35 35~36 37 38 39 40 41 41~42 43 43 Turning on the TV Volume Adjustment Channel Selection On Screen Menus Language Selection On Screen Menus Selection and Adjustment EZ Scan (Channel Search) Manual Scan Channel Edit DTV Signal...
... Instructions Accessories Controls Connection Options 12~13 Remote Control Key Functions Installation External Equipment Connections Basic operation Setup Menu Options Video Menu Options Audio Menu Options 14 15 16~17 18 19~20 20 21~22 23~24 25 25 26~28 Attaching the TV to a wall Desktop Pedestal Installation Basic Connection... 29 29 29 30 31 31 32 33 33 34 35 35~36 37 38 39 40 41 41~42 43 43 Turning on the TV Volume Adjustment Channel Selection On Screen Menus Language Selection On Screen Menus Selection and Adjustment EZ Scan (Channel Search) Manual Scan Channel Edit DTV Signal...
Owners Manual
Page 6
Contents Operation Time Menu Options Option Menu Features Lock Menu Options 44 44 45 45 46 47 48 49 49 50 51~52 Manual Clock Setup Auto Clock Setup On/Off Timer Setup Sleep Timer Auto Off Aspect Ratio Control Caption/Text Caption Option Low Power (42PC3D/3DC/3DV, 50PC3D, 60PC1D/1DC Only) ISM (Image Sticking Minimization) Method (42PC3D/3DC/3DV, 50PC3D, 60PC1D/1DC Only) Parental Lock Setup 53~58 59~60 61 62~63 64~65 65 66~67 External Control Device Setup IR Codes Programming the Remote Programming Codes Troubleshooting Checklist Maintenance Product Specifications Reference 6
Contents Operation Time Menu Options Option Menu Features Lock Menu Options 44 44 45 45 46 47 48 49 49 50 51~52 Manual Clock Setup Auto Clock Setup On/Off Timer Setup Sleep Timer Auto Off Aspect Ratio Control Caption/Text Caption Option Low Power (42PC3D/3DC/3DV, 50PC3D, 60PC1D/1DC Only) ISM (Image Sticking Minimization) Method (42PC3D/3DC/3DV, 50PC3D, 60PC1D/1DC Only) Parental Lock Setup 53~58 59~60 61 62~63 64~65 65 66~67 External Control Device Setup IR Codes Programming the Remote Programming Codes Troubleshooting Checklist Maintenance Product Specifications Reference 6
Owners Manual
Page 7
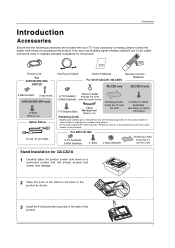
...60PC1D/1DC 2-TV brackets 2-Wall brackets 4- Bolts 4-RING SPACER Polishing Cloth Polish the TV with ferrite cores to maintain standard compliance for the product. Stand Installation for 32LC2D/U 1 Carefully place the product screen side down on a cushioned surface that will protect product and screen from where you purchased the product. TV... AUDIO PO CABMLEODDEVD 1.5VMENU GUIDE ENTER STB DAY+ RATIO TIMER EXIT VOL MUTE CC PAGE INFO 1 FAV 4 7 2 PAGE CH 5 EZ ADJUST PIC EZ APM SOUND 0 SAP 8 9 FLASHBK 6 3 FREEZE Remote Control / For 42PC3D...
...60PC1D/1DC 2-TV brackets 2-Wall brackets 4- Bolts 4-RING SPACER Polishing Cloth Polish the TV with ferrite cores to maintain standard compliance for the product. Stand Installation for 32LC2D/U 1 Carefully place the product screen side down on a cushioned surface that will protect product and screen from where you purchased the product. TV... AUDIO PO CABMLEODDEVD 1.5VMENU GUIDE ENTER STB DAY+ RATIO TIMER EXIT VOL MUTE CC PAGE INFO 1 FAV 4 7 2 PAGE CH 5 EZ ADJUST PIC EZ APM SOUND 0 SAP 8 9 FLASHBK 6 3 FREEZE Remote Control / For 42PC3D...
Owners Manual
Page 8
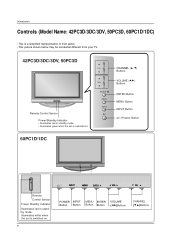
... ENTER Button MENU Button INPUT Button (Power) Button 60PC1D/1DC Remote Control Sensor Power Standby Indicator Illuminates red in standby mode. • illuminates green when the set is switched on . This picture shown below may be somewhat different from your TV. 42PC3D/3DC/3DV, 50PC3D Remote Control Sensor Power/Standby Indicator • illuminates red...
... ENTER Button MENU Button INPUT Button (Power) Button 60PC1D/1DC Remote Control Sensor Power Standby Indicator Illuminates red in standby mode. • illuminates green when the set is switched on . This picture shown below may be somewhat different from your TV. 42PC3D/3DC/3DV, 50PC3D Remote Control Sensor Power/Standby Indicator • illuminates red...
Owners Manual
Page 9
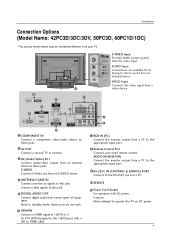
... with a DVI to this jack. VIDEO Input Connects the video signal from your wired remote control. Caution: Never attempt to these ports do notVwIDEOork. 8 Remote Control Port Connect your TV. S-VIDEO VIDEO ( ) AUDIO 9 S-VIDEO VIDEO ( ) AUDIO S-VIDEO Connect S-...Video out from various types of equipment. Introduction Connection Options (Model Name: 42PC3D/3DC/3DV, 50PC3D, 60PC1D/1DC) - R AUDIO Input Connections are...
... with a DVI to this jack. VIDEO Input Connects the video signal from your wired remote control. Caution: Never attempt to these ports do notVwIDEOork. 8 Remote Control Port Connect your TV. S-VIDEO VIDEO ( ) AUDIO 9 S-VIDEO VIDEO ( ) AUDIO S-VIDEO Connect S-...Video out from various types of equipment. Introduction Connection Options (Model Name: 42PC3D/3DC/3DV, 50PC3D, 60PC1D/1DC) - R AUDIO Input Connections are...
Owners Manual
Page 10
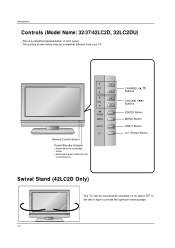
... provide the optimum viewing angle. CH VOL ENTER MENU R INPUT Remote Control Sensor Power/Standby Indicator • illuminates red in standby mode. • illuminates green when the set is a simplified representation of front panel. - The TV can be somewhat different from your TV. CHANNEL (D, E) Buttons VOLUME (F,G) Buttons ENTER Button MENU Button INPUT Button...
... provide the optimum viewing angle. CH VOL ENTER MENU R INPUT Remote Control Sensor Power/Standby Indicator • illuminates red in standby mode. • illuminates green when the set is a simplified representation of front panel. - The TV can be somewhat different from your TV. CHANNEL (D, E) Buttons VOLUME (F,G) Buttons ENTER Button MENU Button INPUT Button...
Owners Manual
Page 11
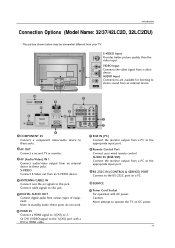
... toS-VIDEO VIDEO AV IN 1 7 RGB IN (PC) ( ) AUDIO Connect the monitor output from a PC to the appropriate input port. 2 AV OUT Connect a second TV or monitor. 3 AV (Audio/Video) IN 1 Connect audio/video output from a PC to the appropriate input port. 9 RS-232C IN (CONTROL & SERVICE) PORT Connect to...Name: 32/37/42LC2D, 32LC2DU) AV IN 1 S-VIDEO VIDEO ( ) AUDIO - Note: In standby mode, these jacks. Connect cable signals to these ports do not work. 8 Remote Control Port Connect your TV. AUDIO IN (RGB/DVI) Connect the monitor output from an external device to this jack.
... toS-VIDEO VIDEO AV IN 1 7 RGB IN (PC) ( ) AUDIO Connect the monitor output from a PC to the appropriate input port. 2 AV OUT Connect a second TV or monitor. 3 AV (Audio/Video) IN 1 Connect audio/video output from a PC to the appropriate input port. 9 RS-232C IN (CONTROL & SERVICE) PORT Connect to...Name: 32/37/42LC2D, 32LC2DU) AV IN 1 S-VIDEO VIDEO ( ) AUDIO - Note: In standby mode, these jacks. Connect cable signals to these ports do not work. 8 Remote Control Port Connect your TV. AUDIO IN (RGB/DVI) Connect the monitor output from an external device to this jack.

Owners Manual
Page 12
...HDMI2. (AV 1-2, Component 1-2, RGB-PC , HDMI1/DVI or HDMI2 input sources are linked automatically, only if these are connected.) MODE Selects the remote operating mode: TV, DVD, VCR, AUDIO, CABLE, or STB. Select a mode other programmed equipment on -screen menus and adjust the system settings to the screen.... Adjust brightness on mode. EXIT Clears all on top of time before your TV or any other than TV, for the remote to TV viewing from any menu. TIMER G p.45 Lets you watch the TV, information displays on -screen displays and returns to operate an external device. RATIO G ...
...HDMI2. (AV 1-2, Component 1-2, RGB-PC , HDMI1/DVI or HDMI2 input sources are linked automatically, only if these are connected.) MODE Selects the remote operating mode: TV, DVD, VCR, AUDIO, CABLE, or STB. Select a mode other programmed equipment on -screen menus and adjust the system settings to the screen.... Adjust brightness on mode. EXIT Clears all on top of time before your TV or any other than TV, for the remote to TV viewing from any menu. TIMER G p.45 Lets you watch the TV, information displays on -screen displays and returns to operate an external device. RATIO G ...
Owners Manual
Page 14
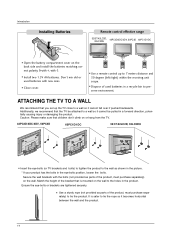
...product. Secure the wall brackets with the bolts (not provided as parts of used batteries with -). Introduction Installing Batteries Remote control effective range 32/37/42LC2D, 32LC2DU 42PC3D/3DC/3DV, 50PC3D 60PC1D/1DC I Open the battery compartment cover on the wall. I Close cover. Match the height of the product,... that is safer to the holes in the eye-bolts position, loosen the bolts. It is mounted on or hang from the TV. 42PC3D/3DC/3DV, 50PC3D 60PC1D/1DC 32/37/42LC2D, 32LC2DU I Use a remote control up the TV close to preserve environment.
...product. Secure the wall brackets with the bolts (not provided as parts of used batteries with -). Introduction Installing Batteries Remote control effective range 32/37/42LC2D, 32LC2DU 42PC3D/3DC/3DV, 50PC3D 60PC1D/1DC I Open the battery compartment cover on the wall. I Close cover. Match the height of the product,... that is safer to the holes in the eye-bolts position, loosen the bolts. It is mounted on or hang from the TV. 42PC3D/3DC/3DV, 50PC3D 60PC1D/1DC 32/37/42LC2D, 32LC2DU I Use a remote control up the TV close to preserve environment.
Owners Manual
Page 19
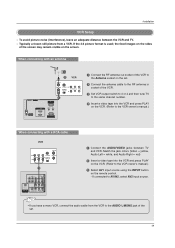
... AUDIO L/MONO jack of the set . 2 Connect the antenna cable to the RF antenna in socket of the VCR to the Antenna socket on the remote control. - If the 4:3 picture format is used; VIDEO AUDIO OPTICAL DIGITAL AUDIO VIDEOS-VIDEO OUT ( ) VIDAEUODIO AUDIO 19 COMPONENT IN AV OUT AV IN 1 ... IN ((CPOCN)TROL & SERVICE) AUDIO IN REMOTE (RGB/DVI) CONTROL IN HDMI / DVI IN ANTENNA/ CABLE IN RS-232C IN When connecting with a (CONTROL&SERVICE) RCA cable 1 Connect the RF antenna out socket of the VCR. 3 Set VCR output switch to 3 or 4 and then tune TV to the same channel number. 4 Insert...
... AUDIO L/MONO jack of the set . 2 Connect the antenna cable to the RF antenna in socket of the VCR to the Antenna socket on the remote control. - If the 4:3 picture format is used; VIDEO AUDIO OPTICAL DIGITAL AUDIO VIDEOS-VIDEO OUT ( ) VIDAEUODIO AUDIO 19 COMPONENT IN AV OUT AV IN 1 ... IN ((CPOCN)TROL & SERVICE) AUDIO IN REMOTE (RGB/DVI) CONTROL IN HDMI / DVI IN ANTENNA/ CABLE IN RS-232C IN When connecting with a (CONTROL&SERVICE) RCA cable 1 Connect the RF antenna out socket of the VCR. 3 Set VCR output switch to 3 or 4 and then tune TV to the same channel number. 4 Insert...
Owners Manual
Page 20
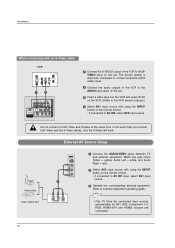
... VCR and press PLAY on the VCR. (Refer to the VCR owner's manual.) 4 Select AV1 input source with using the INPUT button on the remote control. - In the event that you connect both Video and S-Video at the same time. Match the jack colors (Video = yellow, Audio Left... = white, and Audio Right = red). 2 Select AV2 input source with using the INPUT button on the remote control. - Refer to external equipment operating guide. • This TV finds the connected input sources automatically for AV1, AV2, Component 1-2, RGB, HDMI1/DVI and HDMI2 sources are connected. 20 The...
... VCR and press PLAY on the VCR. (Refer to the VCR owner's manual.) 4 Select AV1 input source with using the INPUT button on the remote control. - In the event that you connect both Video and S-Video at the same time. Match the jack colors (Video = yellow, Audio Left... = white, and Audio Right = red). 2 Select AV2 input source with using the INPUT button on the remote control. - Refer to external equipment operating guide. • This TV finds the connected input sources automatically for AV1, AV2, Component 1-2, RGB, HDMI1/DVI and HDMI2 sources are connected. 20 The...
Owners Manual
Page 21
...the set. 2 Select HDMI1/DVI or HDMI2 input source with using the INPUT button on the remote control. - VIDEO AUDIO COMPONENT IN AV OUT AV IN 1 OPTICAL DIGITAL AUDIO OUT S-VIDEO VIDEO ( ) AUDIO • TV can receive the video and audio signal simultaneously with using a HDMI cable. • If the... AUDIO input jacks on the set. 3 Turn on the DVD player, insert a DVD. 4 Select AV1 input source with using the INPUT button on the remote control. 3 Refer to the DVD player's manual for operating instructions. If connected to AV IN2, select AV 2 input source. 5 Refer to the DVD player...
...the set. 2 Select HDMI1/DVI or HDMI2 input source with using the INPUT button on the remote control. - VIDEO AUDIO COMPONENT IN AV OUT AV IN 1 OPTICAL DIGITAL AUDIO OUT S-VIDEO VIDEO ( ) AUDIO • TV can receive the video and audio signal simultaneously with using a HDMI cable. • If the... AUDIO input jacks on the set. 3 Turn on the DVD player, insert a DVD. 4 Select AV1 input source with using the INPUT button on the remote control. 3 Refer to the DVD player's manual for operating instructions. If connected to AV IN2, select AV 2 input source. 5 Refer to the DVD player...
Owners Manual
Page 22
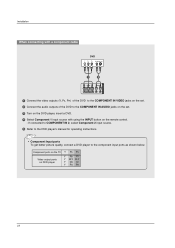
...; Component Input ports VIDEO AUDIO To get better picture quality, connect a DVD player to the DVD player's manual for operating instructions. Component ports on the TV Video output ports on the remote control. - If connected to COMPONENT IN 2, select Component 2 input source. 5 Refer to the component input ports as shown below.
...; Component Input ports VIDEO AUDIO To get better picture quality, connect a DVD player to the DVD player's manual for operating instructions. Component ports on the TV Video output ports on the remote control. - If connected to COMPONENT IN 2, select Component 2 input source. 5 Refer to the component input ports as shown below.
Owners Manual
Page 23
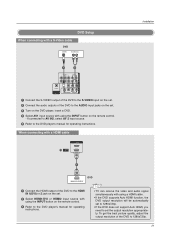
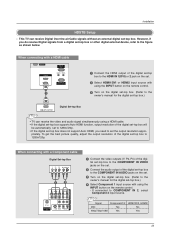
... digital set-top box.) HDMI-DTV OUTPUT Digital Set-top Box COMPONENT IN AV OUT AV IN 1 RGB IN (PC) AUDIO IN REMOTE (RGB/DVI) CONTROL IN • TV can receive Digital Over-the-air/Cable signals without an external digital set -top box to 1280x720p. To get the best picture quality..., adjust the output resolution of the digital AUDIO IN REMOTE (RGB/DVI) CONTROL IN set -top box. This TV can receive the video and audio signal simultaneously using a HDMI cable. • If the digital set-top box supports Auto ...
... digital set-top box.) HDMI-DTV OUTPUT Digital Set-top Box COMPONENT IN AV OUT AV IN 1 RGB IN (PC) AUDIO IN REMOTE (RGB/DVI) CONTROL IN • TV can receive Digital Over-the-air/Cable signals without an external digital set -top box to 1280x720p. To get the best picture quality..., adjust the output resolution of the digital AUDIO IN REMOTE (RGB/DVI) CONTROL IN set -top box. This TV can receive the video and audio signal simultaneously using a HDMI cable. • If the digital set-top box supports Auto ...
Owners Manual
Page 24
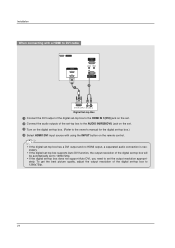
....) REMORTEGBAIUNDIO IN CONTROL IN (RGB/DVI) 4 Select HDMI1/DVI input source with a HDMI to DVI cable SERVICE HDMI IN 2 1(DVI) 1 RGB IN (PC) AUDIO IN REMOTE (RGB/DVI) CONTROL IN RS-232C IN (CONTROL & SERVICE) 2 COMPONENT IN AV OUT AV IN 1 1(DVI) RS-232C IN (CONTROL & SERVICE) DVI-DTV OUTPUT (R) AUDIO... HDMI IN 1(DVI) jack on the set. 2 Connect the audio outputs of the set-top box to the AUDIO IN(RGB/DVI) jack on the remote control. Installation VIDEO AUDIO OPTICAL DIGITAL AUDIO OUT S-VIDEO VIDEO ( ) AUDIO When connecting with using the INPUT button on the set. RS-232C IN (...
....) REMORTEGBAIUNDIO IN CONTROL IN (RGB/DVI) 4 Select HDMI1/DVI input source with a HDMI to DVI cable SERVICE HDMI IN 2 1(DVI) 1 RGB IN (PC) AUDIO IN REMOTE (RGB/DVI) CONTROL IN RS-232C IN (CONTROL & SERVICE) 2 COMPONENT IN AV OUT AV IN 1 1(DVI) RS-232C IN (CONTROL & SERVICE) DVI-DTV OUTPUT (R) AUDIO... HDMI IN 1(DVI) jack on the set. 2 Connect the audio outputs of the set-top box to the AUDIO IN(RGB/DVI) jack on the remote control. Installation VIDEO AUDIO OPTICAL DIGITAL AUDIO OUT S-VIDEO VIDEO ( ) AUDIO When connecting with using the INPUT button on the set. RS-232C IN (...
Owners Manual
Page 26
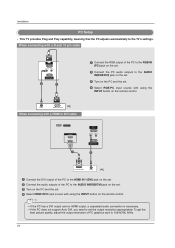
...PC and the set. 4 Select HDMI1/DVI input source with using the INPUT button on the remote control. RGB IN (PC) AUDIO IN REMOTE (RGB/DVI) CONTROL IN Installation RS-232C IN (CONTROL & SERVICE) PC Setup - When...PC input source with a HDMI to DVI cable SERVICE HDMI IN 2 1(DVI) 1 RGB IN (PC) AUDIO IN REMOTE (RGB/DVI) CONTROL IN RS-232C IN (CONTROL & SERVICE) 2 DVI-PC OUTPUT AUDIO PC 1 Connect the ...DVI) jack on the set. 2 Connect the audio outputs of PC graphics card to the TV's settings. RGB IN (PC) AUDIO IN REMOTE (RGB/DVI) CONTROL IN • If the PC has a DVI output and no HDMI ...
...PC and the set. 4 Select HDMI1/DVI input source with using the INPUT button on the remote control. RGB IN (PC) AUDIO IN REMOTE (RGB/DVI) CONTROL IN Installation RS-232C IN (CONTROL & SERVICE) PC Setup - When...PC input source with a HDMI to DVI cable SERVICE HDMI IN 2 1(DVI) 1 RGB IN (PC) AUDIO IN REMOTE (RGB/DVI) CONTROL IN RS-232C IN (CONTROL & SERVICE) 2 DVI-PC OUTPUT AUDIO PC 1 Connect the ...DVI) jack on the set. 2 Connect the audio outputs of PC graphics card to the TV's settings. RGB IN (PC) AUDIO IN REMOTE (RGB/DVI) CONTROL IN • If the PC has a DVI output and no HDMI ...
Owners Manual
Page 29
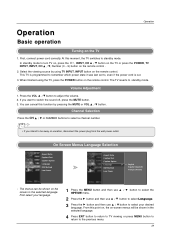
... a channel number. • If you want to switch the sound off, press the MUTE button. 3. Operation Operation Basic operation Turning on the remote control . 2. This TV is programmed to remember which power state it was last set to adjust the volume. 2. Press the VOL D / E button to , even... Language ISM Method Low Power G English Español (Spanish) Français (French) - You can be away on the remote control. At this moment, the TV switches to select your desired language. First select your language. 1 Press the MENU button and then use D / E button to ...
... a channel number. • If you want to switch the sound off, press the MUTE button. 3. Operation Operation Basic operation Turning on the remote control . 2. This TV is programmed to remember which power state it was last set to adjust the volume. 2. Press the VOL D / E button to , even... Language ISM Method Low Power G English Español (Spanish) Français (French) - You can be away on the remote control. At this moment, the TV switches to select your desired language. First select your language. 1 Press the MENU button and then use D / E button to ...
Owners Manual
Page 32
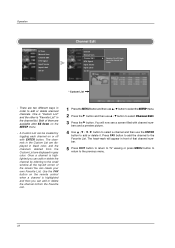
Use the FAV button on the remote control when a channel is highlighted and then you can be created by referring to the Favorite List. You will appear in front of that channel number. 5 Press EXIT button to return to TV viewing or press MENU button to return to the channel edit screen. - bers...
Use the FAV button on the remote control when a channel is highlighted and then you can be created by referring to the Favorite List. You will appear in front of that channel number. 5 Press EXIT button to return to TV viewing or press MENU button to return to the channel edit screen. - bers...
Owners Manual
Page 52
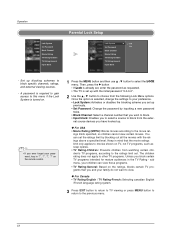
...to the previous menu. 52 Once the option is already set, enter the password as soap operas. • TV Rating-Children: Prevents children from watching certain children's TV programs, according to choose from the external source devices you and your preference. • Lock System: Activates or...Input block: Enables you to select a source to block from the following Lock Menu options. You can view those programs. • TV Rating-General: Based on the remote control. 1 Press the MENU button and then use D / E button to your family do not want to block specific channels, ...
...to the previous menu. 52 Once the option is already set, enter the password as soap operas. • TV Rating-Children: Prevents children from watching certain children's TV programs, according to choose from the external source devices you and your preference. • Lock System: Activates or...Input block: Enables you to select a source to block from the following Lock Menu options. You can view those programs. • TV Rating-General: Based on the remote control. 1 Press the MENU button and then use D / E button to your family do not want to block specific channels, ...

Owners Manual
Page 53
... No. Connect the serial port of Connector; RS-232C Setup RGB IN (PC) AUDIO IN REMOTE (RGB/DVI) CONTROL IN RS-232C IN (CONTROL & SERVICE) Type of the control device to the RS-232C jack on the TV back panel. - Pin Name 1 No connection 2 RXD (Receive data) 3 TXD (Transmit data)... Monitor's functions externally. - Connect the RS-232C input jack to send) 9 No Connection RS-232C Configurations 7-Wire Configurations (Serial female-female NULL modem cable) PC TV RXD 2 TXD 3 GND 5 DTR 4 DSR 6 RTS 7 CTS 8 3 TXD 2 RXD 5 GND 6 DSR 4 DTR 8 CTS 7 RTS D-Sub 9 D-Sub 9 PC 1 5 9 6 3-Wire Configurations...
... No. Connect the serial port of Connector; RS-232C Setup RGB IN (PC) AUDIO IN REMOTE (RGB/DVI) CONTROL IN RS-232C IN (CONTROL & SERVICE) Type of the control device to the RS-232C jack on the TV back panel. - Pin Name 1 No connection 2 RXD (Receive data) 3 TXD (Transmit data)... Monitor's functions externally. - Connect the RS-232C input jack to send) 9 No Connection RS-232C Configurations 7-Wire Configurations (Serial female-female NULL modem cable) PC TV RXD 2 TXD 3 GND 5 DTR 4 DSR 6 RTS 7 CTS 8 3 TXD 2 RXD 5 GND 6 DSR 4 DTR 8 CTS 7 RTS D-Sub 9 D-Sub 9 PC 1 5 9 6 3-Wire Configurations...


