Owners Manual
Page 2
... with arrowhead symbol, within an equilateral triangle is connected. - Any changes or modifications not expressly approved by turning the equipment off and on a circuit different from LG Electronics Corporation. If this product. REGULATORY INFORMATION This equipment has been tested and found to comply with the... WARNING: TO REDUCE THE RISK OF ELECTRIC SHOCK DO NOT REMOVE COVER (OR BACK). Consult the dealer or an experienced radio/TV technician for a Class B digital device, pursuant to the presence of electric shock to operate this equipment does cause harmful interference ...
... with arrowhead symbol, within an equilateral triangle is connected. - Any changes or modifications not expressly approved by turning the equipment off and on a circuit different from LG Electronics Corporation. If this product. REGULATORY INFORMATION This equipment has been tested and found to comply with the... WARNING: TO REDUCE THE RISK OF ELECTRIC SHOCK DO NOT REMOVE COVER (OR BACK). Consult the dealer or an experienced radio/TV technician for a Class B digital device, pursuant to the presence of electric shock to operate this equipment does cause harmful interference ...
Owners Manual
Page 4
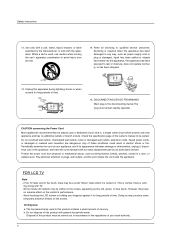
... of these conditions could result in accordance to rain or moisture, does not operate normally, or has been dropped. 13. FOR LCD TV Note - ing wrong with the apparatus. However, they be certain. Disposal of your local authority. 4 Pay particular attention to qualified service...effect on the screen, appearing as tiny red, green, or blue spots. The fluorescent lamp used , use of mercury. Servicing is turned on the screen. CAUTION concerning the Power Cord Most appliances recommend they have the cord replaced with general household waste. that is noth...
... of these conditions could result in accordance to rain or moisture, does not operate normally, or has been dropped. 13. FOR LCD TV Note - ing wrong with the apparatus. However, they be certain. Disposal of your local authority. 4 Pay particular attention to qualified service...effect on the screen, appearing as tiny red, green, or blue spots. The fluorescent lamp used , use of mercury. Servicing is turned on the screen. CAUTION concerning the Power Cord Most appliances recommend they have the cord replaced with general household waste. that is noth...
Owners Manual
Page 5
... Audio Menu Options 14 15 16~17 18 19~20 20 21~22 23~24 25 25 26~28 Attaching the TV to a wall Desktop Pedestal Installation Basic Connection Antenna or Cable Connection VCR Setup External AV Source Setup DVD Setup HDSTB... 29 30 31 31 32 33 33 34 35 35~36 37 38 39 40 41 41~42 43 43 Turning on the TV Volume Adjustment Channel Selection On Screen Menus Language Selection On Screen Menus Selection and Adjustment EZ Scan (Channel Search)... Level Video Reset Audio Language Auto Sound Control(EZ Sound) Manual Sound Control (EZ Sound-User option) Balance TV Speakers On/Off Setup Operation Contents 5
... Audio Menu Options 14 15 16~17 18 19~20 20 21~22 23~24 25 25 26~28 Attaching the TV to a wall Desktop Pedestal Installation Basic Connection Antenna or Cable Connection VCR Setup External AV Source Setup DVD Setup HDSTB... 29 30 31 31 32 33 33 34 35 35~36 37 38 39 40 41 41~42 43 43 Turning on the TV Volume Adjustment Channel Selection On Screen Menus Language Selection On Screen Menus Selection and Adjustment EZ Scan (Channel Search)... Level Video Reset Audio Language Auto Sound Control(EZ Sound) Manual Sound Control (EZ Sound-User option) Balance TV Speakers On/Off Setup Operation Contents 5

Owners Manual
Page 12
... , HDMI1/DVI or HDMI2 input sources are linked automatically, only if these are connected.) MODE Selects the remote operating mode: TV, DVD, VCR, AUDIO, CABLE, or STB. It turns to the last TV channel. MENU BRIGHT + ENTER EXIT TIMER RATIO INFO VOL MUTE FAV CH 1 2 3 4 5 6 7 8 9 0 FLASHBK EZ PIC EZ SOUND SAP CC ADJUST...
... , HDMI1/DVI or HDMI2 input sources are linked automatically, only if these are connected.) MODE Selects the remote operating mode: TV, DVD, VCR, AUDIO, CABLE, or STB. It turns to the last TV channel. MENU BRIGHT + ENTER EXIT TIMER RATIO INFO VOL MUTE FAV CH 1 2 3 4 5 6 7 8 9 0 FLASHBK EZ PIC EZ SOUND SAP CC ADJUST...
Owners Manual
Page 18
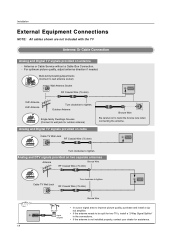
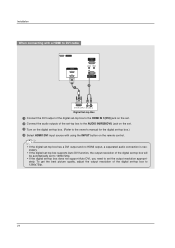
...RF Coaxial Wire (75 ohm) ANTENNA/ CABLE IN VHF Antenna UHF Antenna Turn clockwise to bend the bronze wire when connecting the antenna. IDfIGtIThOALUeATUDaIOntenSn-VIaDEOisVIDnEOot ( ) inAUsDtIOalled properly, contact your dealer for two TV's, install a "2-Way Signal Splitter" • in the connections. For ...NOTE: All cables shown are not included with the TV Antenna Or Cable Connection Analog and Digital TV signals provided on two separate antennas Antenna Bronze Wire RF Coaxial Wire (75 ohm) Cable TV Wall Jack Turn clockwise to tighten. nal amplifier. • If ...
...RF Coaxial Wire (75 ohm) ANTENNA/ CABLE IN VHF Antenna UHF Antenna Turn clockwise to bend the bronze wire when connecting the antenna. IDfIGtIThOALUeATUDaIOntenSn-VIaDEOisVIDnEOot ( ) inAUsDtIOalled properly, contact your dealer for two TV's, install a "2-Way Signal Splitter" • in the connections. For ...NOTE: All cables shown are not included with the TV Antenna Or Cable Connection Analog and Digital TV signals provided on two separate antennas Antenna Bronze Wire RF Coaxial Wire (75 ohm) Cable TV Wall Jack Turn clockwise to tighten. nal amplifier. • If ...
Owners Manual
Page 21
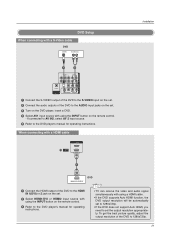
... IN2, select AV 2 input source. 5 Refer to 1280x720p. 21 VIDEO AUDIO COMPONENT IN AV OUT AV IN 1 OPTICAL DIGITAL AUDIO OUT S-VIDEO VIDEO ( ) AUDIO • TV can receive the video and audio signal simultaneously with using a HDMI cable. • If the DVD supports Auto HDMI function, the DVD output resolution will... of the DVD to the S-VIDEO input on the set. 2 Connect the audio outputs of the DVD to the AUDIO input jacks on the set. 3 Turn on the DVD player, insert a DVD. 4 Select AV1 input source with using the INPUT button on the remote control. 3 Refer to the DVD player's manual...
... IN2, select AV 2 input source. 5 Refer to 1280x720p. 21 VIDEO AUDIO COMPONENT IN AV OUT AV IN 1 OPTICAL DIGITAL AUDIO OUT S-VIDEO VIDEO ( ) AUDIO • TV can receive the video and audio signal simultaneously with using a HDMI cable. • If the DVD supports Auto HDMI function, the DVD output resolution will... of the DVD to the S-VIDEO input on the set. 2 Connect the audio outputs of the DVD to the AUDIO input jacks on the set. 3 Turn on the DVD player, insert a DVD. 4 Select AV1 input source with using the INPUT button on the remote control. 3 Refer to the DVD player's manual...
Owners Manual
Page 22
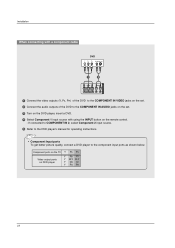
... to the COMPONENT IN VIDEO jacks on the set. 2 Connect the audio outputs of the DVD to the COMPONENT IN AUDIO jacks on the set. 3 Turn on the DVD player, insert a DVD. 4 Select Component 1 input source with using the INPUT button on DVD player Y PB PR Y Pb OPTICAL Y B-Y DIGITALAUDIO... AUDIO 22 If connected to COMPONENT IN 2, select Component 2 input source. 5 Refer to the component input ports as shown below. Component ports on the TV Video output ports on the remote control. - COMPONENT IN AV OUT AV IN 1 • Component Input ports VIDEO AUDIO To get better picture quality, ...
... to the COMPONENT IN VIDEO jacks on the set. 2 Connect the audio outputs of the DVD to the COMPONENT IN AUDIO jacks on the set. 3 Turn on the DVD player, insert a DVD. 4 Select Component 1 input source with using the INPUT button on DVD player Y PB PR Y Pb OPTICAL Y B-Y DIGITALAUDIO... AUDIO 22 If connected to COMPONENT IN 2, select Component 2 input source. 5 Refer to the component input ports as shown below. Component ports on the TV Video output ports on the remote control. - COMPONENT IN AV OUT AV IN 1 • Component Input ports VIDEO AUDIO To get better picture quality, ...
Owners Manual
Page 23
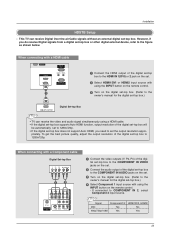
... HDMI1/DVI, HDMI2 No Yes RGB IN (PC) AUDIO IN REMOTE (RGB/DVI) CONTROL IN 23 This TV can receive the video and audio signal simultaneously using the INPUT button on the set -top box. (Refer to... the COMPONENT IN AUDIO jacks on the remote control. - HDMI / DVI IN 3 Turn on the digital set-top box. (Refer to the RS-232C IN owner's manual for the digital set-top box...COMPONENT IN AV OUT AV IN 1 RGB IN (PC) AUDIO IN REMOTE (RGB/DVI) CONTROL IN • TV can receive Digital Over-the-air/Cable signals without an external digital set -top box to the figure as shown...
... HDMI1/DVI, HDMI2 No Yes RGB IN (PC) AUDIO IN REMOTE (RGB/DVI) CONTROL IN 23 This TV can receive the video and audio signal simultaneously using the INPUT button on the set -top box. (Refer to... the COMPONENT IN AUDIO jacks on the remote control. - HDMI / DVI IN 3 Turn on the digital set-top box. (Refer to the RS-232C IN owner's manual for the digital set-top box...COMPONENT IN AV OUT AV IN 1 RGB IN (PC) AUDIO IN REMOTE (RGB/DVI) CONTROL IN • TV can receive Digital Over-the-air/Cable signals without an external digital set -top box to the figure as shown...
Owners Manual
Page 24
RGB IN 3 Turn on the digital set-top box. (Refer to the owner's manual for the d(PCi)gital set-top box.) REMORTEGBAIUNDIO IN CONTROL IN (RGB/DVI) 4 Select ...
RGB IN 3 Turn on the digital set-top box. (Refer to the owner's manual for the d(PCi)gital set-top box.) REMORTEGBAIUNDIO IN CONTROL IN (RGB/DVI) 4 Select ...
Owners Manual
Page 25
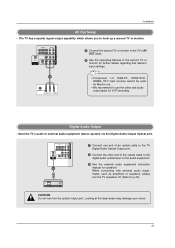
... video and audio output jacks for operation. Send the TV's audio to p.43) CAUTION Do not look into the optical output port. When connecting with external audio equipments, such as amplifiers or speakers, please turn the TV speakers off. (Refer to external audio equipment (stereo ...system) via the Digital Audio Output Optical port. Installation AV Out Setup - The TV has a special signal output capability which allows you to hook up ...
... video and audio output jacks for operation. Send the TV's audio to p.43) CAUTION Do not look into the optical output port. When connecting with external audio equipments, such as amplifiers or speakers, please turn the TV speakers off. (Refer to external audio equipment (stereo ...system) via the Digital Audio Output Optical port. Installation AV Out Setup - The TV has a special signal output capability which allows you to hook up ...
Owners Manual
Page 26
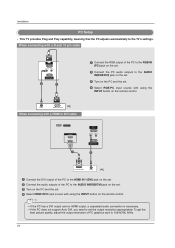
... HDMI1/DVI input source with using the INPUT button on the remote control. When connecting with using the INPUT button on the remote control. This TV provides Plug and Play capability, meaning that the PC adjusts automatically to the AUDIO IN(RGB/DVI) jack on the set.... 3 Turn on the PC and the set the output resolution appropriaRSt-2e32lCyIN. AUDIO RGB-PC OUTPUT PC When connecting with a HDMI to DVI cable SERVICE HDMI ...
... HDMI1/DVI input source with using the INPUT button on the remote control. When connecting with using the INPUT button on the remote control. This TV provides Plug and Play capability, meaning that the PC adjusts automatically to the AUDIO IN(RGB/DVI) jack on the set.... 3 Turn on the PC and the set the output resolution appropriaRSt-2e32lCyIN. AUDIO RGB-PC OUTPUT PC When connecting with a HDMI to DVI cable SERVICE HDMI ...
Owners Manual
Page 29
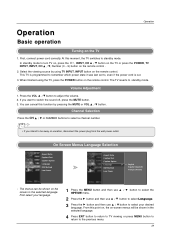
... on the screen in the selected language. 4 Press EXIT button to return to TV viewing or press MENU button to return to adjust the volume. 2. First select your desired language. Operation Operation Basic operation Turning on the remote control. Select the viewing source by pressing the MUTE or VOL ...D / E button. If you intend to turn TV on, press the , INPUT, CH D / E button on the TV or press the POWER, TV INPUT, INPUT, CH D / E, Number (0 ~ 9) button on -screen menus will be away on the remote control. ...
... on the screen in the selected language. 4 Press EXIT button to return to TV viewing or press MENU button to return to adjust the volume. 2. First select your desired language. Operation Operation Basic operation Turning on the remote control. Select the viewing source by pressing the MUTE or VOL ...D / E button. If you intend to turn TV on, press the , INPUT, CH D / E button on the TV or press the POWER, TV INPUT, INPUT, CH D / E, Number (0 ~ 9) button on -screen menus will be away on the remote control. ...
Owners Manual
Page 31
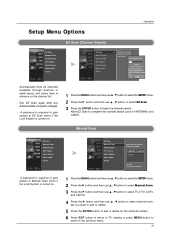
...search cycle for the channel number. 6 Press EXIT button to return to TV viewing or press MENU button to return to the previous menu. 31 A password is required to gain access to EZ Scan menu if the Lock System is turned on. 1 Press the MENU button and then use D / E .../ E button to select EZ Scan. 3 Press the ENTER button to begin the channel search. D E TV G 2 TV 2-0 Press to delete the channel. - A password is required to gain access to Manual Scan menu if the Lock System is turned on the channel list. - Setup Menu Options Operation EZ Scan (Channel Search) EZ Scan Manual...
...search cycle for the channel number. 6 Press EXIT button to return to TV viewing or press MENU button to return to the previous menu. 31 A password is required to gain access to EZ Scan menu if the Lock System is turned on. 1 Press the MENU button and then use D / E .../ E button to select EZ Scan. 3 Press the ENTER button to begin the channel search. D E TV G 2 TV 2-0 Press to delete the channel. - A password is required to gain access to Manual Scan menu if the Lock System is turned on the channel list. - Setup Menu Options Operation EZ Scan (Channel Search) EZ Scan Manual...
Owners Manual
Page 43
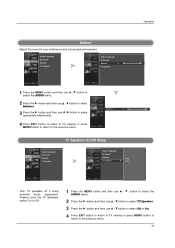
Adjust the sound in your preference and surrounded environment. Balance 0 L R Audio Language EZ Sound Balance TV Speaker TV Speakers On/Off Setup Audio Language EZ Sound Balance TV Speaker Off G On - Turn TV speakers off if using external audio equipment. Feature turns the TV Speakers option On or Off. 1 Press the MENU button and then use D / E button to...
Adjust the sound in your preference and surrounded environment. Balance 0 L R Audio Language EZ Sound Balance TV Speaker TV Speakers On/Off Setup Audio Language EZ Sound Balance TV Speaker Off G On - Turn TV speakers off if using external audio equipment. Feature turns the TV Speakers option On or Off. 1 Press the MENU button and then use D / E button to...
Owners Manual
Page 45
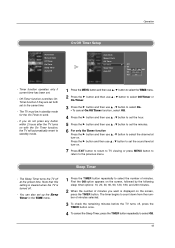
... E button to the same time. - Sleep Timer - If you do not press any button within 2 hours after the TV turns on the screen, followed by the following sleep timer options: 10, 20, 30, 60, 90, 120, 180, and 240 minutes. 2 When the number of minutes selected. 3 To check the remaining minutes before ...the TV turns off at turn -on. 7 Press EXIT button to return to TV viewing or press MENU button to return to select the channel...
... E button to the same time. - Sleep Timer - If you do not press any button within 2 hours after the TV turns on the screen, followed by the following sleep timer options: 10, 20, 30, 60, 90, 120, 180, and 240 minutes. 2 When the number of minutes selected. 3 To check the remaining minutes before ...the TV turns off at turn -on. 7 Press EXIT button to return to TV viewing or press MENU button to return to select the channel...
Owners Manual
Page 46
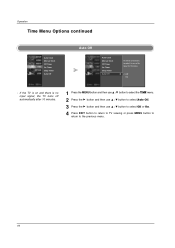
... Manual Clock Off Timer On Timer Sleep Timer Auto Off Auto Off Auto Clock Manual Clock Off Timer On Timer Sleep Timer Auto Off TV will be automatically turned off automatically after 10 minutes. 1 Press the MENU button and then use D / E button to select the TIME menu. 2 Press the G button... and then use D / E button to select Auto Off. 3 Press the G button and then use D / E button to select Off or On. 4 Press EXIT button to return to TV ...
... Manual Clock Off Timer On Timer Sleep Timer Auto Off Auto Off Auto Clock Manual Clock Off Timer On Timer Sleep Timer Auto Off TV will be automatically turned off automatically after 10 minutes. 1 Press the MENU button and then use D / E button to select the TIME menu. 2 Press the G button... and then use D / E button to select Auto Off. 3 Press the G button and then use D / E button to select Off or On. 4 Press EXIT button to return to TV ...
Owners Manual
Page 48
...- Caption/Text, if provided by the broadcaster, would be chosen for digital sources only if they are included on the screen. - Choose the language you turn the power off. - Select a caption mode for a data service. - tion languages: English, Spanish, or French. 4 Press EXIT button to return to...select caption: CC1, CC2, CC3, CC4, Text1, Text2, Text3, or Text4. • CAPTION The term for the words that scroll across the bottom of the TV screen. • TEXT The term for both digital and analog channels on a program. - Caption may not be disabled. 1 Use the CC button repeatedly to ...
...- Caption/Text, if provided by the broadcaster, would be chosen for digital sources only if they are included on the screen. - Choose the language you turn the power off. - Select a caption mode for a data service. - tion languages: English, Spanish, or French. 4 Press EXIT button to return to...select caption: CC1, CC2, CC3, CC4, Text1, Text2, Text3, or Text4. • CAPTION The term for the words that scroll across the bottom of the TV screen. • TEXT The term for both digital and analog channels on a program. - Caption may not be disabled. 1 Use the CC button repeatedly to ...
Owners Manual
Page 52
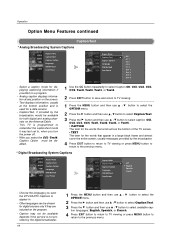
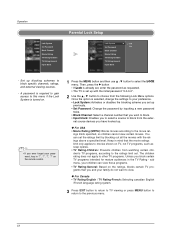
... the initial password "0-0-0-0". 2 Use the D / E button to choose from watching certain children's TV programs, according to movies shown on TV, not TV programs, such as requested. • The TV is turned on. • If you block certain TV programs intended for mature audiences in '7', '7', '7', '7' on the remote control. 1 Press the... to select a source to block from the external source devices you and your family do not want to your password, key in the TV Rating - Then, press the G button • If Lock is already set up blocking schemes to select the LOCK menu. Set up...
... the initial password "0-0-0-0". 2 Use the D / E button to choose from watching certain children's TV programs, according to movies shown on TV, not TV programs, such as requested. • The TV is turned on. • If you block certain TV programs intended for mature audiences in '7', '7', '7', '7' on the remote control. 1 Press the... to select a source to block from the external source devices you and your family do not want to your password, key in the TV Rating - Then, press the G button • If Lock is already set up blocking schemes to select the LOCK menu. Set up...
Owners Manual
Page 61
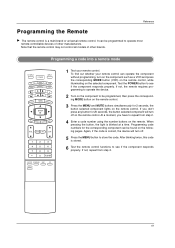
... POWER TV AUDIO DVD MODE CABLE INPUT VCR STB BRIGHT - If you have to repeat from step 2. 61 Programming code numbers for 20 seconds, the button selected component will turn on the component such as a VCR and press the corresponding MODE button (VCR) on the remote control, ... component lights on the remote control. To find out whether your remote control. If not, the remote requires programming to operate the device. 2 Turn on the component to be programmed to operate most remote-controllable devices of other manufacturers. If not, repeat from step 2. 4 Enter a code ...
... POWER TV AUDIO DVD MODE CABLE INPUT VCR STB BRIGHT - If you have to repeat from step 2. 61 Programming code numbers for 20 seconds, the button selected component will turn on the component such as a VCR and press the corresponding MODE button (VCR) on the remote control, ... component lights on the remote control. To find out whether your remote control. If not, the remote requires programming to operate the device. 2 Turn on the component to be programmed to operate most remote-controllable devices of other manufacturers. If not, repeat from step 2. 4 Enter a code ...
Owners Manual
Page 64
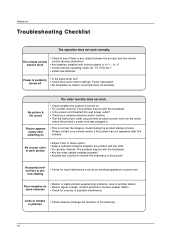
...distance between the product and the remote control causing obstruction. • Are batteries installed with Auto off • Is the sleep timer set : TV, VCR etc.? • Install new batteries. The problem may be with the broadcast. • Are the video cables installed properly? •.... No picture & No sound • Check whether the product is suddenly turned off activated. Lines or streaks in pictures • Check antenna (Change the direction of the picture. Power is turned on some channels • Station or cable product experiencing problems, tune to ...
...distance between the product and the remote control causing obstruction. • Are batteries installed with Auto off • Is the sleep timer set : TV, VCR etc.? • Install new batteries. The problem may be with the broadcast. • Are the video cables installed properly? •.... No picture & No sound • Check whether the product is suddenly turned off activated. Lines or streaks in pictures • Check antenna (Change the direction of the picture. Power is turned on some channels • Station or cable product experiencing problems, tune to ...


