
Owners Manual
Page 1
... usA_c_m_ _us_,,__ usA_c_mm_"_:hu_s_,,__ C*_N*_A P/NO : 5AC33601911 (0909-REVO0) Lifds Good OWNER'S NUAL 42LH90 47LH90 55LH90 43SL90 47SL90 LCD TV OWNER'S MANUAL 425L80 475L80 555L80 Please read this manual carefully before operating your set and retain it for future reference. The model and seria[ on the back an_ Record _r need...
... usA_c_m_ _us_,,__ usA_c_mm_"_:hu_s_,,__ C*_N*_A P/NO : 5AC33601911 (0909-REVO0) Lifds Good OWNER'S NUAL 42LH90 47LH90 55LH90 43SL90 47SL90 LCD TV OWNER'S MANUAL 425L80 475L80 555L80 Please read this manual carefully before operating your set and retain it for future reference. The model and seria[ on the back an_ Record _r need...

Owners Manual
Page 4
... must remain readily operable. @ As long as this unit is not disconnected from physical or mechanical abuse, such as gasoline or candles or expose the TV to direct air conditioning. @ Do not expose to telephone wires, lightening rods, or gas pipes. Pay particular attention to fall into the product, and... do grasp the plug when unplugging the power cord. To reduce the risk of this owner's manual to be connected to the same AC power outlet as vases, cups, etc. Do not install this could result in fire or electric shock. on...
... must remain readily operable. @ As long as this unit is not disconnected from physical or mechanical abuse, such as gasoline or candles or expose the TV to direct air conditioning. @ Do not expose to telephone wires, lightening rods, or gas pipes. Pay particular attention to fall into the product, and... do grasp the plug when unplugging the power cord. To reduce the risk of this owner's manual to be connected to the same AC power outlet as vases, cups, etc. Do not install this could result in fire or electric shock. on...

Owners Manual
Page 6
...Favorite Channel Setup / Favorite Channel List.. 50 Brief Information 51 Input List 52 Input Label 53 AV Mode 54 Simple Manual 54 Key Lock 55 SIMPLINK 56 Entry Modes 58 Photo List 59 Music List 63 Movie List 66 Divx Registration Code 70 Deactivation 71 Picture ...Size (Aspect Ratio) Control 72 Picture Wizard 74 Preset Picture Settings (Picture Mode 76 Manual Picture Adjustment - CONTENTS WARNING / CAUTION 2 SAFETY INSTRUCTIONS 3 FEATURE OF THIS TV ...
...Favorite Channel Setup / Favorite Channel List.. 50 Brief Information 51 Input List 52 Input Label 53 AV Mode 54 Simple Manual 54 Key Lock 55 SIMPLINK 56 Entry Modes 58 Photo List 59 Music List 63 Movie List 66 Divx Registration Code 70 Deactivation 71 Picture ...Size (Aspect Ratio) Control 72 Picture Wizard 74 Preset Picture Settings (Picture Mode 76 Manual Picture Adjustment - CONTENTS WARNING / CAUTION 2 SAFETY INSTRUCTIONS 3 FEATURE OF THIS TV ...

Owners Manual
Page 7
... 119 External Control Through RS-232C 120 Open Source License 126 Clock Setting - Auto Clock Setup 100 - User Mode 90 Balance 91 TV Speakers On/Off Setup 92 Audio Reset 93 Stereo/SAP Broadcast Setup 94 Audio Language 95 On-Screen Menus Language Selection 96 Caption Mode... - Analog Broadcasting System Captions ....... 97 - Manual Clock Setup 101 Auto On/Off Time Setting 102 Sleep Timer Setting 103 Set Password & Lock System 104 Channel Blocking 107 Movie...
... 119 External Control Through RS-232C 120 Open Source License 126 Clock Setting - Auto Clock Setup 100 - User Mode 90 Balance 91 TV Speakers On/Off Setup 92 Audio Reset 93 Stereo/SAP Broadcast Setup 94 Audio Language 95 On-Screen Menus Language Selection 96 Caption Mode... - Analog Broadcasting System Captions ....... 97 - Manual Clock Setup 101 Auto On/Off Time Setting 102 Sleep Timer Setting 103 Set Password & Lock System 104 Channel Blocking 107 Movie...

Owners Manual
Page 9
"O _o rT1 _o © z Owner's Manual CD Manual Remote Control, Batteries Power Cord Not included with all ... Cable Management Clip (Refer to P.19) Protection Cover Simple Remote Control, Batteries Cable Holder (Refer to P.19) (Except 55SL80) x8 Bolts for stand assembly (Refer to P.15) Cable Management Clip (Refer to P.18) Protection Cover (Refer to ... differ from the images below. If an accessory is missing, please contact the dealer where you purchased the TV. The accessories included may cause scratches or discoloration. D-sub 15 pin Cable When using the VGA (D-sub ...
"O _o rT1 _o © z Owner's Manual CD Manual Remote Control, Batteries Power Cord Not included with all ... Cable Management Clip (Refer to P.19) Protection Cover Simple Remote Control, Batteries Cable Holder (Refer to P.19) (Except 55SL80) x8 Bolts for stand assembly (Refer to P.15) Cable Management Clip (Refer to P.18) Protection Cover (Refer to ... differ from the images below. If an accessory is missing, please contact the dealer where you purchased the TV. The accessories included may cause scratches or discoloration. D-sub 15 pin Cable When using the VGA (D-sub ...

Owners Manual
Page 20
PREPARATION DESKTOP PEDESTALINSTALLATION ,,,IImage shown may differ from the wall. _D m _D 4 inches © 4 inches z 4 inches 4 inches SWIVELSTAND After installing the TV, you can adjust the TV set manually to the left or right direction by 20 degrees to suit your TV. For proper ventilation, allow a clearance of 4 inches on all four sides from your viewing position. 20
PREPARATION DESKTOP PEDESTALINSTALLATION ,,,IImage shown may differ from the wall. _D m _D 4 inches © 4 inches z 4 inches 4 inches SWIVELSTAND After installing the TV, you can adjust the TV set manually to the left or right direction by 20 degrees to suit your TV. For proper ventilation, allow a clearance of 4 inches on all four sides from your viewing position. 20

Owners Manual
Page 24
...1 or2 jacks on theTV. 2. How to connect r_ _D z 0 Connect the video outputs (Y, PB, PR) of the digital set-top box to the owner's manual for 42/47/55LH90. r_ top box to use picture for the digital set -top box. Match the jack colors (Y = green, PB = blue, and PR... from a digital set-top box or other digital external device. r_ z r_ O Connect the audio output of the digital set- HD RECEIVERSETUP This TV can receive digital over-the-air/digital cable signals without an external digital set -top box operation.) 0_.Select the Component1 or 2 input source on...
...1 or2 jacks on theTV. 2. How to connect r_ _D z 0 Connect the video outputs (Y, PB, PR) of the digital set-top box to the owner's manual for 42/47/55LH90. r_ top box to use picture for the digital set -top box. Match the jack colors (Y = green, PB = blue, and PR... from a digital set-top box or other digital external device. r_ z r_ O Connect the audio output of the digital set- HD RECEIVERSETUP This TV can receive digital over-the-air/digital cable signals without an external digital set -top box operation.) 0_.Select the Component1 or 2 input source on...

Owners Manual
Page 25
How to HDMI/DVI IN 1, m x ,,-I source on the TV using the INPUT button on the remote c control. How to the owner's manual for the digital set -top box. HDMI-DTV 31.47 31.50 59.94 60.00 44.96 45.00 59.94 60.00 33 ...
How to HDMI/DVI IN 1, m x ,,-I source on the TV using the INPUT button on the remote c control. How to the owner's manual for the digital set -top box. HDMI-DTV 31.47 31.50 59.94 60.00 44.96 45.00 59.94 60.00 33 ...
Owners Manual
Page 26
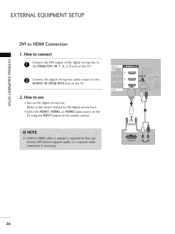
"O m z 2. EXTERNALEQUIPMENT SETUP DVI to connect m x m O CthoenHnDeMctI/DVthle DVI IoNutp1u,t2, ofort5he jadcigkitaol n stehte-TtoVp. How to use m c 01T_urn on the digital set -top box.) 01S_elect the HDMI1, HDMI2, or HDMI3 input source on the TV using the INPUT button on the TV. "O (Refer to the AUDIO IN (RGB/DVl) jack on the remote control. 26 box to _o z m X:) c O Connect the digital set-top box audio output to the owner's manual for the digital set -top box. How to HDMI Connection 1.
"O m z 2. EXTERNALEQUIPMENT SETUP DVI to connect m x m O CthoenHnDeMctI/DVthle DVI IoNutp1u,t2, ofort5he jadcigkitaol n stehte-TtoVp. How to use m c 01T_urn on the digital set -top box.) 01S_elect the HDMI1, HDMI2, or HDMI3 input source on the TV using the INPUT button on the TV. "O (Refer to the AUDIO IN (RGB/DVl) jack on the remote control. 26 box to _o z m X:) c O Connect the digital set-top box audio output to the owner's manual for the digital set -top box. How to HDMI Connection 1.

Owners Manual
Page 27
...get better picture quality, connect a DVD player to the DVD player's manual for operating instructions. I'I'I Match the jack colors (Y = green, PB = blue, and PR = red). Refer to the component input ports as shown below. Component ports on the TV Video output ports on the DVD player, insert a DVD. How to... use m c Turn on DVD player 27 Select the Component1 or 2 input source on the TV using the INPUT button on the TV. z m c O Connect the audio outputs of the DVD to the COMPONENT IN AUDIO 1 or 2 jacks on the remote control. DVD ...
...get better picture quality, connect a DVD player to the DVD player's manual for operating instructions. I'I'I Match the jack colors (Y = green, PB = blue, and PR = red). Refer to the component input ports as shown below. Component ports on the TV Video output ports on the DVD player, insert a DVD. How to... use m c Turn on DVD player 27 Select the Component1 or 2 input source on the TV using the INPUT button on the TV. z m c O Connect the audio outputs of the DVD to the COMPONENT IN AUDIO 1 or 2 jacks on the remote control. DVD ...

Owners Manual
Page 28
... the jack colors (Video = yellow, Audio Left x = white, and Audio Right = red) m _o z 2. HDMI supports both audio and video. 2. How to the DVD player's manual for operating instructions. 28 How to use 01S. How to connect O Connect the AUDIO/VIDEO jacks between... TV and m DVD. No separate audio connection is necessary. How to the DVD player's manual for operating instructions. elect the HDMI1, HDMI2, HDMI3, or HDMI4 input source on the TV using the INPUT button on the remote control. ,_ Refer to ...
... the jack colors (Video = yellow, Audio Left x = white, and Audio Right = red) m _o z 2. HDMI supports both audio and video. 2. How to the DVD player's manual for operating instructions. 28 How to use 01S. How to connect O Connect the AUDIO/VIDEO jacks between... TV and m DVD. No separate audio connection is necessary. How to the DVD player's manual for operating instructions. elect the HDMI1, HDMI2, HDMI3, or HDMI4 input source on the TV using the INPUT button on the remote control. ,_ Refer to ...

Owners Manual
Page 29
..., and Audio Right = red) 2. Insert a video tape into the VCR and press PLAY on the VCR. (Refer to the VCR owner's manual.) Select the AV 1 input source on the TV using the INPUT button on the VCR. (Refer to the RF antenna in socket of the VCR to the same channel number... VCR SETUP Antenna Connection 1. Connect the antenna cable to the VCR owner's manual.) Composite (RCA) Connection 1. et on the TV. How to AM IN 2, select AM2 input source on the TV. If connected to connect O Connect the AUDIO/VIDEO jacks between TV and VCR. How to use Set VCR output switch to 3 or 4 and...
..., and Audio Right = red) 2. Insert a video tape into the VCR and press PLAY on the VCR. (Refer to the VCR owner's manual.) Select the AV 1 input source on the TV using the INPUT button on the VCR. (Refer to the RF antenna in socket of the VCR to the same channel number... VCR SETUP Antenna Connection 1. Connect the antenna cable to the VCR owner's manual.) Composite (RCA) Connection 1. et on the TV. How to AM IN 2, select AM2 input source on the TV. If connected to connect O Connect the AUDIO/VIDEO jacks between TV and VCR. How to use Set VCR output switch to 3 or 4 and...

Owners Manual
Page 33
Select Auto Config.. Size or 33 After adjustment, if the image is still not correct, try using the manual settings or a different resolution or refresh rate on the PC. Select Screen (RGB-PC). Select Yes. Auto Configure Automatically adjusts picture position and minimizes image instability. r'_ x m z m c m z m c Select PICTURE. Start Auto Configuration. 01_If the position of the image is still not correct, try Auto adjustment again. 011If_ picture needs to be adjusted again after Auto adjustment in RGB-PC, you can adjust the Position, Phase.
Select Auto Config.. Size or 33 After adjustment, if the image is still not correct, try using the manual settings or a different resolution or refresh rate on the PC. Select Screen (RGB-PC). Select Yes. Auto Configure Automatically adjusts picture position and minimizes image instability. r'_ x m z m c m z m c Select PICTURE. Start Auto Configuration. 01_If the position of the image is still not correct, try Auto adjustment again. 011If_ picture needs to be adjusted again after Auto adjustment in RGB-PC, you can adjust the Position, Phase.

Owners Manual
Page 34
...: This function allows you prefer. 01S_ize: This function is not clear after auto adjustment and especially if characters are still trembling, adjust the picture phase manually. EXTERNALEQUIPMENT SETUP Adjustment for screen Position, Size, and Phase If the picture is to remove any vertical bars or stripes visible on the screen background.
...: This function allows you prefer. 01S_ize: This function is not clear after auto adjustment and especially if characters are still trembling, adjust the picture phase manually. EXTERNALEQUIPMENT SETUP Adjustment for screen Position, Size, and Phase If the picture is to remove any vertical bars or stripes visible on the screen background.

Owners Manual
Page 37
See the external audio equipment instruction manual for operation. 37 z l.#'i m c O Set the "TV Speaker option - Off" in the AUDIO menu. (b p.92). If you want to enjoy digital broadcasting through 5.1 -channel speakers, connect the OPTICAL DIGITAL AUDIO OUT terminal ...on the back of the optical cable to the digital I'I'I audio input on the audio equipment. AUDIO OUT CONNECTION Send the TV's audio to a Home Theater (or amp). 1. How to connect m x I'I'I z O OoPnTnICecAtLonDe IeGnITdAoLf tAheUDoIpOticaOl UcTa.ble to the...
See the external audio equipment instruction manual for operation. 37 z l.#'i m c O Set the "TV Speaker option - Off" in the AUDIO menu. (b p.92). If you want to enjoy digital broadcasting through 5.1 -channel speakers, connect the OPTICAL DIGITAL AUDIO OUT terminal ...on the back of the optical cable to the digital I'I'I audio input on the audio equipment. AUDIO OUT CONNECTION Send the TV's audio to a Home Theater (or amp). 1. How to connect m x I'I'I z O OoPnTnICecAtLonDe IeGnITdAoLf tAheUDoIpOticaOl UcTa.ble to the...

Owners Manual
Page 43
...your antenna connection and start Auto Tuning. 43 "Store Demo" mode initializes the TV to set the essential items for viewing the TV for use in retail environments. N -r" z Step1. Mode setting Select Auto or Manual. Auto Tuning Select Home Use. It can also be displayed on the screen when... guides the user to easily set the image quality. 01Y0o1u_ can also adjust Initial Setting in the OPTION menu. Picture mode" manually while inspecting the TV, but the TV will be activated from the user menus. 01_Default selection is only intended for the first time when purchasing the...
...your antenna connection and start Auto Tuning. 43 "Store Demo" mode initializes the TV to set the essential items for viewing the TV for use in retail environments. N -r" z Step1. Mode setting Select Auto or Manual. Auto Tuning Select Home Use. It can also be displayed on the screen when... guides the user to easily set the image quality. 01Y0o1u_ can also adjust Initial Setting in the OPTION menu. Picture mode" manually while inspecting the TV, but the TV will be activated from the user menus. 01_Default selection is only intended for the first time when purchasing the...

Owners Manual
Page 44
Accept the current selection. Return to TV viewing. 44 ......... Select a menu item. WATCHING TV / CHANNEL CONTROL ON-SCREENMENUSSELECTION Your TV's OSD (On Screen Display) may differ slightly from that shown in this manual. -r" z < N -r" > Z Z fT1 N 0 Z _m 0 i_!_!!!_!_i_i_ii_!i_i_i_!_!i_!i_i_i_i_i_i_i_i_i_i_i_i_i_i_i_i_i_i_i_i_i iiiiiiiiiiiiiiiiiiiiiiiiiiiiiiiiiiiiiiiiiiiiiiiiiiiiiiiiiiiiiiiiiiiiiiiiiiiiiiiiiiiiiiiiiiiiiiiiiiiiiiiiiiiiiiiiiiiiiiiiiiiiiiiiiiiiiiiiiii I For USA For Canada Display each menu.
Accept the current selection. Return to TV viewing. 44 ......... Select a menu item. WATCHING TV / CHANNEL CONTROL ON-SCREENMENUSSELECTION Your TV's OSD (On Screen Display) may differ slightly from that shown in this manual. -r" z < N -r" > Z Z fT1 N 0 Z _m 0 i_!_!!!_!_i_i_ii_!i_i_i_!_!i_!i_i_i_i_i_i_i_i_i_i_i_i_i_i_i_i_i_i_i_i_i iiiiiiiiiiiiiiiiiiiiiiiiiiiiiiiiiiiiiiiiiiiiiiiiiiiiiiiiiiiiiiiiiiiiiiiiiiiiiiiiiiiiiiiiiiiiiiiiiiiiiiiiiiiiiiiiiiiiiiiiiiiiiiiiiiiiiiiiiii I For USA For Canada Display each menu.

Owners Manual
Page 45
...01S_ound Mode: Selects the desired preset sound setting. 01M_ ulti Audio: Changes the audio language (Digital signal). Make appropriate adjustments. 0_Aspect Ratio: Selects your TV N turns off automatically. -r" z 01D_el/Add/Fav: Select channel you want to add/delete or add the channel to the Favorite List. < ...01C_aption: Select on or off. 01U_SB Device: Select "Eject" in this manual. Q.Menu (Quick Menu) is shown in order to eject a USB N -r" device. > Z Z fT1 N 0 Z _m 0 Return to TV viewing. 45 Display each menu.
...01S_ound Mode: Selects the desired preset sound setting. 01M_ ulti Audio: Changes the audio language (Digital signal). Make appropriate adjustments. 0_Aspect Ratio: Selects your TV N turns off automatically. -r" z 01D_el/Add/Fav: Select channel you want to add/delete or add the channel to the Favorite List. < ...01C_aption: Select on or off. 01U_SB Device: Select "Eject" in this manual. Q.Menu (Quick Menu) is shown in order to eject a USB N -r" device. > Z Z fT1 N 0 Z _m 0 Return to TV viewing. 45 Display each menu.

Owners Manual
Page 46
... © Select Auto Tuning. Select Yes. Return to TV viewing. 01T_he TV will ask for a password if parental control has been activated (Lock Menu). It is subject to allow a channel search. 01W_ hen setting the Auto Tuning or Manual Tuning, the number of maximum channels you can store is... 1,000. WATCHING TV / CHANNEL CONTROL CHANNELSETUP Auto Scan (Auto Tuning) Automatically finds all channels available through antenna or ...
... © Select Auto Tuning. Select Yes. Return to TV viewing. 01T_he TV will ask for a password if parental control has been activated (Lock Menu). It is subject to allow a channel search. 01W_ hen setting the Auto Tuning or Manual Tuning, the number of maximum channels you can store is... 1,000. WATCHING TV / CHANNEL CONTROL CHANNELSETUP Auto Scan (Auto Tuning) Automatically finds all channels available through antenna or ...
Owners Manual
Page 47
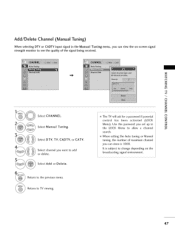
... signal environment. 47 Select Add or Delete. Return to TV viewing. Select Manual Tuning. When setting the Auto tuning or Manual tuning, the number of the signal being received. Select DTV, TV, CADTV, or CATV. Add/Delete Channel (Manual Tuning) When selecting DTV or CADTV input signal in the...store is subject to see the quality of maximum channel you set up in the Manual Tuning menu,, you want to add or delete. Return to the previous menu. It is 1000. N -r" z c_ < N -r" > Z Z fT1 N The TV will ask for a password if parental 0 control has been activated (LOCK Z Menu...
... signal environment. 47 Select Add or Delete. Return to TV viewing. Select Manual Tuning. When setting the Auto tuning or Manual tuning, the number of the signal being received. Select DTV, TV, CADTV, or CATV. Add/Delete Channel (Manual Tuning) When selecting DTV or CADTV input signal in the...store is subject to see the quality of maximum channel you set up in the Manual Tuning menu,, you want to add or delete. Return to the previous menu. It is 1000. N -r" z c_ < N -r" > Z Z fT1 N The TV will ask for a password if parental 0 control has been activated (LOCK Z Menu...


