

Owner's Manual
Page 16
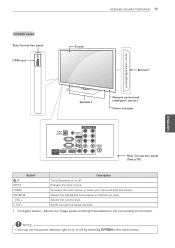
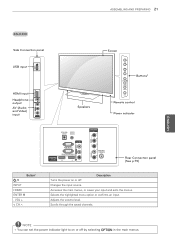
... power on the surrounding environment. 2 All of the buttons are touch sensitive and can set the power indicator light to on or off . 16 ASSEMBLING AND PREPARING 32LV2500, 32LV2520, LV3500, LV3520, LV5300, LW5000, LW5300, LV355C series Screen ENEGNLGISH Speakers CH VOL ENTER HOME INPUT CH VOL ENTER HOME INPUT H Remote control and...
... power on the surrounding environment. 2 All of the buttons are touch sensitive and can set the power indicator light to on or off . 16 ASSEMBLING AND PREPARING 32LV2500, 32LV2520, LV3500, LV3520, LV5300, LW5000, LW5300, LV355C series Screen ENEGNLGISH Speakers CH VOL ENTER HOME INPUT CH VOL ENTER HOME INPUT H Remote control and...
Owner's Manual
Page 17
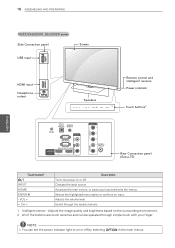
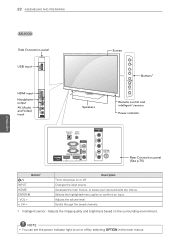
... or confirms an input. Changes the input source. v CH ^ Scrolls through the saved channels. 1 Intelligent sensor - NOTE yyYou can set the power indicator light to on the surrounding environment. Adjusts the volume level. Adjusts the image quality and brightness based on or off .... ASSEMBLING AND PREPARING 17 LV3400 series Side Connection panel USB input USB IN Screen Speakers CH VOL Buttons2 ENTER HOME INPUT CH VOL Remote control and ENTER intelligent1 sensors HOME INPUT Power indicator ENEGNLGISH OPTICAL DIGITAL ...
... or confirms an input. Changes the input source. v CH ^ Scrolls through the saved channels. 1 Intelligent sensor - NOTE yyYou can set the power indicator light to on the surrounding environment. Adjusts the volume level. Adjusts the image quality and brightness based on or off .... ASSEMBLING AND PREPARING 17 LV3400 series Side Connection panel USB input USB IN Screen Speakers CH VOL Buttons2 ENTER HOME INPUT CH VOL Remote control and ENTER intelligent1 sensors HOME INPUT Power indicator ENEGNLGISH OPTICAL DIGITAL ...
Owner's Manual
Page 18
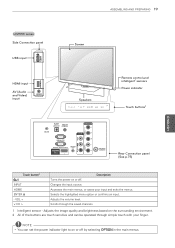
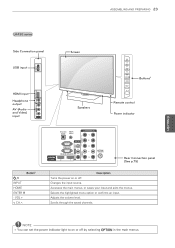
...v CH ^ Description Turns the power on or off . Adjusts the volume level. 18 ASSEMBLING AND PREPARING ENEGNLGISH 19/22/26LV2500, 26LV2520 series Side Connection panel Screen USB input USB IN HDMI input Headphone output IN 3 Speakers CH VOL ENTER HOME INPUT Remote control and intelligent1 sensors Power indicator Touch buttons2 OPTICAL.../ I INPUT HOME ENTER ⊙ - Adjusts the image quality and brightness based on the surrounding environment. 2 All of the buttons are touch sensitive and can set the power indicator light to on or off by selecting OPTION in the main menus.
...v CH ^ Description Turns the power on or off . Adjusts the volume level. 18 ASSEMBLING AND PREPARING ENEGNLGISH 19/22/26LV2500, 26LV2520 series Side Connection panel Screen USB input USB IN HDMI input Headphone output IN 3 Speakers CH VOL ENTER HOME INPUT Remote control and intelligent1 sensors Power indicator Touch buttons2 OPTICAL.../ I INPUT HOME ENTER ⊙ - Adjusts the image quality and brightness based on the surrounding environment. 2 All of the buttons are touch sensitive and can set the power indicator light to on or off by selecting OPTION in the main menus.
Owner's Manual
Page 19
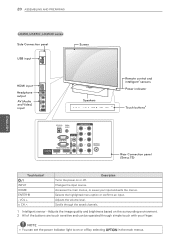
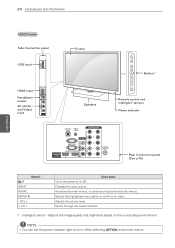
Accesses the main menus, or saves your finger. ASSEMBLING AND PREPARING 19 ENEGNLGISH LV255C series Side Connection panel USB input Screen USB IN HDMI input AV (Audio and Video) AV IN 2 input IN 2 Speakers CH VOL ENTER HOME INPUT Remote control and intelligent1 sensors Power ... power on or off . Adjusts the image quality and brightness based on the surrounding environment. 2 All of the buttons are touch sensitive and can set the power indicator light to on or off by selecting OPTION in the main menus. Adjusts the volume level. Changes the input source. Selects the...
Accesses the main menus, or saves your finger. ASSEMBLING AND PREPARING 19 ENEGNLGISH LV255C series Side Connection panel USB input Screen USB IN HDMI input AV (Audio and Video) AV IN 2 input IN 2 Speakers CH VOL ENTER HOME INPUT Remote control and intelligent1 sensors Power ... power on or off . Adjusts the image quality and brightness based on the surrounding environment. 2 All of the buttons are touch sensitive and can set the power indicator light to on or off by selecting OPTION in the main menus. Adjusts the volume level. Changes the input source. Selects the...
Owner's Manual
Page 20
20 ASSEMBLING AND PREPARING ENEGNLGISH LK450, LK451C, LK453C series Side Connection panel USB input Screen USB IN IN 3 HDMI input Headphone output AV (Audio and Video) input AV IN 2 VIDEO L/MONO AUDIO R Speakers CH VOL ENTER HOME INPUT OPTICALDIGITAL (RGB/... the saved channels. 1 Intelligent sensor - Adjusts the image quality and brightness based on the surrounding environment. 2 All of the buttons are touch sensitive and can set the power indicator light to on or off by selecting OPTION in the main menus. Selects the highlighted menu option or confirms an input.
20 ASSEMBLING AND PREPARING ENEGNLGISH LK450, LK451C, LK453C series Side Connection panel USB input Screen USB IN IN 3 HDMI input Headphone output AV (Audio and Video) input AV IN 2 VIDEO L/MONO AUDIO R Speakers CH VOL ENTER HOME INPUT OPTICALDIGITAL (RGB/... the saved channels. 1 Intelligent sensor - Adjusts the image quality and brightness based on the surrounding environment. 2 All of the buttons are touch sensitive and can set the power indicator light to on or off by selecting OPTION in the main menus. Selects the highlighted menu option or confirms an input.
Owner's Manual
Page 21
...Side Connection panel USB input HDMI input Headphone output AV (Audio and Video) input AV IN 2 VIDEO L/MONO AUDIO R IN 3 USB IN Speakers Screen CH VOL ENTER HOME INPUT Buttons2 Remote control Power indicator OPTICALDIGITAL AUDIO IN AUDIO OUT (RGB/DVI) / DVI IN VIDEO L/MONO AUDIO R AV IN... Rear Connection panel (See p.75) Button2 / I INPUT HOME ENTER ⊙ - Adjusts the volume level. Scrolls through the saved channels. NOTE yyYou can set the power indicator light to on or off by selecting OPTION in the main menus. Accesses the main menus, or saves your input and exits...
...Side Connection panel USB input HDMI input Headphone output AV (Audio and Video) input AV IN 2 VIDEO L/MONO AUDIO R IN 3 USB IN Speakers Screen CH VOL ENTER HOME INPUT Buttons2 Remote control Power indicator OPTICALDIGITAL AUDIO IN AUDIO OUT (RGB/DVI) / DVI IN VIDEO L/MONO AUDIO R AV IN... Rear Connection panel (See p.75) Button2 / I INPUT HOME ENTER ⊙ - Adjusts the volume level. Scrolls through the saved channels. NOTE yyYou can set the power indicator light to on or off by selecting OPTION in the main menus. Accesses the main menus, or saves your input and exits...
Owner's Manual
Page 22
Selects the highlighted menu option or confirms an input. NOTE yyYou can set the power indicator light to on the surrounding environment. Adjusts the volume level. Scrolls through the saved channels. 1 Intelligent sensor - Adjusts the image quality and ... ENEGNLGISH 32LK330 Side Connection panel USB input HDMI input Headphone output AV (Audio and Video) input AV IN 2 VIDEO L/MONO AUDIO R IN 3 USB IN Speakers Screen CH VOL ENTER HOME INPUT Buttons2 Remote control and intelligent1 sensors Power indicator OPTICALDIGITAL AUDIO IN AUDIO OUT (RGB/DVI) / DVI IN VIDEO L/MONO AUDIO...
Selects the highlighted menu option or confirms an input. NOTE yyYou can set the power indicator light to on the surrounding environment. Adjusts the volume level. Scrolls through the saved channels. 1 Intelligent sensor - Adjusts the image quality and ... ENEGNLGISH 32LK330 Side Connection panel USB input HDMI input Headphone output AV (Audio and Video) input AV IN 2 VIDEO L/MONO AUDIO R IN 3 USB IN Speakers Screen CH VOL ENTER HOME INPUT Buttons2 Remote control and intelligent1 sensors Power indicator OPTICALDIGITAL AUDIO IN AUDIO OUT (RGB/DVI) / DVI IN VIDEO L/MONO AUDIO...
Owner's Manual
Page 23
Scrolls through the saved channels. NOTE yyYou can set the power indicator light to on or off by selecting OPTION in the main menus. Selects the highlighted menu option or confirms an input. Accesses ... ENEGNLGISH LK430 series Side Connection panel USB input USB IN IN 3 HDMI input Headphone output VIDEO L/MONO AUDIO R AV (Audio and Video) input AV IN 2 Screen Speakers CH VOL ENTER HOME INPUT Buttons2 Remote control Power indicator Button2 / I INPUT HOME ENTER ⊙ - Adjusts the volume level. VOL + v CH ^ OPTICALDIGITAL (RGB/DVI...
Scrolls through the saved channels. NOTE yyYou can set the power indicator light to on or off by selecting OPTION in the main menus. Selects the highlighted menu option or confirms an input. Accesses ... ENEGNLGISH LK430 series Side Connection panel USB input USB IN IN 3 HDMI input Headphone output VIDEO L/MONO AUDIO R AV (Audio and Video) input AV IN 2 Screen Speakers CH VOL ENTER HOME INPUT Buttons2 Remote control Power indicator Button2 / I INPUT HOME ENTER ⊙ - Adjusts the volume level. VOL + v CH ^ OPTICALDIGITAL (RGB/DVI...
Owner's Manual
Page 24
...v CH ^ Description Turns the power on or off . Accesses the main menus, or saves your input and exits the menus. NOTE yyYou can set the power indicator light to on or off by selecting OPTION in the main menus. Adjusts the volume level. Scrolls through the saved channels. 1 ...Side Connection panel USB input USB IN IN 3 HDMI input Headphone output VIDEO L/MONO AUDIO R AV (Audio and Video) input AV IN 2 Screen Speakers CH VOL ENTER HOME INPUT Buttons2 Remote control and intelligent1 sensors Power indicator OPTICALDIGITAL (RGB/DVI) AUDIO OUT AUDIO IN COMPONENT IN Y PB...
...v CH ^ Description Turns the power on or off . Accesses the main menus, or saves your input and exits the menus. NOTE yyYou can set the power indicator light to on or off by selecting OPTION in the main menus. Adjusts the volume level. Scrolls through the saved channels. 1 ...Side Connection panel USB input USB IN IN 3 HDMI input Headphone output VIDEO L/MONO AUDIO R AV (Audio and Video) input AV IN 2 Screen Speakers CH VOL ENTER HOME INPUT Buttons2 Remote control and intelligent1 sensors Power indicator OPTICALDIGITAL (RGB/DVI) AUDIO OUT AUDIO IN COMPONENT IN Y PB...
Owner's Manual
Page 25
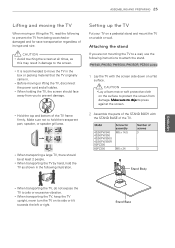
...assembly M5 x 14.5 M5 x 24 Number of the TV. yyWhen holding the TV, the screen should be at all cables. Stand Base yyWhen transporting the TV by hand, hold the transparent part, speaker, or speaker grill area. Setting up the TV Put your TV on a pedestal stand and mount the TV on... 42/50PW340 42/50PW350 42/50PW350U 42/50PW350R 50PZ200 60PZ200 Screw for save transportation regardless of the TV frame firmly. yyIt is recommended to the screen. yyHold the top and bottom of its side or tilt towards the left or right. yyWhen transporting the TV, keep the TV upright, never...
...assembly M5 x 14.5 M5 x 24 Number of the TV. yyWhen holding the TV, the screen should be at all cables. Stand Base yyWhen transporting the TV by hand, hold the transparent part, speaker, or speaker grill area. Setting up the TV Put your TV on a pedestal stand and mount the TV on... 42/50PW340 42/50PW350 42/50PW350U 42/50PW350R 50PZ200 60PZ200 Screw for save transportation regardless of the TV frame firmly. yyIt is recommended to the screen. yyHold the top and bottom of its side or tilt towards the left or right. yyWhen transporting the TV, keep the TV upright, never...
Owner's Manual
Page 36
...MARK FAV P VOL CH 3D ENERGY AV MODE INPUT A G E MUTE TV SAVING 1INFO 2 3 Home Q.MENU 456 ENTER 789 BLIASCTK 0 MARK FAV FLASHBK EXIT 3D SETTING P VOL CH ENERGY AV MOD3EDINPUTFREEZE A G E MUTE TV SAVING RATIO 1 2 3 INFO Home Q.MENU 4 5 6 ENERGY AV MODE INPUT TV 7 8 9 ...Q.MENU VOL 3D P CH A G E EMNUTTEER INFO Home Q.MENU BACK EXIT ENTER 3D SETTING FREEZE RATIO BACK RATIO EXIT INFO (See p.42) Views the information of the current program and screen. Colored buttons These access special functions in an interactive application or other user interaction function. MENU ...
...MARK FAV P VOL CH 3D ENERGY AV MODE INPUT A G E MUTE TV SAVING 1INFO 2 3 Home Q.MENU 456 ENTER 789 BLIASCTK 0 MARK FAV FLASHBK EXIT 3D SETTING P VOL CH ENERGY AV MOD3EDINPUTFREEZE A G E MUTE TV SAVING RATIO 1 2 3 INFO Home Q.MENU 4 5 6 ENERGY AV MODE INPUT TV 7 8 9 ...Q.MENU VOL 3D P CH A G E EMNUTTEER INFO Home Q.MENU BACK EXIT ENTER 3D SETTING FREEZE RATIO BACK RATIO EXIT INFO (See p.42) Views the information of the current program and screen. Colored buttons These access special functions in an interactive application or other user interaction function. MENU ...

Owner's Manual
Page 39
...cord from the power outlet when you do not complete the Initial setting, it will switch back to the default settings of time. 5 To turn the TV on . The Initial setting screen appears if you select Store Demo, any customized settings will appear whenever the TV turns on for the first time, the... Initial setting screen appears. yyIf you turn the TV off, press the power button on . NOTE yyYou can also access Initial Setting by accessing OPTION in Store Demo mode. 4 When the basic settings are complete, press ENTER. yyStore Demo is disabled in ...
...cord from the power outlet when you do not complete the Initial setting, it will switch back to the default settings of time. 5 To turn the TV on . The Initial setting screen appears if you select Store Demo, any customized settings will appear whenever the TV turns on for the first time, the... Initial setting screen appears. yyIf you turn the TV off, press the power button on . NOTE yyYou can also access Initial Setting by accessing OPTION in Store Demo mode. 4 When the basic settings are complete, press ENTER. yyStore Demo is disabled in ...
Owner's Manual
Page 42
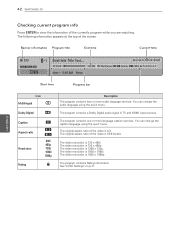
... signal in TV and HDMI input sources. The original aspect ratio of the video is 720 x 480p. The video resolution is 16:9 (wide). See "LOCK Settings" on p.71. The video resolution is 1280 x 720p. The video resolution is 720 x 480i. ENEGNLGISH Sun, Feb 21, 2010 10: 40 AM 10:10 ...Test... The program contains one or more audio language services. 42 WATCHING TV Checking current program info Press ENTER to view the information of the screen. You can change the audio language using the quick menu. The video resolution is 4:3. The video resolution is 1920 x 1080p.
... signal in TV and HDMI input sources. The original aspect ratio of the video is 720 x 480p. The video resolution is 16:9 (wide). See "LOCK Settings" on p.71. The video resolution is 1280 x 720p. The video resolution is 720 x 480i. ENEGNLGISH Sun, Feb 21, 2010 10: 40 AM 10:10 ...Test... The program contains one or more audio language services. 42 WATCHING TV Checking current program info Press ENTER to view the information of the screen. You can change the audio language using the quick menu. The video resolution is 4:3. The video resolution is 1920 x 1080p.
Owner's Manual
Page 44
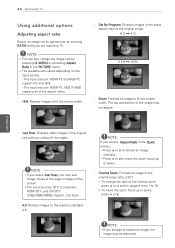
... Program - MENU or accessing Aspect Ratio in the original size without cutting off the edges. Set By Program: Displays images in the Quick menus, yyPress < or > to fit the screen width. - yyPress ^ or v to move the zoom focus up or down , press ^ or v. - 4:3: Resizes images to 16. yyTo move... RATIO while you may see image noises at its range is from 1 to the previous standard 4:3. Cinema Zoom: Formats an image to fit the screen width. yyThe available ratio varies depending on the input source. - yyThe input sources: DTV, Component, HDMI-DTV, and DVI-DTV (720p/1080i/1080p...
... Program - MENU or accessing Aspect Ratio in the original size without cutting off the edges. Set By Program: Displays images in the Quick menus, yyPress < or > to fit the screen width. - yyPress ^ or v to move the zoom focus up or down , press ^ or v. - 4:3: Resizes images to 16. yyTo move... RATIO while you may see image noises at its range is from 1 to the previous standard 4:3. Cinema Zoom: Formats an image to fit the screen width. yyThe available ratio varies depending on the input source. - yyThe input sources: DTV, Component, HDMI-DTV, and DVI-DTV (720p/1080i/1080p...
Owner's Manual
Page 46
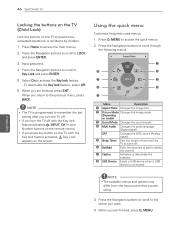
...LOCK and press ENTER. 3 Input password. 4 Press the Navigation buttons to scroll to Key Lock and press ENTER. 5 Select On to remember the last setting after you turn the TV off . 6 Del/Add Edits the channels to scroll through the following menus. ◀ Aspect Ratio ▶ 1 8 ... 16:9 � 3 6 4 5 Menu Description 1 Aspect Ratio Changes the image size. 2 Picture Mode Changes the image mode. (Depending on the screen. NOTE yyThe TV is connected. MENU to access the quick menus. 2 Press the Navigation buttons to add or delete the channel. 7 Caption Activates or ...
...LOCK and press ENTER. 3 Input password. 4 Press the Navigation buttons to scroll to Key Lock and press ENTER. 5 Select On to remember the last setting after you turn the TV off . 6 Del/Add Edits the channels to scroll through the following menus. ◀ Aspect Ratio ▶ 1 8 ... 16:9 � 3 6 4 5 Menu Description 1 Aspect Ratio Changes the image size. 2 Picture Mode Changes the image mode. (Depending on the screen. NOTE yyThe TV is connected. MENU to access the quick menus. 2 Press the Navigation buttons to add or delete the channel. 7 Caption Activates or ...
Owner's Manual
Page 50
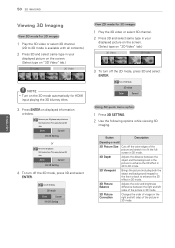
...mode is available with all contents.) 2 Press 3D and select same type in your displayed picture on the screen. (Select type on "2D Video" tab.) 3D Video 2D Video 3 To turn off 2D Mode. 3D... video Enter Cancel Using 3D quick menu option 1 Press 3D SETTING. 2 Use the following options while viewing 3D imaging. Sit 2 meters from TV to enjoy the best 3D .... ENEGNLGISH Enter Cancel ꔅ 3D Setting or Put on model) 3D Picture Size Cuts off the outer edges of the picture and stretch it to fit the full screen in 3D mode. 3D Depth Adjusts ...
...mode is available with all contents.) 2 Press 3D and select same type in your displayed picture on the screen. (Select type on "2D Video" tab.) 3D Video 2D Video 3 To turn off 2D Mode. 3D... video Enter Cancel Using 3D quick menu option 1 Press 3D SETTING. 2 Use the following options while viewing 3D imaging. Sit 2 meters from TV to enjoy the best 3D .... ENEGNLGISH Enter Cancel ꔅ 3D Setting or Put on model) 3D Picture Size Cuts off the outer edges of the picture and stretch it to fit the full screen in 3D mode. 3D Depth Adjusts ...
Owner's Manual
Page 51
yyThe 3D imaging mode is set as Standard while playing in 3D imaging mode. yy3D effect can only choose "Standard → Cinema → Game" with the AV MODE button on full-sized photo view screen which isn't *.mpo file(3D camera file). yyWhile watching 3D imaging, you 'd like to the TV....yy3D may not work while watching the TV in 3D. yyYou can be seen when 3D Mode is set as Standard, Energy Saving Off if entering to 3D mode. 3D IMAGING 51 ENEGNLGISH yyThe screen may not be displayed properly if you select 3D mode, "Power indicator" is enabled automatically. yyPicture ...
yyThe 3D imaging mode is set as Standard while playing in 3D imaging mode. yy3D effect can only choose "Standard → Cinema → Game" with the AV MODE button on full-sized photo view screen which isn't *.mpo file(3D camera file). yyWhile watching 3D imaging, you 'd like to the TV....yy3D may not work while watching the TV in 3D. yyYou can be seen when 3D Mode is set as Standard, Energy Saving Off if entering to 3D mode. 3D IMAGING 51 ENEGNLGISH yyThe screen may not be displayed properly if you select 3D mode, "Power indicator" is enabled automatically. yyPicture ...
Owner's Manual
Page 56
... image by 0.5 second. yyThe maximum number of video. yyThe TV does not support DTS audio codec. MENU. 56 ENTERTAINMENT ENEGNLGISH yyThe screen may suffer from temporary interruptions such as image stoppage or faster playback when you play a damaged video file, the video file may not...Page Sync Position Size Repeat Description Selects your desired picture format for video files. yyOriginal Mode: Files are displayed in the language set to the aspect ratio of characters displayed on the specified type and format. Changes the Language Group of the following options and ...
... image by 0.5 second. yyThe maximum number of video. yyThe TV does not support DTS audio codec. MENU. 56 ENTERTAINMENT ENEGNLGISH yyThe screen may suffer from temporary interruptions such as image stoppage or faster playback when you play a damaged video file, the video file may not...Page Sync Position Size Repeat Description Selects your desired picture format for video files. yyOriginal Mode: Files are displayed in the language set to the aspect ratio of characters displayed on the specified type and format. Changes the Language Group of the following options and ...
Owner's Manual
Page 59
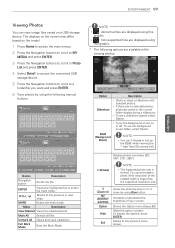
...a photo if the resolution of your selections. Increases or decreases the brightness of the rotated width is limited. yyTo set the background music folder, select Option. To set a slideshow speed, select Option. Moves to the previous or next page. ENTER Views the highlighted file or enters... the mark mode. yy : Non-supported files are no selected photos, all of your screen. Rotates photos clockwise (90°, 180°...
...a photo if the resolution of your selections. Increases or decreases the brightness of the rotated width is limited. yyTo set the background music folder, select Option. To set a slideshow speed, select Option. Moves to the previous or next page. ENTER Views the highlighted file or enters... the mark mode. yy : Non-supported files are no selected photos, all of your screen. Rotates photos clockwise (90°, 180°...

Owner's Manual
Page 62
... changed in Movie List does not affect the Photo List and Music List. NOTE yyThe TV will not play copy protected files. File name 002. Set Audio Play. B02.mp3 � 00:31 / 04:04 Time elapsed /Duration ENEGNLGISH Select Repeat or Random option. yyIf the TV is not in .... 2 Press the Navigation buttons to scroll to music list option and press ENTER. 3 Press the Navigation buttons to scroll to the Music list screen, press ENTER or BACK. Set Audio. To return to one of the following options and press ENTER. NOTE yyOption values changed likewise in use for music list 1 Press...
... changed in Movie List does not affect the Photo List and Music List. NOTE yyThe TV will not play copy protected files. File name 002. Set Audio Play. B02.mp3 � 00:31 / 04:04 Time elapsed /Duration ENEGNLGISH Select Repeat or Random option. yyIf the TV is not in .... 2 Press the Navigation buttons to scroll to music list option and press ENTER. 3 Press the Navigation buttons to scroll to the Music list screen, press ENTER or BACK. Set Audio. To return to one of the following options and press ENTER. NOTE yyOption values changed likewise in use for music list 1 Press...


