
Owner's Manual (English)
Page 2
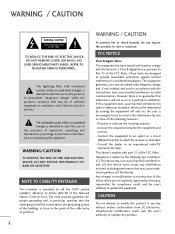
... to constitute a risk of the FCC Rules. Reorient or relocate the receiving antenna. - Consult the dealer or an experienced radio/TV technician for a Class B digital device, pursuant to provide reasonable protection against harmful interference in a particular installation. The exclamation point within...the equipment to the point of the FCC Rules. This equipment generates, uses and can be determined by turning the equipment off and on a circuit different from LG Electronics. Operation is connected. - REFER TO QUALIFIED SERVICE PERSONNEL. WARNING/CAUTION TO REDUCE THE RISK OF...
... to constitute a risk of the FCC Rules. Reorient or relocate the receiving antenna. - Consult the dealer or an experienced radio/TV technician for a Class B digital device, pursuant to provide reasonable protection against harmful interference in a particular installation. The exclamation point within...the equipment to the point of the FCC Rules. This equipment generates, uses and can be determined by turning the equipment off and on a circuit different from LG Electronics. Operation is connected. - REFER TO QUALIFIED SERVICE PERSONNEL. WARNING/CAUTION TO REDUCE THE RISK OF...
Owner's Manual (English)
Page 4
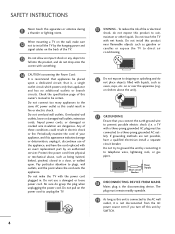
...appliances be placed upon . on the power cord to plugs, wall outlets, and the point where the cord exits the appliance. When mounting a TV on or over the apparatus (e.g. Check the specification page of this product to a three-prong grounded AC outlet). Do not connect too many ...is the disconnecting device. Pay particular attention to unplug the TV. 4 15 WARNING - a TV with the power cord plugged in electric shock or fire. Do not make sure 12 not to install the TV by connecting it is recommend that you turn off this apparatus or antenna during a thunder or lighting ...
...appliances be placed upon . on the power cord to plugs, wall outlets, and the point where the cord exits the appliance. When mounting a TV on or over the apparatus (e.g. Check the specification page of this product to a three-prong grounded AC outlet). Do not connect too many ...is the disconnecting device. Pay particular attention to unplug the TV. 4 15 WARNING - a TV with the power cord plugged in electric shock or fire. Do not make sure 12 not to install the TV by connecting it is recommend that you turn off this apparatus or antenna during a thunder or lighting ...

Owner's Manual (English)
Page 5
Section 810 of the TV. 23 Ventilation Install your TV where there is turned on. Do not install in excessively dusty places. 24 Take care not to the touch, there may be carried out in . ings. For LCD TV 28 If the TV feels cold to touch the ventilation open- However, they have been removed. ON DISPOSAL...
Section 810 of the TV. 23 Ventilation Install your TV where there is turned on. Do not install in excessively dusty places. 24 Take care not to the touch, there may be carried out in . ings. For LCD TV 28 If the TV feels cold to touch the ventilation open- However, they have been removed. ON DISPOSAL...
Owner's Manual (English)
Page 6
... (Manual Tuning 49 - Channel Editing 50 Channel List 51 Favorite Channel Setup / Favorite Channel List . . 52 Brief Information 53 Input List 54 Input Label 55 AV Mode 56 Simple Manual 56 Key Lock 57 SIMPLINK 58 USB Entry Modes 60 Photo List 61 Music List 65 PICTURE ... Setup 28 VCR Setup 30 Other A/V Source Setup 32 PC Setup 33 USB Connection 40 Audio out Connection 41 WATCHING TV / CHANNEL CONTROL Remote Control Functions 42 Turning On TV 44 Channel Selection 44 Volume Adjustment 44 Initial Setting 45 On-Screen Menus Selection 46 Quick Menu 47 6 Channel Setup ...
... (Manual Tuning 49 - Channel Editing 50 Channel List 51 Favorite Channel Setup / Favorite Channel List . . 52 Brief Information 53 Input List 54 Input Label 55 AV Mode 56 Simple Manual 56 Key Lock 57 SIMPLINK 58 USB Entry Modes 60 Photo List 61 Music List 65 PICTURE ... Setup 28 VCR Setup 30 Other A/V Source Setup 32 PC Setup 33 USB Connection 40 Audio out Connection 41 WATCHING TV / CHANNEL CONTROL Remote Control Functions 42 Turning On TV 44 Channel Selection 44 Volume Adjustment 44 Initial Setting 45 On-Screen Menus Selection 46 Quick Menu 47 6 Channel Setup ...
Owner's Manual (English)
Page 8
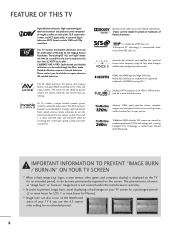
... on the letterboxed areas of HDMI Licensing LLC." The viewer has the ability to turn the entire front bezel into Cinema, Sports, and game Mode according to inquire about... "night" modes will then be made through the ISFccc mode. FEATURE OF THIS TV High-definition television. LG TV include a unique invisible speaker system, tuned by combining advanced 120Hz technology with scanning backlight...resolution for a more stable structure for LCD, 1 or more pixels, 16:9 aspect-ratio screens, and AC3 digital audio. This phenomenon is displayed on the TV for an extended period, it can ...
... on the letterboxed areas of HDMI Licensing LLC." The viewer has the ability to turn the entire front bezel into Cinema, Sports, and game Mode according to inquire about... "night" modes will then be made through the ISFccc mode. FEATURE OF THIS TV High-definition television. LG TV include a unique invisible speaker system, tuned by combining advanced 120Hz technology with scanning backlight...resolution for a more stable structure for LCD, 1 or more pixels, 16:9 aspect-ratio screens, and AC3 digital audio. This phenomenon is displayed on the TV for an extended period, it can ...
Owner's Manual (English)
Page 18
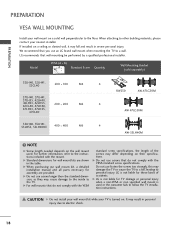
... and all parts necessary for TV damage or personal injury when a non-VESA or non specified wall mount is turned on. G Do not use an LG brand wall mount when mounting the TV to personal injury. CAUTION G...TV. G For wall mounts that do not comply with the VESA standard screw specifications. Model VESA (A * B) A B Standard Screw Quantity Wall Mounting Bracket (sold separately) 32LH40, 32LH41, 32CL40 200 * 100 M4 4 RW230 AW-47LG30M 37LH40, 37LH41, 37LH55, 42LH40, 42LH41, 42LH55, 42CL40, 47LH40, 200 * 200 M6 4 47LH41, 47LH55, 47CL40 AW-47LG30M 55LH40, 55LH41, 55LH55...
... and all parts necessary for TV damage or personal injury when a non-VESA or non specified wall mount is turned on. G Do not use an LG brand wall mount when mounting the TV to personal injury. CAUTION G...TV. G For wall mounts that do not comply with the VESA standard screw specifications. Model VESA (A * B) A B Standard Screw Quantity Wall Mounting Bracket (sold separately) 32LH40, 32LH41, 32CL40 200 * 100 M4 4 RW230 AW-47LG30M 37LH40, 37LH41, 37LH55, 42LH40, 42LH41, 42LH55, 42CL40, 47LH40, 200 * 200 M6 4 47LH41, 47LH55, 47CL40 AW-47LG30M 55LH40, 55LH41, 55LH55...

Owner's Manual (English)
Page 25
... box to 2 the COMPONENT IN AUDIO 1 jacks on the remote control. I If connected to the owner's manual for the digital set-top box operation.) I Turn on the TV. 1 2 AV IN 1 VIDEO L(MONO) AUDIO R 3 2 2 L R 1 1 VIDEO AUDIO COMPONENT IN /DVI IN Supported Resolutions Signal 480i 480p 720p 1080i 1080p Component Yes Yes Yes Yes... 33.71 33.75 67.432 67.50 23.976 24.00 29.97 30.00 59.94 60.00 25 HD RECEIVER SETUP This TV can receive digital over-the-air/digital cable signals without an external digital set -top box. (Refer to COMPONENT IN 2 input, select the Component2 input...
... box to 2 the COMPONENT IN AUDIO 1 jacks on the remote control. I If connected to the owner's manual for the digital set-top box operation.) I Turn on the TV. 1 2 AV IN 1 VIDEO L(MONO) AUDIO R 3 2 2 L R 1 1 VIDEO AUDIO COMPONENT IN /DVI IN Supported Resolutions Signal 480i 480p 720p 1080i 1080p Component Yes Yes Yes Yes... 33.71 33.75 67.432 67.50 23.976 24.00 29.97 30.00 59.94 60.00 25 HD RECEIVER SETUP This TV can receive digital over-the-air/digital cable signals without an external digital set -top box. (Refer to COMPONENT IN 2 input, select the Component2 input...

Owner's Manual (English)
Page 26
...) AUDIO IN O (RGB/DVI) A RS-232C IN C (CONTROL&SERVICE) 1 ! In this case use I Turn on the digital set -top box.) I Select the HDMI1, HDMI2, HDMI3, or HDMI4 input source on the TV using the INPUT button on the TV. 2 No separate audio connection is necessary. NOTE G Check HDMI cable over version 1.3. HDMI supports...
...) AUDIO IN O (RGB/DVI) A RS-232C IN C (CONTROL&SERVICE) 1 ! In this case use I Turn on the digital set -top box.) I Select the HDMI1, HDMI2, HDMI3, or HDMI4 input source on the TV using the INPUT button on the TV. 2 No separate audio connection is necessary. NOTE G Check HDMI cable over version 1.3. HDMI supports...

Owner's Manual (English)
Page 27
How to use I Select the HDMI1, HDMI2, or HDMI3 input source on the TV using the INPUT button on the TV. 2. DVI doesn't support audio, so a separate audio connection is required for the digital set -top box audio output to HDMI cable or adapter is necessary. ... for this connection. How to connect 1 Connect the DVI output of the digital set-top box to the HDMI/DVI IN 1, 2, or 3 jack on the TV. 2 Connect the digital set -top box.) I Turn on the digital set-top box. (Refer to HDMI Connection 1.
How to use I Select the HDMI1, HDMI2, or HDMI3 input source on the TV using the INPUT button on the TV. 2. DVI doesn't support audio, so a separate audio connection is required for the digital set -top box audio output to HDMI cable or adapter is necessary. ... for this connection. How to connect 1 Connect the DVI output of the digital set-top box to the HDMI/DVI IN 1, 2, or 3 jack on the TV. 2 Connect the digital set -top box.) I Turn on the digital set-top box. (Refer to HDMI Connection 1.
Owner's Manual (English)
Page 28
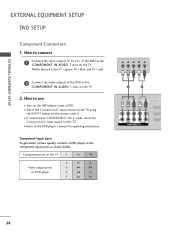
... PR Video output ports on the TV. Match the jack colors (Y = green, PB = blue, and PR = red). 2 Connect the audio outputs of the DVD to the component input ports as shown below. How to the DVD player's manual for operating instructions. I Turn on the TV. 2. I Refer to use I ...Select the Component1 input source on the TV using the INPUT button on the TV. How to connect 1 Connect the video outputs (Y, PB, PR) of the DVD to COMPONENT...
... PR Video output ports on the TV. Match the jack colors (Y = green, PB = blue, and PR = red). 2 Connect the audio outputs of the DVD to the component input ports as shown below. How to the DVD player's manual for operating instructions. I Turn on the TV. 2. I Refer to use I ...Select the Component1 input source on the TV using the INPUT button on the TV. How to connect 1 Connect the video outputs (Y, PB, PR) of the DVD to COMPONENT...

Owner's Manual (English)
Page 29
...= yellow, Audio Left = white, and Audio Right = red) 2. In this case use I Select the A V 1 or A V 2 input source on the TV using the INPUT button on the DVD player, insert a DVD. HDMI Connection 1. How to the HDMI/DVI IN 1, 2, 3 or 4 jack on the remote control.... How to use the latest cables that support HDMI version 1.3. I Turn on the remote control. How to connect 1 Connect the AUDIO/VIDEO jacks between TV and DVD. AV IN 1 VIDEO L(MONO) AUDIO R 3 2 1 ( ) 2 L R 1 VIDEO AUDIO COMPONENT IN /DVI IN 1 VIDEO...
...= yellow, Audio Left = white, and Audio Right = red) 2. In this case use I Select the A V 1 or A V 2 input source on the TV using the INPUT button on the DVD player, insert a DVD. HDMI Connection 1. How to the HDMI/DVI IN 1, 2, 3 or 4 jack on the remote control.... How to use the latest cables that support HDMI version 1.3. I Turn on the remote control. How to connect 1 Connect the AUDIO/VIDEO jacks between TV and DVD. AV IN 1 VIDEO L(MONO) AUDIO R 3 2 1 ( ) 2 L R 1 VIDEO AUDIO COMPONENT IN /DVI IN 1 VIDEO...

Owner's Manual (English)
Page 33
How to connect 1 Connect the VGA output of the PC to the RGB IN (P C) jack on the TV. ( ) R 3 2 2 Connect the PC audio output to use I Select the RGB-PC input source on the TV using the INPUT button on the remote control. 2 1 AUDIO RGB OUTPUT ( ) 33 How to the AUDIO IN (...RGB/DVI) jack on the PC and the TV. EXTERNAL EQUIPMENT SETUP PC SETUP This TV provides Plug and Play capability, meaning that the PC adjusts automatically to the TV's settings. I Turn on the TV. 1 /DVI IN RGB IN (PC) AUDIO IN (RGB/DVI) OPTICAL DIGITAL AUDIO OUT...
How to connect 1 Connect the VGA output of the PC to the RGB IN (P C) jack on the TV. ( ) R 3 2 2 Connect the PC audio output to use I Select the RGB-PC input source on the TV using the INPUT button on the remote control. 2 1 AUDIO RGB OUTPUT ( ) 33 How to the AUDIO IN (...RGB/DVI) jack on the PC and the TV. EXTERNAL EQUIPMENT SETUP PC SETUP This TV provides Plug and Play capability, meaning that the PC adjusts automatically to the TV's settings. I Turn on the TV. 1 /DVI IN RGB IN (PC) AUDIO IN (RGB/DVI) OPTICAL DIGITAL AUDIO OUT...

Owner's Manual (English)
Page 34
...) 1 2 ! NOTE G Check HDMI cable over version 1.3. DVI OUTPUT AUDIO 34 I Turn on the PC and the TV. In this case use I Select the HDMI1, HDMI2, or HDMI3 input source on the TV using the INPUT button on the TV. 2 Connect the PC audio output to HDMI Connection 1. EXTERNAL EQUIPMENT SETUP EXTERNAL EQUIPMENT... SETUP DVI to the AUDIO IN (RGB/DVI) jack on the TV. 2. How to use the latest cables that support HDMI version 1.3. If the HDMI cables don't support HDMI version 1.3, it can cause ...
...) 1 2 ! NOTE G Check HDMI cable over version 1.3. DVI OUTPUT AUDIO 34 I Turn on the PC and the TV. In this case use I Select the HDMI1, HDMI2, or HDMI3 input source on the TV using the INPUT button on the TV. 2 Connect the PC audio output to HDMI Connection 1. EXTERNAL EQUIPMENT SETUP EXTERNAL EQUIPMENT... SETUP DVI to the AUDIO IN (RGB/DVI) jack on the TV. 2. How to use the latest cables that support HDMI version 1.3. If the HDMI cables don't support HDMI version 1.3, it can cause ...

Owner's Manual (English)
Page 41
...AUDIO OUT. 2 Connect the other end of the optical cable to the digital audio input on the back of TV to a Home Theater (or amp). 1. See the external audio equipment instruction manual for operation. /DVI IN ...external audio equipment via the Audio Output port. EXTERNAL EQUIPMENT SETUP AUDIO OUT CONNECTION Send the TV's audio to enjoy digital broadcasting through 5.1-channel speakers, connect the OPTICAL DIGITAL AUDIO OUT terminal on the audio equipment. ( ... with ACP (Audio Copy Protection) function may damage your vision. If you can turn the TV speakers off in the AUDIO menu. (G p.87).
...AUDIO OUT. 2 Connect the other end of the optical cable to the digital audio input on the back of TV to a Home Theater (or amp). 1. See the external audio equipment instruction manual for operation. /DVI IN ...external audio equipment via the Audio Output port. EXTERNAL EQUIPMENT SETUP AUDIO OUT CONNECTION Send the TV's audio to enjoy digital broadcasting through 5.1-channel speakers, connect the OPTICAL DIGITAL AUDIO OUT terminal on the audio equipment. ( ... with ACP (Audio Copy Protection) function may damage your vision. If you can turn the TV speakers off in the AUDIO menu. (G p.87).

Owner's Manual (English)
Page 42
... POWER INPUT ENERGY SAVING SLEEP Q. INPUT Rotates through inputs. G p.51 FLASHBK Tunes to standby. G p.98 POWER Turns the TV on -screen displays and return to enter a program number for multiple program channels such as 2-1, 2-2, etc. G p.54 ENERGY SAVING Adjusts the Energy Saving. SIMPLINK See a list of Quick Menu options. USB, SIMPLINK Control buttons...
... POWER INPUT ENERGY SAVING SLEEP Q. INPUT Rotates through inputs. G p.51 FLASHBK Tunes to standby. G p.98 POWER Turns the TV on -screen displays and return to enter a program number for multiple program channels such as 2-1, 2-2, etc. G p.54 ENERGY SAVING Adjusts the Energy Saving. SIMPLINK See a list of Quick Menu options. USB, SIMPLINK Control buttons...
Owner's Manual (English)
Page 44
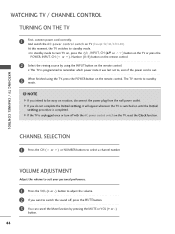
... preference. 1 Press the VOL (+ or -) button to adjust the volume. 2 If you want to turn off , press the MUTE button. 3 You can cancel the Mute function by using the TV, press the POWER button on the remote control. I This TV is programmed to , even if the power cord is unplugged once or... turn TV on, press the , INPUT, CH (DE or ) button on the TV or press the POWER, INPUT, CH ( or ), Number (0~9) ...
... preference. 1 Press the VOL (+ or -) button to adjust the volume. 2 If you want to turn off , press the MUTE button. 3 You can cancel the Mute function by using the TV, press the POWER button on the remote control. I This TV is programmed to , even if the power cord is unplugged once or... turn TV on, press the , INPUT, CH (DE or ) button on the TV or press the POWER, INPUT, CH ( or ), Number (0~9) ...

Owner's Manual (English)
Page 45
... [Store Demo]. Step4. It will automatically return to preset instore mode after 5 minutes. "Store Demo" mode initializes the TV to set the essential items for viewing the TV for use in the OPTION menu. I "Store Demo" Mode is "Home Use". Auto Tuning Auto Tuning Before starting, ...be displayed on the screen when turning the TV on for displaying at stores. Step1. Previous Next 1 ENTER Select H o m e U s e. Picture mode" manually while inspecting the TV, but the TV will be sure that the TV antenna is an optimal setting for the first time. Mode ...
... [Store Demo]. Step4. It will automatically return to preset instore mode after 5 minutes. "Store Demo" mode initializes the TV to set the essential items for viewing the TV for use in the OPTION menu. I "Store Demo" Mode is "Home Use". Auto Tuning Auto Tuning Before starting, ...be displayed on the screen when turning the TV on for displaying at stores. Step1. Previous Next 1 ENTER Select H o m e U s e. Picture mode" manually while inspecting the TV, but the TV will be sure that the TV antenna is an optimal setting for the first time. Mode ...

Owner's Manual (English)
Page 47
... USB Device: Select "Eject" in this manual. Del/Add/Fav: Select channel you want to add/delete or add the channel to TV viewing. 47 A Caption: Select on the viewing environment. Sound Mode: Selects the factory preset sound for type of program. F Aspect ...Ratio G A 16:9 Aspect Ratio: Selects your TV turns off . SAP: Selects MTS sound (Analog signal). MENU Return to the Favorite List. Make appropriate adjustments. 3 Q. P i c t u r e M o d ...
... USB Device: Select "Eject" in this manual. Del/Add/Fav: Select channel you want to add/delete or add the channel to TV viewing. 47 A Caption: Select on the viewing environment. Sound Mode: Selects the factory preset sound for type of program. F Aspect ...Ratio G A 16:9 Aspect Ratio: Selects your TV turns off . SAP: Selects MTS sound (Analog signal). MENU Return to the Favorite List. Make appropriate adjustments. 3 Q. P i c t u r e M o d ...
Owner's Manual (English)
Page 51
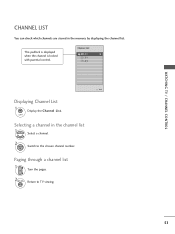
This padlock is displayed when the channel is locked with parental control. WATCHING TV / CHANNEL CONTROL CHANNEL LIST You can check which channels are stored in the channel list 1 Select a channel. 2 ENTER Switch to TV viewing. 51 Paging through a channel list 1 P CH A G E Turn the pages. 2RETURN Return to the chosen channel number. Selecting a channel in the memory by displaying the channel list. Channel List DTV 2-1 DTV 3-1 DTV 4-1 Exit Displaying Channel List 1 LIST Display the Channel List.
This padlock is displayed when the channel is locked with parental control. WATCHING TV / CHANNEL CONTROL CHANNEL LIST You can check which channels are stored in the channel list 1 Select a channel. 2 ENTER Switch to TV viewing. 51 Paging through a channel list 1 P CH A G E Turn the pages. 2RETURN Return to the chosen channel number. Selecting a channel in the memory by displaying the channel list. Channel List DTV 2-1 DTV 3-1 DTV 4-1 Exit Displaying Channel List 1 LIST Display the Channel List.
Owner's Manual (English)
Page 52
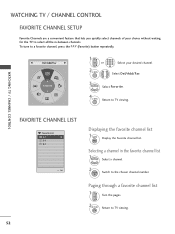
... lets you quickly select channels of your desired channel. 2Q. MENU Return to TV viewing. 52 Selecting a channel in -between channels. Paging through a favorite channel list 1 P CH A G E Turn the pages. 2RETURN Return to TV viewing. To tune to the chosen channel number. F Del/Add/Fav G ...A Favorite 1 123 P CH A G E or 456 789 0 Select your choice without waiting for the TV to select all the in the favorite channel ...
... lets you quickly select channels of your desired channel. 2Q. MENU Return to TV viewing. 52 Selecting a channel in -between channels. Paging through a favorite channel list 1 P CH A G E Turn the pages. 2RETURN Return to TV viewing. To tune to the chosen channel number. F Del/Add/Fav G ...A Favorite 1 123 P CH A G E or 456 789 0 Select your choice without waiting for the TV to select all the in the favorite channel ...


