

Specification (English)
Page 1
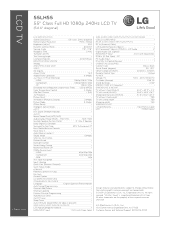
Full HD 1080p resolution and a unique panel design set the LH55 series apart. LCD TV 55LH55 55" Class Full HD 1080p 240Hz LCD TV (54.6" diagonal) TruMotion 240Hz provides clearer, fast-action scenes. TV • TruMotion 240Hz • Intelligent Sensor Mode • Full HD 1080p HD Resolution • 80,000:1 Dynamic ... • Super IPS Panel • Wide Viewing Angle • XD Engine® • 24p Real Cinema • ISFccc® Ready • Picture Wizard • AV Mode II (Cinema, Sports, Game) • 60,000 Hour Panel Life (typical) • NTSC/ATSC Tuners with Clear QAM ...
Full HD 1080p resolution and a unique panel design set the LH55 series apart. LCD TV 55LH55 55" Class Full HD 1080p 240Hz LCD TV (54.6" diagonal) TruMotion 240Hz provides clearer, fast-action scenes. TV • TruMotion 240Hz • Intelligent Sensor Mode • Full HD 1080p HD Resolution • 80,000:1 Dynamic ... • Super IPS Panel • Wide Viewing Angle • XD Engine® • 24p Real Cinema • ISFccc® Ready • Picture Wizard • AV Mode II (Cinema, Sports, Game) • 60,000 Hour Panel Life (typical) • NTSC/ATSC Tuners with Clear QAM ...
Specification (English)
Page 2
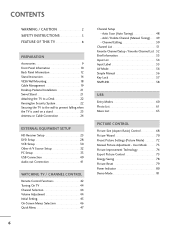
... 5 Modes SPECIAL FEATURES Picture Wizard • Backlight Control • Smart Energy Saving • Mechanical Power Off • 1080p Source Input - LCD TV 55LH55 55" Class Full HD 1080p 240Hz LCD TV (54.6" diagonal) LGusa.com LCD SPECIFICATION Screen Size (Class) 55" Class (54.6" diagonal) Native Display ...Timer • Auto Off/Auto Sleep (When no video is a registered trademark of their respective owners. 09/11/09 LG Electronics U.S.A., Inc. 1000 Sylvan Avenue Englewood Cliffs, NJ 07632 Customer Service and Technical Support: (800) 243-0000 Component ...
... 5 Modes SPECIAL FEATURES Picture Wizard • Backlight Control • Smart Energy Saving • Mechanical Power Off • 1080p Source Input - LCD TV 55LH55 55" Class Full HD 1080p 240Hz LCD TV (54.6" diagonal) LGusa.com LCD SPECIFICATION Screen Size (Class) 55" Class (54.6" diagonal) Native Display ...Timer • Auto Off/Auto Sleep (When no video is a registered trademark of their respective owners. 09/11/09 LG Electronics U.S.A., Inc. 1000 Sylvan Avenue Englewood Cliffs, NJ 07632 Customer Service and Technical Support: (800) 243-0000 Component ...
Owner's Manual (English)
Page 6
...Input List 54 Input Label 55 AV Mode 56 Simple Manual 56 Key Lock 57 SIMPLINK 58 USB Entry Modes 60 Photo List 61 Music List 65 PICTURE CONTROL Picture Size (Aspect Ratio) Control 68 Picture Wizard 70 Preset Picture Settings (Picture Mode 72 Manual Picture Adjustment -... CONTENTS WARNING / CAUTION 2 SAFETY INSTRUCTIONS 3 FEATURE OF THIS TV 8 PREPARATION Accessories 9 Front Panel Information 10...
...Input List 54 Input Label 55 AV Mode 56 Simple Manual 56 Key Lock 57 SIMPLINK 58 USB Entry Modes 60 Photo List 61 Music List 65 PICTURE CONTROL Picture Size (Aspect Ratio) Control 68 Picture Wizard 70 Preset Picture Settings (Picture Mode 72 Manual Picture Adjustment -... CONTENTS WARNING / CAUTION 2 SAFETY INSTRUCTIONS 3 FEATURE OF THIS TV 8 PREPARATION Accessories 9 Front Panel Information 10...
Owner's Manual (English)
Page 8
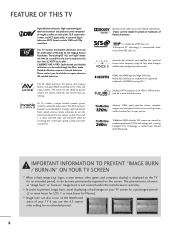
...offer. This TV contains the detailed calibrations necessary for the picture they are embedded in ." TruMotion 240Hz displays 240 scenes per second by the Imaging Science Foundation. The resulting ISF "day" and "night" modes will then be made through the ISFccc mode. LG TV include a...I When a fixed image (e.g. CALIBRATE LIKE A PRO: Sophisticated and detailed calibrations can become permanently imprinted on your TV screen for a prolonged period (2 or more hours for LCD, 1 or more stable structure for Plasma). The result is a clean, polished look, and enhanced audio by ...
...offer. This TV contains the detailed calibrations necessary for the picture they are embedded in ." TruMotion 240Hz displays 240 scenes per second by the Imaging Science Foundation. The resulting ISF "day" and "night" modes will then be made through the ISFccc mode. LG TV include a...I When a fixed image (e.g. CALIBRATE LIKE A PRO: Sophisticated and detailed calibrations can become permanently imprinted on your TV screen for a prolonged period (2 or more hours for LCD, 1 or more stable structure for Plasma). The result is a clean, polished look, and enhanced audio by ...
Owner's Manual (English)
Page 10
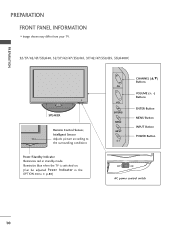
Illuminates blue when the TV is switched on. (Can be adjusted Power Indicator in standby mode. PREPARATION PREPARATION FRONT PANEL INFORMATION I Image shown may differ from your TV. 32/37/42/47/55LH40, 32/37/42/47/55LH41, 37/42/47/55LH55, 55LH400C SPEAKER Remote Control Sensor, Intelligent Sensor Adjusts picture according to the surrounding conditions Power/Standby Indicator Illuminates red in the OPTION menu. G p.80) CH VOL ENTER MENU INPUT CHANNEL (D,E) Buttons VOLUME (+, -) Buttons ENTER Button MENU Button INPUT Button POWER Button OFF ON AC power control switch 10
Illuminates blue when the TV is switched on. (Can be adjusted Power Indicator in standby mode. PREPARATION PREPARATION FRONT PANEL INFORMATION I Image shown may differ from your TV. 32/37/42/47/55LH40, 32/37/42/47/55LH41, 37/42/47/55LH55, 55LH400C SPEAKER Remote Control Sensor, Intelligent Sensor Adjusts picture according to the surrounding conditions Power/Standby Indicator Illuminates red in the OPTION menu. G p.80) CH VOL ENTER MENU INPUT CHANNEL (D,E) Buttons VOLUME (+, -) Buttons ENTER Button MENU Button INPUT Button POWER Button OFF ON AC power control switch 10

Owner's Manual (English)
Page 11
Remote Control Sensor POWER Button 11 PREPARATION 32/42/47CL40 CH CHANNEL ( , ) Buttons SPEAKER Intelligent Sensor Adjusts picture according to the surrounding conditions VOL ENTER MENU INPUT VOLUME (+, -) Buttons ENTER Button MENU Button INPUT Button Power/Standby Indicator Illuminates red in standby mode. Illuminates blue when the set is switched on.
Remote Control Sensor POWER Button 11 PREPARATION 32/42/47CL40 CH CHANNEL ( , ) Buttons SPEAKER Intelligent Sensor Adjusts picture according to the surrounding conditions VOL ENTER MENU INPUT VOLUME (+, -) Buttons ENTER Button MENU Button INPUT Button Power/Standby Indicator Illuminates red in standby mode. Illuminates blue when the set is switched on.
Owner's Manual (English)
Page 23
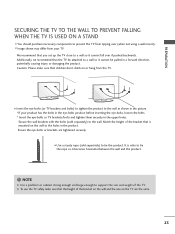
... the holes in the upper holes. Secure the wall brackets with the bolts (sold separately) to the wall as shown in the picture. * If your TV. I Insert the eye-bolts (or TV brackets and bolts) to tighten the product to tie the product. I Use a sturdy rope (sold separately) to tie the rope so...
... the holes in the upper holes. Secure the wall brackets with the bolts (sold separately) to the wall as shown in the picture. * If your TV. I Insert the eye-bolts (or TV brackets and bolts) to tighten the product to tie the product. I Use a sturdy rope (sold separately) to tie the rope so...

Owner's Manual (English)
Page 24
... picture quality, adjust antenna directio( n i)f needed. Cable Cable TV Wall Jack RF Coaxial Wire (75 ohm) ANTENNA/ CABLE IN I To prevent damage do not connect to the power outlet until all connections are made between the devices. I If the antenna is not installed properly, contact your TV....wall jack for outdoor antenna) ( ) Copper Wire Be careful not to be split for assistance. 24 R PREPARATION PREPARATION I To improve the picture quality in a poor signal area, please purchase a signal amplifier and install properly. I If the antenna needs to bend the copper wire when...
... picture quality, adjust antenna directio( n i)f needed. Cable Cable TV Wall Jack RF Coaxial Wire (75 ohm) ANTENNA/ CABLE IN I To prevent damage do not connect to the power outlet until all connections are made between the devices. I If the antenna is not installed properly, contact your TV....wall jack for outdoor antenna) ( ) Copper Wire Be careful not to be split for assistance. 24 R PREPARATION PREPARATION I To improve the picture quality in a poor signal area, please purchase a signal amplifier and install properly. I If the antenna needs to bend the copper wire when...
Owner's Manual (English)
Page 28
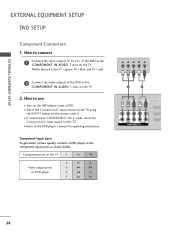
... PR = red). 2 Connect the audio outputs of the DVD to the DVD player's manual for operating instructions. Component Input ports To get better picture quality, connect a DVD player to the COMPONENT IN AUDIO 1 jacks on the remote control. I If connected to use I Select the Component1 input... source on the TV using the INPUT button on the TV. 2. How to COMPONENT IN 2 input, select the Component2 input source on DVD player Y PB PR Y B-Y R-Y Y Cb Cr Y Pb Pr Y...
... PR = red). 2 Connect the audio outputs of the DVD to the DVD player's manual for operating instructions. Component Input ports To get better picture quality, connect a DVD player to the COMPONENT IN AUDIO 1 jacks on the remote control. I If connected to use I Select the Component1 input... source on the TV using the INPUT button on the TV. 2. How to COMPONENT IN 2 input, select the Component2 input source on DVD player Y PB PR Y B-Y R-Y Y Cb Cr Y Pb Pr Y...

Owner's Manual (English)
Page 35
... allow the image to another rate or adjust the brightness and contrast on the screen properly. The fixed image may be positioned on the PICTURE menu until the picture is present, change the PC output to be noise associated with the resolution, vertical pattern, contrast or brightness. G When selecting HDMI-PC, set... menu. G Avoid keeping a fixed image on the graphics card, some resolution settings may not work if a HDMI to 1920x1080. NOTES G To get the the best picture quality, adjust the PC graphics card to DVI Cable is separate. EXTERNAL EQUIPMENT SETUP !
... allow the image to another rate or adjust the brightness and contrast on the screen properly. The fixed image may be positioned on the PICTURE menu until the picture is present, change the PC output to be noise associated with the resolution, vertical pattern, contrast or brightness. G When selecting HDMI-PC, set... menu. G Avoid keeping a fixed image on the graphics card, some resolution settings may not work if a HDMI to 1920x1080. NOTES G To get the the best picture quality, adjust the PC graphics card to DVI Cable is separate. EXTERNAL EQUIPMENT SETUP !

Owner's Manual (English)
Page 36
...this function only when the PC resolution is set to 1024X768, 1280X768 or 1360X768. You can also be adjusted. PICTURE Move Enter E • Contrast 50 • Brightness 50 • Sharpness 50 • Color 50 • Tint 0R G •... Advanced Control • Picture Reset Screen (RGB-PC) 1 MENU 2 ENTER 3 ENTER 4 ENTER 5 ENTER Select PICTURE. Select Resolution. SCREEN Resolution Auto Config. EXTERNAL EQUIPMENT SETUP EXTERNAL EQUIPMENT SETUP Screen Setup for PC mode Selecting ...
...this function only when the PC resolution is set to 1024X768, 1280X768 or 1360X768. You can also be adjusted. PICTURE Move Enter E • Contrast 50 • Brightness 50 • Sharpness 50 • Color 50 • Tint 0R G •... Advanced Control • Picture Reset Screen (RGB-PC) 1 MENU 2 ENTER 3 ENTER 4 ENTER 5 ENTER Select PICTURE. Select Resolution. SCREEN Resolution Auto Config. EXTERNAL EQUIPMENT SETUP EXTERNAL EQUIPMENT SETUP Screen Setup for PC mode Selecting ...

Owner's Manual (English)
Page 37
... still not correct, try Auto adjustment again. To Set Yes No I If picture needs to be adjusted again after Auto adjustment in RGB-PC, you can adjust the Position, S i z e or P h a s e. 37 PICTURE Move Enter E • Contrast 50 • Brightness 50 • Sharpness... 50 • Color 50 • Tint 0R G • Advanced Control • Picture Reset Screen (RGB-PC) 1 MENU 2 ENTER 3 ENTER Select PICTURE. Select Auto Config.. 4 ENTER Select Y e s. 5 ENTER Start Auto Configuration. After adjustment, if the image is still ...
... still not correct, try Auto adjustment again. To Set Yes No I If picture needs to be adjusted again after Auto adjustment in RGB-PC, you can adjust the Position, S i z e or P h a s e. 37 PICTURE Move Enter E • Contrast 50 • Brightness 50 • Sharpness... 50 • Color 50 • Tint 0R G • Advanced Control • Picture Reset Screen (RGB-PC) 1 MENU 2 ENTER 3 ENTER Select PICTURE. Select Auto Config.. 4 ENTER Select Y e s. 5 ENTER Start Auto Configuration. After adjustment, if the image is still ...

Owner's Manual (English)
Page 38
...the screen background. SCREEN Resolution Auto Config. Position Size Phase Reset Move Prev. I S i z e: This function is to adjust picture to left/right and up/down as you to minimize any horizontal noise and clear or sharpen the image of characters. 38 Select Position,...8226; Brightness 50 • Sharpness 50 • Color 50 • Tint 0R G • Advanced Control • Picture Reset Screen (RGB-PC) 1 MENU 2 ENTER 3 ENTER 4 ENTER 5 ENTER Select PICTURE. This feature operates only in RGB-PC mode. I P h a s e: This function allows you prefer. Select Screen...
...the screen background. SCREEN Resolution Auto Config. Position Size Phase Reset Move Prev. I S i z e: This function is to adjust picture to left/right and up/down as you to minimize any horizontal noise and clear or sharpen the image of characters. 38 Select Position,...8226; Brightness 50 • Sharpness 50 • Color 50 • Tint 0R G • Advanced Control • Picture Reset Screen (RGB-PC) 1 MENU 2 ENTER 3 ENTER 4 ENTER 5 ENTER Select PICTURE. This feature operates only in RGB-PC mode. I P h a s e: This function allows you prefer. Select Screen...

Owner's Manual (English)
Page 39
Select Screen (RGB-PC). Position Size Phase Reset Move Prev. Select Reset. To Set Yes No 39 PICTURE Move Enter E • Contrast 50 • Brightness 50 • Sharpness 50 • Color 50 • Tint 0R G • Advanced Control • Picture Reset Screen (RGB-PC) 1 MENU 2 ENTER 3 ENTER 4 ENTER 5 ENTER Select PICTURE. This feature operates only in RGB-PC mode. SCREEN Resolution Auto Config. EXTERNAL EQUIPMENT SETUP Screen Reset (Reset to original factory values) Returns Position, S i z e, and Phase to the default factory settings. Select Y e s.
Select Screen (RGB-PC). Position Size Phase Reset Move Prev. Select Reset. To Set Yes No 39 PICTURE Move Enter E • Contrast 50 • Brightness 50 • Sharpness 50 • Color 50 • Tint 0R G • Advanced Control • Picture Reset Screen (RGB-PC) 1 MENU 2 ENTER 3 ENTER 4 ENTER 5 ENTER Select PICTURE. This feature operates only in RGB-PC mode. SCREEN Resolution Auto Config. EXTERNAL EQUIPMENT SETUP Screen Reset (Reset to original factory values) Returns Position, S i z e, and Phase to the default factory settings. Select Y e s.

Owner's Manual (English)
Page 43
...polarity. UP/DOWN Installing Batteries I Close cover. 43 G p.62, 66 MUTE Switches the sound on or off. G p.71 Use to apply the Picture Wizard settings. Don't mix old or used batteries with new ones. G p.53 AV MODE Toggles through the programmed Favorite channels. I Install two 1.5V... AAA batteries. WATCHING TV / CHANNEL CONTROL THUMBSTICK Navigates the on-screen menus and adjusts the system settings to your preference. (Up/Down/Left Right/ENTER) RETURN Allows ...
...polarity. UP/DOWN Installing Batteries I Close cover. 43 G p.62, 66 MUTE Switches the sound on or off. G p.71 Use to apply the Picture Wizard settings. Don't mix old or used batteries with new ones. G p.53 AV MODE Toggles through the programmed Favorite channels. I Install two 1.5V... AAA batteries. WATCHING TV / CHANNEL CONTROL THUMBSTICK Navigates the on-screen menus and adjusts the system settings to your preference. (Up/Down/Left Right/ENTER) RETURN Allows ...

Owner's Manual (English)
Page 45
... Use" mode for the first time when purchasing the TV. "Store Demo" mode initializes the TV to set the essential items for viewing the TV for the best picture in retail environments. Step4. Previous Next 1 ENTER Select H o m e U s e. WATCHING TV / CHANNEL CONTROL INITIAL SETTING This Function guides the user... to easily set the image quality. It can adjust the "Picture menu - Picture mode" manually while inspecting the TV, but the TV will be displayed on the screen when turning the TV on for use in your antenna connection and start Auto Tuning. 45 Step1....
... Use" mode for the first time when purchasing the TV. "Store Demo" mode initializes the TV to set the essential items for viewing the TV for the best picture in retail environments. Step4. Previous Next 1 ENTER Select H o m e U s e. WATCHING TV / CHANNEL CONTROL INITIAL SETTING This Function guides the user... to easily set the image quality. It can adjust the "Picture menu - Picture mode" manually while inspecting the TV, but the TV will be displayed on the screen when turning the TV on for use in your antenna connection and start Auto Tuning. 45 Step1....

Owner's Manual (English)
Page 46
...8226; Treble 50 • Bass 50 E WATCHING TV / CHANNEL CONTROL OPTION Menu Language Audio Language Input Label SIMPLINK Key Lock Simple Manual Caption Set ID E Move Enter : English : English : On : Off : Off : 1 CHANNEL PICTURE AUDIO TIME OPTION LOCK INPUT USB TIME Clock Off ...Time On Time Sleep Timer Move Enter : Off : Off : Off LOCK Move Enter Lock System : Off Set Password Block Channel Movie Rating TV Rating-Children TV Rating-General Downloadable Rating Input Block Lock ...
...8226; Treble 50 • Bass 50 E WATCHING TV / CHANNEL CONTROL OPTION Menu Language Audio Language Input Label SIMPLINK Key Lock Simple Manual Caption Set ID E Move Enter : English : English : On : Off : Off : 1 CHANNEL PICTURE AUDIO TIME OPTION LOCK INPUT USB TIME Clock Off ...Time On Time Sleep Timer Move Enter : Off : Off : Off LOCK Move Enter Lock System : Off Set Password Block Channel Movie Rating TV Rating-Children TV Rating-General Downloadable Rating Input Block Lock ...

Owner's Manual (English)
Page 47
... (Quick Menu) is shown in order to the Favorite List. P i c t u r e M o d e: Selects the factory preset picture depend on or off automatically. Sleep Timer: Select the amount of time before your desired picture format. WATCHING TV / CHANNEL CONTROL QUICK MENU Your TV's OSD (On Screen Display) may differ slightly from what is a menu of program. Make...
... (Quick Menu) is shown in order to the Favorite List. P i c t u r e M o d e: Selects the factory preset picture depend on or off automatically. Sleep Timer: Select the amount of time before your desired picture format. WATCHING TV / CHANNEL CONTROL QUICK MENU Your TV's OSD (On Screen Display) may differ slightly from what is a menu of program. Make...

Owner's Manual (English)
Page 56
...of the manual you select "Cinema" in AV mode, the "Picture Mode" and "Sound Mode" return to select the desired source. Return to see. Picture Mode" and "AUDIO menu - I O f f: Disables the AV MODE. I If you want to TV viewing. 56 SIMPLE MANUAL You can easily and effectively access the... TV information by viewing a simple manual on the TV. Off Cinema Game Sport 1 AV MODE 2 ENTER...
...of the manual you select "Cinema" in AV mode, the "Picture Mode" and "Sound Mode" return to select the desired source. Return to see. Picture Mode" and "AUDIO menu - I O f f: Disables the AV MODE. I If you want to TV viewing. 56 SIMPLE MANUAL You can easily and effectively access the... TV information by viewing a simple manual on the TV. Off Cinema Game Sport 1 AV MODE 2 ENTER...

Owner's Manual (English)
Page 68
... input source use 4:3 or 16:9 aspect ratio. I Press the RATIO button repeatedly to select the desired picture format. PICTURE CONTROL PICTURE SIZE (ASPECT RATIO) CONTROL This feature lets you can select a different aspect ratio depending on your TV. You can select all aspect ratios in the Q.MENU. MENU Return to the previous menu. I You...
... input source use 4:3 or 16:9 aspect ratio. I Press the RATIO button repeatedly to select the desired picture format. PICTURE CONTROL PICTURE SIZE (ASPECT RATIO) CONTROL This feature lets you can select a different aspect ratio depending on your TV. You can select all aspect ratios in the Q.MENU. MENU Return to the previous menu. I You...

