

Specification (English)
Page 1
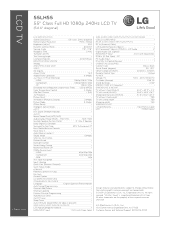
LCD TV 55LH55 55" Class Full HD 1080p 240Hz LCD TV (54.6" diagonal) TruMotion 240Hz provides clearer, fast-action scenes. Full HD 1080p resolution and a unique panel design set the LH55 series apart. TV • TruMotion 240Hz • Intelligent Sensor Mode • Full HD 1080p HD Resolution • 80,000:1 Dynamic Contrast Ratio • 2.4ms Response Time (GTG...
LCD TV 55LH55 55" Class Full HD 1080p 240Hz LCD TV (54.6" diagonal) TruMotion 240Hz provides clearer, fast-action scenes. Full HD 1080p resolution and a unique panel design set the LH55 series apart. TV • TruMotion 240Hz • Intelligent Sensor Mode • Full HD 1080p HD Resolution • 80,000:1 Dynamic Contrast Ratio • 2.4ms Response Time (GTG...
Specification (English)
Page 2
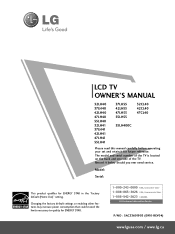
...trademarks are approximate. © 2009 LG Electronics U.S.A., Inc., Englewood Cliffs, NJ. Component 1080p/1080i/720p - LCD TV 55LH55 55" Class Full HD 1080p 240Hz LCD TV (54.6" diagonal) LGusa.com LCD SPECIFICATION Screen Size (Class) 55" Class (54.6" diagonal) Native Display Resolution 1920 x...Quick Setup Guide • e-Manual • Parental Control w/V-Chip • Key Lock • Closed Caption • LG SIMPLINK (HDMI CEC) • CONVENIENCE FEATURES Language English/Spanish/French/Korean Auto Tuning/Programming • Channel Add/Delete •...
...trademarks are approximate. © 2009 LG Electronics U.S.A., Inc., Englewood Cliffs, NJ. Component 1080p/1080i/720p - LCD TV 55LH55 55" Class Full HD 1080p 240Hz LCD TV (54.6" diagonal) LGusa.com LCD SPECIFICATION Screen Size (Class) 55" Class (54.6" diagonal) Native Display Resolution 1920 x...Quick Setup Guide • e-Manual • Parental Control w/V-Chip • Key Lock • Closed Caption • LG SIMPLINK (HDMI CEC) • CONVENIENCE FEATURES Language English/Spanish/French/Korean Auto Tuning/Programming • Channel Add/Delete •...
Owner's Manual (English)
Page 1
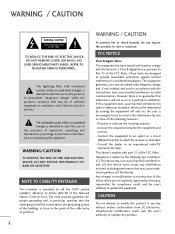
LCD TV OWNER'S MANUAL 32LH40 37LH40 42LH40 47LH40 55LH40 32LH41 37LH41 42LH41 47LH41 55LH41 37LH55 42LH55 47LH55 55LH55 32CL40 42CL40 47CL40 55LH400C Please read this manual carefully before operating your set and retain it below should you ever need service. Model: ...STAR. 1-800-243-0000 USA, Consumer User 1-888-865-3026 USA, Commercial User 1-888-542-2623 CANADA LG Customer Information Center P/NO : SAC33601903 (0910-REV04) www.lgusa.com / www.lg.ca Changing the factory default settings or enabling other features may increase power consumption that could exceed the limits ...
LCD TV OWNER'S MANUAL 32LH40 37LH40 42LH40 47LH40 55LH40 32LH41 37LH41 42LH41 47LH41 55LH41 37LH55 42LH55 47LH55 55LH55 32CL40 42CL40 47CL40 55LH400C Please read this manual carefully before operating your set and retain it below should you ever need service. Model: ...STAR. 1-800-243-0000 USA, Consumer User 1-888-865-3026 USA, Commercial User 1-888-542-2623 CANADA LG Customer Information Center P/NO : SAC33601903 (0910-REV04) www.lgusa.com / www.lg.ca Changing the factory default settings or enabling other features may increase power consumption that could exceed the limits ...
Owner's Manual (English)
Page 2
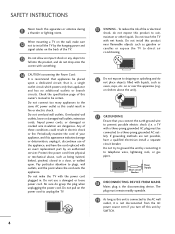
...interference will not occur in any way without written authorization from that to rain or moisture. Consult the dealer or an experienced radio/TV technician for a Class B digital device, pursuant to the point of the FCC Rules. Unauthorized modification could void the user's authority... the product's enclosure that the cable ground shall be determined by turning the equipment off and on a circuit different from LG Electronics. These limits are designed to provide reasonable protection against harmful interference in construction of this device which are not expressly approved...
...interference will not occur in any way without written authorization from that to rain or moisture. Consult the dealer or an experienced radio/TV technician for a Class B digital device, pursuant to the point of the FCC Rules. Unauthorized modification could void the user's authority... the product's enclosure that the cable ground shall be determined by turning the equipment off and on a circuit different from LG Electronics. These limits are designed to provide reasonable protection against harmful interference in construction of this device which are not expressly approved...
Owner's Manual (English)
Page 4
... electrician install a separate circuit breaker. The plug must be certain. Do not connect too many appliances to rain, moisture or other liquids. a TV with a three-prong grounded AC plug must remain readily operable. 19 As long as this product near flammable objects such as gasoline or candles or... expose the TV to direct air conditioning. 16 Do not expose to telephone wires, lightening rods, or gas pipes. Pay particular attention to a three-...
... electrician install a separate circuit breaker. The plug must be certain. Do not connect too many appliances to rain, moisture or other liquids. a TV with a three-prong grounded AC plug must remain readily operable. 19 As long as this product near flammable objects such as gasoline or candles or... expose the TV to direct air conditioning. 16 Do not expose to telephone wires, lightening rods, or gas pipes. Pay particular attention to a three-...

Owner's Manual (English)
Page 5
...unplug the power cord and scrub gently with a soft cloth to the regulations of your local authority. 5 ON DISPOSAL (Only Hg lamp used LCD TV) The fluorescent lamp used in contact with such power lines or circuits as electric shock may occur. Disposal of overhead power lines or other odors...the power cord contact an authorized service center. 26 Do not press strongly upon the panel with general household waste. For LCD TV 28 If the TV feels cold to carry larger TVs. This is normal, there is installed, follow the precautions below. Do not dispose of the National Electrical Code (NEC)...
...unplug the power cord and scrub gently with a soft cloth to the regulations of your local authority. 5 ON DISPOSAL (Only Hg lamp used LCD TV) The fluorescent lamp used in contact with such power lines or circuits as electric shock may occur. Disposal of overhead power lines or other odors...the power cord contact an authorized service center. 26 Do not press strongly upon the panel with general household waste. For LCD TV 28 If the TV feels cold to carry larger TVs. This is normal, there is installed, follow the precautions below. Do not dispose of the National Electrical Code (NEC)...
Owner's Manual (English)
Page 6
... Mode 81 Channel Editing 50 Channel List 51 Favorite Channel Setup / Favorite Channel List . . 52 Brief Information 53 Input List 54 Input Label 55 AV Mode 56 Simple Manual 56 Key Lock 57 SIMPLINK 58 USB Entry Modes 60 Photo List 61 Music List ... - Add / Delete Channel (Manual Tuning 49 - Auto Scan (Auto Tuning 48 - CONTENTS WARNING / CAUTION 2 SAFETY INSTRUCTIONS 3 FEATURE OF THIS TV 8 PREPARATION Accessories 9 Front Panel Information 10 Back Panel Information 12 Stand Instruction 14 VESA Wall Mounting 18 Cable Management 19 Desktop Pedestal Installation 21 Swivel...
... Mode 81 Channel Editing 50 Channel List 51 Favorite Channel Setup / Favorite Channel List . . 52 Brief Information 53 Input List 54 Input Label 55 AV Mode 56 Simple Manual 56 Key Lock 57 SIMPLINK 58 USB Entry Modes 60 Photo List 61 Music List ... - Add / Delete Channel (Manual Tuning 49 - Auto Scan (Auto Tuning 48 - CONTENTS WARNING / CAUTION 2 SAFETY INSTRUCTIONS 3 FEATURE OF THIS TV 8 PREPARATION Accessories 9 Front Panel Information 10 Back Panel Information 12 Stand Instruction 14 VESA Wall Mounting 18 Cable Management 19 Desktop Pedestal Installation 21 Swivel...
Owner's Manual (English)
Page 7
...On/Off Time Setting 97 Sleep Timer Setting 98 PARENTAL CONTROL / RATINGS Set Password & Lock System 99 Channel Blocking 102 Movie & TV Rating 103 Downloadable Rating 108 External Input Blocking 109 APPENDIX Troubleshooting 110 Maintenance 112 Product Specifications 113 IR Codes 115 External Control Through RS...Leveler (Auto Volume 82 Clear Voice II 83 Preset Sound Setting (Sound Mode 84 Sound Setting Adjustment - User Mode 85 Balance 86 TV Speakers On/Off Setup 87 Audio Reset 88 Stereo/SAP Broadcasts Setup 89 Audio Language 90 On-Screen Menus Language Selection 91 Caption ...
...On/Off Time Setting 97 Sleep Timer Setting 98 PARENTAL CONTROL / RATINGS Set Password & Lock System 99 Channel Blocking 102 Movie & TV Rating 103 Downloadable Rating 108 External Input Blocking 109 APPENDIX Troubleshooting 110 Maintenance 112 Product Specifications 113 IR Codes 115 External Control Through RS...Leveler (Auto Volume 82 Clear Voice II 83 Preset Sound Setting (Sound Mode 84 Sound Setting Adjustment - User Mode 85 Balance 86 TV Speakers On/Off Setup 87 Audio Reset 88 Stereo/SAP Broadcasts Setup 89 Audio Language 90 On-Screen Menus Language Selection 91 Caption ...
Owner's Manual (English)
Page 8
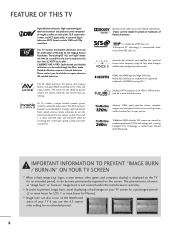
...user to experience the best their LG HDTV has to quickly choose the correct mode for the picture they are embedded in full 1920 x 1080p resolution for a more hours for a crisper picture. This TV contains the detailed calibrations necessary for LCD, 1 or more detailed picture... HDMI logo and High-Definition Multimedia Interface are trademarks of HDMI Licensing LLC." TruSurround XT technology is verified from Intertek &TüV Rheinland. LG TV include a unique invisible speaker system, tuned by increasing the "sweet spot", giving a wider and richer sound field. "Dolby "and the...
...user to experience the best their LG HDTV has to quickly choose the correct mode for the picture they are embedded in full 1920 x 1080p resolution for a more hours for a crisper picture. This TV contains the detailed calibrations necessary for LCD, 1 or more detailed picture... HDMI logo and High-Definition Multimedia Interface are trademarks of HDMI Licensing LLC." TruSurround XT technology is verified from Intertek &TüV Rheinland. LG TV include a unique invisible speaker system, tuned by increasing the "sweet spot", giving a wider and richer sound field. "Dolby "and the...
Owner's Manual (English)
Page 9
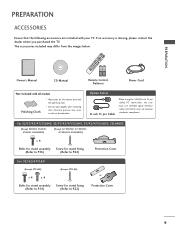
... differ from the images below. For 32/37/42/47/55LH40, 32/37/42/47/55LH41, 37/42/47/55LH55, 55LH400C (Except 55LH40, 55LH41, 55LH55, 55LH400C) (Except 47/55LH40, 47/55LH41, 47/55LH55, 55LH400C) x 4 Bolts for stand assembly Screw for stand fixing (Refer to P.16) (Refer to P.22)... Cord Not included with all models Polishing Cloth * Wipe spots on the exterior only with your TV. If an accessory is missing, please contact the dealer where you purchased the TV. PREPARATION PREPARATION ACCESSORIES Ensure that the following accessories are included with the polishing cloth. * Do not...
... differ from the images below. For 32/37/42/47/55LH40, 32/37/42/47/55LH41, 37/42/47/55LH55, 55LH400C (Except 55LH40, 55LH41, 55LH55, 55LH400C) (Except 47/55LH40, 47/55LH41, 47/55LH55, 55LH400C) x 4 Bolts for stand assembly Screw for stand fixing (Refer to P.16) (Refer to P.22)... Cord Not included with all models Polishing Cloth * Wipe spots on the exterior only with your TV. If an accessory is missing, please contact the dealer where you purchased the TV. PREPARATION PREPARATION ACCESSORIES Ensure that the following accessories are included with the polishing cloth. * Do not...
Owner's Manual (English)
Page 10
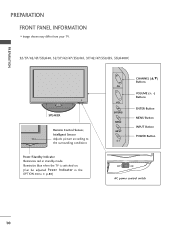
G p.80) CH VOL ENTER MENU INPUT CHANNEL (D,E) Buttons VOLUME (+, -) Buttons ENTER Button MENU Button INPUT Button POWER Button OFF ON AC power control switch 10 PREPARATION PREPARATION FRONT PANEL INFORMATION I Image shown may differ from your TV. 32/37/42/47/55LH40, 32/37/42/47/55LH41, 37/42/47/55LH55, 55LH400C SPEAKER Remote Control Sensor, Intelligent Sensor Adjusts picture according to the surrounding conditions Power/Standby Indicator Illuminates red in the OPTION menu. Illuminates blue when the TV is switched on. (Can be adjusted Power Indicator in standby mode.
G p.80) CH VOL ENTER MENU INPUT CHANNEL (D,E) Buttons VOLUME (+, -) Buttons ENTER Button MENU Button INPUT Button POWER Button OFF ON AC power control switch 10 PREPARATION PREPARATION FRONT PANEL INFORMATION I Image shown may differ from your TV. 32/37/42/47/55LH40, 32/37/42/47/55LH41, 37/42/47/55LH55, 55LH400C SPEAKER Remote Control Sensor, Intelligent Sensor Adjusts picture according to the surrounding conditions Power/Standby Indicator Illuminates red in the OPTION menu. Illuminates blue when the TV is switched on. (Can be adjusted Power Indicator in standby mode.

Owner's Manual (English)
Page 13
... & SERVICE) PORT Used by third party devices. Uses a D-sub 15 pin cable (VGA cable). Accepts DVI video using an adapter or HDMI to operate the TV on DC power. 13 Supports HD. PREPARATION 1 AV (Audio/Video) IN Analog composite connection. Supports HD video and Digital audio.
... & SERVICE) PORT Used by third party devices. Uses a D-sub 15 pin cable (VGA cable). Accepts DVI video using an adapter or HDMI to operate the TV on DC power. 13 Supports HD. PREPARATION 1 AV (Audio/Video) IN Analog composite connection. Supports HD video and Digital audio.
Owner's Manual (English)
Page 14
Do not over tighten. 14 STAND BODY COVER BASE INSTALLATION (Only 32/42CL40) 1 Carefully place the TV screen side down on a cushioned surface to protect the screen from your TV. PREPARATION PREPARATION STAND INSTRUCTION (For 32/42/47CL40) I Image shown may differ from damage. 2 Assemble the parts of the STAND ...BODY with COVER BASE of the TV by using the 4 screws supplied. 3 Assemble the TV as shown. 4 Fix the 4 bolts securely using the holes in the back of the TV. ! NOTE G When assembling the desk type stand, make sure the screws are ...
Do not over tighten. 14 STAND BODY COVER BASE INSTALLATION (Only 32/42CL40) 1 Carefully place the TV screen side down on a cushioned surface to protect the screen from your TV. PREPARATION PREPARATION STAND INSTRUCTION (For 32/42/47CL40) I Image shown may differ from damage. 2 Assemble the parts of the STAND ...BODY with COVER BASE of the TV by using the 4 screws supplied. 3 Assemble the TV as shown. 4 Fix the 4 bolts securely using the holes in the back of the TV. ! NOTE G When assembling the desk type stand, make sure the screws are ...
Owner's Manual (English)
Page 15
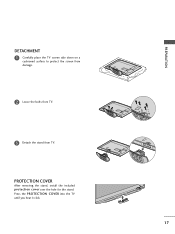
Press the PROTECTION COVER into the TV until you hear it click. 15 PREPARATION DETACHMENT 1 Carefully place the TV screen side down on a cushioned surface to protect the screen from damage. 2 Loose the bolts from TV. 3 Detach the stand from TV. PROTECTION COVER After removing the stand, install the included protection cover over the hole for the stand.
Press the PROTECTION COVER into the TV until you hear it click. 15 PREPARATION DETACHMENT 1 Carefully place the TV screen side down on a cushioned surface to protect the screen from damage. 2 Loose the bolts from TV. 3 Detach the stand from TV. PROTECTION COVER After removing the stand, install the included protection cover over the hole for the stand.
Owner's Manual (English)
Page 16
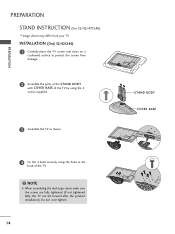
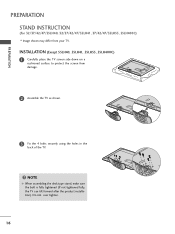
...sure the bolt is fully tightened (If not tightened fully, the TV can tilt forward after the product installation). Do not over tighten. 16 PREPARATION PREPARATION STAND INSTRUCTION (For 32/37/42/47/55LH40, 32/37/42/47/55LH41, 37/42/47/55LH55, 55LH400C) I Image shown may differ from damage. 2 Assemble ...the TV as shown. 3 Fix the 4 bolts securely using the holes in the back of the...
...sure the bolt is fully tightened (If not tightened fully, the TV can tilt forward after the product installation). Do not over tighten. 16 PREPARATION PREPARATION STAND INSTRUCTION (For 32/37/42/47/55LH40, 32/37/42/47/55LH41, 37/42/47/55LH55, 55LH400C) I Image shown may differ from damage. 2 Assemble ...the TV as shown. 3 Fix the 4 bolts securely using the holes in the back of the...
Owner's Manual (English)
Page 17
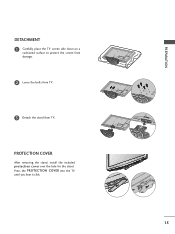
Press the PROTECTION COVER into the TV until you hear it click. 17 PROTECTION COVER After removing the stand, install the included protection cover over the hole for the stand. PREPARATION DETACHMENT 1 Carefully place the TV screen side down on a cushioned surface to protect the screen from damage. 2 Loose the bolts from TV. 3 Detach the stand from TV.
Press the PROTECTION COVER into the TV until you hear it click. 17 PROTECTION COVER After removing the stand, install the included protection cover over the hole for the stand. PREPARATION DETACHMENT 1 Carefully place the TV screen side down on a cushioned surface to protect the screen from damage. 2 Loose the bolts from TV. 3 Detach the stand from TV.
Owner's Manual (English)
Page 18
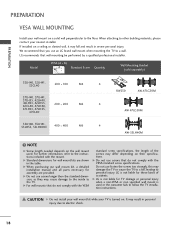
.... NOTE G Screw length needed depends on a solid wall perpendicular to follow the TV installation instructions. G Do not use an LG brand wall mount when mounting the TV to the TV. We recommend that you use screws that do not comply with the VESA standard screw..., 37LH41, 37LH55, 42LH40, 42LH41, 42LH55, 42CL40, 47LH40, 200 * 200 M6 4 47LH41, 47LH55, 47CL40 AW-47LG30M 55LH40, 55LH41, 55LH55, 55LH400C 400 * 400 M6 4 AW-55LH40M ! LG recommends that do not comply with the mount. When attaching to the instructions included with the VESA standard screw specifications.
.... NOTE G Screw length needed depends on a solid wall perpendicular to follow the TV installation instructions. G Do not use an LG brand wall mount when mounting the TV to the TV. We recommend that you use screws that do not comply with the VESA standard screw..., 37LH41, 37LH55, 42LH40, 42LH41, 42LH55, 42CL40, 47LH40, 200 * 200 M6 4 47LH41, 47LH55, 47CL40 AW-47LG30M 55LH40, 55LH41, 55LH55, 55LH400C 400 * 400 M6 4 AW-55LH40M ! LG recommends that do not comply with the mount. When attaching to the instructions included with the VESA standard screw specifications.
Owner's Manual (English)
Page 19
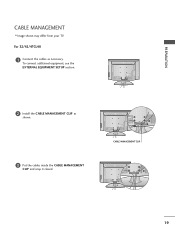
To connect additional equipment, see the EXTERNAL EQUIPMENT SETUP section. 2 Install the CABLE MANAGEMENT CLIP as necessary. PREPARATION CABLE MANAGEMENT I Image shown may differ from your TV. CABLE MANAGEMENT CLIP 19 For 32/42/47CL40 1 Connect the cables as shown. 3 Put the cables inside the CABLE MANAGEMENT CLIP and snap it closed.
To connect additional equipment, see the EXTERNAL EQUIPMENT SETUP section. 2 Install the CABLE MANAGEMENT CLIP as necessary. PREPARATION CABLE MANAGEMENT I Image shown may differ from your TV. CABLE MANAGEMENT CLIP 19 For 32/42/47CL40 1 Connect the cables as shown. 3 Put the cables inside the CABLE MANAGEMENT CLIP and snap it closed.
Owner's Manual (English)
Page 20
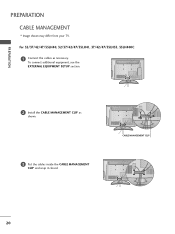
To connect additional equipment, see the EXTERNAL EQUIPMENT SETUP section. 2 Install the CABLE MANAGEMENT CLIP as necessary. For 32/37/42/47/55LH40, 32/37/42/47/55LH41, 37/42/47/55LH55, 55LH400C 1 Connect the cables as shown. 3 Put the cables inside the CABLE MANAGEMENT CLIP and snap it closed. CABLE MANAGEMENT CLIP 20 PREPARATION PREPARATION CABLE MANAGEMENT I Image shown may differ from your TV.
To connect additional equipment, see the EXTERNAL EQUIPMENT SETUP section. 2 Install the CABLE MANAGEMENT CLIP as necessary. For 32/37/42/47/55LH40, 32/37/42/47/55LH41, 37/42/47/55LH55, 55LH400C 1 Connect the cables as shown. 3 Put the cables inside the CABLE MANAGEMENT CLIP and snap it closed. CABLE MANAGEMENT CLIP 20 PREPARATION PREPARATION CABLE MANAGEMENT I Image shown may differ from your TV.
Owner's Manual (English)
Page 21
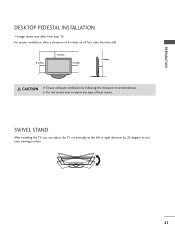
SWIVEL STAND After installing the TV, you can adjust the TV set manually to suit your TV. G Do not mount near or above any type of 4 inches on all four sides from your viewing position. 21 For proper ventilation, allow a clearance of heat source. PREPARATION DESKTOP PEDESTAL INSTALLATION I Image shown may differ from the wall. 4 inches 4 inches 4 inches 4 inches CAUTION G Ensure adequate ventilation by 20 degrees to the left or right direction by following the clearance recommendations.
SWIVEL STAND After installing the TV, you can adjust the TV set manually to suit your TV. G Do not mount near or above any type of 4 inches on all four sides from your viewing position. 21 For proper ventilation, allow a clearance of heat source. PREPARATION DESKTOP PEDESTAL INSTALLATION I Image shown may differ from the wall. 4 inches 4 inches 4 inches 4 inches CAUTION G Ensure adequate ventilation by 20 degrees to the left or right direction by following the clearance recommendations.


