
Specification (English)
Page 1
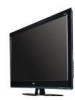
... • Super IPS Panel • Wide Viewing Angle • XD Engine® • 24p Real Cinema • ISFccc® Ready • Picture Wizard • AV Mode II (Cinema, Sports, Game) • 60,000 Hour Panel Life (typical) • NTSC/ATSC Tuners with Clear QAM ...1 Digital Audio Out (Optical) (rear) • USB 2.0 (JPEG, MP3) (side) • PC Connectivity (D-sub 15pin) • RF Antenna Input LGusa.com LCD TV 55LH40 55" Class Full HD 1080p 120Hz LCD TV (54.6" diagonal) Full HD 1080p performance, a robust feature set and Smart Energy Savings make the LH40 Series a standout.
... • Super IPS Panel • Wide Viewing Angle • XD Engine® • 24p Real Cinema • ISFccc® Ready • Picture Wizard • AV Mode II (Cinema, Sports, Game) • 60,000 Hour Panel Life (typical) • NTSC/ATSC Tuners with Clear QAM ...1 Digital Audio Out (Optical) (rear) • USB 2.0 (JPEG, MP3) (side) • PC Connectivity (D-sub 15pin) • RF Antenna Input LGusa.com LCD TV 55LH40 55" Class Full HD 1080p 120Hz LCD TV (54.6" diagonal) Full HD 1080p performance, a robust feature set and Smart Energy Savings make the LH40 Series a standout.
Owner's Manual (English)
Page 6
... List 61 Music List 65 PICTURE CONTROL Picture Size (Aspect Ratio) Control 68 Picture Wizard 70 Preset Picture Settings (Picture Mode 72 Manual Picture Adjustment - User Mode 73 Picture Improvement Technology 74 Expert Picture Control 75 Energy Saving 78 Picture Reset 79 Power Indicator 80 Demo Mode 81 CONTENTS WARNING / CAUTION 2 SAFETY INSTRUCTIONS 3 FEATURE OF THIS TV 8 PREPARATION Accessories 9 Front Panel...
... List 61 Music List 65 PICTURE CONTROL Picture Size (Aspect Ratio) Control 68 Picture Wizard 70 Preset Picture Settings (Picture Mode 72 Manual Picture Adjustment - User Mode 73 Picture Improvement Technology 74 Expert Picture Control 75 Energy Saving 78 Picture Reset 79 Power Indicator 80 Demo Mode 81 CONTENTS WARNING / CAUTION 2 SAFETY INSTRUCTIONS 3 FEATURE OF THIS TV 8 PREPARATION Accessories 9 Front Panel...
Owner's Manual (English)
Page 8
...dealer to help keep dialogue audible when background noise swells. Please contact your TV screen for a prolonged period (2 or more hours for LCD, 1 or more stable structure for the picture they are trademarks or registered trademarks of digital television, HDTV formats include 1080i...behind the front cabinet and use the 4:3 aspect ratio setting for Plasma). Manufactured under the manufacturer's warranty. logos, screen menus, video game, and computer display) is verified from Intertek &TüV Rheinland. LG TV include a unique invisible speaker system, tuned by combining ...
...dealer to help keep dialogue audible when background noise swells. Please contact your TV screen for a prolonged period (2 or more hours for LCD, 1 or more stable structure for the picture they are trademarks or registered trademarks of digital television, HDTV formats include 1080i...behind the front cabinet and use the 4:3 aspect ratio setting for Plasma). Manufactured under the manufacturer's warranty. logos, screen menus, video game, and computer display) is verified from Intertek &TüV Rheinland. LG TV include a unique invisible speaker system, tuned by combining ...

Owner's Manual (English)
Page 11
Remote Control Sensor POWER Button 11 PREPARATION 32/42/47CL40 CH CHANNEL ( , ) Buttons SPEAKER Intelligent Sensor Adjusts picture according to the surrounding conditions VOL ENTER MENU INPUT VOLUME (+, -) Buttons ENTER Button MENU Button INPUT Button Power/Standby Indicator Illuminates red in standby mode. Illuminates blue when the set is switched on.
Remote Control Sensor POWER Button 11 PREPARATION 32/42/47CL40 CH CHANNEL ( , ) Buttons SPEAKER Intelligent Sensor Adjusts picture according to the surrounding conditions VOL ENTER MENU INPUT VOLUME (+, -) Buttons ENTER Button MENU Button INPUT Button Power/Standby Indicator Illuminates red in standby mode. Illuminates blue when the set is switched on.
Owner's Manual (English)
Page 23
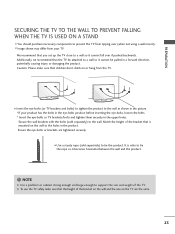
... potentially causing injury or damaging the product. NOTE G Use a platform or cabinet strong enough and large enough to the holes in the picture. * If your TV. Additionally, we recommend that children don't climb on the TV are tightened securely. Ensure the eye-bolts or brackets are the same. 23 G To use the...brackets with the bolts (sold separately) to a wall so it cannot fall over (when not using a wall mount). Caution: Please make sure that you set up the TV close to tie the product. I Image shown may differ from tipping over if pushed backwards. PREPARATION SECURING THE...
... potentially causing injury or damaging the product. NOTE G Use a platform or cabinet strong enough and large enough to the holes in the picture. * If your TV. Additionally, we recommend that children don't climb on the TV are tightened securely. Ensure the eye-bolts or brackets are the same. 23 G To use the...brackets with the bolts (sold separately) to a wall so it cannot fall over (when not using a wall mount). Caution: Please make sure that you set up the TV close to tie the product. I Image shown may differ from tipping over if pushed backwards. PREPARATION SECURING THE...

Owner's Manual (English)
Page 35
... 66.587 67.5 60.00 59.934 60.00 35 EXTERNAL EQUIPMENT SETUP ! The fixed image may be positioned on the graphics card, some resolution settings may not work if a HDMI to 1920x1080. G Depending on the screen properly. G Depending on the screen. G In PC mode, there may become permanently imprinted... card, DOS mode may not allow the image to Just scan. G The synchronization input form for a long period of time. G When selecting HDMI-PC, set the "Input Label PC" in use. NOTES G To get the the best picture quality, adjust the PC graphics card to DVI Cable is separate.
... 66.587 67.5 60.00 59.934 60.00 35 EXTERNAL EQUIPMENT SETUP ! The fixed image may be positioned on the graphics card, some resolution settings may not work if a HDMI to 1920x1080. G Depending on the screen properly. G Depending on the screen. G In PC mode, there may become permanently imprinted... card, DOS mode may not allow the image to Just scan. G The synchronization input form for a long period of time. G When selecting HDMI-PC, set the "Input Label PC" in use. NOTES G To get the the best picture quality, adjust the PC graphics card to DVI Cable is separate.

Owner's Manual (English)
Page 36
EXTERNAL EQUIPMENT SETUP EXTERNAL EQUIPMENT SETUP Screen Setup for PC mode Selecting Resolution You can use this function only when the PC resolution is set to 1024X768, 1280X768 or 1360X768. Select Screen (RGB-PC). Select Resolution. Position Size Phase Reset Move Prev. 1024 x 768 1280 x 768 1360... x 768 36 You can choose the resolution in RGB-PC mode. PICTURE Move Enter E • Contrast 50 • Brightness 50 • Sharpness 50 • Color 50 • Tint 0R G • Advanced Control •...
EXTERNAL EQUIPMENT SETUP EXTERNAL EQUIPMENT SETUP Screen Setup for PC mode Selecting Resolution You can use this function only when the PC resolution is set to 1024X768, 1280X768 or 1360X768. Select Screen (RGB-PC). Select Resolution. Position Size Phase Reset Move Prev. 1024 x 768 1280 x 768 1360... x 768 36 You can choose the resolution in RGB-PC mode. PICTURE Move Enter E • Contrast 50 • Brightness 50 • Sharpness 50 • Color 50 • Tint 0R G • Advanced Control •...

Owner's Manual (English)
Page 37
... 50 • Color 50 • Tint 0R G • Advanced Control • Picture Reset Screen (RGB-PC) 1 MENU 2 ENTER 3 ENTER Select PICTURE. Select Auto Config.. 4 ENTER Select Y e s. 5 ENTER Start Auto Configuration. Position Size Phase Reset Move Prev. To Set Yes No I If picture needs to be adjusted again after Auto adjustment in RGB-PC, you...
... 50 • Color 50 • Tint 0R G • Advanced Control • Picture Reset Screen (RGB-PC) 1 MENU 2 ENTER 3 ENTER Select PICTURE. Select Auto Config.. 4 ENTER Select Y e s. 5 ENTER Start Auto Configuration. Position Size Phase Reset Move Prev. To Set Yes No I If picture needs to be adjusted again after Auto adjustment in RGB-PC, you...

Owner's Manual (English)
Page 39
Select Reset. To Set Yes No 39 EXTERNAL EQUIPMENT SETUP Screen Reset (Reset to original factory values) Returns Position, S i z e, and Phase to the default factory settings. PICTURE Move Enter E • Contrast 50 • Brightness 50 • Sharpness 50 • Color 50 • Tint 0R G • Advanced Control • Picture Reset Screen (RGB-PC) 1 MENU 2 ENTER 3 ENTER 4 ENTER 5 ENTER Select PICTURE. Select Y e s. Select Screen (RGB-PC). SCREEN Resolution Auto Config. This feature operates only in RGB-PC mode. Position Size Phase Reset Move Prev.
Select Reset. To Set Yes No 39 EXTERNAL EQUIPMENT SETUP Screen Reset (Reset to original factory values) Returns Position, S i z e, and Phase to the default factory settings. PICTURE Move Enter E • Contrast 50 • Brightness 50 • Sharpness 50 • Color 50 • Tint 0R G • Advanced Control • Picture Reset Screen (RGB-PC) 1 MENU 2 ENTER 3 ENTER 4 ENTER 5 ENTER Select PICTURE. Select Y e s. Select Screen (RGB-PC). SCREEN Resolution Auto Config. This feature operates only in RGB-PC mode. Position Size Phase Reset Move Prev.

Owner's Manual (English)
Page 43
...with new ones. G p.53 AV MODE Toggles through the programmed Favorite channels. UP/DOWN PAGE Moves from one full set of the screen. I Close cover. 43 I Install two 1.5V AAA batteries. UP/DOWN Installing Batteries I Open the... battery compartment cover on or off. WATCHING TV / CHANNEL CONTROL THUMBSTICK Navigates the on-screen menus and adjusts the system settings to your preference. (Up/Down/Left Right/ENTER) RETURN Allows the user to ...of screen information to move return one . G p.71 Use to apply the Picture Wizard settings.
...with new ones. G p.53 AV MODE Toggles through the programmed Favorite channels. UP/DOWN PAGE Moves from one full set of the screen. I Close cover. 43 I Install two 1.5V AAA batteries. UP/DOWN Installing Batteries I Open the... battery compartment cover on or off. WATCHING TV / CHANNEL CONTROL THUMBSTICK Navigates the on-screen menus and adjusts the system settings to your preference. (Up/Down/Left Right/ENTER) RETURN Allows the user to ...of screen information to move return one . G p.71 Use to apply the Picture Wizard settings.

Owner's Manual (English)
Page 45
...TV to preset instore mode after 5 minutes. Previous Next 1 ENTER Select H o m e U s e. Auto Tuning Auto Tuning Before starting, be activated from the user menus. It can adjust the "Picture menu - I Default selection is connected. 1 ENTER Previous INFO i Simple Manual Next Check your home environment. Step3. Time setting Time Setting Current Time Setting... desired time option. Step4. Step2. We recommend setting the TV to use this TV at Store, select [Store Demo]. I You can also adjust Initial Setting in retail environments. Store Demo Home Use Select ...
...TV to preset instore mode after 5 minutes. Previous Next 1 ENTER Select H o m e U s e. Auto Tuning Auto Tuning Before starting, be activated from the user menus. It can adjust the "Picture menu - I Default selection is connected. 1 ENTER Previous INFO i Simple Manual Next Check your home environment. Step3. Time setting Time Setting Current Time Setting... desired time option. Step4. Step2. We recommend setting the TV to use this TV at Store, select [Store Demo]. I You can also adjust Initial Setting in retail environments. Store Demo Home Use Select ...

Owner's Manual (English)
Page 46
... : Standard • SRS TruSurround XT: Off • Treble 50 • Bass 50 E WATCHING TV / CHANNEL CONTROL OPTION Menu Language Audio Language Input Label SIMPLINK Key Lock Simple Manual Caption Set ID E Move Enter : English : English : On : Off : Off : 1 CHANNEL PICTURE AUDIO TIME OPTION LOCK INPUT USB TIME Clock Off Time On Time Sleep...
... : Standard • SRS TruSurround XT: Off • Treble 50 • Bass 50 E WATCHING TV / CHANNEL CONTROL OPTION Menu Language Audio Language Input Label SIMPLINK Key Lock Simple Manual Caption Set ID E Move Enter : English : English : On : Off : Off : 1 CHANNEL PICTURE AUDIO TIME OPTION LOCK INPUT USB TIME Clock Off Time On Time Sleep...

Owner's Manual (English)
Page 56
... SIMPLINK Key Lock Simple Manual Caption Set ID E : English : English : On : Off : Off : 1 Select OPTION. Sound Mode" respectively. I Sport: Optimizes video and audio for "PICTURE menu - I Cinema: Optimizes video and audio for playing games. I O f f: Disables the AV MODE. SIMPLE MANUAL You can easily and effectively access the TV information by viewing a simple manual...
... SIMPLINK Key Lock Simple Manual Caption Set ID E : English : English : On : Off : Off : 1 Select OPTION. Sound Mode" respectively. I Sport: Optimizes video and audio for "PICTURE menu - I Cinema: Optimizes video and audio for playing games. I O f f: Disables the AV MODE. SIMPLE MANUAL You can easily and effectively access the TV information by viewing a simple manual...

Owner's Manual (English)
Page 68
... • Sharpness 60 E 16:9 Just Scan Set By Program 4:3 Zoom Cinema Zoom 1 1 MENU Select PICTURE. 2 ENTER 3 ENTER Select Aspect Ratio. HDMI/RGB-PC input source use 4:3 or 16:9 aspect ratio. I You can select a different aspect ratio depending on your TV. I Press the RATIO button repeatedly to TV viewing. You can also adjust Aspect Ratio...
... • Sharpness 60 E 16:9 Just Scan Set By Program 4:3 Zoom Cinema Zoom 1 1 MENU Select PICTURE. 2 ENTER 3 ENTER Select Aspect Ratio. HDMI/RGB-PC input source use 4:3 or 16:9 aspect ratio. I You can select a different aspect ratio depending on your TV. I Press the RATIO button repeatedly to TV viewing. You can also adjust Aspect Ratio...

Owner's Manual (English)
Page 69
... Scan Zoom Choose Zoom when you want to enlarge the picture in correct proportion. Set By Program Selects the proper picture proportion to match the source's image. (4:3 4:3) Set By Program (16:9 16:9) Set By Program Cinema Zoom Choose Cinema Zoom when you want to view a picture with cinemascope aspect ratio (2.35:1) without any alteration. Just Scan...
... Scan Zoom Choose Zoom when you want to enlarge the picture in correct proportion. Set By Program Selects the proper picture proportion to match the source's image. (4:3 4:3) Set By Program (16:9 16:9) Set By Program Cinema Zoom Choose Cinema Zoom when you want to view a picture with cinemascope aspect ratio (2.35:1) without any alteration. Just Scan...
Owner's Manual (English)
Page 70
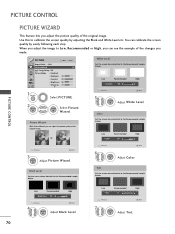
... to the Recommended sample below . Low • Tint Recommended 0 E R E High G Previous Next 7 ENTER Adjust T i n t. Picture Wizard With Picture Wizard, you made. PICTURE CONTROL E PICTURE CONTROL PICTURE WIZARD This feature lets you adjust the picture quality of the original image. Black Level Set the screen above identical to the Recommended sample below . 70 Low Recommended • Brightness 50...
... to the Recommended sample below . Low • Tint Recommended 0 E R E High G Previous Next 7 ENTER Adjust T i n t. Picture Wizard With Picture Wizard, you made. PICTURE CONTROL E PICTURE CONTROL PICTURE WIZARD This feature lets you adjust the picture quality of the original image. Black Level Set the screen above identical to the Recommended sample below . 70 Low Recommended • Brightness 50...

Owner's Manual (English)
Page 71
... 11 MARK Select input source to the Recommended sample below . Horizontal Sharpness Set the screen above identical to apply the settings. I Once the Picture Wizard sets the picture quality, Energy Saving is saved to Expert1. i The current adjustment value is changed to the TV. Low Recommended E • H Sharpness 50 Previous E High Next 8 ENTER Adjust H o r i z o n t a l S h a r p n e s s. Dark Recommended...
... 11 MARK Select input source to the Recommended sample below . Horizontal Sharpness Set the screen above identical to apply the settings. I Once the Picture Wizard sets the picture quality, Energy Saving is saved to Expert1. i The current adjustment value is changed to the TV. Low Recommended E • H Sharpness 50 Previous E High Next 8 ENTER Adjust H o r i z o n t a l S h a r p n e s s. Dark Recommended...

Owner's Manual (English)
Page 72
... to TV viewing. I Standard: This is changed contrast, brightness, sharpness, color and tint automatically. I Cinema: This mode optimizes video for vivid picture. MENU Return to the previous menu. I S p o r t: This is changed to emphasize dynamic video and primary color (e.g, white, uniform, grass, sky blue etc.) by realizing the optimal screen for picture settings available in...
... to TV viewing. I Standard: This is changed contrast, brightness, sharpness, color and tint automatically. I Cinema: This mode optimizes video for vivid picture. MENU Return to the previous menu. I S p o r t: This is changed to emphasize dynamic video and primary color (e.g, white, uniform, grass, sky blue etc.) by realizing the optimal screen for picture settings available in...
Owner's Manual (English)
Page 73
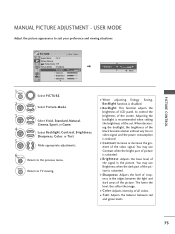
... darker without any loss in video signal and the power consumption is saturated. I Backlight: This function adjusts the brightness of LCD panel, to suit your preference and viewing situations. I T i n t: Adjusts the balance between the light and dark ...6 RETURN Return to TV viewing. USER MODE Adjust the picture appearance to control the brightness of the picture. Adjusting the backlight is recommended when setting the brightness of the picture is disabled. E PICTURE Move Enter Aspect Ratio : 16:9 Picture Wizard Energy Saving : Off Picture Mode : Standard •...
... darker without any loss in video signal and the power consumption is saturated. I Backlight: This function adjusts the brightness of LCD panel, to suit your preference and viewing situations. I T i n t: Adjusts the balance between the light and dark ...6 RETURN Return to TV viewing. USER MODE Adjust the picture appearance to control the brightness of the picture. Adjusting the backlight is recommended when setting the brightness of the picture is disabled. E PICTURE Move Enter Aspect Ratio : 16:9 Picture Wizard Energy Saving : Off Picture Mode : Standard •...

Owner's Manual (English)
Page 74
You can calibrate the screen for each Picture Mode or set the video seeing differently for each input. Select your desired options. 4 Make appropriate adjustments. 5 RETURN Return to TV viewing. MENU Return to the previous menu. Select Advanced Control. To reset to the factory default after making adjustments to each input source, execute the...
You can calibrate the screen for each Picture Mode or set the video seeing differently for each input. Select your desired options. 4 Make appropriate adjustments. 5 RETURN Return to TV viewing. MENU Return to the previous menu. Select Advanced Control. To reset to the factory default after making adjustments to each input source, execute the...


