Owner's Manual
Page 6
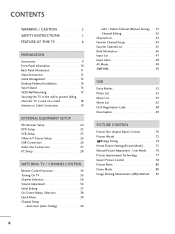
... Movie List 62 DivX Registration Code 68 Deactivation 69 PICTURE CONTROL Picture Size (Aspect Ratio) Control 70 Picture Wizard 72 Energy Saving 74 Preset Picture Settings(Picture Mode 75 Manual Picture Adjustment - Add / Delete Channel (Manual Tuning 41 - User Mode 76 Picture Improvement Technology 77 Expert Picture Control 78 Picture Reset 80 Demo Mode 80 Image Sticking Minimization (ISM...
... Movie List 62 DivX Registration Code 68 Deactivation 69 PICTURE CONTROL Picture Size (Aspect Ratio) Control 70 Picture Wizard 72 Energy Saving 74 Preset Picture Settings(Picture Mode 75 Manual Picture Adjustment - Add / Delete Channel (Manual Tuning 41 - User Mode 76 Picture Improvement Technology 77 Expert Picture Control 78 Picture Reset 80 Demo Mode 80 Image Sticking Minimization (ISM...
Owner's Manual
Page 8
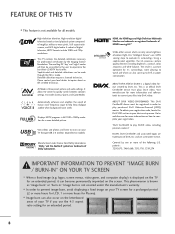
...surroundings, more pixels, 16:9 aspect-ratio screens, and AC3 digital audio. Detailed calibration requires a licensed technician. The result is a picture optimized for LCD, 1 or more of roughly a million or more pleasing to watch and which can be accessible by the Imaging ... one or more hours for all models. High-definition television. Manufactured under the manufacturer's warranty. Using a sophisticated algorithm, the LG processes picture quality elements including brightness, contrast, color, sharpness and white balance. FEATURE OF THIS TV s This feature is not available for...
...surroundings, more pixels, 16:9 aspect-ratio screens, and AC3 digital audio. Detailed calibration requires a licensed technician. The result is a picture optimized for LCD, 1 or more of roughly a million or more pleasing to watch and which can be accessible by the Imaging ... one or more hours for all models. High-definition television. Manufactured under the manufacturer's warranty. Using a sophisticated algorithm, the LG processes picture quality elements including brightness, contrast, color, sharpness and white balance. FEATURE OF THIS TV s This feature is not available for...
Owner's Manual
Page 10
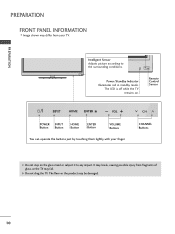
It may break, causing possible injury from your finger. G Do not drag the TV. ENTER VOL CH Intelligent Sensor Adjusts picture according to any impact. Remote Control Sensor HOME ENTER VOL CH POWER INPUT Button Button HOME Button ENTER Button VOLUME Buttons You can operate the ...
It may break, causing possible injury from your finger. G Do not drag the TV. ENTER VOL CH Intelligent Sensor Adjusts picture according to any impact. Remote Control Sensor HOME ENTER VOL CH POWER INPUT Button Button HOME Button ENTER Button VOLUME Buttons You can operate the ...
Owner's Manual
Page 18
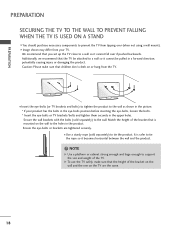
... height of the TV. G To use the TV safely, make sure that children don't climb on the wall to the wall as shown in the picture. * If your TV. Secure the wall brackets with the bolts (sold separately) to tie the product. PREPARATION PREPARATION SECURING THE TV TO THE WALL TO...
... height of the TV. G To use the TV safely, make sure that children don't climb on the wall to the wall as shown in the picture. * If your TV. Secure the wall brackets with the bolts (sold separately) to tie the product. PREPARATION PREPARATION SECURING THE TV TO THE WALL TO...
Owner's Manual
Page 19
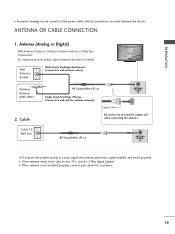
PREPARATION () VARIABLE AUDIO OUT R I To improve the picture quality in a poor signal area, please purchase a signal amplifier and install properly. Cable Cable TV Wall Jack RF Coaxial Wire (75 Ω) Single-family Dwellings /... do not connect to be split for assistance. 19 Antenna (Analog or Digital) Wall Antenna Socket or Outdoor Antenna without a Cable Box Connection. For optimum picture quality, adjust antenna direction if needed. Multi-family Dwellings/Apartments R Wall (Connect to bRend the copper wire when connecting the antenna. ANTENNA OR CABLE CONNECTION...
PREPARATION () VARIABLE AUDIO OUT R I To improve the picture quality in a poor signal area, please purchase a signal amplifier and install properly. Cable Cable TV Wall Jack RF Coaxial Wire (75 Ω) Single-family Dwellings /... do not connect to be split for assistance. 19 Antenna (Analog or Digital) Wall Antenna Socket or Outdoor Antenna without a Cable Box Connection. For optimum picture quality, adjust antenna direction if needed. Multi-family Dwellings/Apartments R Wall (Connect to bRend the copper wire when connecting the antenna. ANTENNA OR CABLE CONNECTION...
Owner's Manual
Page 23
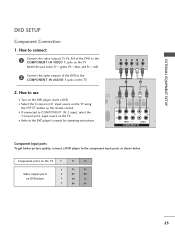
... ports Y on the TV. DIO IN B/DVI) REMOTE CONTROL IN AV IN 1 VIDEO /MONO AUDIO 2 L R 1 VIDEO AUDIO A COMPONENT IN Component Input ports To get better picture quality, connect a DVD player to the DVD player's manual for operating instructions. Match the jack colors (Y = green, PB = blue, and PR = red). 2 Connect the audio...
... ports Y on the TV. DIO IN B/DVI) REMOTE CONTROL IN AV IN 1 VIDEO /MONO AUDIO 2 L R 1 VIDEO AUDIO A COMPONENT IN Component Input ports To get better picture quality, connect a DVD player to the DVD player's manual for operating instructions. Match the jack colors (Y = green, PB = blue, and PR = red). 2 Connect the audio...
Owner's Manual
Page 29
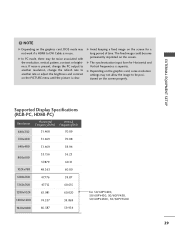
... to be noise associated with the resolution, vertical pattern, contrast or brightness. G Depending on the graphics card, some resolution settings may be positioned on the PICTURE menu until the picture is separate. EXTERNAL EQUIPMENT SETUP !
... to be noise associated with the resolution, vertical pattern, contrast or brightness. G Depending on the graphics card, some resolution settings may be positioned on the PICTURE menu until the picture is separate. EXTERNAL EQUIPMENT SETUP !
Owner's Manual
Page 30
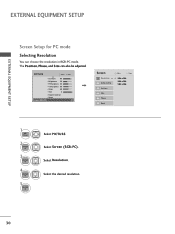
The Position, Phase, and Size can choose the resolution in RGB-PC mode. PICTURE Move E • Contrast 90 • Brightness 50 • H Sharpness 60 • V Sharpness 60 • Color 60 • Tint 0R • Expert Control • Reset Screen (...). Select the desired resolution. 30 Select Resolution. Position Size Phase Reset Move Prev. 1024 x 768 1280 x 768 1360 x 768 1 Home 2 ENTER 3 ENTER 4 ENTER 5 ENTER Select PICTURE.
The Position, Phase, and Size can choose the resolution in RGB-PC mode. PICTURE Move E • Contrast 90 • Brightness 50 • H Sharpness 60 • V Sharpness 60 • Color 60 • Tint 0R • Expert Control • Reset Screen (...). Select the desired resolution. 30 Select Resolution. Position Size Phase Reset Move Prev. 1024 x 768 1280 x 768 1360 x 768 1 Home 2 ENTER 3 ENTER 4 ENTER 5 ENTER Select PICTURE.
Owner's Manual
Page 31
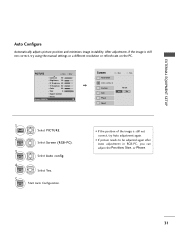
... 0R • Expert Control • Reset Screen (RGB-PC) Enter G Screen Resolution Auto config. EXTERNAL EQUIPMENT SETUP Auto Configure Automatically adjusts picture position and minimizes image instability. After adjustment, if the image is still not correct, try using the manual settings or a different resolution or refresh... e s. 5 ENTER Start Auto Configuration. • If the position of the image is still not correct, try Auto adjustment again. • If picture needs to be adjusted again after Auto adjustment in RGB-PC, you can adjust the Position, Si ze, or Phase. 31
... 0R • Expert Control • Reset Screen (RGB-PC) Enter G Screen Resolution Auto config. EXTERNAL EQUIPMENT SETUP Auto Configure Automatically adjusts picture position and minimizes image instability. After adjustment, if the image is still not correct, try using the manual settings or a different resolution or refresh... e s. 5 ENTER Start Auto Configuration. • If the position of the image is still not correct, try Auto adjustment again. • If picture needs to be adjusted again after Auto adjustment in RGB-PC, you can adjust the Position, Si ze, or Phase. 31
Owner's Manual
Page 32
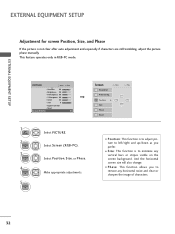
...horizontal noise and clear or sharpen the image of characters. 32 G 1 Home 2 ENTER 3 ENTER 4 ENTER 5 ENTER Select PICTURE. And the horizontal screen size will also change. EXTERNAL EQUIPMENT SETUP EXTERNAL EQUIPMENT SETUP Adjustment for screen Position, Size, and Phase If the... picture is to remove any vertical bars or stripes visible on the screen background. PICTURE Move E • Contrast 90 • Brightness 50 • H Sharpness 60 • V Sharpness ...
...horizontal noise and clear or sharpen the image of characters. 32 G 1 Home 2 ENTER 3 ENTER 4 ENTER 5 ENTER Select PICTURE. And the horizontal screen size will also change. EXTERNAL EQUIPMENT SETUP EXTERNAL EQUIPMENT SETUP Adjustment for screen Position, Size, and Phase If the... picture is to remove any vertical bars or stripes visible on the screen background. PICTURE Move E • Contrast 90 • Brightness 50 • H Sharpness 60 • V Sharpness ...
Owner's Manual
Page 33
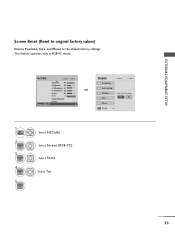
...original factory values) Returns Position, S i z e, and Phase to the default factory settings. Select Screen (RGB-PC). Select Reset. Select Y e s. PICTURE Move E • Contrast 90 • Brightness 50 • H Sharpness 60 • V Sharpness 60 • Color 60 • Tint 0R &#...8226; Expert Control • Reset Screen (RGB-PC) Enter G 1 Home 2 ENTER 3 ENTER 4 ENTER 5 ENTER Select PICTURE. Yes No Phase Reset G 33 Position Size Initialize Settings. Screen Move Prev. This feature operates only in RGB-PC mode. Resolution Auto config.
...original factory values) Returns Position, S i z e, and Phase to the default factory settings. Select Screen (RGB-PC). Select Reset. Select Y e s. PICTURE Move E • Contrast 90 • Brightness 50 • H Sharpness 60 • V Sharpness 60 • Color 60 • Tint 0R &#...8226; Expert Control • Reset Screen (RGB-PC) Enter G 1 Home 2 ENTER 3 ENTER 4 ENTER 5 ENTER Select PICTURE. Yes No Phase Reset G 33 Position Size Initialize Settings. Screen Move Prev. This feature operates only in RGB-PC mode. Resolution Auto config.

Owner's Manual
Page 35
... ones. s Close cover. 35 G p.36 CHANNEL Changes the channel. Q.MENU Opens the list of the screen. SIMPLINK Accesses the AV devices connected to apply the Picture Wizard setting. G p.45 Select the input to the TV; RATIO Changes the aspect ratio. Opens the SIMPLINK menu. THUMBSTICK Navigates the on -screen displays and...
... ones. s Close cover. 35 G p.36 CHANNEL Changes the channel. Q.MENU Opens the list of the screen. SIMPLINK Accesses the AV devices connected to apply the Picture Wizard setting. G p.45 Select the input to the TV; RATIO Changes the aspect ratio. Opens the SIMPLINK menu. THUMBSTICK Navigates the on -screen displays and...
Owner's Manual
Page 37
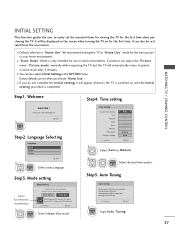
... the TV on until the Initial setting procedure is completed. Factory defaults are set the essential items for viewing the TV for choosing LG Next Step2. Step3. Choose the setting mode you for the first time when purchasing the TV. Previous Next Select H om e ... s e mode. Step4. Auto Tuning Auto Tuning Check your home environment. It will appear whenever the TV is switched on for the best picture in the OPTION menu. I You can also adjust Initial Setting in your antenna connection. WATCHING TV / CHANNEL CONTROL Step1. Welcome 1 ENTER WELCOME...
... the TV on until the Initial setting procedure is completed. Factory defaults are set the essential items for viewing the TV for choosing LG Next Step2. Step3. Choose the setting mode you for the first time when purchasing the TV. Previous Next Select H om e ... s e mode. Step4. Auto Tuning Auto Tuning Check your home environment. It will appear whenever the TV is switched on for the best picture in the OPTION menu. I You can also adjust Initial Setting in your antenna connection. WATCHING TV / CHANNEL CONTROL Step1. Welcome 1 ENTER WELCOME...
Owner's Manual
Page 38
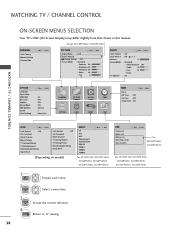
... manual. Return to TV viewing. Except 42/50PT250U, 50/60PV550U CHANNEL Auto Tuning Manual Tuning Channel Edit Move Enter PICTURE Move Aspect Ratio : 16:9 Picture Wizard Energy Saving : Off Picture Mode : Standard • Contrast 90 • Brightness 50 • Sharpness 60 • Color 60 •...French Downloadable Rating Input Block (Depending on model) INPUT TV AV1 AV2 Component1 Component2 RGB-PC HDMI1 HDMI2 HDMI3 Move Enter For 42/50PT350, 42/50PT350C, 50/60PV450, 50/60PV450C, 42/50PT250U, 50/60PV550U USB Photo List Music List Movie List DivX Reg. Select a...
... manual. Return to TV viewing. Except 42/50PT250U, 50/60PV550U CHANNEL Auto Tuning Manual Tuning Channel Edit Move Enter PICTURE Move Aspect Ratio : 16:9 Picture Wizard Energy Saving : Off Picture Mode : Standard • Contrast 90 • Brightness 50 • Sharpness 60 • Color 60 •...French Downloadable Rating Input Block (Depending on model) INPUT TV AV1 AV2 Component1 Component2 RGB-PC HDMI1 HDMI2 HDMI3 Move Enter For 42/50PT350, 42/50PT350C, 50/60PV450, 50/60PV450C, 42/50PT250U, 50/60PV550U USB Photo List Music List Movie List DivX Reg. Select a...
Owner's Manual
Page 39
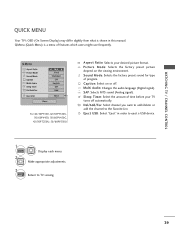
...Q.MENU 2 Display each menu. Caption: Select on the viewing environment. Eject USB: Select "Eject" in this manual. P i c t u r e M o d e: Selects the factory preset picture depend on or off automatically. WATCHING TV / CHANNEL CONTROL QUICK MENU Your TV's OSD (On Screen Display) may differ slightly from what is a menu of... Caption Multi Audio Sleep Timer CH Del/Add/Fav F 16:9 G Vivid Standard Off English Off Add Eject USB Eject Close For 42/50PT350, 42/50PT350C, 50/60PV450, 50/60PV450C, 42/50PT250U, 50/60PV550U Aspect Ratio: Selects your TV turns off . SAP: Selects MTS sound...
...Q.MENU 2 Display each menu. Caption: Select on the viewing environment. Eject USB: Select "Eject" in this manual. P i c t u r e M o d e: Selects the factory preset picture depend on or off automatically. WATCHING TV / CHANNEL CONTROL QUICK MENU Your TV's OSD (On Screen Display) may differ slightly from what is a menu of... Caption Multi Audio Sleep Timer CH Del/Add/Fav F 16:9 G Vivid Standard Off English Off Add Eject USB Eject Close For 42/50PT350, 42/50PT350C, 50/60PV450, 50/60PV450C, 42/50PT250U, 50/60PV550U Aspect Ratio: Selects your TV turns off . SAP: Selects MTS sound...
Owner's Manual
Page 44
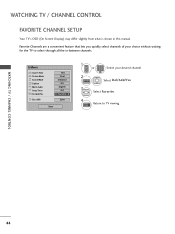
... SETUP Your TV's OSD (On Screen Display) may differ slightly from what is shown in -between channels. WATCHING TV / CHANNEL CONTROL 44 Q.Menu Aspect Ratio Picture Mode Sound Mode Caption Multi Audio Sleep Timer CH Del/Add/Fav Eject USB 16:9 Vivid Standard Off English Off F Favorite G Eject Close 1 or P CH...
... SETUP Your TV's OSD (On Screen Display) may differ slightly from what is shown in -between channels. WATCHING TV / CHANNEL CONTROL 44 Q.Menu Aspect Ratio Picture Mode Sound Mode Caption Multi Audio Sleep Timer CH Del/Add/Fav Eject USB 16:9 Vivid Standard Off English Off F Favorite G Eject Close 1 or P CH...

Owner's Manual
Page 49
... settings. Sound Mode" respectively. s G a m e: Optimizes video and audio for watching sports events. s Sport: Optimizes video and audio for playing games. Picture Mode" and "AUDIO menu - s When in Game Mode, functions related to select the desired source. 2 ENTER s If you select "O f f" in ... Game Cinema Sport WATCHING TV / CHANNEL CONTROL 1AV MODE Press the AV MODE button repeatedly to picture quality will be optimized for watching movies. s If you select "Cinema" in AV mode, the "Picture Mode" and "Sound Mode" return to use the Game Mode. s O f f: Disables the...
... settings. Sound Mode" respectively. s G a m e: Optimizes video and audio for watching sports events. s Sport: Optimizes video and audio for playing games. Picture Mode" and "AUDIO menu - s When in Game Mode, functions related to select the desired source. 2 ENTER s If you select "O f f" in ... Game Cinema Sport WATCHING TV / CHANNEL CONTROL 1AV MODE Press the AV MODE button repeatedly to picture quality will be optimized for watching movies. s If you select "Cinema" in AV mode, the "Picture Mode" and "Sound Mode" return to use the Game Mode. s O f f: Disables the...
Owner's Manual
Page 58
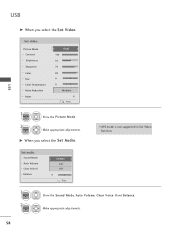
G When you select the Set Video. USB USB G When you select the Set Audio. Set video. Make appropriate adjustments. Sound Mode Auto Volume Clear Voice ll Balance Cinema Off Off 0 L R Prev. 1 ENTER 2 ENTER Show the Sound Mode, Auto Volume, Clear Voice II and Balance. Make appropriate adjustments. 58 Set audio. Picture Mode Contrast Brightness Sharpness Color Tint Color Temperature Noise Reduction Reset Vivid 100 50 70 80 0 W C 0 W C Medium Prev. 1 ENTER 2 ENTER Show the Picture Mode. I APS mode is not supported in Set Video function.
G When you select the Set Video. USB USB G When you select the Set Audio. Set video. Make appropriate adjustments. Sound Mode Auto Volume Clear Voice ll Balance Cinema Off Off 0 L R Prev. 1 ENTER 2 ENTER Show the Sound Mode, Auto Volume, Clear Voice II and Balance. Make appropriate adjustments. 58 Set audio. Picture Mode Contrast Brightness Sharpness Color Tint Color Temperature Noise Reduction Reset Vivid 100 50 70 80 0 W C 0 W C Medium Prev. 1 ENTER 2 ENTER Show the Picture Mode. I APS mode is not supported in Set Video function.
Owner's Manual
Page 66
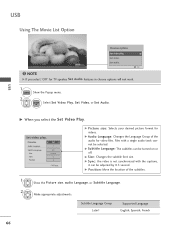
... Prev. G Sync: the video is not synchronized with a single audio track cannot be selected. Set video play . G Picture size: Selects your desired picture format for video files. G Size: Changes the subtitle font size. Subtitle Language Group Latin1 Supported Language English, Spanish, French ...66 G Subtitle Language: The subtitles can be turned on or off. Picture Size Audio Language F Full G 1 Subtitle Language . Files with the captions, it can be adjusted by 0.5 second. Exit !...
... Prev. G Sync: the video is not synchronized with a single audio track cannot be selected. Set video play . G Picture size: Selects your desired picture format for video files. G Size: Changes the subtitle font size. Subtitle Language Group Latin1 Supported Language English, Spanish, French ...66 G Subtitle Language: The subtitles can be turned on or off. Picture Size Audio Language F Full G 1 Subtitle Language . Files with the captions, it can be adjusted by 0.5 second. Exit !...
Owner's Manual
Page 67
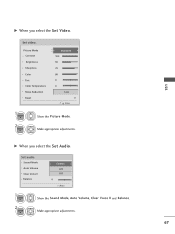
USB G When you select the Set Video. Make appropriate adjustments. Set video. Sound Mode Auto Volume Clear Voice ll Balance Cinema Off Off 0 L R Prev. 1 ENTER Show the Sound Mode, Auto Volume, Clear Voice II and Balance. 2 ENTER Make appropriate adjustments. 67 G When you select the Set Audio. Picture Mode Contrast Brightness Sharpness Color Tint Color Temperature Noise Reduction Reset Standard 100 50 70 80 0 W C 0 W C Low Prev. 1 ENTER 2 ENTER Show the Picture Mode. Set audio.
USB G When you select the Set Video. Make appropriate adjustments. Set video. Sound Mode Auto Volume Clear Voice ll Balance Cinema Off Off 0 L R Prev. 1 ENTER Show the Sound Mode, Auto Volume, Clear Voice II and Balance. 2 ENTER Make appropriate adjustments. 67 G When you select the Set Audio. Picture Mode Contrast Brightness Sharpness Color Tint Color Temperature Noise Reduction Reset Standard 100 50 70 80 0 W C 0 W C Low Prev. 1 ENTER 2 ENTER Show the Picture Mode. Set audio.


