
User Manual
Page 4
... 33 On-Screen Menus Selection and Adjustment . . 34 Auto Programme Tuning 35 Manual Programme Tuning (In Digital Mode) . . 36 Manual Programme Tuning (In Analogue Mode) . . 37 Programme Edit 39 Software Update 42 Diagnostics 43 CI[COMMON INTERFACE] INFORMATION . . . 44 Selecting the Programme Table... 45 Input List 46 47 Data Service 49 Input Label 49 AV Mode 50 Simple manual 51 Initializing (Reset to original factory settings) . .52...
... 33 On-Screen Menus Selection and Adjustment . . 34 Auto Programme Tuning 35 Manual Programme Tuning (In Digital Mode) . . 36 Manual Programme Tuning (In Analogue Mode) . . 37 Programme Edit 39 Software Update 42 Diagnostics 43 CI[COMMON INTERFACE] INFORMATION . . . 44 Selecting the Programme Table... 45 Input List 46 47 Data Service 49 Input Label 49 AV Mode 50 Simple manual 51 Initializing (Reset to original factory settings) . .52...
User Manual
Page 13
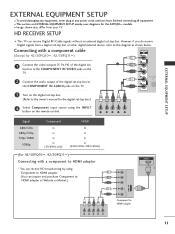
.../576p 720p/1080i 1080p Component O O O O (50/60Hz only) HDMI X O O O (24Hz/30Hz/50Hz/60Hz) (For 42/50PQ10**, 42/50PQ11**) HDMI IN Connecting with a component cable (Except for 42/50PQ10**, 42/50PQ11**) 1 Connect the video outputs (Y, PB, PR) of the digital set 1 top box to the COMPONENT IN VIDEO jacks on...an external digital set-top box. HD RECEIVER SETUP I Image shown may differ from a digital set -top box. (Refer to the owner's manual for the 42PQ30** models. Connecting with a component to HDMI adapter * You can receive HD broadcasting by using the INPUT button on the remote ...
.../576p 720p/1080i 1080p Component O O O O (50/60Hz only) HDMI X O O O (24Hz/30Hz/50Hz/60Hz) (For 42/50PQ10**, 42/50PQ11**) HDMI IN Connecting with a component cable (Except for 42/50PQ10**, 42/50PQ11**) 1 Connect the video outputs (Y, PB, PR) of the digital set 1 top box to the COMPONENT IN VIDEO jacks on...an external digital set-top box. HD RECEIVER SETUP I Image shown may differ from a digital set -top box. (Refer to the owner's manual for the 42PQ30** models. Connecting with a component to HDMI adapter * You can receive HD broadcasting by using the INPUT button on the remote ...
User Manual
Page 14
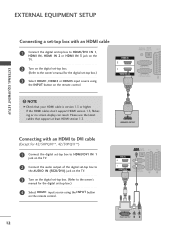
... jack on the TV. 2 Turn on the digital set-top box. (Refer to the owner's manual for the digital set -top box.) 4 Select HDMI1 input source using the INPUT button on the ... EXTERNAL EQUIPMENT SETUP Connecting a set-top box with an HDMI to DVI cable (Except for 42/50PQ10**, 42/50PQ11**) 1 Connect the digital set-top box to HDMI/DVI IN 1 jack on the ...TV. 2 Connect the audio output of the digital set-top box to the AUDIO IN (RGB/DVI) jack on the TV. 3 Turn on the digital set-top box. (Refer to the owner's manual...
... jack on the TV. 2 Turn on the digital set-top box. (Refer to the owner's manual for the digital set -top box.) 4 Select HDMI1 input source using the INPUT button on the ... EXTERNAL EQUIPMENT SETUP Connecting a set-top box with an HDMI to DVI cable (Except for 42/50PQ10**, 42/50PQ11**) 1 Connect the digital set-top box to HDMI/DVI IN 1 jack on the ...TV. 2 Connect the audio output of the digital set-top box to the AUDIO IN (RGB/DVI) jack on the TV. 3 Turn on the digital set-top box. (Refer to the owner's manual...

User Manual
Page 15
tions. 1 2 Component Input ports To achieve better picture quality, connect a DVD player to the DVD player's manual for operating instruc- Component ports on the TV Y PB PR Video output ports on the remote control. 5 Refer to the component input ports as shown ...below. EXTERNAL EQUIPMENT SETUP DVD SETUP Connecting with a component cable (Except for 42/50PQ10**, 42/50PQ11**) 1 Connect the video outputs (Y, PB, PR) of the DVD to the COMPONENT IN VIDEO jacks on the TV. 2 Connect the audio outputs of...
tions. 1 2 Component Input ports To achieve better picture quality, connect a DVD player to the DVD player's manual for operating instruc- Component ports on the TV Y PB PR Video output ports on the remote control. 5 Refer to the component input ports as shown ...below. EXTERNAL EQUIPMENT SETUP DVD SETUP Connecting with a component cable (Except for 42/50PQ10**, 42/50PQ11**) 1 Connect the video outputs (Y, PB, PR) of the DVD to the COMPONENT IN VIDEO jacks on the TV. 2 Connect the audio outputs of...

User Manual
Page 16
.../ VIDEO (R) AUDIO (L) Input Scart Video Audio RGB AV1 O O O Output Video, Audio ATV only AV2 O O X ATV, DTV, AV1/2/3 output is converted to the DVD player's manual for 42/50PQ10**, 42/50PQ11**. NOTE G Any Euro scart cable used must be signal shielded. 14 AV IN 3 EXTERNAL EQUIPMENT SETUP EXTERNAL EQUIPMENT SETUP Connecting with a Euro Scart...
.../ VIDEO (R) AUDIO (L) Input Scart Video Audio RGB AV1 O O O Output Video, Audio ATV only AV2 O O X ATV, DTV, AV1/2/3 output is converted to the DVD player's manual for 42/50PQ10**, 42/50PQ11**. NOTE G Any Euro scart cable used must be signal shielded. 14 AV IN 3 EXTERNAL EQUIPMENT SETUP EXTERNAL EQUIPMENT SETUP Connecting with a Euro Scart...

User Manual
Page 17
... 3 jack on the TV. 2 Select HDMI1, HDMI2 or HDMI3 input source using the INPUT button on the remote control. 5 Refer to the DVD player's manual for 42/50PQ10**, 42/50PQ11**) 1 Connect the S-VIDEO output of the DVD to the S VIDEO input on the TV. 2 Connect the audio outputs of the DVD to the...
... 3 jack on the TV. 2 Select HDMI1, HDMI2 or HDMI3 input source using the INPUT button on the remote control. 5 Refer to the DVD player's manual for 42/50PQ10**, 42/50PQ11**) 1 Connect the S-VIDEO output of the DVD to the S VIDEO input on the TV. 2 Connect the audio outputs of the DVD to the...

User Manual
Page 19
... TV AV1 (TV Out) X O AV2 (Monitor Out) O O AV2 (When DTV scheduled recording is available. G AV3, Component, RGB : Except for 42/50PQ10**, 42/50PQ11**. ! EXTERNAL EQUIPMENT SETUP Connecting with a Euro Scart cable 1 Connect the Euro scart socket of the VCR to the A V 1 Euro scart socket on... the TV. 2 Insert a video tape into the VCR and press PLAY on the VCR. (Refer to the VCR owner's manual.) 3 Select AV1 input source...
... TV AV1 (TV Out) X O AV2 (Monitor Out) O O AV2 (When DTV scheduled recording is available. G AV3, Component, RGB : Except for 42/50PQ10**, 42/50PQ11**. ! EXTERNAL EQUIPMENT SETUP Connecting with a Euro Scart cable 1 Connect the Euro scart socket of the VCR to the A V 1 Euro scart socket on... the TV. 2 Insert a video tape into the VCR and press PLAY on the VCR. (Refer to the VCR owner's manual.) 3 Select AV1 input source...

User Manual
Page 20
...AUDIO L/MONO jack of the TV. 1 S-VIDEO VIDEO L R ANT IN OUTPUT SWITCH ANT OUT EXTERNAL EQUIPMENT SETUP Connecting with a S-Video cable (Except for 42/50PQ10**, 42/50PQ11**) 1 Connect the AUDIO/VIDEO jacks between TV and VCR. AV IN 3 ! Match the jack colours (Video = yellow, Audio Left = white, and... Audio Right = red) 2 Insert a video tape into the VCR and press PLAY on the VCR. (Refer to the VCR owner's manual.) 4 Select AV3 input ...
...AUDIO L/MONO jack of the TV. 1 S-VIDEO VIDEO L R ANT IN OUTPUT SWITCH ANT OUT EXTERNAL EQUIPMENT SETUP Connecting with a S-Video cable (Except for 42/50PQ10**, 42/50PQ11**) 1 Connect the AUDIO/VIDEO jacks between TV and VCR. AV IN 3 ! Match the jack colours (Video = yellow, Audio Left = white, and... Audio Right = red) 2 Insert a video tape into the VCR and press PLAY on the VCR. (Refer to the VCR owner's manual.) 4 Select AV3 input ...
User Manual
Page 35
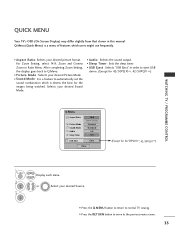
...device. (Except for 42/50PQ10**, 42/50PQ11**) Q.Menu Aspect Ratio Picture Mode Sound Mode Audio Sleep Timer 16:9 Zoom Setting Standard Standard L+R Off USB Eject Eject Close (Except for the images being watched. For Zoom Setting, select 14:9, Zoom and Cinema Zoom in this manual. MENU 2 OK ...• Picture Mode : Selects your desired Picture Mode. • Sound Mode : It is a menu of features which it deems the best for 42/50PQ10**, 42/50PQ11**) 1 Q. Selects your desired Source. • Press the Q.MENU button to return to normal TV viewing. • Press the RETURN button ...
...device. (Except for 42/50PQ10**, 42/50PQ11**) Q.Menu Aspect Ratio Picture Mode Sound Mode Audio Sleep Timer 16:9 Zoom Setting Standard Standard L+R Off USB Eject Eject Close (Except for the images being watched. For Zoom Setting, select 14:9, Zoom and Cinema Zoom in this manual. MENU 2 OK ...• Picture Mode : Selects your desired Picture Mode. • Sound Mode : It is a menu of features which it deems the best for 42/50PQ10**, 42/50PQ11**) 1 Q. Selects your desired Source. • Press the Q.MENU button to return to normal TV viewing. • Press the RETURN button ...
User Manual
Page 36
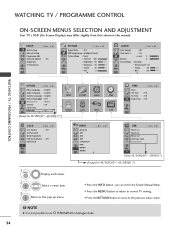
... Hearing( ) : Off Data Service : MHEG Country : UK Input Label SIMPLINK : On E (Except for 42/50PQ10**, 42/50PQ11**) • Press the INFO button, you can check the Simple Manual Menu. • Press the MENU button to return to normal TV viewing. • Press the RETURN button ...Off : Off 1 MENU Display each menu. 2 OK Select a menu item. 3 OK Move to the previous menu screen. ! SETUP Auto Tuning Manual Tuning Programme Edit Software Update Diagnostics CI Information Move OK : On PICTURE Move Aspect Ratio : 16:9 Energy Saving : Intelligent Sensor Picture Mode : Vivid...
... Hearing( ) : Off Data Service : MHEG Country : UK Input Label SIMPLINK : On E (Except for 42/50PQ10**, 42/50PQ11**) • Press the INFO button, you can check the Simple Manual Menu. • Press the MENU button to return to normal TV viewing. • Press the RETURN button ...Off : Off 1 MENU Display each menu. 2 OK Select a menu item. 3 OK Move to the previous menu screen. ! SETUP Auto Tuning Manual Tuning Programme Edit Software Update Diagnostics CI Information Move OK : On PICTURE Move Aspect Ratio : 16:9 Energy Saving : Intelligent Sensor Picture Mode : Vivid...

User Manual
Page 44
... Programme Edit Software Update Diagnostics CI Information Move OK : : OOnn SETUP Auto Tuning Manual Tuning Programme Edit Software Update Diagnostics CI Information Move OK O::fOOfnn OOnn WATCHING TV / PROGRAMME CONTROL 1 MENU 2 OK Select SETUP. Select Software Update. 3 OK 4 ... turned on the TV will result in Diagnostics menu. • It may take an hour to download now? firm message box will be disconnected. 42 • After Software Update, you will be downloaded through the digital terrestrial broadcasting system. Yes No When the power is updated at the time below...
... Programme Edit Software Update Diagnostics CI Information Move OK : : OOnn SETUP Auto Tuning Manual Tuning Programme Edit Software Update Diagnostics CI Information Move OK O::fOOfnn OOnn WATCHING TV / PROGRAMME CONTROL 1 MENU 2 OK Select SETUP. Select Software Update. 3 OK 4 ... turned on the TV will result in Diagnostics menu. • It may take an hour to download now? firm message box will be disconnected. 42 • After Software Update, you will be downloaded through the digital terrestrial broadcasting system. Yes No When the power is updated at the time below...

