
User Manual
Page 4
... (In Analogue Mode) . . 37 Programme Edit 39 Software Update 42 Diagnostics 43 CI[COMMON INTERFACE] INFORMATION . . . 44 Selecting the Programme Table 45 Input List 46 47 Data Service 49 Input Label 49 AV Mode 50 Simple manual 51 Initializing (Reset to original factory settings) . .52 TO USE A USB DEVICE When connecting a USB...
... (In Analogue Mode) . . 37 Programme Edit 39 Software Update 42 Diagnostics 43 CI[COMMON INTERFACE] INFORMATION . . . 44 Selecting the Programme Table 45 Input List 46 47 Data Service 49 Input Label 49 AV Mode 50 Simple manual 51 Initializing (Reset to original factory settings) . .52 TO USE A USB DEVICE When connecting a USB...
User Manual
Page 5
... Auto On/ Off Timer Setting 98 Sleep Timer Setting 99 PARENTAL CONTROL /34 RATINGS Set Password & Lock System 100 Block Programme 101 Parental Control 102 Input Block 103 Key Lock 104 TELETEXT Switch on/off 105 SIMPLE Text 105 TOP Text 105 FASTEXT 106 Special Teletext Functions 106 DIGITAL TELETEXT Teletext...
... Auto On/ Off Timer Setting 98 Sleep Timer Setting 99 PARENTAL CONTROL /34 RATINGS Set Password & Lock System 100 Block Programme 101 Parental Control 102 Input Block 103 Key Lock 104 TELETEXT Switch on/off 105 SIMPLE Text 105 TOP Text 105 FASTEXT 106 Special Teletext Functions 106 DIGITAL TELETEXT Teletext...

User Manual
Page 6
... switched on . Illuminates blue when the TV is switched on . POWER POWER INPUT MENU OK P INPUT INPUT MENU OK MENU OK VOLUME PROGRAMME P POWER 4 INPUT MENU OK INPUT MENU OK INPUT MENU OK INPUT MENU OK P VOLUME P P POWER PROGRAMME POWER 42/50PQ10**, 42/50PQ20**, 50PS20** INPUT MENU OK P Intelligent Sensor (Except for 42/50PQ10**) Adjusts picture according to...
... switched on . Illuminates blue when the TV is switched on . POWER POWER INPUT MENU OK P INPUT INPUT MENU OK MENU OK VOLUME PROGRAMME P POWER 4 INPUT MENU OK INPUT MENU OK INPUT MENU OK INPUT MENU OK P VOLUME P P POWER PROGRAMME POWER 42/50PQ10**, 42/50PQ20**, 50PS20** INPUT MENU OK P Intelligent Sensor (Except for 42/50PQ10**) Adjusts picture according to...

User Manual
Page 7
INPUT MENU OK INPUT MENU OK INPUT MENU INPUT - UT MENU OK 60PS40** P POWER OK MENU INPUT VOLUME OK MENU INPUT POWER Remote Control Sensor POWER Power/Standby Indicator • illuminates red in standby mode. • The LED is switched on . OK MENU + - + OK - + PP VOLUME P ...
INPUT MENU OK INPUT MENU OK INPUT MENU INPUT - UT MENU OK 60PS40** P POWER OK MENU INPUT VOLUME OK MENU INPUT POWER Remote Control Sensor POWER Power/Standby Indicator • illuminates red in standby mode. • The LED is switched on . OK MENU + - + OK - + PP VOLUME P ...

User Manual
Page 8
... on an AC power. Never attempt to operate the TV on a PC. Use an Optical audio cable. 3 Euro Scart Socket (AV1/AV2) Connect scart socket input or output from your TV. 42/50PQ10**, 42/50PQ11** USB IN SERVICE ONLY PREPARATION USB IN SERVICE ONLY 1 7 2 3 USB IN SERVICE ONLY 8 HDMI ...is not available in all countries.) 8 SERVICE ONLY PORT 6 PREPARATION BACK PANEL INFORMATION A Image shown may differ from an external device to these jacks. 4 HDMI Input Connect an HDMI signal to HDMI IN. 6 5 RS-232C IN (CONTROL & SERVICE) PORT Connect to the RS-232C port on DC power. 2 OPTICAL ...
... on an AC power. Never attempt to operate the TV on a PC. Use an Optical audio cable. 3 Euro Scart Socket (AV1/AV2) Connect scart socket input or output from your TV. 42/50PQ10**, 42/50PQ11** USB IN SERVICE ONLY PREPARATION USB IN SERVICE ONLY 1 7 2 3 USB IN SERVICE ONLY 8 HDMI ...is not available in all countries.) 8 SERVICE ONLY PORT 6 PREPARATION BACK PANEL INFORMATION A Image shown may differ from an external device to these jacks. 4 HDMI Input Connect an HDMI signal to HDMI IN. 6 5 RS-232C IN (CONTROL & SERVICE) PORT Connect to the RS-232C port on DC power. 2 OPTICAL ...

User Manual
Page 9
... Memory Card International Association) Card Slot Insert the CI Module to PCMCIA CARD SLOT. (This feature is not available in all countries.) 11 USB Input Connect USB storage device to this jack. Use an Optical audio cable. 4 Euro Scart Socket (AV1/AV2) Connect scart socket... input or output from a PC. S-Video Input Connect S-Video out from a PC or DTV. 7 RS-232C IN (CONTROL & SERVICE) PORT Connect to various types of equipment. VIDEO L/MONO AUDIO R S-VIDEO HDMI IN 3 R...
... Memory Card International Association) Card Slot Insert the CI Module to PCMCIA CARD SLOT. (This feature is not available in all countries.) 11 USB Input Connect USB storage device to this jack. Use an Optical audio cable. 4 Euro Scart Socket (AV1/AV2) Connect scart socket... input or output from a PC. S-Video Input Connect S-Video out from a PC or DTV. 7 RS-232C IN (CONTROL & SERVICE) PORT Connect to various types of equipment. VIDEO L/MONO AUDIO R S-VIDEO HDMI IN 3 R...
User Manual
Page 13
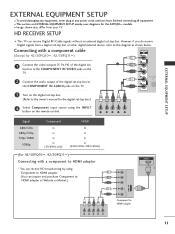
... SETUP I This TV can receive Digital RF/Cable signals without an external digital set -top box.) 4 Select Component input source using Component to HDMI adapter. (You can receive HD broadcasting by using the INPUT button on EXTERNAL EQUIPMENT SETUP mainly uses diagrams for the 42PQ30** models. HD RECEIVER SETUP I To avoid damaging...
... SETUP I This TV can receive Digital RF/Cable signals without an external digital set -top box.) 4 Select Component input source using Component to HDMI adapter. (You can receive HD broadcasting by using the INPUT button on EXTERNAL EQUIPMENT SETUP mainly uses diagrams for the 42PQ30** models. HD RECEIVER SETUP I To avoid damaging...
User Manual
Page 14
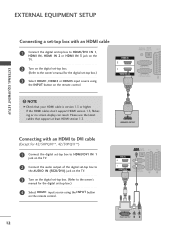
... on the TV. 2 Turn on the digital set-top box. (Refer to the owner's manual for the digital set -top box.) 4 Select HDMI1 input source using the INPUT button on the remote control. NOTE G Check that support at least HDMI version 1.3. EXTERNAL EQUIPMENT SETUP EXTERNAL EQUIPMENT SETUP Connecting a set-top box with... the TV. 3 Turn on the digital set-top box. (Refer to the owner's manual for the digital set -top box.) 3 Select HDMI1, HDMI2 or HDMI3 input source using the INPUT button on the remote control. HDMI IN 2 1 HDMI/DVI IN 1 !
... on the TV. 2 Turn on the digital set-top box. (Refer to the owner's manual for the digital set -top box.) 4 Select HDMI1 input source using the INPUT button on the remote control. NOTE G Check that support at least HDMI version 1.3. EXTERNAL EQUIPMENT SETUP EXTERNAL EQUIPMENT SETUP Connecting a set-top box with... the TV. 3 Turn on the digital set-top box. (Refer to the owner's manual for the digital set -top box.) 3 Select HDMI1, HDMI2 or HDMI3 input source using the INPUT button on the remote control. HDMI IN 2 1 HDMI/DVI IN 1 !

User Manual
Page 15
Component ports on the TV Y PB PR Video output ports on the remote control. 5 Refer to the component input ports as shown below. tions. 1 2 Component Input ports To achieve better picture quality, connect a DVD player to the DVD player's manual for 42/50PQ10**, 42/50PQ11**) 1 Connect the video... outputs of the DVD to the COMPONENT IN AUDIO jacks on the TV. 3 Turn on the DVD player, insert a DVD. 4 Select Component input source using the INPUT button on DVD player Y PB PR Y B-Y R-Y Y Cb Cr Y Pb Pr 13 EXTERNAL EQUIPMENT SETUP DVD SETUP Connecting with a component cable...
Component ports on the TV Y PB PR Video output ports on the remote control. 5 Refer to the component input ports as shown below. tions. 1 2 Component Input ports To achieve better picture quality, connect a DVD player to the DVD player's manual for 42/50PQ10**, 42/50PQ11**) 1 Connect the video... outputs of the DVD to the COMPONENT IN AUDIO jacks on the TV. 3 Turn on the DVD player, insert a DVD. 4 Select Component input source using the INPUT button on DVD player Y PB PR Y B-Y R-Y Y Cb Cr Y Pb Pr 13 EXTERNAL EQUIPMENT SETUP DVD SETUP Connecting with a component cable...

User Manual
Page 16
... Out) X O AV2 (Monitor Out) O O AV2 (When DTV scheduled recording is in progress using the INPUT button on the remote control. Monitor Out: Outputs the current screen image. AUDIO/ VIDEO (R) AUDIO (L) Input Scart Video Audio RGB AV1 O O O Output Video, Audio ATV only AV2 O O X ATV, DTV,... is converted to the A V 1 Euro scart socket on the TV. 2 Turn on the DVD player, insert a DVD. 3 Select AV1 input source using recording equipment.) O O (The input mode is available. NOTE G Any Euro scart cable used must be signal shielded. 14 AV IN 3 VIDEO L/MONO AUDIO R S-VIDEO HDMI IN...
... Out) X O AV2 (Monitor Out) O O AV2 (When DTV scheduled recording is in progress using the INPUT button on the remote control. Monitor Out: Outputs the current screen image. AUDIO/ VIDEO (R) AUDIO (L) Input Scart Video Audio RGB AV1 O O O Output Video, Audio ATV only AV2 O O X ATV, DTV,... is converted to the A V 1 Euro scart socket on the TV. 2 Turn on the DVD player, insert a DVD. 3 Select AV1 input source using recording equipment.) O O (The input mode is available. NOTE G Any Euro scart cable used must be signal shielded. 14 AV IN 3 VIDEO L/MONO AUDIO R S-VIDEO HDMI IN...

User Manual
Page 17
...that your HDMI cable is version 1.3 or higher. AV IN 3 Connecting the HDMI cable 1 Connect the HDMI output of the DVD to the AUDIO input jacks on the TV. 3 Turn on the DVD player, insert a DVD. VIDEO S-VIDEO L R ANT IN OUTPUT SWITCH 1 ANT OUT 2 ...VIDEO L/MONO AUDIO R S-VIDEO HDMI IN 3 4 Select AV3 input source using a HDMI cable. G Check that support at least HDMI version 1.3. 15 tions. EXTERNAL EQUIPMENT SETUP Connecting with a S-Video cable (Except for 42/50PQ10...
...that your HDMI cable is version 1.3 or higher. AV IN 3 Connecting the HDMI cable 1 Connect the HDMI output of the DVD to the AUDIO input jacks on the TV. 3 Turn on the DVD player, insert a DVD. VIDEO S-VIDEO L R ANT IN OUTPUT SWITCH 1 ANT OUT 2 ...VIDEO L/MONO AUDIO R S-VIDEO HDMI IN 3 4 Select AV3 input source using a HDMI cable. G Check that support at least HDMI version 1.3. 15 tions. EXTERNAL EQUIPMENT SETUP Connecting with a S-Video cable (Except for 42/50PQ10...

User Manual
Page 19
.../RGB/HDMI O X O G TV Out : Outputs analog TV video signals. Monitor Out: Outputs the current screen image. Output Type Current input mode Digital TV Analogue TV AV1 (TV Out) X O AV2 (Monitor Out) O O AV2 (When DTV scheduled recording is in progress using the... INPUT button on the VCR. (Refer to the VCR owner's manual.) 3 Select AV1 input source using recording equipment.) O O (The input mode is converted to AV2 Euro scart socket, select AV2 input source. 1 AUDIO/ VIDEO (R) AUDIO (L) Input Scart Video Audio RGB AV1 O O O...
.../RGB/HDMI O X O G TV Out : Outputs analog TV video signals. Monitor Out: Outputs the current screen image. Output Type Current input mode Digital TV Analogue TV AV1 (TV Out) X O AV2 (Monitor Out) O O AV2 (When DTV scheduled recording is in progress using the... INPUT button on the VCR. (Refer to the VCR owner's manual.) 3 Select AV1 input source using recording equipment.) O O (The input mode is converted to AV2 Euro scart socket, select AV2 input source. 1 AUDIO/ VIDEO (R) AUDIO (L) Input Scart Video Audio RGB AV1 O O O...

User Manual
Page 20
... IN OUTPUT SWITCH ANT OUT 1 2 The picture quality is improved; EXTERNAL EQUIPMENT SETUP VIDEO L/MONO AUDIO R S-VIDEO HDMI IN 3 Connecting with using the INPUT button on the remote control. ! NOTE G If both S-VIDEO and VIDEO sockets have a mono VCR, connect the audio cable from the VCR to the...42/50PQ11**) 1 Connect the AUDIO/VIDEO jacks between TV and VCR. AV IN 3 ! NOTE G If you have been connected to normal composite (RCA cable) input. Match the jack colours (Video = yellow, Audio Left = white, and Audio Right = red) 2 Insert a video tape into the VCR and press PLAY...
... IN OUTPUT SWITCH ANT OUT 1 2 The picture quality is improved; EXTERNAL EQUIPMENT SETUP VIDEO L/MONO AUDIO R S-VIDEO HDMI IN 3 Connecting with using the INPUT button on the remote control. ! NOTE G If both S-VIDEO and VIDEO sockets have a mono VCR, connect the audio cable from the VCR to the...42/50PQ11**) 1 Connect the AUDIO/VIDEO jacks between TV and VCR. AV IN 3 ! NOTE G If you have been connected to normal composite (RCA cable) input. Match the jack colours (Video = yellow, Audio Left = white, and Audio Right = red) 2 Insert a video tape into the VCR and press PLAY...

User Manual
Page 21
... IN instruction manual for all countries. 1 1 Insert the CI Module to external audio equipment via the Digital Audio Output (Optical) port. IN tal audio (Optical) input on the back of TV to a DVD Home Theater (or amp). 1 Connect one end of an optical cable to the TV Digital Audio (Optical) Output...
... IN instruction manual for all countries. 1 1 Insert the CI Module to external audio equipment via the Digital Audio Output (Optical) port. IN tal audio (Optical) input on the back of TV to a DVD Home Theater (or amp). 1 Connect one end of an optical cable to the TV Digital Audio (Optical) Output...

User Manual
Page 22
... L/MONO AUDIO R S-VIDEO HDMI IN 3 20 AV IN 3 Match the jack colours. (Video = yellow, Audio Left = white, and Audio Right = red) 2 Select AV3 input source using the INPUT button on the side of TV. EXTERNAL EQUIPMENT SETUP EXTERNAL EQUIPMENT SETUP OTHER A/V SOURCE SETUP (Except for 42/50PQ10**, 42/50PQ11**) 1 Connect the USB...
... L/MONO AUDIO R S-VIDEO HDMI IN 3 20 AV IN 3 Match the jack colours. (Video = yellow, Audio Left = white, and Audio Right = red) 2 Select AV3 input source using the INPUT button on the side of TV. EXTERNAL EQUIPMENT SETUP EXTERNAL EQUIPMENT SETUP OTHER A/V SOURCE SETUP (Except for 42/50PQ10**, 42/50PQ11**) 1 Connect the USB...

User Manual
Page 23
.... 2 Connect the PC audio output to the AUDIO IN (RGB/DVI) jack on the TV. 3 Turn on the PC and the TV 4 Select R G B input source using the INPUT button on the remote control. HDMI IN 2 1 HDMI/DVI IN 2 1 Connecting with a D-sub 15 pin cable 1 Connect the RGB output of the PC to..., meaning that the PC adjusts automatically to the AUDIO IN (RGB/DVI) jack on the TV. 3 Turn on the PC and the TV. 4 Select HDMI1 input source using the INPUT button on the remote control.
.... 2 Connect the PC audio output to the AUDIO IN (RGB/DVI) jack on the TV. 3 Turn on the PC and the TV 4 Select R G B input source using the INPUT button on the remote control. HDMI IN 2 1 HDMI/DVI IN 2 1 Connecting with a D-sub 15 pin cable 1 Connect the RGB output of the PC to..., meaning that the PC adjusts automatically to the AUDIO IN (RGB/DVI) jack on the TV. 3 Turn on the PC and the TV. 4 Select HDMI1 input source using the INPUT button on the remote control.

User Manual
Page 25
..., set the TV to either RGB or HDMI IN (or HDMI/DVI IN) to resolution, vertical pattern, contrast or brightness in PC mode. G The synchronization input waveform for Horizontal and Vertical frequencies are not included with the TV). G If using under 5m of the PC graphic card can not be interference... are separate. G Connect the signal cable from the monitor output port of the PC to the RGB (PC) port of the PC to the Audio input on the TV. EXTERNAL EQUIPMENT SETUP !
..., set the TV to either RGB or HDMI IN (or HDMI/DVI IN) to resolution, vertical pattern, contrast or brightness in PC mode. G The synchronization input waveform for Horizontal and Vertical frequencies are not included with the TV). G If using under 5m of the PC graphic card can not be interference... are separate. G Connect the signal cable from the monitor output port of the PC to the RGB (PC) port of the PC to the Audio input on the TV. EXTERNAL EQUIPMENT SETUP !

User Manual
Page 30
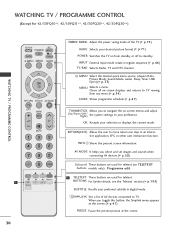
... details, see the 'Teletext' section.(G p.105) SUBTITLE Recalls your preference. Clears all on the TV. OK Accepts your selection or displays the current mode. INPUT External input mode rotate in a menu. AV MODE It helps you toggle this button, the Simplink menu appears at the remote control sensor on -screen displays and...
... details, see the 'Teletext' section.(G p.105) SUBTITLE Recalls your preference. Clears all on the TV. OK Accepts your selection or displays the current mode. INPUT External input mode rotate in a menu. AV MODE It helps you toggle this button, the Simplink menu appears at the remote control sensor on -screen displays and...
User Manual
Page 32
... further details, see the 'Teletext' section.(G p.105) SUBTITLE Recalls your preferred subtitle in regular sequence.(G p.46) TV/RAD Selects Radio, TV and DTV channel. INPUT External input mode rotate in digital mode. AV MODE It helps you to navigate the on TELETEXT buttons models only) , Programme edit. 1 TELETEXT These buttons are used...
... further details, see the 'Teletext' section.(G p.105) SUBTITLE Recalls your preferred subtitle in regular sequence.(G p.46) TV/RAD Selects Radio, TV and DTV channel. INPUT External input mode rotate in digital mode. AV MODE It helps you to navigate the on TELETEXT buttons models only) , Programme edit. 1 TELETEXT These buttons are used...

User Manual
Page 34
... be displayed again. button to the previous OSD. Set ID : On In standby mode to turn TV on, press the INPUT or P D E button on the TV or press the POWER, INPUT, P or NUMBER button on the remote control and the TV will switch on the TV, you will switch on the DTV... on, you can cancel this function by pressing the MUTE, + or -, AV Mode button. 32 Note: a. or NUMBER buttons to turn TV on, press the INPUT or P D E button on the TV or press the POWER but- The mode (Home Use, Store Demo) can be changed by us after turning on . You...
... be displayed again. button to the previous OSD. Set ID : On In standby mode to turn TV on, press the INPUT or P D E button on the TV or press the POWER, INPUT, P or NUMBER button on the remote control and the TV will switch on the TV, you will switch on the DTV... on, you can cancel this function by pressing the MUTE, + or -, AV Mode button. 32 Note: a. or NUMBER buttons to turn TV on, press the INPUT or P D E button on the TV or press the POWER but- The mode (Home Use, Store Demo) can be changed by us after turning on . You...


