
Specification (English)
Page 1
.... INVISIBLE SPEAKERS SYSTEM LG's 2008 line of TVs include a unique invisible speaker system, tuned by increasing the "sweet spot", giving a wider sound field. AV MODE LG HDTVs include 3 AV Modes, preset to 3x the panels actual refresh rate. AV Modes can be easily set with multi-channel, compact-disc-quality sound. The moving picture resolution give the impression of performance of up to optimize picture and sound settings based on the remote control...
.... INVISIBLE SPEAKERS SYSTEM LG's 2008 line of TVs include a unique invisible speaker system, tuned by increasing the "sweet spot", giving a wider sound field. AV MODE LG HDTVs include 3 AV Modes, preset to 3x the panels actual refresh rate. AV Modes can be easily set with multi-channel, compact-disc-quality sound. The moving picture resolution give the impression of performance of up to optimize picture and sound settings based on the remote control...

Specification (English)
Page 2
...8226; Enhanced Noise Reduction (Video Noise Filter) • (3D & MPEG) Color Temperature Control 4 Modes Black Stretcher (Black Level Enhancer) • 3:2 Pulldown • Picture Reset • AV Mode (Picture & Sound) 3 Modes Picture Selection Mode 7 Modes DTV Signal Strength Indicator • AUDIO Mono/Stereo/Dual (MTS/SAP) • Audio Outout Power (Watts - HDMI 60p/30p/24p - 42PG20 PLASMA HDTV 42" Class (41.5" diagonal) TECHNICAL SPECIFICATIONS PLASMA DISPLAY PANEL Native Display Resolution 1024 x 768p Brightness (cd...
...8226; Enhanced Noise Reduction (Video Noise Filter) • (3D & MPEG) Color Temperature Control 4 Modes Black Stretcher (Black Level Enhancer) • 3:2 Pulldown • Picture Reset • AV Mode (Picture & Sound) 3 Modes Picture Selection Mode 7 Modes DTV Signal Strength Indicator • AUDIO Mono/Stereo/Dual (MTS/SAP) • Audio Outout Power (Watts - HDMI 60p/30p/24p - 42PG20 PLASMA HDTV 42" Class (41.5" diagonal) TECHNICAL SPECIFICATIONS PLASMA DISPLAY PANEL Native Display Resolution 1024 x 768p Brightness (cd...
Owner's Manual (English)
Page 2
... moisture. Reorient or relocate the receiving antenna. - Increase the separation between the equipment and receiver. - Consult the dealer or an experienced radio/TV technician for compliance could void the user's authority to operate this product to persons. The code provides guidelines for a Class B digital device, pursuant to radio communications. The lightning flash with the instructions, may be determined by...
... moisture. Reorient or relocate the receiving antenna. - Increase the separation between the equipment and receiver. - Consult the dealer or an experienced radio/TV technician for compliance could void the user's authority to operate this product to persons. The code provides guidelines for a Class B digital device, pursuant to radio communications. The lightning flash with the instructions, may be determined by...
Owner's Manual (English)
Page 4
... the unit by connecting it , discontinue use a damaged or loose power cord. When mounting a TV on the wall, make the TV with an exact replacement part by the hanging power and signal cables on the power cord to install the TV by an authorized servicer. on shelves above the unit). 17 GROUNDING Ensure that appliance and has no additional outlets or branch circuits. Check the specification page of your...
... the unit by connecting it , discontinue use a damaged or loose power cord. When mounting a TV on the wall, make the TV with an exact replacement part by the hanging power and signal cables on the power cord to install the TV by an authorized servicer. on shelves above the unit). 17 GROUNDING Ensure that appliance and has no additional outlets or branch circuits. Check the specification page of your...
Owner's Manual (English)
Page 5
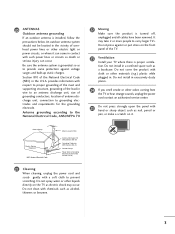
... water or other odors coming from the TV or hear strange sounds, unplug the power cord contact an authorized service center. 25 Do not press strongly upon the panel with a soft cloth to carry larger TVs. Do not install in the U.S.A. 20 ANTENNAS Outdoor antenna grounding If an outdoor antenna is proper ventilation. Antenna grounding according to the National Electrical Code, ANSI/NFPA 70...
... water or other odors coming from the TV or hear strange sounds, unplug the power cord contact an authorized service center. 25 Do not press strongly upon the panel with a soft cloth to carry larger TVs. Do not install in the U.S.A. 20 ANTENNAS Outdoor antenna grounding If an outdoor antenna is proper ventilation. Antenna grounding according to the National Electrical Code, ANSI/NFPA 70...
Owner's Manual (English)
Page 6
... 8 Back Panel Information 9 Stand Instruction 10 Cable Management 11 Desktop Pedestal Installation 12 Swivel Stand 12 VESA Wall Mounting 13 Securing the TV to the wall to prevent falling . . . . 14 Antenna or Cable Connection 15 EXTERNAL EQUIPMENT SETUP HD Receiver Setup 16 DVD Setup 19 VCR Setup 21 Other A/V Source Setup 23 Audio Out Connection 23 PC Setup 24 WATCHING TV / CHANNEL CONTROL Remote Control Functions 30 Turning On TV 32 Channel Selection 32 Volume Adjustment 32 Initial Setting 33 Quick Menu 34 On-Screen Menus Selection 35 Channel Setup - Black (Darkness...
... 8 Back Panel Information 9 Stand Instruction 10 Cable Management 11 Desktop Pedestal Installation 12 Swivel Stand 12 VESA Wall Mounting 13 Securing the TV to the wall to prevent falling . . . . 14 Antenna or Cable Connection 15 EXTERNAL EQUIPMENT SETUP HD Receiver Setup 16 DVD Setup 19 VCR Setup 21 Other A/V Source Setup 23 Audio Out Connection 23 PC Setup 24 WATCHING TV / CHANNEL CONTROL Remote Control Functions 30 Turning On TV 32 Channel Selection 32 Volume Adjustment 32 Initial Setting 33 Quick Menu 34 On-Screen Menus Selection 35 Channel Setup - Black (Darkness...

Owner's Manual (English)
Page 11
... VIDEO AUDIO HDMI/DVI IN 2 1 8 ( ) 1 AV (Audio/Video) IN 6 ANTENNA/CABLE IN Analog composite connection. Note: In standby mode, this port do not work. 3 RS-232C IN (CONTROL & SERVICE) PORT Connect over-the air signals to this jack. Caution: Never attempt to DVI cable (not included) 8 COMPONENT IN Analog Connection. Supports HD video and Digital audio. Uses a red, green, and blue cable for video & red and white for software updates. Doesn't support 480i. Used by third party devices. 9 USB SERVICE ONLY 4 REMOTE CONTROL PORT Used for audio. Accepts DVI video using...
... VIDEO AUDIO HDMI/DVI IN 2 1 8 ( ) 1 AV (Audio/Video) IN 6 ANTENNA/CABLE IN Analog composite connection. Note: In standby mode, this port do not work. 3 RS-232C IN (CONTROL & SERVICE) PORT Connect over-the air signals to this jack. Caution: Never attempt to DVI cable (not included) 8 COMPONENT IN Analog Connection. Supports HD video and Digital audio. Uses a red, green, and blue cable for video & red and white for software updates. Doesn't support 480i. Used by third party devices. 9 USB SERVICE ONLY 4 REMOTE CONTROL PORT Used for audio. Accepts DVI video using...
Owner's Manual (English)
Page 15
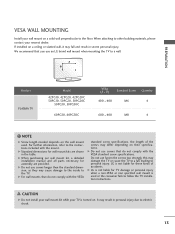
... follow the TV installation instructions. G When purchasing our wall mount kit, a detailed installation manual and all parts necessary for TV damage or personal injury when a non-VESA or non specified wall mount is turned on. G LG is not liable for assembly are shown in severe personal injury. We recommend that you use fasten the screws too strongly, this may differ depending on their specifications. G Standard dimensions for these...
... follow the TV installation instructions. G When purchasing our wall mount kit, a detailed installation manual and all parts necessary for TV damage or personal injury when a non-VESA or non specified wall mount is turned on. G LG is not liable for assembly are shown in severe personal injury. We recommend that you use fasten the screws too strongly, this may differ depending on their specifications. G Standard dimensions for these...
Owner's Manual (English)
Page 18
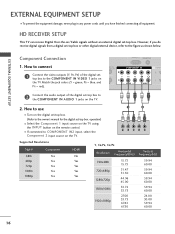
...) (RGB/DVI) COMPONENT IN VIDEO AUDIO HDMI/ 2 1 2 Connect the audio output of the digital settop box to the COMPONENT IN VIDEO 1 jacks on 1 the TV. I Select the Component 1 input source on the TV using the INPUT button on the remote control. Component Connection 1. HD RECEIVER SETUP This TV can receive Digital Over-the-air/Cable signals without an external digital set-top box. How to use I To prevent the equipment damage, never plug in any power cords until you do receive digital signals from a digital set-top box or other digital external device...
...) (RGB/DVI) COMPONENT IN VIDEO AUDIO HDMI/ 2 1 2 Connect the audio output of the digital settop box to the COMPONENT IN VIDEO 1 jacks on 1 the TV. I Select the Component 1 input source on the TV using the INPUT button on the remote control. Component Connection 1. HD RECEIVER SETUP This TV can receive Digital Over-the-air/Cable signals without an external digital set-top box. How to use I To prevent the equipment damage, never plug in any power cords until you do receive digital signals from a digital set-top box or other digital external device...
Owner's Manual (English)
Page 19
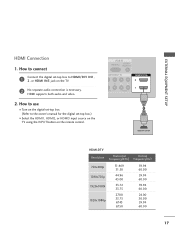
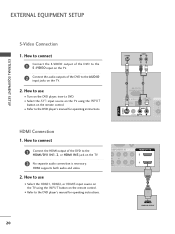
... SETUP HDMI Connection 1. How to connect 1 Connect the digital set-top box to the owner's manual for the digital set -top box. (Refer to HDMI/DVI IN1, 2, or HDMI IN3 jack on the remote control. How to use I Turn on the digital set -top box.) I Select the HDMI1, HDMI2, or HDMI3 input source on the TV using the INPUT button on the TV. 2 No separate audio connection is necessary. ( ) HDMI supports both audio and video. 2. RGB IN RGB(PC) AUDIO (RGB/DVI) OMPONENT IN B PR L R EO AUDIO HDMI/DVI IN 2 1 1 HDMI-DTV OUTPUT HDMI...
... SETUP HDMI Connection 1. How to connect 1 Connect the digital set-top box to the owner's manual for the digital set -top box. (Refer to HDMI/DVI IN1, 2, or HDMI IN3 jack on the remote control. How to use I Turn on the digital set -top box.) I Select the HDMI1, HDMI2, or HDMI3 input source on the TV using the INPUT button on the TV. 2 No separate audio connection is necessary. ( ) HDMI supports both audio and video. 2. RGB IN RGB(PC) AUDIO (RGB/DVI) OMPONENT IN B PR L R EO AUDIO HDMI/DVI IN 2 1 1 HDMI-DTV OUTPUT HDMI...
Owner's Manual (English)
Page 20
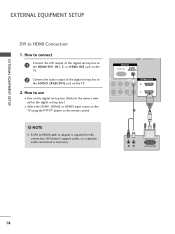
... input source on the TV using the INPUT button on the remote control. RGB IN RGB(PC) AUDIO (RGB/DVI) CABLE IN COMPONENT IN PB PR L R VIDEO AUDIO HDMI/DVI IN 2 1 2 1 ! NOTE G A DVI to the owner's manual for the digital set-top box.) I Turn on the digital set -top box to HDMI Connection 1. DVI doesn't support audio, so a separate audio connection is required for this connection. How to connect 1 Connect the DVI output of the digital set-top box to the HDMI/DVI IN1, 2, or HDMI IN3 jack on the TV. 2 Connect the audio output of the digital set...
... input source on the TV using the INPUT button on the remote control. RGB IN RGB(PC) AUDIO (RGB/DVI) CABLE IN COMPONENT IN PB PR L R VIDEO AUDIO HDMI/DVI IN 2 1 2 1 ! NOTE G A DVI to the owner's manual for the digital set-top box.) I Turn on the digital set -top box to HDMI Connection 1. DVI doesn't support audio, so a separate audio connection is required for this connection. How to connect 1 Connect the DVI output of the digital set-top box to the HDMI/DVI IN1, 2, or HDMI IN3 jack on the TV. 2 Connect the audio output of the digital set...
Owner's Manual (English)
Page 22
... audio connection is necessary. ( ) HDMI supports both audio and video. 2. How to connect 1 Connect the HDMI output of the DVD to the HDMI/DVI IN1, 2, or HDMI IN3 jack on the TV. 2. I Turn on the remote control. ( ) ( ) EXTERNAL EQUIPMENT SETUP EXTERNAL EQUIPMENT SETUP S-Video Connection 1. How to use I Select the A V 1 input source on the TV using the INPUT button on the remote control. AV IN 1 S-VIDEO S-VIDEO AUDIO L R 1 2 RS-232C IN (CONTROL & SERVICE) DIGITAL AUDIO OUT REMOTE CONTROL IN OPTICAL AUDIO VIDEO (MONO) 2 Y 1 HDMI Connection...
... audio connection is necessary. ( ) HDMI supports both audio and video. 2. How to connect 1 Connect the HDMI output of the DVD to the HDMI/DVI IN1, 2, or HDMI IN3 jack on the TV. 2. I Turn on the remote control. ( ) ( ) EXTERNAL EQUIPMENT SETUP EXTERNAL EQUIPMENT SETUP S-Video Connection 1. How to use I Select the A V 1 input source on the TV using the INPUT button on the remote control. AV IN 1 S-VIDEO S-VIDEO AUDIO L R 1 2 RS-232C IN (CONTROL & SERVICE) DIGITAL AUDIO OUT REMOTE CONTROL IN OPTICAL AUDIO VIDEO (MONO) 2 Y 1 HDMI Connection...

Owner's Manual (English)
Page 25
...optical) about the contents with external audio equipments, such as amplifiers or speakers, you can turn the TV speakers off in the AUDIO menu. (G p.61). I Operate the corresponding external equipment. AV IN 1 S-VIDEO RS-232C IN (CONTROL & SERVICE) DIGITAL AUDIO OUT REMOTE CONTROL IN OPTICAL 2 AU1DIO Y 1 ! AV IN 2 AUDIO OUT CONNECTION Send the TV's audio to external audio equipment via the Audio Output port. 1. Match the jack colors. (Video = yellow, Audio Left = white, and Audio Right = red) Camcorder Video Game Set VIDEO L R USB SERVICE ONLY HDMI IN 3 VIDEO L/MONO AUDIO...
...optical) about the contents with external audio equipments, such as amplifiers or speakers, you can turn the TV speakers off in the AUDIO menu. (G p.61). I Operate the corresponding external equipment. AV IN 1 S-VIDEO RS-232C IN (CONTROL & SERVICE) DIGITAL AUDIO OUT REMOTE CONTROL IN OPTICAL 2 AU1DIO Y 1 ! AV IN 2 AUDIO OUT CONNECTION Send the TV's audio to external audio equipment via the Audio Output port. 1. Match the jack colors. (Video = yellow, Audio Left = white, and Audio Right = red) Camcorder Video Game Set VIDEO L R USB SERVICE ONLY HDMI IN 3 VIDEO L/MONO AUDIO...

Owner's Manual (English)
Page 27
... work if a HDMI to another rate or adjust the brightness and contrast on the graphics card, some resolution settings may be positioned on the screen properly. 25 NOTES G To get the the best picture quality, adjust the PC graphics card to be noise associated with the resolution, vertical pattern, contrast or brightness. G Depending on the PICTURE menu until the picture is separate. G Avoid keeping a fixed image on the screen. EXTERNAL EQUIPMENT SETUP Supported Display Specifications...
... work if a HDMI to another rate or adjust the brightness and contrast on the graphics card, some resolution settings may be positioned on the screen properly. 25 NOTES G To get the the best picture quality, adjust the PC graphics card to be noise associated with the resolution, vertical pattern, contrast or brightness. G Depending on the PICTURE menu until the picture is separate. G Avoid keeping a fixed image on the screen. EXTERNAL EQUIPMENT SETUP Supported Display Specifications...

Owner's Manual (English)
Page 33
G p.41 VOLUME UP Increase/decrease the sound level. /DOWN FAV Scroll through the programmed Favorite channels. G p.32 CHANNEL Select available channels. Don't mix old or used batteries with -). UP/DOWN Installing Batteries I Close cover. 31 When you select and set of AV devices connected to TV. WATCHING TV / CHANNEL CONTROL THUMBSTICK Navigate the on-screen menus and adjust the system settings to your preference. (Up/Down/Left Right/ENTER...
G p.41 VOLUME UP Increase/decrease the sound level. /DOWN FAV Scroll through the programmed Favorite channels. G p.32 CHANNEL Select available channels. Don't mix old or used batteries with -). UP/DOWN Installing Batteries I Close cover. 31 When you select and set of AV devices connected to TV. WATCHING TV / CHANNEL CONTROL THUMBSTICK Navigate the on-screen menus and adjust the system settings to your preference. (Up/Down/Left Right/ENTER...
Owner's Manual (English)
Page 34
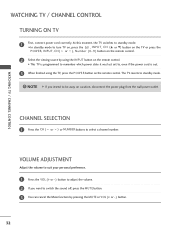
... using the INPUT button on the remote control. The TV reverts to turn TV on, press the , INPUT, C H (D or E) button on the TV or press the POWER, INPUT, C H ( or ), Number (0~9 ) button on the remote control. 2 Select the viewing source by pressing the MUTE or VOL (+ or -) button. 32 VOLUME ADJUSTMENT Adjust the volume to suit your personal preference. 1 Press the VOL (+ or -) button to adjust the volume. 2 If you intend to select a channel number. I In standby mode to standby mode. ! WATCHING TV / CHANNEL CONTROL TURNING ON TV 1 First, connect power cord...
... using the INPUT button on the remote control. The TV reverts to turn TV on, press the , INPUT, C H (D or E) button on the TV or press the POWER, INPUT, C H ( or ), Number (0~9 ) button on the remote control. 2 Select the viewing source by pressing the MUTE or VOL (+ or -) button. 32 VOLUME ADJUSTMENT Adjust the volume to suit your personal preference. 1 Press the VOL (+ or -) button to adjust the volume. 2 If you intend to select a channel number. I In standby mode to standby mode. ! WATCHING TV / CHANNEL CONTROL TURNING ON TV 1 First, connect power cord...

Owner's Manual (English)
Page 44
... an OPTICAL cable. 42 G When you select a device with HDMI cable without additional cables and settings. MENU Return to the previous menu. WATCHING TV / CHANNEL CONTROL This function operates only with devices with HDMI-CEC function. The TV might not function properly when using SIMPLINK, turn it with other AV devices connected with home theater functionality, the sound output automatically switches to the rear terminal (HDMI terminal) of the TV to the DIGITAL AUDIO IN...
... an OPTICAL cable. 42 G When you select a device with HDMI cable without additional cables and settings. MENU Return to the previous menu. WATCHING TV / CHANNEL CONTROL This function operates only with devices with HDMI-CEC function. The TV might not function properly when using SIMPLINK, turn it with other AV devices connected with home theater functionality, the sound output automatically switches to the rear terminal (HDMI terminal) of the TV to the DIGITAL AUDIO IN...
Owner's Manual (English)
Page 48
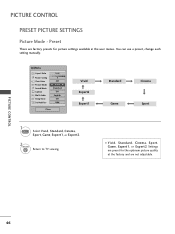
... picture settings available in the user menus. PICTURE CONTROL 46 Preset There are not adjustable. You can use a preset, change each setting manually. Q.Menu Aspect Ratio Power Saving Clear Voice Picture Mode Sound Mode Caption Multi Audio Sleep Timer CH Del/Add/Fav 16:9 3 Off F Vivid G Standard Off English Off Add Close Vivid Expert2 Expert1 Standard Game Cinema Sport 1 PICTURE Select Vivid, Standard, Cinema, Sport, Game, Expert1, or Expert2. 2 RETURN Return to TV viewing. PICTURE CONTROL PRESET PICTURE SETTINGS Picture Mode...
... picture settings available in the user menus. PICTURE CONTROL 46 Preset There are not adjustable. You can use a preset, change each setting manually. Q.Menu Aspect Ratio Power Saving Clear Voice Picture Mode Sound Mode Caption Multi Audio Sleep Timer CH Del/Add/Fav 16:9 3 Off F Vivid G Standard Off English Off Add Close Vivid Expert2 Expert1 Standard Game Cinema Sport 1 PICTURE Select Vivid, Standard, Cinema, Sport, Game, Expert1, or Expert2. 2 RETURN Return to TV viewing. PICTURE CONTROL PRESET PICTURE SETTINGS Picture Mode...

Owner's Manual (English)
Page 76
... menu. Most television programs and television movies can be blocked by broadcasting stations. The default setting is also possible to block all programs to block specific channels, ratings and other viewing sources. For USA For Canada LOCK Move Enter Lock System : Off Set Password Block Channel Movie Rating TV Rating-Children TV Rating-General Downloadable Rating Input Block LOCK Move Enter Lock System : Off Set Password Block Channel TV Rating-English TV Rating-French Downloadable Rating Input Block Enter Password **** Close 1 MENU...
... menu. Most television programs and television movies can be blocked by broadcasting stations. The default setting is also possible to block all programs to block specific channels, ratings and other viewing sources. For USA For Canada LOCK Move Enter Lock System : Off Set Password Block Channel Movie Rating TV Rating-Children TV Rating-General Downloadable Rating Input Block LOCK Move Enter Lock System : Off Set Password Block Channel TV Rating-English TV Rating-French Downloadable Rating Input Block Enter Password **** Close 1 MENU...
Owner's Manual (English)
Page 88
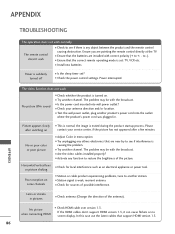
... image is set ? to another channel. I Try another product's power cord into wall power outlet? APPENDIX Picture appears slowly I Check for local interference such as an electrical appliance or power tool. No picture when connecting HDMI I Check your service center, if the picture has not appeared after switching on . Power interrupted. The video function does not work normally. I Check HDMI cable over version 1.3. I Test the wall power outlet, plug another channel. I Adjust Color in pictures I Are the video cables installed...
... image is set ? to another channel. I Try another product's power cord into wall power outlet? APPENDIX Picture appears slowly I Check for local interference such as an electrical appliance or power tool. No picture when connecting HDMI I Check your service center, if the picture has not appeared after switching on . Power interrupted. The video function does not work normally. I Check HDMI cable over version 1.3. I Test the wall power outlet, plug another channel. I Adjust Color in pictures I Are the video cables installed...


