Owner's Manual (English)
Page 1
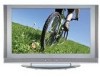
Environmental Protection Agency(EPA). As an ENERGY STAR Partner LGE U. Please read this manual carefully before operating your dealer when you require service. See the label attached on the back cover and quote this product meets ... number and serial number of power-saving guidelines issued by the U.S. LCD TV MODELS: 32LC2D 32LC2DC 37LC2D 42LC2D PLASMA TV MODELS: 42PC3D 42PC3DC 42PC3DV 50PC3D 50PC3DX 42PC1DVH 42PC3DH 42PC3DVA 50PC3DH OWNER'S MANUAL Internet Home Page : http://www.lge.com http://www.lg.ca http://www.lgcommercial.com ENERGYSTAR is a set of the set . ...
Environmental Protection Agency(EPA). As an ENERGY STAR Partner LGE U. Please read this manual carefully before operating your dealer when you require service. See the label attached on the back cover and quote this product meets ... number and serial number of power-saving guidelines issued by the U.S. LCD TV MODELS: 32LC2D 32LC2DC 37LC2D 42LC2D PLASMA TV MODELS: 42PC3D 42PC3DC 42PC3DV 50PC3D 50PC3DX 42PC1DVH 42PC3DH 42PC3DVA 50PC3DH OWNER'S MANUAL Internet Home Page : http://www.lge.com http://www.lg.ca http://www.lgcommercial.com ENERGYSTAR is a set of the set . ...
Owner's Manual (English)
Page 3
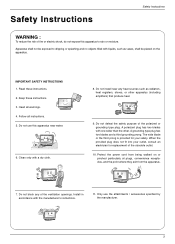
... WARNING : To reduce the risk of fire or electric shock, do not expose this apparatus near any of the ventilation openings. Read these instructions. 3. Owner's Manual 2. Do not use the attachments / accessories specified by the manufacturer. 3 Keep these instructions. Heed all instructions. 5. Only use this apparatus to dripping or splashing and...
... WARNING : To reduce the risk of fire or electric shock, do not expose this apparatus near any of the ventilation openings. Read these instructions. 3. Owner's Manual 2. Do not use the attachments / accessories specified by the manufacturer. 3 Keep these instructions. Heed all instructions. 5. Only use this apparatus to dripping or splashing and...
Owner's Manual (English)
Page 4
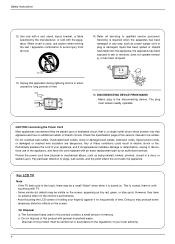
...outlets. Any of these conditions could result in accordance to the regulations of your finger(s) against it for long periods of this owner's manual to rain or moisture, does not operate normally, or has been dropped. 13. Do not dispose of this product contains a small amount... the touch, there may produce some temporary distortion effects on the screen, appearing as being twisted, kinked, pinched, closed in this product with TV. - However, they be certain. The fluorescent lamp used , use of mercury. Use only with the apparatus. Unplug this product must remain ...
...outlets. Any of these conditions could result in accordance to the regulations of your finger(s) against it for long periods of this owner's manual to rain or moisture, does not operate normally, or has been dropped. 13. Do not dispose of this product contains a small amount... the touch, there may produce some temporary distortion effects on the screen, appearing as being twisted, kinked, pinched, closed in this product with TV. - However, they be certain. The fluorescent lamp used , use of mercury. Use only with the apparatus. Unplug this product must remain ...
Owner's Manual (English)
Page 5
... VCR Setup External AV Source Setup DVD Setup HDSTB Setup Monitor Out Setup Digital Audio Output PC Setup 32 Turning on the TV 32 Volume Adjustment 32 Channel Selection 32 On Screen Menus Language Selection 33 On Screen Menus Selection and Adjustment 34 EZ Scan ... (Adaptive Picture Mode) 39 Manual Picture Control (EZ Picture-Custom option) 39 Color Temperature Control 39 Video Reset 40 Audio Language 40 EZ SoundRite 41 EZ Sound 41 Manual Sound Control (EZ Sound-Custom option) 42 Stereo/SAP Broadcasts Setup 42 Front Surround 43 TV Speakers On/Off Setup 43...
... VCR Setup External AV Source Setup DVD Setup HDSTB Setup Monitor Out Setup Digital Audio Output PC Setup 32 Turning on the TV 32 Volume Adjustment 32 Channel Selection 32 On Screen Menus Language Selection 33 On Screen Menus Selection and Adjustment 34 EZ Scan ... (Adaptive Picture Mode) 39 Manual Picture Control (EZ Picture-Custom option) 39 Color Temperature Control 39 Video Reset 40 Audio Language 40 EZ SoundRite 41 EZ Sound 41 Manual Sound Control (EZ Sound-Custom option) 42 Stereo/SAP Broadcasts Setup 42 Front Surround 43 TV Speakers On/Off Setup 43...

Owner's Manual (English)
Page 6
... Menu Options Option Menu Features Lock Menu Options 44 44 45 45 46 47 48 48 49 50 50 51 52~53 Auto Clock Setup Manual Clock Setup On/Off Timer Setup Sleep Timer Auto Off Aspect Ratio Control Cinema 3:2 Mode Setup Caption Caption/Text Caption Option Low Power (42PC1D**/42PC3D...
... Menu Options Option Menu Features Lock Menu Options 44 44 45 45 46 47 48 48 49 50 50 51 52~53 Auto Clock Setup Manual Clock Setup On/Off Timer Setup Sleep Timer Auto Off Aspect Ratio Control Cinema 3:2 Mode Setup Caption Caption/Text Caption Option Low Power (42PC1D**/42PC3D...
Owner's Manual (English)
Page 7
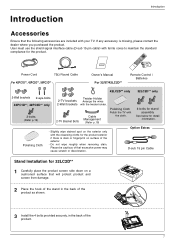
... INFO 1 FAV 4 7 2 PAGE CH 5 EZ ADJUST PIC EZ APM SOUND 0 SAP 8 9 FLASHBK 6 3 FREEZE Power Cord 75Ω Round Cable Owner's Manual Remote Control / Batteries For 42PC1D**, 42PC3D**, 50PC3D** For 32/37/42LC2D** 42LC2D** only 32LC2D** only 2-Wall brackets 2-eye-bolts 42PC1D**, 42PC3D** only 2-bolts (Refer ... ferrite cores to maintain the standard compliance for the product. Slightly wipe stained spot on the exterior only with your TV. Polishing Cloth - Option Extras D-sub 15 pin Cable Stand Installation for 32LC2D** 1 Carefully place the product screen side ...
... INFO 1 FAV 4 7 2 PAGE CH 5 EZ ADJUST PIC EZ APM SOUND 0 SAP 8 9 FLASHBK 6 3 FREEZE Power Cord 75Ω Round Cable Owner's Manual Remote Control / Batteries For 42PC1D**, 42PC3D**, 50PC3D** For 32/37/42LC2D** 42LC2D** only 32LC2D** only 2-Wall brackets 2-eye-bolts 42PC1D**, 42PC3D** only 2-bolts (Refer ... ferrite cores to maintain the standard compliance for the product. Slightly wipe stained spot on the exterior only with your TV. Polishing Cloth - Option Extras D-sub 15 pin Cable Stand Installation for 32LC2D** 1 Carefully place the product screen side ...
Owner's Manual (English)
Page 13
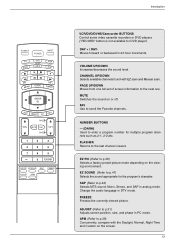
...the currently-viewed picture. APM (Refer to p.38) Concurrently, compare with EZ scan and Manual scan. MUTE Switches the sound on the screen. 13 CHANNEL UP/DOWN Selects available channels...) Selects a factory preset picture mode depending on the viewing environment. FLASHBK Returns to the next one. Introduction TV INPUT POWER TV AUDIO DVD MODE CABLE INPUT VCR STB DAY MENU GUIDE DAY+ RATIO ENTER EXIT TIMER CC INFO PAGE VOL ...backward in analog mode. ADJUST (Refer to p.42) Selects MTS sound: Mono, Stereo, and SAP in 24 hour increments. Change the audio language...
...the currently-viewed picture. APM (Refer to p.38) Concurrently, compare with EZ scan and Manual scan. MUTE Switches the sound on the screen. 13 CHANNEL UP/DOWN Selects available channels...) Selects a factory preset picture mode depending on the viewing environment. FLASHBK Returns to the next one. Introduction TV INPUT POWER TV AUDIO DVD MODE CABLE INPUT VCR STB DAY MENU GUIDE DAY+ RATIO ENTER EXIT TIMER CC INFO PAGE VOL ...backward in analog mode. ADJUST (Refer to p.42) Selects MTS sound: Mono, Stereo, and SAP in 24 hour increments. Change the audio language...
Owner's Manual (English)
Page 14
SETUP VIDEO AUDIO TIME EZ Scan Manual Scan Channel Edit DTV Signal Input Source Input Label Set ID OPTION LOCK MENU Previous Antenna Cable AV1 AV2 G Component1 Component2 RGB-PC HDMI/DVI • Antenna: Select it when watching the TV/DTV. • Cable: Select it when...HDMI/DVI 3. When no external equipment is connected: Antenna Cable AV1 AV2 Component1 HDMI/DVI RGB-DTV (or RGB-PC) Component2 2. Introduction TV INPUT POWER INPUT INPUT TV AUDIO DVD MODE CABLE VCR STB DAY MENU GUIDE DAY+ RATIO ENTER EXIT TIMER CC INFO PAGE VOL MUTE FAV CH PAGE 1 2 3 ...
SETUP VIDEO AUDIO TIME EZ Scan Manual Scan Channel Edit DTV Signal Input Source Input Label Set ID OPTION LOCK MENU Previous Antenna Cable AV1 AV2 G Component1 Component2 RGB-PC HDMI/DVI • Antenna: Select it when watching the TV/DTV. • Cable: Select it when...HDMI/DVI 3. When no external equipment is connected: Antenna Cable AV1 AV2 Component1 HDMI/DVI RGB-DTV (or RGB-PC) Component2 2. Introduction TV INPUT POWER INPUT INPUT TV AUDIO DVD MODE CABLE VCR STB DAY MENU GUIDE DAY+ RATIO ENTER EXIT TIMER CC INFO PAGE VOL MUTE FAV CH PAGE 1 2 3 ...
Owner's Manual (English)
Page 22
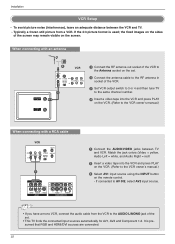
To avoid picture noise (interference), leave an adequate distance between TV and VCR. the fixed images on the sides of the VCR to the Antenna socket on the VCR. (Refer to the VCR owner's manual.) CABLE IN When connecting with an antenna ANTENNA IN CABLE IN ANTENNA IN 2 ANT IN VCR ANT ... a video tape into the VCR and press PLAY on the VCR. (Refer to AV IN2, select AV2 input source. If connected to the VCR owner's manual.) 3 Select AV1 input source using the INPUT button on the screen. Installation VCR Setup - Match the jack colors (Video = yellow, Audio Left = white, and ...
To avoid picture noise (interference), leave an adequate distance between TV and VCR. the fixed images on the sides of the VCR to the Antenna socket on the VCR. (Refer to the VCR owner's manual.) CABLE IN When connecting with an antenna ANTENNA IN CABLE IN ANTENNA IN 2 ANT IN VCR ANT ... a video tape into the VCR and press PLAY on the VCR. (Refer to AV IN2, select AV2 input source. If connected to the VCR owner's manual.) 3 Select AV1 input source using the INPUT button on the screen. Installation VCR Setup - Match the jack colors (Video = yellow, Audio Left = white, and ...
Owner's Manual (English)
Page 23
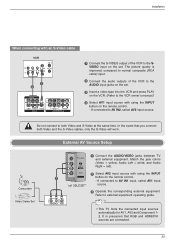
... both Video and the S-Video cables, only the S-Video will work. If connected to external equipment operating guide. R AUDIO L VIDEO • This TV finds the connected input sources automatically for AV1, AV2 and Component 12. compared to normal composite (RCA cable) input. 2 Connect the audio outputs of...to the SVIDEO input on the set . 3 Insert a video tape into the VCR and press PLAY on the VCR. (Refer to the VCR owner's manual.) 4 Select AV1 input source with using the INPUT button on the remote control. - External AV Source Setup Camcorder Video Game Set S-VIDEO R AUDIO L/...
... both Video and the S-Video cables, only the S-Video will work. If connected to external equipment operating guide. R AUDIO L VIDEO • This TV finds the connected input sources automatically for AV1, AV2 and Component 12. compared to normal composite (RCA cable) input. 2 Connect the audio outputs of...to the SVIDEO input on the set . 3 Insert a video tape into the VCR and press PLAY on the VCR. (Refer to the VCR owner's manual.) 4 Select AV1 input source with using the INPUT button on the remote control. - External AV Source Setup Camcorder Video Game Set S-VIDEO R AUDIO L/...
Owner's Manual (English)
Page 24
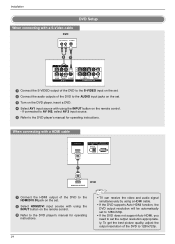
... the output resolution of the DVD to set the output resolution appropriately. AV OUT 24( ) VIDEO AUDIO AV IN 1 S-VIDEO VIDEO AUDIO COMPONENT IN • TV can receive the video and audio signal simultaneously by using a HDMI cable. • If the DVD supports Auto HDMI function, the DVD output resolution will... (L) S-VIDEO 21 AV OUT VIDEO (MONO) AUDIO AV IN 1 S-VIDEO VIDEO AUDIO COMPONENT IN 1 Connect the S-VIDEO output of the DVD to the DVD player's manual for operating instructions. If connected to AV IN2, select AV 2 input source. 5 Refer to the DVD player...
... the output resolution of the DVD to set the output resolution appropriately. AV OUT 24( ) VIDEO AUDIO AV IN 1 S-VIDEO VIDEO AUDIO COMPONENT IN • TV can receive the video and audio signal simultaneously by using a HDMI cable. • If the DVD supports Auto HDMI function, the DVD output resolution will... (L) S-VIDEO 21 AV OUT VIDEO (MONO) AUDIO AV IN 1 S-VIDEO VIDEO AUDIO COMPONENT IN 1 Connect the S-VIDEO output of the DVD to the DVD player's manual for operating instructions. If connected to AV IN2, select AV 2 input source. 5 Refer to the DVD player...
Owner's Manual (English)
Page 25
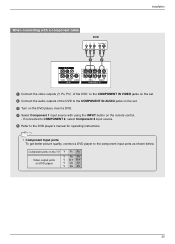
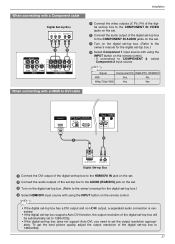
AV OUT • Component Input ports To get better picture quality, connect a DVD( p)layer to the DVD player's manual for operating instructions. If connected to COMPONENT 2, select Component 2 input source. 5 Refer to the component input ports as shown below. VIDEO... AUDIO S-VIDEO VIDEO AUDIO AV IN 1 COMPONENT IN Component ports on the TV Y PB PR Video output ports on the remote control. - Installation When connecting with a component cable DVD B R (R) AUDIO (L) AV OUT 1 2 VIDEO (MONO) ...
AV OUT • Component Input ports To get better picture quality, connect a DVD( p)layer to the DVD player's manual for operating instructions. If connected to COMPONENT 2, select Component 2 input source. 5 Refer to the component input ports as shown below. VIDEO... AUDIO S-VIDEO VIDEO AUDIO AV IN 1 COMPONENT IN Component ports on the TV Y PB PR Video output ports on the remote control. - Installation When connecting with a component cable DVD B R (R) AUDIO (L) AV OUT 1 2 VIDEO (MONO) ...
Owner's Manual (English)
Page 26
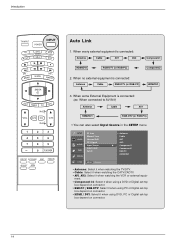
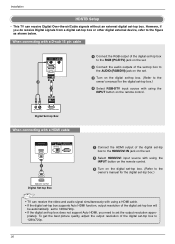
...do receive Digital signals from a digital set -top box to the figure as shown below. priately. This TV can receive the video and audio signal simultaneously with using the INPUT button on the remote control. 3 ...RGB/DVI) jack on the set. 3 Turn on the digital set-top box. (Refer to the owner's manual for the digital set-top box.) 4 Select RGB-DTV input source with using the INPUT button on the remote... IN jack on the digital set-top box. (Refer to the owner's manual for the digital set-top box.) • TV can receive Digital Over-the-air/Cable signals without an external digital set the...
...do receive Digital signals from a digital set -top box to the figure as shown below. priately. This TV can receive the video and audio signal simultaneously with using the INPUT button on the remote control. 3 ...RGB/DVI) jack on the set. 3 Turn on the digital set-top box. (Refer to the owner's manual for the digital set-top box.) 4 Select RGB-DTV input source with using the INPUT button on the remote... IN jack on the digital set-top box. (Refer to the owner's manual for the digital set-top box.) • TV can receive Digital Over-the-air/Cable signals without an external digital set the...
Owner's Manual (English)
Page 27
If connected to the REMOTE CONTROL owner's manual for the digital set-top box.) Select Component 1 input source with using the INPUT button on the remote control. VIDEO AUDIO COMPONENT IN VIDEO (MONO) ...-top box will be automatically set to 1280x720p. • If the digital set-top box does not support Auto DVI, you need to the owner's manual for the digital RGB IN REMOTE CONTROL IN set-top box.) 4 Select HDMI/DVI inpAUuDIOt(RsGBo/DVuI) rce with using the INPUT button on the...
If connected to the REMOTE CONTROL owner's manual for the digital set-top box.) Select Component 1 input source with using the INPUT button on the remote control. VIDEO AUDIO COMPONENT IN VIDEO (MONO) ...-top box will be automatically set to 1280x720p. • If the digital set-top box does not support Auto DVI, you need to the owner's manual for the digital RGB IN REMOTE CONTROL IN set-top box.) 4 Select HDMI/DVI inpAUuDIOt(RsGBo/DVuI) rce with using the INPUT button on the...
Owner's Manual (English)
Page 28
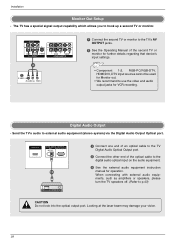
...Do not look into the optical output port. When connecting with external audio equipments, such as amplifiers or speakers, please turn the TV speakers off. (Refer to external audio equipment (stereo system) via the Digital Audio Output Optical port. HDMI/DVI IN DIGITAL AUDIO... audio equipment instruction manual for VCR recording. Installation Monitor Out Setup - AV OUT VIDEO (MONO) AUDIO AV IN 1 S-VIDEO 1/2 VIDEO AUDIO COMPONENT IN S-VIDEO IN (R) AUDIO (L) VIDEO 1 Connect the second TV or monitor to the TV's AV OUTPUT jacks. 2 See the Operating Manual of the optical cable...
...Do not look into the optical output port. When connecting with external audio equipments, such as amplifiers or speakers, please turn the TV speakers off. (Refer to external audio equipment (stereo system) via the Digital Audio Output Optical port. HDMI/DVI IN DIGITAL AUDIO... audio equipment instruction manual for VCR recording. Installation Monitor Out Setup - AV OUT VIDEO (MONO) AUDIO AV IN 1 S-VIDEO 1/2 VIDEO AUDIO COMPONENT IN S-VIDEO IN (R) AUDIO (L) VIDEO 1 Connect the second TV or monitor to the TV's AV OUTPUT jacks. 2 See the Operating Manual of the optical cable...
Owner's Manual (English)
Page 30
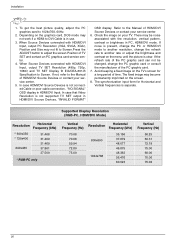
.../DVI Source Devices or contact your TV. If the refresh rate of the PC graphic card can not be noise associated with HDMI/DVI Input, output TV SET Resolution (480p, 720p, 1080i) and TV SET Display fit EIA/CEA-861-B Specification to the Manual of TV SET and contact an PC graphics ...card service center. 4. Check the image on the TV's screen for Horizontal and Vertical frequencies is in PC,...
.../DVI Source Devices or contact your TV. If the refresh rate of the PC graphic card can not be noise associated with HDMI/DVI Input, output TV SET Resolution (480p, 720p, 1080i) and TV SET Display fit EIA/CEA-861-B Specification to the Manual of TV SET and contact an PC graphics ...card service center. 4. Check the image on the TV's screen for Horizontal and Vertical frequencies is in PC,...
Owner's Manual (English)
Page 33
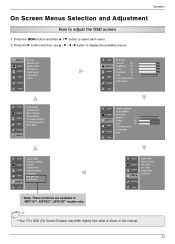
.... Press the G button and then use D / E / F / G button to adjust the OSD screen 1. SETUP VIDEO AUDIO TIME G Auto Clock Manual Clock Off Timer On Timer Sleep Timer Auto Off OPTION LOCK • Your TV's OSD (On Screen Display) may differ slightly from what is shown in 42PC1D**, 42PC3D**, 50PC3D** models only. Press the...
.... Press the G button and then use D / E / F / G button to adjust the OSD screen 1. SETUP VIDEO AUDIO TIME G Auto Clock Manual Clock Off Timer On Timer Sleep Timer Auto Off OPTION LOCK • Your TV's OSD (On Screen Display) may differ slightly from what is shown in 42PC1D**, 42PC3D**, 50PC3D** models only. Press the...
Owner's Manual (English)
Page 34
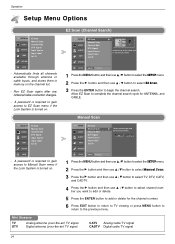
...inputs, and stores them in memory on . Mini Glossary TV DTV Analog antenna (over-the-air) TV signal Digital antenna (over-the-air) TV signal CATV Analog cable TV signal CADTV Digital cable TV signal 34 SETUP VIDEO AUDIO TIME EZ Scan Manual Scan Channel Edit DTV Signal Input Source Input Label Set...and then use D / E button to select the SETUP menu. 2 Press the G button and then use D / E button to select Manual Scan. 3 Press the G button and then use D / E button to select TV, DTV, CATV, and CADTV. 4 Press the G button and then use D / E button to select channel number you to the EZ...
...inputs, and stores them in memory on . Mini Glossary TV DTV Analog antenna (over-the-air) TV signal Digital antenna (over-the-air) TV signal CATV Analog cable TV signal CADTV Digital cable TV signal 34 SETUP VIDEO AUDIO TIME EZ Scan Manual Scan Channel Edit DTV Signal Input Source Input Label Set...and then use D / E button to select the SETUP menu. 2 Press the G button and then use D / E button to select Manual Scan. 3 Press the G button and then use D / E button to select TV, DTV, CATV, and CADTV. 4 Press the G button and then use D / E button to select channel number you to the EZ...

Owner's Manual (English)
Page 35
... on or off with channel num- Operation SETUP G VIDEO AUDIO TIME EZ Scan Manual Scan Channel Edit DTV Signal Input Source Input Label Set ID OPTION LOCK Channel Edit SETUP VIDEO AUDIO TIME... EZ Scan Manual Scan Channel Edit DTV Signal Input Source Input Label Set ID OPTION LOCK MENU Previous G ...the small window at the top-left corner of that channel number. 5 Press EXIT button to return to TV viewing or press MENU button to return to select Channel Edit. 3 Press the G button. The channels...
... on or off with channel num- Operation SETUP G VIDEO AUDIO TIME EZ Scan Manual Scan Channel Edit DTV Signal Input Source Input Label Set ID OPTION LOCK Channel Edit SETUP VIDEO AUDIO TIME... EZ Scan Manual Scan Channel Edit DTV Signal Input Source Input Label Set ID OPTION LOCK MENU Previous G ...the small window at the top-left corner of that channel number. 5 Press EXIT button to return to TV viewing or press MENU button to return to select Channel Edit. 3 Press the G button. The channels...
Owner's Manual (English)
Page 36
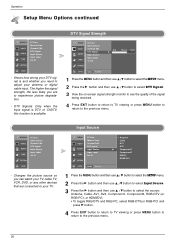
...(or RGB-PC) and press G button. 4 Press EXIT button to return to TV viewing or press MENU button to return to experience picture degradation. - Shows how strong your TV. Operation Setup Menu Options continued SETUP G VIDEO AUDIO TIME EZ Scan Manual Scan Channel Edit DTV Signal Input Source Input Label Set ID OPTION...
...(or RGB-PC) and press G button. 4 Press EXIT button to return to TV viewing or press MENU button to return to experience picture degradation. - Shows how strong your TV. Operation Setup Menu Options continued SETUP G VIDEO AUDIO TIME EZ Scan Manual Scan Channel Edit DTV Signal Input Source Input Label Set ID OPTION...

