
Owners Manual
Page 8
... 59 - PICTURE Settings 69 - Mounting on the TV (Child Lock) 46 Using the quick menu 47 Using the customer support 47 - Tidying cables 34 REMOTE CONTROL 38 WATCHING TV 38 Connecting to the AC/DC adapter 39 Turning the TV on a table 32 - Adjusting aspect ratio 45 - Changing AV modes 45...
... 59 - PICTURE Settings 69 - Mounting on the TV (Child Lock) 46 Using the quick menu 47 Using the customer support 47 - Tidying cables 34 REMOTE CONTROL 38 WATCHING TV 38 Connecting to the AC/DC adapter 39 Turning the TV on a table 32 - Adjusting aspect ratio 45 - Changing AV modes 45...

Owners Manual
Page 9
RGBConnection 81 ConnectintgoanAudioSystem 81 - Screen and frame 83 - 78 - Digitaol pticaat udioconnection 81 Connectintgoa USB 81 Connectintgoa Headphon(_e) 82 SIMPLINCKonnection 82 - Power cord 83 Preventing "image burn" or "Burn-in" on your TV screen 84 TROUBLESHOOTING 86 SPECIFICATIONS 94 IR CODES 96 EXTERNAL SETUP CONTROL DEVICE 104 OPEN SOURCE LmCENSE TABLE OF CONTENTS 9 Cabinet and stand 83 - HDMIConnection 79 - ActivatinagndUsingtheSIMPLINK menus 83 MAINTENANCE 83 Cleaning Your TV 83 - DVltoHDMIConnection 80 - CompositCeonnection 79 Connectintgoa PC 79 -
RGBConnection 81 ConnectintgoanAudioSystem 81 - Screen and frame 83 - 78 - Digitaol pticaat udioconnection 81 Connectintgoa USB 81 Connectintgoa Headphon(_e) 82 SIMPLINCKonnection 82 - Power cord 83 Preventing "image burn" or "Burn-in" on your TV screen 84 TROUBLESHOOTING 86 SPECIFICATIONS 94 IR CODES 96 EXTERNAL SETUP CONTROL DEVICE 104 OPEN SOURCE LmCENSE TABLE OF CONTENTS 9 Cabinet and stand 83 - HDMIConnection 79 - ActivatinagndUsingtheSIMPLINK menus 83 MAINTENANCE 83 Cleaning Your TV 83 - DVltoHDMIConnection 80 - CompositCeonnection 79 Connectintgoa PC 79 -
Owners Manual
Page 10
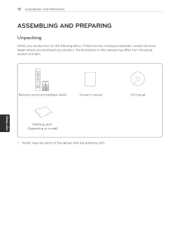
10 ASSEMBLAINNGDPREPARING ASSEMBLING AND PREPARING Unpacking Check your product box for the following items. If there are any missing accessories, contact the local dealer where you purchased your product. Remote control and batteries (AAA) Owner's manual CD manual Polishing cloth 1 (Depending on model) 1 Gently wipe the spots on the cabinet with the polishing cloth. The illustrations in this manual may differ from the actual product and item.
10 ASSEMBLAINNGDPREPARING ASSEMBLING AND PREPARING Unpacking Check your product box for the following items. If there are any missing accessories, contact the local dealer where you purchased your product. Remote control and batteries (AAA) Owner's manual CD manual Polishing cloth 1 (Depending on model) 1 Gently wipe the spots on the cabinet with the polishing cloth. The illustrations in this manual may differ from the actual product and item.
Owners Manual
Page 16
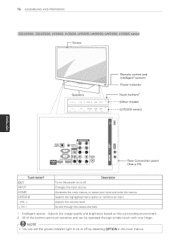
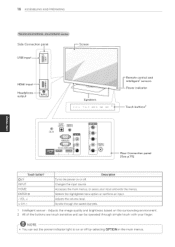
... the highlighted menu option or confirms an input. VOL + v CH A D...e..s.c..r.i.p..t.i.o..n. Turns the power on or off . J J Adjusts the volume level. Changes the input source. Remote control and intelligent 1 sensors Power indicator -- ®:1 ] #--J Touch buttons 2 (Other model) (LV5300 series) Touch button z (.D/ I INPUT HOME ENTER ® - 16 ASSEMBLING AND PREPARING _t_ Screen...
... the highlighted menu option or confirms an input. VOL + v CH A D...e..s.c..r.i.p..t.i.o..n. Turns the power on or off . J J Adjusts the volume level. Changes the input source. Remote control and intelligent 1 sensors Power indicator -- ®:1 ] #--J Touch buttons 2 (Other model) (LV5300 series) Touch button z (.D/ I INPUT HOME ENTER ® - 16 ASSEMBLING AND PREPARING _t_ Screen...
Owners Manual
Page 17
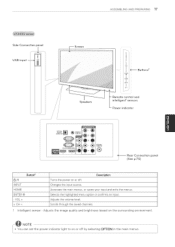
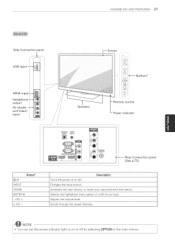
... sensor - Speakers v B_ D I_ %EIR DI INPUT I INPUT HOME ENTER ® VOL + vCHA ' DeSCription Turns the power on or off . d)/I D_ Butt°ns2 Remote control and intelligent 1 sensors Power indicator _, RAUGDBI/ODVII)N Rear Connection (See p.75) panel Button 2 .... Adjusts the image quality and brightness based on the surrounding environment. -@ NOTE...
... sensor - Speakers v B_ D I_ %EIR DI INPUT I INPUT HOME ENTER ® VOL + vCHA ' DeSCription Turns the power on or off . d)/I D_ Butt°ns2 Remote control and intelligent 1 sensors Power indicator _, RAUGDBI/ODVII)N Rear Connection (See p.75) panel Button 2 .... Adjusts the image quality and brightness based on the surrounding environment. -@ NOTE...
Owners Manual
Page 18
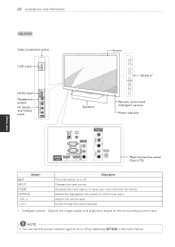
... your input and exits the menus. VOL + v CH A Description Turns the power on or off . 18 ASSEMBLING AND PREPARING Side Connection panel Screen Speakers Remote control and intelligent 1 sensors Power indicator J Touch buttons 2 ,® DC-IN OP/_CAL DIGITAL AUDJOOUT N (RGB/DVI) AUDIOIN L_ "_ &NTENNA/ _:'_CABLE,N Rear Connection (See p.75) panel...
... your input and exits the menus. VOL + v CH A Description Turns the power on or off . 18 ASSEMBLING AND PREPARING Side Connection panel Screen Speakers Remote control and intelligent 1 sensors Power indicator J Touch buttons 2 ,® DC-IN OP/_CAL DIGITAL AUDJOOUT N (RGB/DVI) AUDIOIN L_ "_ &NTENNA/ _:'_CABLE,N Rear Connection (See p.75) panel...
Owners Manual
Page 21
... input. ASSEMBLING AND PREPARING 21 Side Connection panel een Buttons 2 output | AV tAudio _ and Video) I_ input // // // / / / / Speakers OPllCDAILGITAL AUDIOIN AUODO_ (RGS/DV]} /, h F '_i Remote control Power indicator \V ANTENNA/ CABLEIN ® Rear Connection (See p.75) panel £ Button2ji ¸ @/I INPUT HOME ENTER ® VOL + v CH A _!£iiiLiiiLikDescriptio r!!l 7 7 7 7 7 7 7 7 7 7 7 7 i Turns the power on...
... input. ASSEMBLING AND PREPARING 21 Side Connection panel een Buttons 2 output | AV tAudio _ and Video) I_ input // // // / / / / Speakers OPllCDAILGITAL AUDIOIN AUODO_ (RGS/DV]} /, h F '_i Remote control Power indicator \V ANTENNA/ CABLEIN ® Rear Connection (See p.75) panel £ Button2ji ¸ @/I INPUT HOME ENTER ® VOL + v CH A _!£iiiLiiiLikDescriptio r!!l 7 7 7 7 7 7 7 7 7 7 7 7 i Turns the power on...
Owners Manual
Page 22
...; Selects the highlighted menu option or confirms an input. - 22 ASSEMBLING AND PREPARING Side Connection panel Screen ©÷1 ©rot -II Buttons z Speakers Remote control and intelligent 1 sensors Power indicator OPTICBAGLITAL AUDIOIN AUOBOUT N (RGB!DVI} L/_ _ ANTENNA/ CABLEIN ® Rear Connection (See p.75) panel \ ...)... :Ji Y BUtton2 i ¸Y Y Y Y:LYLYLY D,escripti0n...
...; Selects the highlighted menu option or confirms an input. - 22 ASSEMBLING AND PREPARING Side Connection panel Screen ©÷1 ©rot -II Buttons z Speakers Remote control and intelligent 1 sensors Power indicator OPTICBAGLITAL AUDIOIN AUOBOUT N (RGB!DVI} L/_ _ ANTENNA/ CABLEIN ® Rear Connection (See p.75) panel \ ...)... :Ji Y BUtton2 i ¸Y Y Y Y:LYLYLY D,escripti0n...
Owners Manual
Page 24
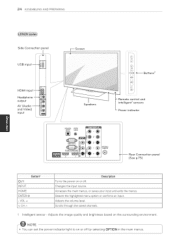
... Button z /I Buttons 2 // // Speakers s OFEA/DIGD/ AUDIOOUT N (RGB!DVI) AUDIOIN RGBIN (PC) _r_ RS-23E2CN_&&SN_} I_ 8_, _ ,_h LO 10J r@ _ _i-__ ACNATBELNENAI/N 2 1_ " 2 1 Remote control and intelligent 1 sensors Power indicator -- You can set the power indicator light to on the surrounding environment. Adjusts the volume level. Selects the highlighted menu...
... Button z /I Buttons 2 // // Speakers s OFEA/DIGD/ AUDIOOUT N (RGB!DVI) AUDIOIN RGBIN (PC) _r_ RS-23E2CN_&&SN_} I_ 8_, _ ,_h LO 10J r@ _ _i-__ ACNATBELNENAI/N 2 1_ " 2 1 Remote control and intelligent 1 sensors Power indicator -- You can set the power indicator light to on the surrounding environment. Adjusts the volume level. Selects the highlighted menu...
Owners Manual
Page 34
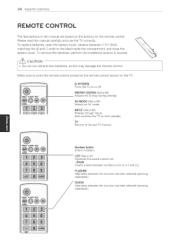
... reverse. [-_ CAUTION , Do not mix old and new batteries, as 2-1 and 2-2. Make sure to point the remote control toward at the remote control sensor on the TV. 0) (POWER) Turns the TV on the remote control. QVl EW Alternates between the two last channels selected (pressing repeatedly). To replace batteries, open the battery cover... the TV on from standby, TV Returns to the label inside the compartment, and close the battery cover. Please read this may damage the remote control.
... reverse. [-_ CAUTION , Do not mix old and new batteries, as 2-1 and 2-2. Make sure to point the remote control toward at the remote control sensor on the TV. 0) (POWER) Turns the TV on the remote control. QVl EW Alternates between the two last channels selected (pressing repeatedly). To replace batteries, open the battery cover... the TV on from standby, TV Returns to the label inside the compartment, and close the battery cover. Please read this may damage the remote control.
Owners Manual
Page 35
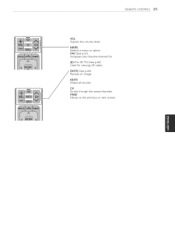
MUTE Mutes all sounds. CH Scrolls through the saved channels, PAGE Moves to the previous or next screen. REMOTE CONTROL 35 VOL Adjusts the volume level. MARK Selects a menu or option. FAV (See p.41) Accesses your favorite channel list, 3D (For 3D TV) (See p.48) Used for viewing 3D video, RATIO (See p.44) Resizes an image.
MUTE Mutes all sounds. CH Scrolls through the saved channels, PAGE Moves to the previous or next screen. REMOTE CONTROL 35 VOL Adjusts the volume level. MARK Selects a menu or option. FAV (See p.41) Accesses your favorite channel list, 3D (For 3D TV) (See p.48) Used for viewing 3D video, RATIO (See p.44) Resizes an image.

Owners Manual
Page 36
... the SiMPLiNK menu. MENU (See p.46) Accesses the quick menu. Home Accesses the main menus, or saves your input and exit the menus. Q. 36 REMOTE CONTROL INFO (See p.42) Views the information of the current program and screen.
... the SiMPLiNK menu. MENU (See p.46) Accesses the quick menu. Home Accesses the main menus, or saves your input and exit the menus. Q. 36 REMOTE CONTROL INFO (See p.42) Views the information of the current program and screen.

Owners Manual
Page 37
Opens the StMPLINK menu, RATIO (See p.44) Resizes an image. SIMPLINK (See p,82) Accesses the AV devices connected to the TV; REMOTE CONTROL 37 Control buttons Controls the StMPLINK compatible devices (USB,StMPLINK). Freezes the current frame (Not supported when using USB Mode and Simplink.).
Opens the StMPLINK menu, RATIO (See p.44) Resizes an image. SIMPLINK (See p,82) Accesses the AV devices connected to the TV; REMOTE CONTROL 37 Control buttons Controls the StMPLINK compatible devices (USB,StMPLINK). Freezes the current frame (Not supported when using USB Mode and Simplink.).
Owners Manual
Page 39
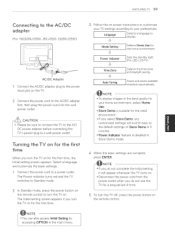
... turns red and the TV switches to Standby mode. 2 In Standby mode, press the power button on the remote control to turn the TV off, press the power button on the remote control. Power Indicator feature is suitable for a long period of Store Demo in 5 minutes. Select a language and customize the basic...
... turns red and the TV switches to Standby mode. 2 In Standby mode, press the power button on the remote control to turn the TV off, press the power button on the remote control. Power Indicator feature is suitable for a long period of Store Demo in 5 minutes. Select a language and customize the basic...

Owners Manual
Page 40
... TV scans a blocked channel, you are watching TV ( _ ). 1 The Lock icon (_) appears in the order of a channel blocked with parental control. 2 Each AV mode has the optimized image and sound settings. RATIO Resizes an image (See p.44). Managing channels *The Digital broadcasting (DTV, Cable...the Navigation buttons to scroll to the previously customized settings. 4 To turn the TV on. 2 Press INPUT and select TV. 3 Control the TV using the following while you are watching TV. Alternates between the last two channels selected. buttons _Button CH (A, V) ' Description...
... TV scans a blocked channel, you are watching TV ( _ ). 1 The Lock icon (_) appears in the order of a channel blocked with parental control. 2 Each AV mode has the optimized image and sound settings. RATIO Resizes an image (See p.44). Managing channels *The Digital broadcasting (DTV, Cable...the Navigation buttons to scroll to the previously customized settings. 4 To turn the TV on. 2 Press INPUT and select TV. 3 Control the TV using the following while you are watching TV. Alternates between the last two channels selected. buttons _Button CH (A, V) ' Description...

Owners Manual
Page 41
... scroll to the previous or next page, press CH (A, V). - To move to register or cancel the current channel in front of a channel blocked with parental control. • If you select the blocked channel, you want and press ENTER. - @ NOTE • The Lock icon (_) appears in favorite channel list. Adds or deletes...
... scroll to the previous or next page, press CH (A, V). - To move to register or cancel the current channel in front of a channel blocked with parental control. • If you select the blocked channel, you want and press ENTER. - @ NOTE • The Lock icon (_) appears in favorite channel list. Adds or deletes...
Owners Manual
Page 46
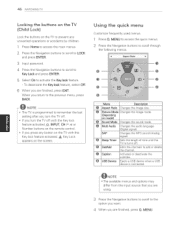
... buttons on the TV to prevent any button on the TV with the Key lock feature activated, O, INPUT, CH (A, V) or Number buttons on the remote control. Sets the length of time until the TV to turns off.
... buttons on the TV to prevent any button on the TV with the Key lock feature activated, O, INPUT, CH (A, V) or Number buttons on the remote control. Sets the length of time until the TV to turns off.
Owners Manual
Page 51
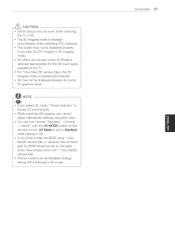
... 3D imaging mode is turned off automatically. You can be seen when 3D Mode is selected appropriately for BGM should be set on the remote control. While watching 3D imaging, you cannot adjust video/audio settings using _.mpo file(3D camera file), In advance, the contents path for the 3D input...
... 3D imaging mode is turned off automatically. You can be seen when 3D Mode is selected appropriately for BGM should be set on the remote control. While watching 3D imaging, you cannot adjust video/audio settings using _.mpo file(3D camera file), In advance, the contents path for the 3D input...
Owners Manual
Page 55
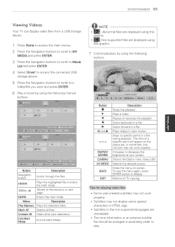
... point will appear on screen. Returns to TV viewing. * Some user-created subtitles may not work properly. Subtitles may not display some flies, this graphic. 7 Control playback by using the following menus/ buttons. Subtitles in a file during playback. Exit the Mark Mode. Skips to specific points in the non-supported languages...
... point will appear on screen. Returns to TV viewing. * Some user-created subtitles may not work properly. Subtitles may not display some flies, this graphic. 7 Control playback by using the following menus/ buttons. Subtitles in a file during playback. Exit the Mark Mode. Skips to specific points in the non-supported languages...
Owners Manual
Page 61
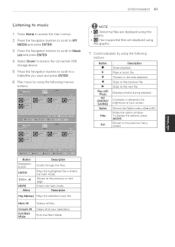
... buttons to scroll to Music List and press ENTER. 4 Select Drivel to a folder/file you want and press ENTER. 6 Play music by using this graphic. 7 Control playback by using the following buttons.
... buttons to scroll to Music List and press ENTER. 4 Select Drivel to a folder/file you want and press ENTER. 6 Play music by using this graphic. 7 Control playback by using the following buttons.


