
Owners Manual
Page 3
... from being walked on or pinched particularly at plugs, convenience receptacles, and the point where they exit from the apparatus. 2 Clean only with the cart, stand, tripod, bracket, or table specified by the manufacturer. 3 Do not block any heat sources such as power- supply cord or plug is required when the...
... from being walked on or pinched particularly at plugs, convenience receptacles, and the point where they exit from the apparatus. 2 Clean only with the cart, stand, tripod, bracket, or table specified by the manufacturer. 3 Do not block any heat sources such as power- supply cord or plug is required when the...
Owners Manual
Page 6
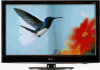
... SAFETY INSTRUCTIONS 3 FEATURE OF THIS TV 8 PREPARATION Accessories 9 Front Panel Information 10 Back Panel Information 11 Stand Instruction 12 VESA Wall Mounting 14 Cable Management 15 Desktop Pedestal Installation 16 Swivel Stand 16 Kensington Security System 16 Attaching the TV to a Desk 17 Securing the TV to the wall to... prevent falling when the TV is used on a stand 18 Antenna or Cable Connection 19 EXTERNAL EQUIPMENT SETUP HD Receiver Setup 20 DVD Setup 23 VCR Setup 25 Other A/V Source Setup 27 ...
... SAFETY INSTRUCTIONS 3 FEATURE OF THIS TV 8 PREPARATION Accessories 9 Front Panel Information 10 Back Panel Information 11 Stand Instruction 12 VESA Wall Mounting 14 Cable Management 15 Desktop Pedestal Installation 16 Swivel Stand 16 Kensington Security System 16 Attaching the TV to a Desk 17 Securing the TV to the wall to... prevent falling when the TV is used on a stand 18 Antenna or Cable Connection 19 EXTERNAL EQUIPMENT SETUP HD Receiver Setup 20 DVD Setup 23 VCR Setup 25 Other A/V Source Setup 27 ...
Owners Manual
Page 9
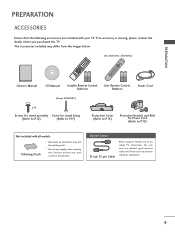
Option Extras D-sub 15 pin Cable When using the VGA (D-sub 15 pin cable) PC connection, the user must use shielded signal interface cables with the polishing cloth. * Do not wipe roughly when removing stain. ... VOL 2 3 6 BED1 BED2 1.5V 1.5V Owner's Manual CD Manual Installer Remote Control, User Remote Control, Batteries Batteries Power Cord (Except 47LH300C) x 4 Screws for stand assembly Screw for stand fixing (Refer to P.12) (Refer to P.17) Protection Cover (Refer to P.13) Protective Bracket and Bolt for Power Cord (Refer to P.15) Not included...
Option Extras D-sub 15 pin Cable When using the VGA (D-sub 15 pin cable) PC connection, the user must use shielded signal interface cables with the polishing cloth. * Do not wipe roughly when removing stain. ... VOL 2 3 6 BED1 BED2 1.5V 1.5V Owner's Manual CD Manual Installer Remote Control, User Remote Control, Batteries Batteries Power Cord (Except 47LH300C) x 4 Screws for stand assembly Screw for stand fixing (Refer to P.12) (Refer to P.17) Protection Cover (Refer to P.13) Protective Bracket and Bolt for Power Cord (Refer to P.15) Not included...
Owners Manual
Page 12
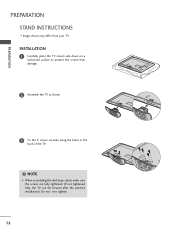
INSTALLATION 1 Carefully place the TV screen side down on a cushioned surface to protect the screen from your TV. PREPARATION PREPARATION STAND INSTRUCTIONS I Image shown may differ from damage. 2 Assemble the TV as shown. 3 Fix the 4 screws securely using the holes in the back of the TV. ! Do not over tighten. 12 NOTE G When assembling the desk type stand, make sure the screws are fully tightened (If not tightened fully, the TV can tilt forward after the product installation).
INSTALLATION 1 Carefully place the TV screen side down on a cushioned surface to protect the screen from your TV. PREPARATION PREPARATION STAND INSTRUCTIONS I Image shown may differ from damage. 2 Assemble the TV as shown. 3 Fix the 4 screws securely using the holes in the back of the TV. ! Do not over tighten. 12 NOTE G When assembling the desk type stand, make sure the screws are fully tightened (If not tightened fully, the TV can tilt forward after the product installation).
Owners Manual
Page 13
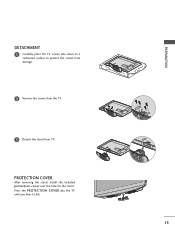
PROTECTION COVER After removing the stand, install the included protection cover over the hole for the stand. Press the PROTECTION COVER into the TV until you hear it click. 13 PREPARATION DETACHMENT 1 Carefully place the TV screen side down on a cushioned surface to protect the screen from damage. 2 Remove the screws from the TV. 3 Detach the stand from TV.
PROTECTION COVER After removing the stand, install the included protection cover over the hole for the stand. Press the PROTECTION COVER into the TV until you hear it click. 13 PREPARATION DETACHMENT 1 Carefully place the TV screen side down on a cushioned surface to protect the screen from damage. 2 Remove the screws from the TV. 3 Detach the stand from TV.

Owners Manual
Page 16
... G Do not mount near or above any type of the Kensington company. Connect the Kensington Security System cable as notebook PCs and LCD projectors. For further information, contact http://www.kensington.com, the internet homepage of heat source. For proper ventilation, allow a clearance ...the left or right direction by following the clearance recommendations. Kensington sells security systems for all four sides from your viewing position. SWIVEL STAND After installing the TV, you can adjust the TV set manually to the user's guide provided with a Kensington Security System connector on...
... G Do not mount near or above any type of the Kensington company. Connect the Kensington Security System cable as notebook PCs and LCD projectors. For further information, contact http://www.kensington.com, the internet homepage of heat source. For proper ventilation, allow a clearance ...the left or right direction by following the clearance recommendations. Kensington sells security systems for all four sides from your viewing position. SWIVEL STAND After installing the TV, you can adjust the TV set manually to the user's guide provided with a Kensington Security System connector on...
Owners Manual
Page 17
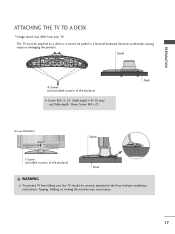
... (not provided as parts of the product) G Screw: M5 x L (*L: Table depth + 8~10 mm) ex) Table depth: 15mm, Screw: M5 x 25 (Except 47LH300C) Stand 1-Screw (provided as parts of the product) Desk WARNING G To prevent TV from your TV. Tipping, shaking, or rocking the machine may differ from falling ...
... (not provided as parts of the product) G Screw: M5 x L (*L: Table depth + 8~10 mm) ex) Table depth: 15mm, Screw: M5 x 25 (Except 47LH300C) Stand 1-Screw (provided as parts of the product) Desk WARNING G To prevent TV from your TV. Tipping, shaking, or rocking the machine may differ from falling ...
Owners Manual
Page 18
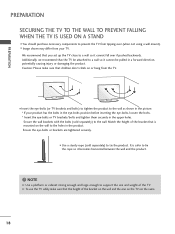
... cannot fall over (when not using a wall mount). PREPARATION PREPARATION SECURING THE TV TO THE WALL TO PREVENT FALLING WHEN THE TV IS USED ON A STAND I Use a sturdy rope (sold separately) to the wall. Ensure the eye-bolts or brackets are the same. 18
... cannot fall over (when not using a wall mount). PREPARATION PREPARATION SECURING THE TV TO THE WALL TO PREVENT FALLING WHEN THE TV IS USED ON A STAND I Use a sturdy rope (sold separately) to the wall. Ensure the eye-bolts or brackets are the same. 18
Owners Manual
Page 107
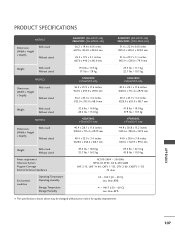
...) 40.4 x 28.1 x 11.6 inches 1028.0 x 715.4 x 297.0 mm 40.4 x 25.7 x 3.4 inches 1028.0 x 655.0 x 88.7 mm Weight With stand Without stand MODELS Dimensions (Width x Height x Depth) With stand Without stand 32.6 lbs / 14.8 kg 28.6 lbs / 13.0 kg 42LH300C (42LH300C-UA) 40.4 x 28.1 x 11.6 inches 1028.0 x 715.4 x 297.0 mm 40.4 x 25.9 x 3.4 inches 1028.0 x 658.6 x 88.7 mm 41...
...) 40.4 x 28.1 x 11.6 inches 1028.0 x 715.4 x 297.0 mm 40.4 x 25.7 x 3.4 inches 1028.0 x 655.0 x 88.7 mm Weight With stand Without stand MODELS Dimensions (Width x Height x Depth) With stand Without stand 32.6 lbs / 14.8 kg 28.6 lbs / 13.0 kg 42LH300C (42LH300C-UA) 40.4 x 28.1 x 11.6 inches 1028.0 x 715.4 x 297.0 mm 40.4 x 25.9 x 3.4 inches 1028.0 x 658.6 x 88.7 mm 41...


