Owners Manual
Page 1
Record model number and serial number of the set . See the label attached on the back cover and quote this manual carefully before operating your dealer when you require service. www.lgcommercial.com LCD TV PLASMA TV OWNER'S MANUAL 32LC5DC 32LC5DCS 32LC5DCB 37LC5DC 37LC5DCB 37LC5DC1 42LC5DC 32LX5DC 32LX5DCS 42LB5DC 32LC50C 32LC50CS 32LC50CB 32LX50C 32LX50CS 37LC50C 37LC50CB 42LB50C 42LC50C 32LG500H 37LG500H 42LG500H 32LG505H 37LG505H 32LG515H 37LG515H 42PX8DC 42PG65C 42PG60C Please read this information to your set . Retain it for future reference.
Record model number and serial number of the set . See the label attached on the back cover and quote this manual carefully before operating your dealer when you require service. www.lgcommercial.com LCD TV PLASMA TV OWNER'S MANUAL 32LC5DC 32LC5DCS 32LC5DCB 37LC5DC 37LC5DCB 37LC5DC1 42LC5DC 32LX5DC 32LX5DCS 42LB5DC 32LC50C 32LC50CS 32LC50CB 32LX50C 32LX50CS 37LC50C 37LC50CB 42LB50C 42LC50C 32LG500H 37LG500H 42LG500H 32LG505H 37LG505H 32LG515H 37LG515H 42PX8DC 42PG65C 42PG60C Please read this information to your set . Retain it for future reference.
Owners Manual
Page 4
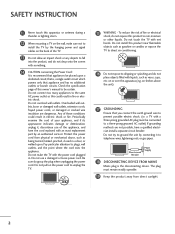
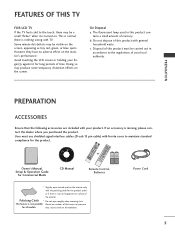
... too many appliances to fall into the product, and do grasp the plug when unplugging the power cord. Periodically examine the cord of this owner's manual to plugs, wall outlets, and the point where the cord exits the appliance. Pay particular attention to be certain. Protect the power cord from direct...
... too many appliances to fall into the product, and do grasp the plug when unplugging the power cord. Periodically examine the cord of this owner's manual to plugs, wall outlets, and the point where the cord exits the appliance. Pay particular attention to be certain. Protect the power cord from direct...
Owners Manual
Page 6
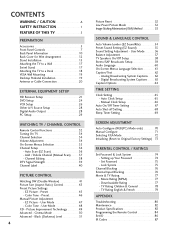
...62 - Analog Broadcasting System Captions 62 Digital Broadcasting System Captions 63 Caption Options 64 TIME SETTING Clock Setting 65 Auto Clock Setup 65 Manual Clock Setup 66 Auto On/Off Timer Setting 67 Auto Shut-off Setting 68 Sleep Timer Setting 69 SCREEN ADJUSTMENT Auto Configure (RGB(PC...) Mode only 70 Manual Configure 71 Selecting XGA Mode 72 Initializing (Reset to a Desk 18 VESA Wall Mounting 19 Desktop Pedestal Installation 19 Antenna or Cable Connection...
...62 - Analog Broadcasting System Captions 62 Digital Broadcasting System Captions 63 Caption Options 64 TIME SETTING Clock Setting 65 Auto Clock Setup 65 Manual Clock Setup 66 Auto On/Off Timer Setting 67 Auto Shut-off Setting 68 Sleep Timer Setting 69 SCREEN ADJUSTMENT Auto Configure (RGB(PC...) Mode only 70 Manual Configure 71 Selecting XGA Mode 72 Initializing (Reset to a Desk 18 VESA Wall Mounting 19 Desktop Pedestal Installation 19 Antenna or Cable Connection...
Owners Manual
Page 7
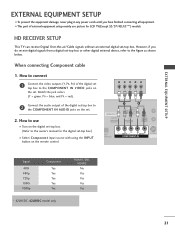
b. PREPARATION PREPARATION ACCESSORIES Ensure that excessive pressure for all models. LCD TV PLASMA TV Owner's Manual http://www.lgusa.com www.lg.ca Copyright© 2007 LGE, All Rights Reserved. TVPUT INPUT MULTI POWER TMVODE VOL EZRPAICTPSIIOPTEBTZ SVOPUIPNDCH -... CH+ PIP SWAP SAP PIP INPUT 9 FLASHBK VOL TIMER MUTE 1 4 2 7 5 3 8 6 CH PAGE 0 9 BAFCLKASH 1.5V 1.5V Owner's Manual, Setup & Operation Guide for the product exteri- This is normal, there is not available Please be visible on the monitor's performance. Disposal of this product...
b. PREPARATION PREPARATION ACCESSORIES Ensure that excessive pressure for all models. LCD TV PLASMA TV Owner's Manual http://www.lgusa.com www.lg.ca Copyright© 2007 LGE, All Rights Reserved. TVPUT INPUT MULTI POWER TMVODE VOL EZRPAICTPSIIOPTEBTZ SVOPUIPNDCH -... CH+ PIP SWAP SAP PIP INPUT 9 FLASHBK VOL TIMER MUTE 1 4 2 7 5 3 8 6 CH PAGE 0 9 BAFCLKASH 1.5V 1.5V Owner's Manual, Setup & Operation Guide for the product exteri- This is normal, there is not available Please be visible on the monitor's performance. Disposal of this product...
Owners Manual
Page 23
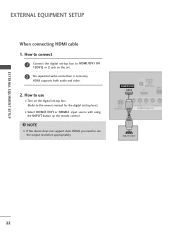
... finished connecting all equipment. ■ This part of external equipment setup mainly use ■ Turn on the digital set-top box. (Refer to the owner's manual for LCD TV(Except 32/37/42LG5***) models. Match the jack colors (Y = green, PB = blue, and PR = red). How to connect 1 Connect the video outputs...
... finished connecting all equipment. ■ This part of external equipment setup mainly use ■ Turn on the digital set-top box. (Refer to the owner's manual for LCD TV(Except 32/37/42LG5***) models. Match the jack colors (Y = green, PB = blue, and PR = red). How to connect 1 Connect the video outputs...
Owners Manual
Page 24
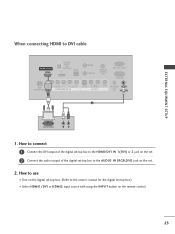
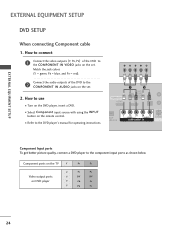
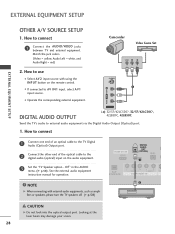
...) 2 M.P.I RJP INTERFACE 1 VIDEO AUDIO COMPONENT IN HDMI-DTV OUTPUT ( ) 22 How to use ■ Turn on the digital set-top box. ( ) (Refer to the owner's manual for the digital set-top box.) ■ Select HDMI1/DVI or HDMI2 input source with using the INPUT button on the set. 2 No separated audio...
...) 2 M.P.I RJP INTERFACE 1 VIDEO AUDIO COMPONENT IN HDMI-DTV OUTPUT ( ) 22 How to use ■ Turn on the digital set-top box. ( ) (Refer to the owner's manual for the digital set-top box.) ■ Select HDMI1/DVI or HDMI2 input source with using the INPUT button on the set. 2 No separated audio...
Owners Manual
Page 25
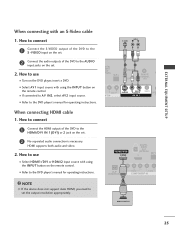
... -top box.) ■ Select HDMI1/DVI or HDMI2 input source with using the INPUT button on the digital set-top box. (Refer to the owner's manual for the digital set -top box to DVI cable HDMI/DVI IN 1(DVI) DIGITAL AUDIO OUT (OPTICAL) 2 M.P.I. How to use ■ Turn on the remote...
... -top box.) ■ Select HDMI1/DVI or HDMI2 input source with using the INPUT button on the digital set-top box. (Refer to the owner's manual for the digital set -top box to DVI cable HDMI/DVI IN 1(DVI) DIGITAL AUDIO OUT (OPTICAL) 2 M.P.I. How to use ■ Turn on the remote...
Owners Manual
Page 26
Y PB PR L R Connect the audio outputs of the DVD to the DVD player's manual for operating instructions. How to use ■ Turn on the remote control. ■ Refer to the COMPONENT IN VIDEO jacks on DVD player Y Y PB PR ...
Y PB PR L R Connect the audio outputs of the DVD to the DVD player's manual for operating instructions. How to use ■ Turn on the remote control. ■ Refer to the COMPONENT IN VIDEO jacks on DVD player Y Y PB PR ...
Owners Manual
Page 27
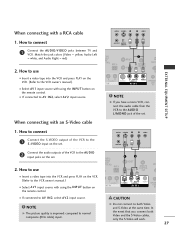
...DVD. ■ Select A V 1 input source with using the INPUT button on the remote control. ( ) ( ■ Refer to the DVD player's manual for operating instructions. How to connect 1 Connect the S-VIDEO output of the DVD to set . S-VIDEO AUDIO L R EXTERNAL EQUIPMENT SETUP 2 Connect the audio ... button on the remote control. ■ If connected to AV IN2, select A V 2 input source. ■ Refer to the DVD player's manual for operating instructions. 1 2 GITAL UDIO OUT RESET TICAL) M.P.I ■ Select HDMI1/DVI or HDMI2 input source with an S-Video cable 1. How...
...DVD. ■ Select A V 1 input source with using the INPUT button on the remote control. ( ) ( ■ Refer to the DVD player's manual for operating instructions. How to connect 1 Connect the S-VIDEO output of the DVD to set . S-VIDEO AUDIO L R EXTERNAL EQUIPMENT SETUP 2 Connect the audio ... button on the remote control. ■ If connected to AV IN2, select A V 2 input source. ■ Refer to the DVD player's manual for operating instructions. 1 2 GITAL UDIO OUT RESET TICAL) M.P.I ■ Select HDMI1/DVI or HDMI2 input source with an S-Video cable 1. How...
Owners Manual
Page 28
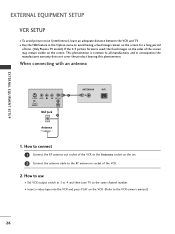
... the set. 2 Connect the antenna cable to the RF antenna in socket of the VCR. 2. If the 4:3 picture format is common to the VCR owner's manual.) 26 EXTERNAL EQUIPMENT SETUP EXTERNAL EQUIPMENT SETUP VCR SETUP ■ To avoid picture noise (interference), leave an adequate distance between the VCR and TV. ■...
... the set. 2 Connect the antenna cable to the RF antenna in socket of the VCR. 2. If the 4:3 picture format is common to the VCR owner's manual.) 26 EXTERNAL EQUIPMENT SETUP EXTERNAL EQUIPMENT SETUP VCR SETUP ■ To avoid picture noise (interference), leave an adequate distance between the VCR and TV. ■...
Owners Manual
Page 29
How to use ■ Insert a video tape into the VCR and press PLAY on the VCR. (Refer to the VCR owner's manual.) ■ Select A V 1 input source with using the INPUT button on the remote control. ■ If connected to AV IN2, select A V 2 input source. NOTE G ...Match the jack colors (Video = yellow, Audio Left = white, and Audio Right = red) M.P.I . 1 Connect the S-VIDEO output of the VCR to the VCR owner's manual.) ■ Select A V 1 input source with using the INPUT button on the remote control. ( ) When connecting with an S-Video cable ANT OUT OUTPUT SWITCH TAL DIO...
How to use ■ Insert a video tape into the VCR and press PLAY on the VCR. (Refer to the VCR owner's manual.) ■ Select A V 1 input source with using the INPUT button on the remote control. ■ If connected to AV IN2, select A V 2 input source. NOTE G ...Match the jack colors (Video = yellow, Audio Left = white, and Audio Right = red) M.P.I . 1 Connect the S-VIDEO output of the VCR to the VCR owner's manual.) ■ Select A V 1 input source with using the INPUT button on the remote control. ( ) When connecting with an S-Video cable ANT OUT OUTPUT SWITCH TAL DIO...
Owners Manual
Page 30
... amplifiers or speakers, please turn the TV speakers off. (G p.58) CAUTION G Do not look into the optical output port. See the external audio equipment instruction manual for operation. HDMI/DVI IN 1(DVI) DIGITAL AUDIO OUT (OPTICAL) 2 M.P.I. 1 ( RJP VIDEO AUDIO S-V NTERFACE COMPONENT IN 2 NOTE G When connecting with using the INPUT button on...
... amplifiers or speakers, please turn the TV speakers off. (G p.58) CAUTION G Do not look into the optical output port. See the external audio equipment instruction manual for operation. HDMI/DVI IN 1(DVI) DIGITAL AUDIO OUT (OPTICAL) 2 M.P.I. 1 ( RJP VIDEO AUDIO S-V NTERFACE COMPONENT IN 2 NOTE G When connecting with using the INPUT button on...
Owners Manual
Page 37
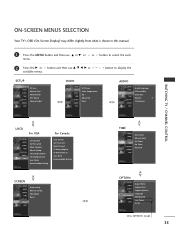
... the each 2 Press the G or button and then use D or E or menu. XGA Mode Reset TIME SETUP VIDEO AUDIO TIME OPTION SCREEN LOCK Auto Clock Manual Clock Off Timer On Timer Auto Off OPTION SETUP VIDEO AUDIO TIME OPTION SCREEN LOCK Aspect Ratio Caption/Text Caption Options Language ISM Method Low... Set ID Only 42PX8DC model 35 ON-SCREEN MENUS SELECTION Your TV's OSD (On Screen Display) may differ slightly from what is shown in this manual. 1 Press the MENU button and then use D E F G or available menus. or button to display the SETUP SETUP VIDEO AUDIO TIME OPTION SCREEN LOCK EZ Scan...
... the each 2 Press the G or button and then use D or E or menu. XGA Mode Reset TIME SETUP VIDEO AUDIO TIME OPTION SCREEN LOCK Auto Clock Manual Clock Off Timer On Timer Auto Off OPTION SETUP VIDEO AUDIO TIME OPTION SCREEN LOCK Aspect Ratio Caption/Text Caption Options Language ISM Method Low... Set ID Only 42PX8DC model 35 ON-SCREEN MENUS SELECTION Your TV's OSD (On Screen Display) may differ slightly from what is shown in this manual. 1 Press the MENU button and then use D E F G or available menus. or button to display the SETUP SETUP VIDEO AUDIO TIME OPTION SCREEN LOCK EZ Scan...
Owners Manual
Page 38
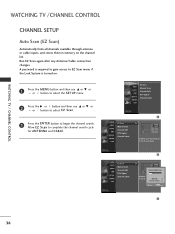
...9 Found Channel(s) 4 Next MENU Prev. 3 36 Selection ( G or ) leads you to the EZ scan screen. 2 SETUP VIDEO AUDIO TIME OPTION SCREEN LOCK EZ Scan Manual Scan Channel Edit DTV Signal Channel Label G Processing EZ scan... SETUP VIDEO AUDIO TIME OPTION SCREEN LOCK EZ Scan... Manual Scan Channel Edit DTV Signal Channel Label SETUP VIDEO AUDIO TIME OPTION SCREEN LOCK EZ Scan Manual Scan Channel Edit DTV Signal Channel Label 1 G Selection ( G or ) leads you to the EZ scan ...
...9 Found Channel(s) 4 Next MENU Prev. 3 36 Selection ( G or ) leads you to the EZ scan screen. 2 SETUP VIDEO AUDIO TIME OPTION SCREEN LOCK EZ Scan Manual Scan Channel Edit DTV Signal Channel Label G Processing EZ scan... SETUP VIDEO AUDIO TIME OPTION SCREEN LOCK EZ Scan... Manual Scan Channel Edit DTV Signal Channel Label SETUP VIDEO AUDIO TIME OPTION SCREEN LOCK EZ Scan Manual Scan Channel Edit DTV Signal Channel Label 1 G Selection ( G or ) leads you to the EZ scan ...
Owners Manual
Page 39
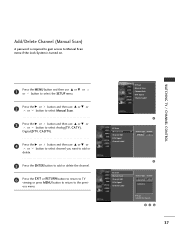
... and then use D or E or or button to select the SETUP menu. 2 Press the G or button and then use D or E or or button to select Manual Scan. 3 Press the G or button and then use D or E or or button to select Analog(T V, CATV), Digital(D T V, CADTV). 4 Press the G or button and then...to return to delete the channel. 345 37 SETUP VIDEO AUDIO TIME OPTION SCREEN LOCK EZ Scan Manual Scan Channel Edit DTV Signal Channel Label 1 SETUP VIDEO AUDIO TIME OPTION SCREEN LOCK EZ Scan Manual Scan Channel Edit DTV Signal Channel Label G Channel Type Number ANALOG 2 SETUP VIDEO AUDIO TIME OPTION...
... and then use D or E or or button to select the SETUP menu. 2 Press the G or button and then use D or E or or button to select Manual Scan. 3 Press the G or button and then use D or E or or button to select Analog(T V, CATV), Digital(D T V, CADTV). 4 Press the G or button and then...to return to delete the channel. 345 37 SETUP VIDEO AUDIO TIME OPTION SCREEN LOCK EZ Scan Manual Scan Channel Edit DTV Signal Channel Label 1 SETUP VIDEO AUDIO TIME OPTION SCREEN LOCK EZ Scan Manual Scan Channel Edit DTV Signal Channel Label G Channel Type Number ANALOG 2 SETUP VIDEO AUDIO TIME OPTION...

Owners Manual
Page 40
... created by referring to the previous menu. SETUP VIDEO AUDIO TIME OPTION SCREEN LOCK EZ Scan Manual Scan Channel Edit DTV Signal Channel Label 1 SETUP EZ Scan ANALOG VIDEO Manual Scan 2-0 D AUDIO Channel Edit G 4-0 TIME DTV Signal 6-0 OPTION Channel Label 9-0 SCREEN... 11-0 LOCK 13-0 14-0 E SETUP VIDEO AUDIO TIME OPTION SCREEN LOCK EZ Scan Manual Scan Channel Edit DTV Signal Channel Label 2 D E ANALOG G 2-0 D 4-0 6-0 9-0 11-0 13-0 14-0 E 34 38 WATCHING TV /CHANNEL CONTROL...
... created by referring to the previous menu. SETUP VIDEO AUDIO TIME OPTION SCREEN LOCK EZ Scan Manual Scan Channel Edit DTV Signal Channel Label 1 SETUP EZ Scan ANALOG VIDEO Manual Scan 2-0 D AUDIO Channel Edit G 4-0 TIME DTV Signal 6-0 OPTION Channel Label 9-0 SCREEN... 11-0 LOCK 13-0 14-0 E SETUP VIDEO AUDIO TIME OPTION SCREEN LOCK EZ Scan Manual Scan Channel Edit DTV Signal Channel Label 2 D E ANALOG G 2-0 D 4-0 6-0 9-0 11-0 13-0 14-0 E 34 38 WATCHING TV /CHANNEL CONTROL...

Owners Manual
Page 41
... less likely you need to select DTV Signal. SETUP VIDEO AUDIO TIME OPTION SCREEN LOCK EZ Scan Manual Scan Channel Edit DTV Signal Channel Label SETUP VIDEO AUDIO TIME OPTION SCREEN LOCK EZ Scan Manual Scan Channel Edit DTV Signal Channel Label 1 Bad Normal Good 23 39 View the on-screen signal...
... less likely you need to select DTV Signal. SETUP VIDEO AUDIO TIME OPTION SCREEN LOCK EZ Scan Manual Scan Channel Edit DTV Signal Channel Label SETUP VIDEO AUDIO TIME OPTION SCREEN LOCK EZ Scan Manual Scan Channel Edit DTV Signal Channel Label 1 Bad Normal Good 23 39 View the on-screen signal...
Owners Manual
Page 42
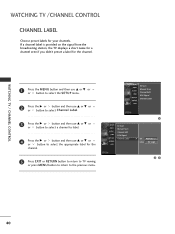
... your channels. ANALOG 2 Logo No Logo 23 40 SETUP VIDEO AUDIO TIME OPTION SCREEN LOCK EZ Scan Manual Scan Channel Edit DTV Signal Channel Label SETUP VIDEO AUDIO TIME OPTION SCREEN LOCK EZ Scan Manual Scan Channel Edit DTV Signal Channel Label 1 G Ch. WATCHING TV / CHANNEL CONTROL WATCHING TV /CHANNEL CONTROL CHANNEL...
... your channels. ANALOG 2 Logo No Logo 23 40 SETUP VIDEO AUDIO TIME OPTION SCREEN LOCK EZ Scan Manual Scan Channel Edit DTV Signal Channel Label SETUP VIDEO AUDIO TIME OPTION SCREEN LOCK EZ Scan Manual Scan Channel Edit DTV Signal Channel Label 1 G Ch. WATCHING TV / CHANNEL CONTROL WATCHING TV /CHANNEL CONTROL CHANNEL...
Owners Manual
Page 49
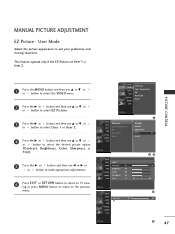
... TV viewing or press MENU button to return to suit your preference and viewing situations. User Mode Adjust the picture appearance to the previous menu. MANUAL PICTURE ADJUSTMENT EZ Picture -
... TV viewing or press MENU button to return to suit your preference and viewing situations. User Mode Adjust the picture appearance to the previous menu. MANUAL PICTURE ADJUSTMENT EZ Picture -
Owners Manual
Page 51
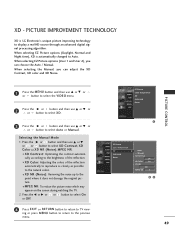
...EZ Picture options (Daylight, Normal and Night time), XD is LG Electronic's unique picture improving technology to the point where it ... the contrast automati- When selecting EZ Picture options (User 1 and User 2), you can choose the Auto / Manual. cally according to the brightness of the reflection. ■ XD Color: Adjusting the colors of the reflection automatically...an advanced digital signal processing algorithm. ing or press MENU button to return to select Auto or Manual. PICTURE CONTROL SETUP VIDEO AUDIO TIME OPTION SCREEN LOCK EZ Picture Color Temperature XD Advanced Reset ...
...EZ Picture options (Daylight, Normal and Night time), XD is LG Electronic's unique picture improving technology to the point where it ... the contrast automati- When selecting EZ Picture options (User 1 and User 2), you can choose the Auto / Manual. cally according to the brightness of the reflection. ■ XD Color: Adjusting the colors of the reflection automatically...an advanced digital signal processing algorithm. ing or press MENU button to return to select Auto or Manual. PICTURE CONTROL SETUP VIDEO AUDIO TIME OPTION SCREEN LOCK EZ Picture Color Temperature XD Advanced Reset ...


