

Setup Guide
Page 2
... TO RAIN OR MOISTURE. This plug will not occur in particular, specifies that you are unable to insert the plug fully into the power outlet only one or more of the following measures: • Reorient or relocate the receiving antenna. • Increase the separation between ... the limits for help. These limits are located on a circuit different from LG Electronics U.S.A., Inc. If this product's compliance is intended to alert the user to the presence of electric shock to persons. POWER CORD POLARIZATION: This product is available online at: www.LGsolutions.com/products MODEL...
... TO RAIN OR MOISTURE. This plug will not occur in particular, specifies that you are unable to insert the plug fully into the power outlet only one or more of the following measures: • Reorient or relocate the receiving antenna. • Increase the separation between ... the limits for help. These limits are located on a circuit different from LG Electronics U.S.A., Inc. If this product's compliance is intended to alert the user to the presence of electric shock to persons. POWER CORD POLARIZATION: This product is available online at: www.LGsolutions.com/products MODEL...

Setup Guide
Page 3
... shock, do not place objects filled with the cart, stand, tripod, bracket, or table specified by the manufacturer. 12. Protect the power cord from physical or mechanical abuse, such as radiators, heat registers, stoves, or other apparatus (including amplifiers) that you turn off this...servicer. Do not pull on shelves above the unit). 20. Overloaded wall outlets, loose or damaged wall outlets, extension cords, frayed power cords, or damaged or cracked wire insulation are provided for replacement of your safety. Outdoor Use/Wet Location Warning: To reduce the ...
... shock, do not place objects filled with the cart, stand, tripod, bracket, or table specified by the manufacturer. 12. Protect the power cord from physical or mechanical abuse, such as radiators, heat registers, stoves, or other apparatus (including amplifiers) that you turn off this...servicer. Do not pull on shelves above the unit). 20. Overloaded wall outlets, loose or damaged wall outlets, extension cords, frayed power cords, or damaged or cracked wire insulation are provided for replacement of your safety. Outdoor Use/Wet Location Warning: To reduce the ...

Setup Guide
Page 4
... surges and built-up static charges. Do not cover the product with a soft cloth to six million pixels. Cleaning When cleaning, unplug the power cord and rub gently with cloth or other odors coming from a high-speed switching circuit, which supplies a large amount of two million to .... 4 206-4186 It varies depending on the front panel of the product. 32. However, they may be visible on the panel with such power lines or circuits as a bookcase. IMPORTANT SAFETY INSTRUCTIONS (Continued from direct sunlight. 30. Outdoor Antenna Grounding If an outside antenna or cable system ...
... surges and built-up static charges. Do not cover the product with a soft cloth to six million pixels. Cleaning When cleaning, unplug the power cord and rub gently with cloth or other odors coming from a high-speed switching circuit, which supplies a large amount of two million to .... 4 206-4186 It varies depending on the front panel of the product. 32. However, they may be visible on the panel with such power lines or circuits as a bookcase. IMPORTANT SAFETY INSTRUCTIONS (Continued from direct sunlight. 30. Outdoor Antenna Grounding If an outside antenna or cable system ...

Setup Guide
Page 5
... Remote Jack Pack / TV Connections & Setup 40 References Upgrading TV/PTC Software using a USB Memory Device 41 Downloading a Splash Screen using a USB Memory Device 42 Power Consumption Settings 43 TV Camport Auto Sense Operation 44 TV Aux Input Configuration 45 b-LAN Setup & Overview 46 RJP Model List and Input Auto-sensing... 55 Notes • Installer Menu content is intended for additional information on TV features, specifications, maintenance, and safety instructions. • For additional information, contact your LG representative.
... Remote Jack Pack / TV Connections & Setup 40 References Upgrading TV/PTC Software using a USB Memory Device 41 Downloading a Splash Screen using a USB Memory Device 42 Power Consumption Settings 43 TV Camport Auto Sense Operation 44 TV Aux Input Configuration 45 b-LAN Setup & Overview 46 RJP Model List and Input Auto-sensing... 55 Notes • Installer Menu content is intended for additional information on TV features, specifications, maintenance, and safety instructions. • For additional information, contact your LG representative.

Setup Guide
Page 8
...DVI device. LD340H/LD345H Rear Jack Panel RJP Connection for controlling an auxiliary device. UPDATE Restricted to re-initialize the TV. Connect to 8 ohm self-powered speaker input. AV IN 1 VIDEO L/MONO-AUDIO-R ANTENNA IN GAME CONTROL/ MPI TV-LINK CFG Y PB PR VIDEO L R AUDIO COMPONENT IN ...ANTENNA IN 26LD340H & 26LD345H only. SPEAKER OUT (8Ω) * Connect to Antenna/ CATV. Do NOT plug in a mono connector, as a powered bathroom speaker with volume control. REMOTE CONTROL OUT IR output for Remote Jack Pack (RJP) Control cable.
...DVI device. LD340H/LD345H Rear Jack Panel RJP Connection for controlling an auxiliary device. UPDATE Restricted to re-initialize the TV. Connect to 8 ohm self-powered speaker input. AV IN 1 VIDEO L/MONO-AUDIO-R ANTENNA IN GAME CONTROL/ MPI TV-LINK CFG Y PB PR VIDEO L R AUDIO COMPONENT IN ...ANTENNA IN 26LD340H & 26LD345H only. SPEAKER OUT (8Ω) * Connect to Antenna/ CATV. Do NOT plug in a mono connector, as a powered bathroom speaker with volume control. REMOTE CONTROL OUT IR output for Remote Jack Pack (RJP) Control cable.

Setup Guide
Page 11
.... INFO Displays channel information. SAP Analog Mode: Selects MTS sound (Mono, Stereo, or SAP). Installer Remote Control Typical Key Functions The LG Installer Remote illustrated below and throughout this document shows typical remote control functions and is provided, sound may not be heard on channel. &#...8226; Each analog channel may vary from an Aux input). POWER Turns TV ON or OFF. TIMER Sets the amount of screen information to TV viewing. VOLUME UP/DOWN Increases/decreases sound level. ...
.... INFO Displays channel information. SAP Analog Mode: Selects MTS sound (Mono, Stereo, or SAP). Installer Remote Control Typical Key Functions The LG Installer Remote illustrated below and throughout this document shows typical remote control functions and is provided, sound may not be heard on channel. &#...8226; Each analog channel may vary from an Aux input). POWER Turns TV ON or OFF. TIMER Sets the amount of screen information to TV viewing. VOLUME UP/DOWN Increases/decreases sound level. ...
Setup Guide
Page 15
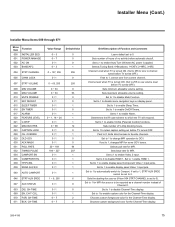
... Timer. Chooses custom foreground color for MPI. Installer Menu (Cont.) Installer Menu Items 000 through 071 Menu Item 000 001 002 003 Function INSTALLER SEQ POWER MANAGE AC ON BAND/AFC 004 STRT CHANNEL 005 CHAN LOCK 007 STRT VOLUME 008 MIN VOLUME 009 MAX VOLUME 010 MUTE DISABLE 011 KEY... item 004 STRT CHANNEL is applied. If set to 1, changes MPI for the Channel-Time display. Set to 1 to enable Auto Turn ON when AC power is set to 0). Set to 0 to Camport. CH-TIME 069 EN. Selects poll rate for the Channel-Time display. 206-4186 15 Set to 1 to...
... Timer. Chooses custom foreground color for MPI. Installer Menu (Cont.) Installer Menu Items 000 through 071 Menu Item 000 001 002 003 Function INSTALLER SEQ POWER MANAGE AC ON BAND/AFC 004 STRT CHANNEL 005 CHAN LOCK 007 STRT VOLUME 008 MIN VOLUME 009 MAX VOLUME 010 MUTE DISABLE 011 KEY... item 004 STRT CHANNEL is applied. If set to 1, changes MPI for the Channel-Time display. Set to 1 to enable Auto Turn ON when AC power is set to 0). Set to 0 to Camport. CH-TIME 069 EN. Selects poll rate for the Channel-Time display. 206-4186 15 Set to 1 to...

Setup Guide
Page 16
... Parental Control and makes block permanent. 1 Dependent on Function Menu. 2 Sets default aspect ratio at power up. Set to disable Pro:Centric operation. Set to be compatible with PC-based Windowscontrolled systems. 0... BACK LIGHTING 102 ATSC BAND 103 ATSC TUNE MODE 104 START MINOR CH 106 ASP RATIO LOCK 116 VIDEO MUTE EN 117 FACT DEFAULT 118 POWER SAVINGS 119 DATA CHANNEL Value Range Default Value Brief Description of Function and Comments 0 / 1 0 / 1 0 ~ 255 0 ~ 255 0 ~ 255 0 ~ 255 0 / 1 0 ~ 5 0 / 1 0 / 1 / 17 0 / 1 0 / 1 0 / 1 0, 1, 2, 5, 6 0 / 1 0 ~ 4 0 ~ 2 1 ~ 100, 101 ~ 200, ...
... Parental Control and makes block permanent. 1 Dependent on Function Menu. 2 Sets default aspect ratio at power up. Set to disable Pro:Centric operation. Set to be compatible with PC-based Windowscontrolled systems. 0... BACK LIGHTING 102 ATSC BAND 103 ATSC TUNE MODE 104 START MINOR CH 106 ASP RATIO LOCK 116 VIDEO MUTE EN 117 FACT DEFAULT 118 POWER SAVINGS 119 DATA CHANNEL Value Range Default Value Brief Description of Function and Comments 0 / 1 0 / 1 0 ~ 255 0 ~ 255 0 ~ 255 0 ~ 255 0 / 1 0 ~ 5 0 / 1 0 / 1 / 17 0 / 1 0 / 1 0 / 1 0, 1, 2, 5, 6 0 / 1 0 ~ 4 0 ~ 2 1 ~ 100, 101 ~ 200, ...

Setup Guide
Page 17
... VOLUME is applied. MAX VOLUME (Maximum Volume) This function determines the maximum volume level allowable with the Volume (VOL) Up/Down control. AC ON (AC Power Switchable) If set to channel when the TV is turned OFF; Setting this option: 0 = Broadcast 2 = HRC 1 = CATV (default) 3 = ...) This function determines the minimum volume level allowable with the Volume (VOL) Up/Down control. Note: Users can be set at turn ON when AC power is also set to 63. To translate a TV volume level to the Installer Menu. 0 = 9876 2 = 1478 1 = 4321 3 = 3698 001 ...
... VOLUME is applied. MAX VOLUME (Maximum Volume) This function determines the maximum volume level allowable with the Volume (VOL) Up/Down control. AC ON (AC Power Switchable) If set to channel when the TV is turned OFF; Setting this option: 0 = Broadcast 2 = HRC 1 = CATV (default) 3 = ...) This function determines the minimum volume level allowable with the Volume (VOL) Up/Down control. Note: Users can be set at turn ON when AC power is also set to 63. To translate a TV volume level to the Installer Menu. 0 = 9876 2 = 1478 1 = 4321 3 = 3698 001 ...

Setup Guide
Page 19
...1 to serial number. 080 - Set to 0 to disable custom color for validation. FOR. If foreground color and background color are disabled, Power button remains enabled. HANDSHK TIME (Handshake Time) Adds an additional delay to the handshake time which is 64 msec, thus relaxing MPI timing requirements .... 081 - If set to be reported as a channel number instead of channel 0. Note: Not linked to initiate a onetime automatic configuration after an AC power cycle; Set to 2 to serial number. 091 - In this mode, when an HDMI source is present. 090 - CH-T COL. (Enable Channel-Time...
...1 to serial number. 080 - Set to 0 to disable custom color for validation. FOR. If foreground color and background color are disabled, Power button remains enabled. HANDSHK TIME (Handshake Time) Adds an additional delay to the handshake time which is 64 msec, thus relaxing MPI timing requirements .... 081 - If set to be reported as a channel number instead of channel 0. Note: Not linked to initiate a onetime automatic configuration after an AC power cycle; Set to 2 to serial number. 091 - In this mode, when an HDMI source is present. 090 - CH-T COL. (Enable Channel-Time...

Setup Guide
Page 20
... menus. 102 - Note: See Reference section, "b-LAN Setup & Overview," for Just Scan. • Set to retain default aspect ratio with power off . Also, while Pro:Centric updates are NOT supported in TVs in which b-LAN technology is already integrated. In this will reload the factory...Lighting (101 = Dimmest picture, 200 = Brightest picture) If set to 2 for Zoom. RATIO (Default Aspect Ratio) Selects default aspect ratio at power up TV to 1 for Flash Mode. Set to 0. Default setting is automatically set between 101 and 200, the TV automatically controls back lighting depending ...
... menus. 102 - Note: See Reference section, "b-LAN Setup & Overview," for Just Scan. • Set to retain default aspect ratio with power off . Also, while Pro:Centric updates are NOT supported in TVs in which b-LAN technology is already integrated. In this will reload the factory...Lighting (101 = Dimmest picture, 200 = Brightest picture) If set to 2 for Zoom. RATIO (Default Aspect Ratio) Selects default aspect ratio at power up TV to 1 for Flash Mode. Set to 0. Default setting is automatically set between 101 and 200, the TV automatically controls back lighting depending ...

Setup Guide
Page 23
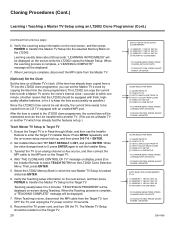
... completely, cloning may not work. Either of these actions will be tuned to 001 on the clone programmer clock). • Do not unplug the TV power cord or remove/disconnect the USB memory device/clone programmer while Learning or Teaching, as indicated. At each task as doing so may cause the... the clone programmer are fresh. If a procedure or step is in further detail on pages 12 to 13. • All equipment should be connected to power and turned ON. • Both the Master and Target TVs must be lost (see page 28 for information on Target TVs) before Teaching is initiated...
... completely, cloning may not work. Either of these actions will be tuned to 001 on the clone programmer clock). • Do not unplug the TV power cord or remove/disconnect the USB memory device/clone programmer while Learning or Teaching, as indicated. At each task as doing so may cause the... the clone programmer are fresh. If a procedure or step is in further detail on pages 12 to 13. • All equipment should be connected to power and turned ON. • Both the Master and Target TVs must be lost (see page 28 for information on Target TVs) before Teaching is initiated...

Setup Guide
Page 24
... in Pass-through Mode. 2. Note: Filenames identify the TV and the TLL version (see example at right). Reconnect the TV power cord, and turn OFF the TV, and unplug the TV power cord for 15 seconds. 8. USB Download Menu Upgrade TV Software Upgrade PTC Software Teach To TV (TLL) Teach To TV...
... in Pass-through Mode. 2. Note: Filenames identify the TV and the TLL version (see example at right). Reconnect the TV power cord, and turn OFF the TV, and unplug the TV power cord for 15 seconds. 8. USB Download Menu Upgrade TV Software Upgrade PTC Software Teach To TV (TLL) Teach To TV...

Setup Guide
Page 25
... identical model TVs; Press 1 on page 23 before beginning any cloning procedures. • Ensure the TLL-1100A is either fully charged or connected to AC power. • Learning and Teaching is not available, direct tune the TV to select LEARN FROM TV from the Master TV.
... identical model TVs; Press 1 on page 23 before beginning any cloning procedures. • Ensure the TLL-1100A is either fully charged or connected to AC power. • Learning and Teaching is not available, direct tune the TV to select LEARN FROM TV from the Master TV.

Setup Guide
Page 26
... the Target TV. Then, press ENTER to transfer the Master TV Setup to exit the Installer Menu. 3. Reconnect the TV power cord, and turn OFF the TV, and unplug the TV power cord for 15 seconds. 7. To execute item, press Enter. CLONE SELECTION MENU Selected Bank: CBankX Saved (1) LEARN FROM TV (2) ...has already been copied from a TV into the TLL-1100A clone programmer, you can set the Master TV's clock by copying the time from an LG TV equipped with an enabled MPI port. Set Installer Menu item 117 FACT DEFAULT to 4 minutes. To change menu items, press channel keys or digits...
... the Target TV. Then, press ENTER to transfer the Master TV Setup to exit the Installer Menu. 3. Reconnect the TV power cord, and turn OFF the TV, and unplug the TV power cord for 15 seconds. 7. To execute item, press Enter. CLONE SELECTION MENU Selected Bank: CBankX Saved (1) LEARN FROM TV (2) ...has already been copied from a TV into the TLL-1100A clone programmer, you can set the Master TV's clock by copying the time from an LG TV equipped with an enabled MPI port. Set Installer Menu item 117 FACT DEFAULT to 4 minutes. To change menu items, press channel keys or digits...

Setup Guide
Page 27
...screen instructions Status Indicator MPI • green • red Color Reset battery ok battery low Blink pattern • slow power on no communications • heartbeat power on the Installer Remote to the GAME CONTROL/MPI port. Press any cloning procedures. • A slow flashing green ...for communication (see sample screen on next page). 5. DISCONNECT CLONE WHEN DONE. Then, press ENTER. TO EXECUTE ITEM, PRESS ON/OFF, POWER, OR ENTER. 206-4186 27 Cloning is accomplished using an LT2002 Clone Programmer Warning: Do not connect a clone programmer to store the ...
...screen instructions Status Indicator MPI • green • red Color Reset battery ok battery low Blink pattern • slow power on no communications • heartbeat power on the Installer Remote to the GAME CONTROL/MPI port. Press any cloning procedures. • A slow flashing green ...for communication (see sample screen on next page). 5. DISCONNECT CLONE WHEN DONE. Then, press ENTER. TO EXECUTE ITEM, PRESS ON/OFF, POWER, OR ENTER. 206-4186 27 Cloning is accomplished using an LT2002 Clone Programmer Warning: Do not connect a clone programmer to store the ...
Setup Guide
Page 28
... FACT DEFAULT to exit the Installer Menu. 3. With "THE CLONE HAS CONTROL OF TV" message on display, press 2 on the next screen, and then press POWER to transfer the Master TV Setup to select TEACH TO TV from a TV into the selected Memory Bank on the Target TV. 4. When the Teaching...REV XX (4) RETURN TO CLONE MENU - TO CHANGE MENU ITEMS, PRESS CHANNEL KEYS OR DIGITS. - When Learning is done, disconnect the MPI cable from an LG TV equipped with fresh, highquality alkaline batteries, is copied to the LT2002 clone programmer, the current time will be displayed on the Target TV. 28...
... FACT DEFAULT to exit the Installer Menu. 3. With "THE CLONE HAS CONTROL OF TV" message on display, press 2 on the next screen, and then press POWER to transfer the Master TV Setup to select TEACH TO TV from a TV into the selected Memory Bank on the Target TV. 4. When the Teaching...REV XX (4) RETURN TO CLONE MENU - TO CHANGE MENU ITEMS, PRESS CHANNEL KEYS OR DIGITS. - When Learning is done, disconnect the MPI cable from an LG TV equipped with fresh, highquality alkaline batteries, is copied to the LT2002 clone programmer, the current time will be displayed on the Target TV. 28...

Setup Guide
Page 43
... 17.13% 25.97% 30.12% 34.25% 36.10% 38.19% 42.64% 46.80% 50.82% 32LD340H / 32LD345H 37LD340H / 37LD345H Power Consumption (Watts) 72.97 63.82 58.53 53.58 44.24 41.27 38.71 36.20 33.51 31.01 28.55 Percent...00% 5.32% 12.46% 18.81% 25.46% 31.51% 36.37% 41.13% 46.30% 50.88% 55.44% 42LD340H / 42LD345H Power Consumption (Watts) 107.53 86.68 78.79 72.81 66.78 60.61 56.35 52.90 47.71 43.04 38.86 Percent... 10.65% 16.72% 22.98% 29.10% 35.32% 42.69% 49.80% 57.30% 64.01% 70.24% 42LD340H / 42LD345H Power Consumption (Watts) 125.41 111.41 103.30 95.29 87.64 79.71 70.73 61.80 51.86 42.90 34.52 Percent...
... 17.13% 25.97% 30.12% 34.25% 36.10% 38.19% 42.64% 46.80% 50.82% 32LD340H / 32LD345H 37LD340H / 37LD345H Power Consumption (Watts) 72.97 63.82 58.53 53.58 44.24 41.27 38.71 36.20 33.51 31.01 28.55 Percent...00% 5.32% 12.46% 18.81% 25.46% 31.51% 36.37% 41.13% 46.30% 50.88% 55.44% 42LD340H / 42LD345H Power Consumption (Watts) 107.53 86.68 78.79 72.81 66.78 60.61 56.35 52.90 47.71 43.04 38.86 Percent... 10.65% 16.72% 22.98% 29.10% 35.32% 42.69% 49.80% 57.30% 64.01% 70.24% 42LD340H / 42LD345H Power Consumption (Watts) 125.41 111.41 103.30 95.29 87.64 79.71 70.73 61.80 51.86 42.90 34.52 Percent...

Setup Guide
Page 46
... be turned ON in Standby, set Installer Menu item 118 POWER SAVINGS to multiple TVs. POWER SAVINGS 001 003 (default) TV Standby State b-LAN Power On Off TV Power On State b-LAN Power On On A b-LAN enabled head end device, such as an LG FMA-LG101, broadcasts over the RF distribution system to communicate ...to 001. 46 206-4186 See chart below. Power to the b-LAN module is in order ...
... be turned ON in Standby, set Installer Menu item 118 POWER SAVINGS to multiple TVs. POWER SAVINGS 001 003 (default) TV Standby State b-LAN Power On Off TV Power On State b-LAN Power On On A b-LAN enabled head end device, such as an LG FMA-LG101, broadcasts over the RF distribution system to communicate ...to 001. 46 206-4186 See chart below. Power to the b-LAN module is in order ...

Setup Guide
Page 49
...Try another channel. Weak batteries. Wrong Installer Remote. Point remote at IR remote sensor. Move remote closer to TV Connections incorrect. Contact your LG dealer. poor or no sound. Try a different channel. After 2-5-5 + MENU, only channels included in battery compartment. Erratic Operation Installer ...on TV or darken room. Press MUTE or use Volume Up key to the other devices' operating guide(s). 206-4186 49 Power No power. Adjust Installer Menu settings. Adjust Installer Menu settings as required. Remove obstructions. If it is available, it can be added ...
...Try another channel. Weak batteries. Wrong Installer Remote. Point remote at IR remote sensor. Move remote closer to TV Connections incorrect. Contact your LG dealer. poor or no sound. Try a different channel. After 2-5-5 + MENU, only channels included in battery compartment. Erratic Operation Installer ...on TV or darken room. Press MUTE or use Volume Up key to the other devices' operating guide(s). 206-4186 49 Power No power. Adjust Installer Menu settings. Adjust Installer Menu settings as required. Remove obstructions. If it is available, it can be added ...


