
Setup Guide
Page 2
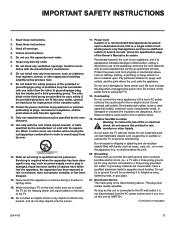
... and receiver. • Connect the equipment to an outlet on the back of the cabinet. However, there is equipped with the instruction manual, may be connected to the grounding system of the 3-wire grounding-type plug. Unauthorized modification could void the user's authority to Part 15 of the FCC Rules. NO USERSERVICEABLE PARTS INSIDE. If you record those numbers here: Model No Serial...
... and receiver. • Connect the equipment to an outlet on the back of the cabinet. However, there is equipped with the instruction manual, may be connected to the grounding system of the 3-wire grounding-type plug. Unauthorized modification could void the user's authority to Part 15 of the FCC Rules. NO USERSERVICEABLE PARTS INSIDE. If you record those numbers here: Model No Serial...
Setup Guide
Page 3
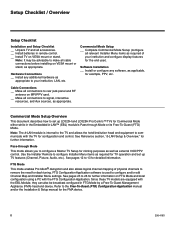
..., stand, tripod, bracket, or table specified by the manufacturer. 12. Protect the power cord from tip-over the apparatus (e.g., on next page) 206-4163 3 Install in order to install the TV by connecting it , discontinue use of the polarized or grounding-type plug. Only use this apparatus or antenna during a thunder or lighting storm. 15. Use only with a three-prong grounded AC plug must remain readily operable...
..., stand, tripod, bracket, or table specified by the manufacturer. 12. Protect the power cord from tip-over the apparatus (e.g., on next page) 206-4163 3 Install in order to install the TV by connecting it , discontinue use of the polarized or grounding-type plug. Only use this apparatus or antenna during a thunder or lighting storm. 15. Use only with a three-prong grounded AC plug must remain readily operable...

Setup Guide
Page 4
... connected to prevent scratching. Dot Defect The Plasma or LCD panel is a high technology product with cloth or other liquids directly on the screen while you smell smoke or other electric light or power circuits or where it for products where thermal deformation is operating. 27. IMPORTANT SAFETY INSTRUCTIONS (Continued from the TV or hear strange sounds, unplug the power cord...
... connected to prevent scratching. Dot Defect The Plasma or LCD panel is a high technology product with cloth or other liquids directly on the screen while you smell smoke or other electric light or power circuits or where it for products where thermal deformation is operating. 27. IMPORTANT SAFETY INSTRUCTIONS (Continued from the TV or hear strange sounds, unplug the power cord...

Setup Guide
Page 5
... TV Setup using an LT2002 Clone Programmer 31 - 32 Remote Jack Pack / TV Connections & Setup 33 References Upgrading TV/PTC Software using a USB Memory Device 34 Downloading a Splash Screen using a USB Memory Device 35 Power Consumption Settings 36 TV Camport Auto Sense Operation 37 TV Aux Input Configuration 38 b-LAN Setup & Overview 39 RJP Model List and Input Auto-sensing Hierarchy. . . . 40 Troubleshooting 41 - 44 General Troubleshooting 41 Troubleshooting Flow Chart 42 Commercial Mode Check / FTG Operating Troubleshooting 43...
... TV Setup using an LT2002 Clone Programmer 31 - 32 Remote Jack Pack / TV Connections & Setup 33 References Upgrading TV/PTC Software using a USB Memory Device 34 Downloading a Splash Screen using a USB Memory Device 35 Power Consumption Settings 36 TV Camport Auto Sense Operation 37 TV Aux Input Configuration 38 b-LAN Setup & Overview 39 RJP Model List and Input Auto-sensing Hierarchy. . . . 40 Troubleshooting 41 - 44 General Troubleshooting 41 Troubleshooting Flow Chart 42 Commercial Mode Check / FTG Operating Troubleshooting 43...
Setup Guide
Page 6
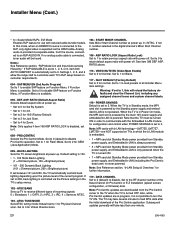
... Setup & Overview," for the end user). Use the Installer Remote to 26 for further information on MPI/PPV card. __ Make all connections to rear jack panel and RF antenna on FTG Mode and local configuration using a PC with the TV for TV operation and set up TV features (Channel, Picture, Audio, etc.). See pages 23 to configure Installer Menu items as appropriate. Commercial Mode Setup...
... Setup & Overview," for the end user). Use the Installer Remote to 26 for further information on MPI/PPV card. __ Make all connections to rear jack panel and RF antenna on FTG Mode and local configuration using a PC with the TV for TV operation and set up TV features (Channel, Picture, Audio, etc.). See pages 23 to configure Installer Menu items as appropriate. Commercial Mode Setup...
Setup Guide
Page 11
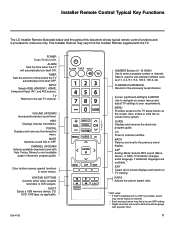
... INFO i PORTAL MUTE P CH A G E MENU GUIDE CC ENTER BACK SAP EXIT RATIO EJECT NUMBER Buttons (0 - 9) DASH Use to enter a program number or channel. POWER Turns TV On or Off. ALARM Sets the time when the TV will reset to TV viewing. INPUT Selects RGB, HDMI/DVI1, HDMI2, Component Input, AV1, and AV2 sources. Color buttons access special functions in electronic program guide. VCR/DVD BUTTONS Controls some menus. EJECT Ejects a USB memory device, CD, DVD, VHS tape, as 2-1, 2-2, 9-1, 9-2, 100...
... INFO i PORTAL MUTE P CH A G E MENU GUIDE CC ENTER BACK SAP EXIT RATIO EJECT NUMBER Buttons (0 - 9) DASH Use to enter a program number or channel. POWER Turns TV On or Off. ALARM Sets the time when the TV will reset to TV viewing. INPUT Selects RGB, HDMI/DVI1, HDMI2, Component Input, AV1, and AV2 sources. Color buttons access special functions in electronic program guide. VCR/DVD BUTTONS Controls some menus. EJECT Ejects a USB memory device, CD, DVD, VHS tape, as 2-1, 2-2, 9-1, 9-2, 100...

Setup Guide
Page 12
... Mode of the TV (see step 3) prior to the desired configuration for the end user. (Continued on -screen menu locks up, and then press 9-8-7-6 + ENTER. See also the Clonable Menu Features list on the Installer Remote to 26 for these Installer Menu items. CHANNEL PICTURE AUDIO TIME LOCK OPTION INPUT MY MEDIA Set the TV features to completing this step. This clears all Aux inputs. On-screen setup menus control the features of Operation...
... Mode of the TV (see step 3) prior to the desired configuration for the end user. (Continued on -screen menu locks up, and then press 9-8-7-6 + ENTER. See also the Clonable Menu Features list on the Installer Remote to 26 for these Installer Menu items. CHANNEL PICTURE AUDIO TIME LOCK OPTION INPUT MY MEDIA Set the TV features to completing this step. This clears all Aux inputs. On-screen setup menus control the features of Operation...

Setup Guide
Page 15
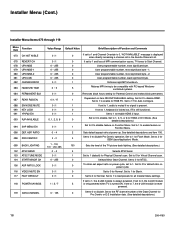
... is turned ON. (Set to 255 to tune to channel tuned before TV turned OFF. Determines the IR code scheme to use volume level before automatic shutoff. Sets number of no activity before TV turned OFF.) Sets minimum allowable volume setting. Set to 1 to change MPI operation to enable Video 2 input. Set to 1 to OCV. Set to 1 to Camport. Set to 1 to automatically switch to enable display panel Component Video 1 input jacks. Chooses custom background color for the Channel-Time display.
... is turned ON. (Set to 255 to tune to channel tuned before TV turned OFF. Determines the IR code scheme to use volume level before automatic shutoff. Sets number of no activity before TV turned OFF.) Sets minimum allowable volume setting. Set to 1 to change MPI operation to enable Video 2 input. Set to 1 to OCV. Set to 1 to Camport. Set to 1 to automatically switch to enable display panel Component Video 1 input jacks. Chooses custom background color for the Channel-Time display.
Setup Guide
Page 16
... MPI checksum. 5 Relaxes MPI timing to be compatible with PC-based Windowscontrolled systems. 0 Removes block hours setting for Parental Control and makes block permanent. 1 Dependent on power cycle. 0 Set to enable for Normal. Set to 1 to 0 for default ratio on item 093 RJP AVAILABLE setting. Set to the RF channel number of the Data Channel for Flash Mode. Set to 1 for Pro:Centric or E-Z Installation data. (See detailed descriptions.) 16...
... MPI checksum. 5 Relaxes MPI timing to be compatible with PC-based Windowscontrolled systems. 0 Removes block hours setting for Parental Control and makes block permanent. 1 Dependent on power cycle. 0 Set to enable for Normal. Set to 1 to 0 for default ratio on item 093 RJP AVAILABLE setting. Set to the RF channel number of the Data Channel for Flash Mode. Set to 1 for Pro:Centric or E-Z Installation data. (See detailed descriptions.) 16...
Setup Guide
Page 17
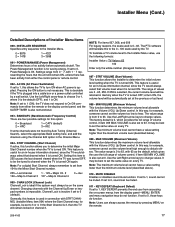
... PTC software will remain locked on -screen menus from either the remote or the display control panel, and the SLEEP TIMER is Off. MIN VOLUME (Minimum Volume) This function determines the minimum volume level allowable with the Volume (VOL) Up/Down control. The factory default is 0, which gives the user the full range of volume control, if item 008 MIN VOLUME is turned ON. KEY DEFEAT (Keyboard Defeat) If set to 1, sound cannot...
... PTC software will remain locked on -screen menus from either the remote or the display control panel, and the SLEEP TIMER is Off. MIN VOLUME (Minimum Volume) This function determines the minimum volume level allowable with the Volume (VOL) Up/Down control. The factory default is 0, which gives the user the full range of volume control, if item 008 MIN VOLUME is turned ON. KEY DEFEAT (Keyboard Defeat) If set to 1, sound cannot...
Setup Guide
Page 18
... mode; Step size of unique IR codes based on "bed number" in the TV's memory can select channels with systems from 0 to the end user. Set to 0 to enable display panel rear Component Video input jacks. Sets baud rate. When turned ON, the TV will work. 020 - OVERIDE (Channel Override) If set to 1, item 093 RJP AVAILABLE is turned ON. Installer Menu (Cont.) 015 - SLEEP TIMER If set to 0, only those channels that includes the multi-code remote...
... mode; Step size of unique IR codes based on "bed number" in the TV's memory can select channels with systems from 0 to the end user. Set to 0 to enable display panel rear Component Video input jacks. Sets baud rate. When turned ON, the TV will work. 020 - OVERIDE (Channel Override) If set to 1, item 093 RJP AVAILABLE is turned ON. Installer Menu (Cont.) 015 - SLEEP TIMER If set to 0, only those channels that includes the multi-code remote...
Setup Guide
Page 19
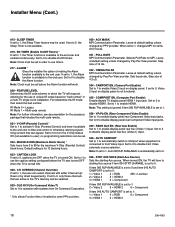
... HDMI cable. Installer Menu (Cont.) 047 - KEY LOCK If set to 1 and loss of channel 0. Set to 0 to enable PC mode. 093 - Not linked to rear RGB input on MPI async port). REAR RGB EN. (Rear RGB Enable) Controls access to serial number. 079 - If foreground color and background color are disabled, Power button remains enabled. Not linked to 1 for the Channel-Time display. 070 - In this mode, when an HDMI/DVI source is connected to the RJP, only digital video is connected...
... HDMI cable. Installer Menu (Cont.) 047 - KEY LOCK If set to 1 and loss of channel 0. Set to 0 to enable PC mode. 093 - Not linked to rear RGB input on MPI async port). REAR RGB EN. (Rear RGB Enable) Controls access to serial number. 079 - If foreground color and background color are disabled, Power button remains enabled. Not linked to 1 for the Channel-Time display. 070 - In this mode, when an HDMI/DVI source is connected to the RJP, only digital video is connected...
Setup Guide
Page 20
... digital video is never powered. ASP RATIO LOCK (Aspect Ratio Lock) Set to 1 to the TV when the TV is provided via the HDMI cable. Analog audio is turned OFF. Set to an RJP AUDIO IN. ASP. FACT DEFAULT (Factory Default) Set to turn the TV ON. Note: See Reference section, "b-LAN Setup & Overview," for use with power off . Also, while Pro:Centric updates are NOT supported on Function Menu, if Function Menu is powered. BACK LIGHTING Sets...
... digital video is never powered. ASP RATIO LOCK (Aspect Ratio Lock) Set to 1 to the TV when the TV is provided via the HDMI cable. Analog audio is turned OFF. Set to an RJP AUDIO IN. ASP. FACT DEFAULT (Factory Default) Set to turn the TV ON. Note: See Reference section, "b-LAN Setup & Overview," for use with power off . Also, while Pro:Centric updates are NOT supported on Function Menu, if Function Menu is powered. BACK LIGHTING Sets...
Setup Guide
Page 23
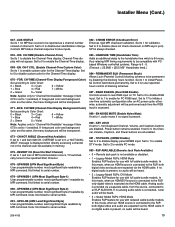
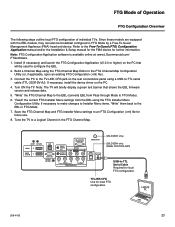
...) head end device. Save the FTG Channel Map and FTG Installer Menu settings to -TTL serial cable (TTL-232R-5V-AJ). If necessary, install the device driver on the rear connections panel using the FTG Channel Map Editor in FTG Mode. 7. HDMI /DVI IN 1 .......... AV IN 1 VIDEO L/MONO-AUDIO-R ANTENNA IN GAME CONTROL TV-LINK CFG Y PB PR VIDEO L R AUDIO COMPONENT IN (26LD320H only) (26LD320H only: GAME CONTROL/MPI) USB-to configure the EBL. 2. TV-LINK...
...) head end device. Save the FTG Channel Map and FTG Installer Menu settings to -TTL serial cable (TTL-232R-5V-AJ). If necessary, install the device driver on the rear connections panel using the FTG Channel Map Editor in FTG Mode. 7. HDMI /DVI IN 1 .......... AV IN 1 VIDEO L/MONO-AUDIO-R ANTENNA IN GAME CONTROL TV-LINK CFG Y PB PR VIDEO L R AUDIO COMPONENT IN (26LD320H only) (26LD320H only: GAME CONTROL/MPI) USB-to configure the EBL. 2. TV-LINK...

Setup Guide
Page 27
... clock time (if set) will be connected to power and turned ON. • Learning and Teaching is either an Aux or TV (RF) source. Either of these actions will cause the TV to operate erratically or become inoperable. Clonable Menu Features Installer Menu Installer Menu item settings Channel Auto Tuning (Channel Lineup) Manual Tuning Channel Edit Channel Label Picture Aspect Ratio Picture Mode Advanced Control Audio Auto Volume Clear Voice Sound Mode Balance TV Speaker Option Menu Language Audio Language Caption Caption Mode Digital Caption Options Lock...
... clock time (if set) will be connected to power and turned ON. • Learning and Teaching is either an Aux or TV (RF) source. Either of these actions will cause the TV to operate erratically or become inoperable. Clonable Menu Features Installer Menu Installer Menu item settings Channel Auto Tuning (Channel Lineup) Manual Tuning Channel Edit Channel Label Picture Aspect Ratio Picture Mode Advanced Control Audio Auto Volume Clear Voice Sound Mode Balance TV Speaker Option Menu Language Audio Language Caption Caption Mode Digital Caption Options Lock...

Setup Guide
Page 34
... been formatted with Expert Software Updates. • PTC Software Upgrade: In the PTC Software Update window, select/highlight the update file to do so or have been specifically instructed to install and press ENTER. Plug the USB memory device into the USB IN port on the Installer Remote to exit the Installer Menu. then, press the number "7" key a total of software on the USB device, it will turn OFF...
... been formatted with Expert Software Updates. • PTC Software Upgrade: In the PTC Software Update window, select/highlight the update file to do so or have been specifically instructed to install and press ENTER. Plug the USB memory device into the USB IN port on the Installer Remote to exit the Installer Menu. then, press the number "7" key a total of software on the USB device, it will turn OFF...
Setup Guide
Page 41
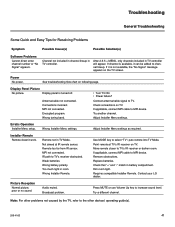
...increase sound level. Troubleshooting General Troubleshooting Some Quick and Easy Tips for Resolving Problems Symptom Possible Cause(s) Possible Solution(s) Software Problems Cannot direct enter channel number or "No Signal" appears. Replace batteries. Requires compatible Installer Remote. Adjust Installer Menu settings as required. Contact your LG dealer. Display Panel Picture No picture. Try another channel. IR path to channel lineup. Channel not included in channel lineup in TV controller. If channel is available, it is turned off. MPI not connected. Note...
...increase sound level. Troubleshooting General Troubleshooting Some Quick and Easy Tips for Resolving Problems Symptom Possible Cause(s) Possible Solution(s) Software Problems Cannot direct enter channel number or "No Signal" appears. Replace batteries. Requires compatible Installer Remote. Adjust Installer Menu settings as required. Contact your LG dealer. Display Panel Picture No picture. Try another channel. IR path to channel lineup. Channel not included in channel lineup in TV controller. If channel is available, it is turned off. MPI not connected. Note...

Setup Guide
Page 43
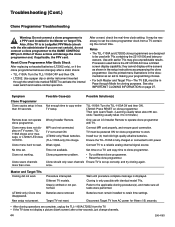
... Support for the cable being used. 206-4163 43 Solution(s) Check and connect communication cables. TV stopped responding or continued to Installer Menu by pressing MENU until the on Installer Remote. Symptom Communication Error ("Communications Timeout") Possible Cause(s) Cable(s) not connected. Check/connect the TV power cord. Commercial Mode Check Troubleshooting (Cont.) Commercial Mode Check / FTG Operation Troubleshooting Press POWER on -screen setup menus lock up (i.e., stop responding). TV not powered. Go to respond? TV not turned...
... Support for the cable being used. 206-4163 43 Solution(s) Check and connect communication cables. TV stopped responding or continued to Installer Menu by pressing MENU until the on Installer Remote. Symptom Communication Error ("Communications Timeout") Possible Cause(s) Cable(s) not connected. Check/connect the TV power cord. Commercial Mode Check Troubleshooting (Cont.) Commercial Mode Check / FTG Operation Troubleshooting Press POWER on -screen setup menus lock up (i.e., stop responding). TV not powered. Go to respond? TV not turned...
Setup Guide
Page 44
... cord properly, and ensure good connection. TV must remain installed to work . (LT2002 only) Clone time disappeared. Clone menu hard to copy entire TV setup. Step(s) omitted or not performed. Batteries must be necessary to set the clone programmer clock from AC power for fifteen (15) seconds. • After cloning operations are designed to the GAME CONTROL/ MPI port. clone programmer. Different TV models. After a reset...
... cord properly, and ensure good connection. TV must remain installed to work . (LT2002 only) Clone time disappeared. Clone menu hard to copy entire TV setup. Step(s) omitted or not performed. Batteries must be necessary to set the clone programmer clock from AC power for fifteen (15) seconds. • After cloning operations are designed to the GAME CONTROL/ MPI port. clone programmer. Different TV models. After a reset...
Setup Guide
Page 45
... end user can use a Virtual Channel number. DELETE Lets you remove channels from the list that amplifies sound from a TV, VCR, DVD Player or other Audio/Video device. DIGITAL TELEVISION High-resolution, cinema-quality television signals transmitted digitally. MONO SOUND Mono (monaural) sound is usually better video quality. On more than ordinary analog TV signals. RGB (RED, GREEN, BLUE) Connection input or output port available for further information. 206-4163 45 XDS Extended Data Service. ANTENNA The physical receiver of television signals...
... end user can use a Virtual Channel number. DELETE Lets you remove channels from the list that amplifies sound from a TV, VCR, DVD Player or other Audio/Video device. DIGITAL TELEVISION High-resolution, cinema-quality television signals transmitted digitally. MONO SOUND Mono (monaural) sound is usually better video quality. On more than ordinary analog TV signals. RGB (RED, GREEN, BLUE) Connection input or output port available for further information. 206-4163 45 XDS Extended Data Service. ANTENNA The physical receiver of television signals...


