Owner's Manual (English)
Page 6
.../ Delete Channel (Manual Scan 37 - CONTENTS WARNING / CAUTION 1 SAFETY INSTRUCTION 2 FEATURE OF THIS TV 6 PREPARATION Accessories 7 Front Panel Controls 8 Back Panel Information 11 Back Cover for Wire Arrangement 13 Attaching the TV to a Wall 16 Swivel Stand 16 Attaching the TV to a Desk 17 Stand Installation...DVD Setup 24 VCR Setup 26 Other A/V Source Setup 28 Digital Audio Output 28 PC Setup 29 WATCHING TV / CHANNEL CONTROL Remote Control Functions 32 Turning On TV 34 Channel Selection 34 Volume Adjustment 34 On-Screen Menus Selection 35 Channel Setup 36 - Auto Scan ...
.../ Delete Channel (Manual Scan 37 - CONTENTS WARNING / CAUTION 1 SAFETY INSTRUCTION 2 FEATURE OF THIS TV 6 PREPARATION Accessories 7 Front Panel Controls 8 Back Panel Information 11 Back Cover for Wire Arrangement 13 Attaching the TV to a Wall 16 Swivel Stand 16 Attaching the TV to a Desk 17 Stand Installation...DVD Setup 24 VCR Setup 26 Other A/V Source Setup 28 Digital Audio Output 28 PC Setup 29 WATCHING TV / CHANNEL CONTROL Remote Control Functions 32 Turning On TV 34 Channel Selection 34 Volume Adjustment 34 On-Screen Menus Selection 35 Channel Setup 36 - Auto Scan ...
Owner's Manual (English)
Page 7
Setting up Your Password 74 Set Password 75 Lock System 75 Channel Blocking 76 External Input Blocking 76 Movie & TV Rating 77 - TIME SETTING Clock Setting 65 Auto Clock Setup 65 Manual Clock Setup 66 Auto On/Off Timer Setting 67 ... XGA Mode 72 Initializing (Reset to Original Factory Settings) . 73 PARENTAL CONTROL / RATINGS Set Password & Lock System 74 - TV Rating Children & General 78 TV Rating English & French 79 APPENDIX Troubleshooting 80 Maintenance 82 Product Specifications 83 Programming the Remote Control 84 Set ID 86 IR Codes 87 5 Movie Rating (MPAA) 77 ...
Setting up Your Password 74 Set Password 75 Lock System 75 Channel Blocking 76 External Input Blocking 76 Movie & TV Rating 77 - TIME SETTING Clock Setting 65 Auto Clock Setup 65 Manual Clock Setup 66 Auto On/Off Timer Setting 67 ... XGA Mode 72 Initializing (Reset to Original Factory Settings) . 73 PARENTAL CONTROL / RATINGS Set Password & Lock System 74 - TV Rating Children & General 78 TV Rating English & French 79 APPENDIX Troubleshooting 80 Maintenance 82 Product Specifications 83 Programming the Remote Control 84 Set ID 86 IR Codes 87 5 Movie Rating (MPAA) 77 ...

Owner's Manual (English)
Page 9
...LCD TV PLASMA TV Owner's Manual http://www.lgusa.com www.lg.ca Copyright© 2007 LGE, All Rights Reserved. PIP CH SWAP + DVD VCR PIP INPUT INFO EXIT CC MENU RATIO SAP ENTER 9 VOL TIMER MUTE 1 4 2 7 5 3 8 6 0 9 BAFCLKASH CH PAGE 1.5V 1.5V Owner's Manual, Setup & Operation Guide for Commercial Mode CD Manual Remote Control... assembly (Refer to p.13) (Refer to p.18) 32/37LC5DC*, 32/37LC50C* models only M4xL22 Torx plus Star head screw ...exterior only with the twist holder. 32/37/42LC5DC*, 32/37/42LC50C*, 42LB5DC, 42LB50C models only D-sub 15 pin Cable x...
...LCD TV PLASMA TV Owner's Manual http://www.lgusa.com www.lg.ca Copyright© 2007 LGE, All Rights Reserved. PIP CH SWAP + DVD VCR PIP INPUT INFO EXIT CC MENU RATIO SAP ENTER 9 VOL TIMER MUTE 1 4 2 7 5 3 8 6 0 9 BAFCLKASH CH PAGE 1.5V 1.5V Owner's Manual, Setup & Operation Guide for Commercial Mode CD Manual Remote Control... assembly (Refer to p.13) (Refer to p.18) 32/37LC5DC*, 32/37LC50C* models only M4xL22 Torx plus Star head screw ...exterior only with the twist holder. 32/37/42LC5DC*, 32/37/42LC50C*, 42LB5DC, 42LB50C models only D-sub 15 pin Cable x...
Owner's Manual (English)
Page 10
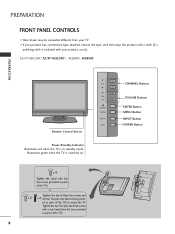
... (provided as parts of the TV). Tighten the two Torx plus star head screws (provid- or Tighten the two of the TV). 8 PREPARATION FRONT PANEL CONTROLS ■ Here shown may be somewhat different from your TV. ■ If your product, use it). 32/37/42LC5DC*,32/37/42LC50C*, 42LB5DC, 42LB50C PREPARATION Remote Control Sensor Power/Standby Indicator Illuminates...
... (provided as parts of the TV). Tighten the two Torx plus star head screws (provid- or Tighten the two of the TV). 8 PREPARATION FRONT PANEL CONTROLS ■ Here shown may be somewhat different from your TV. ■ If your product, use it). 32/37/42LC5DC*,32/37/42LC50C*, 42LB5DC, 42LB50C PREPARATION Remote Control Sensor Power/Standby Indicator Illuminates...

Owner's Manual (English)
Page 11
Illuminates green when the TV is in standby mode. CH VOL ENTER MENU INPUT ON/OFF ON/OFF Button INPUT Button MENU Button ENTER Button VOLUME Buttons CHANNEL Buttons 9 PREPARATION 32LX5DC*, 32LX50C* Remote Control Sensor Power/Standby Indicator Illuminates red when the TV is switched on.
Illuminates green when the TV is in standby mode. CH VOL ENTER MENU INPUT ON/OFF ON/OFF Button INPUT Button MENU Button ENTER Button VOLUME Buttons CHANNEL Buttons 9 PREPARATION 32LX5DC*, 32LX50C* Remote Control Sensor Power/Standby Indicator Illuminates red when the TV is switched on.

Owner's Manual (English)
Page 12
Illuminates green when the TV is in standby mode. INPUT MENU ENTER VOL CH POWER Button INPUT Button MENU Button ENTER Button VOLUME Buttons CHANNEL Buttons Remote Control Sensor Power/Standby Indicator Illuminates red when the TV is switched on. 10 INPUT ENTER PREPARATION 42PX8DC PREPARATION INPUT ENTER This TV's stand is sold, separately.
Illuminates green when the TV is in standby mode. INPUT MENU ENTER VOL CH POWER Button INPUT Button MENU Button ENTER Button VOLUME Buttons CHANNEL Buttons Remote Control Sensor Power/Standby Indicator Illuminates red when the TV is switched on. 10 INPUT ENTER PREPARATION 42PX8DC PREPARATION INPUT ENTER This TV's stand is sold, separately.

Owner's Manual (English)
Page 14
This part mainly use picture for the LCD TV models. S-VIDEO Connect S-Video out from your TV. PREPARATION PREPARATION ■ Here shown may be somewhat different from an S-VIDEO device. 9 COMPONENT IN Connect a component video/audio device to these jacks. 10 ...to operate the TV on DC power. 12 ANTENNA IN Connect over-the air signals to either input. 2 DIGITAL AUDIO OUT Connect digital audio from various types of equipment. Note: In standby mode, these jacks. ANTENNA IN M.P.I. 13 12 1 HDMI/DVI IN 1(DVI) 2 DIGITAL AUDIO OUT (OPTICAL) 2 3 M.P.I 4 RESET/UPDATE/REMOTE CONTROL OUT 5 ...
This part mainly use picture for the LCD TV models. S-VIDEO Connect S-Video out from your TV. PREPARATION PREPARATION ■ Here shown may be somewhat different from an S-VIDEO device. 9 COMPONENT IN Connect a component video/audio device to these jacks. 10 ...to operate the TV on DC power. 12 ANTENNA IN Connect over-the air signals to either input. 2 DIGITAL AUDIO OUT Connect digital audio from various types of equipment. Note: In standby mode, these jacks. ANTENNA IN M.P.I. 13 12 1 HDMI/DVI IN 1(DVI) 2 DIGITAL AUDIO OUT (OPTICAL) 2 3 M.P.I 4 RESET/UPDATE/REMOTE CONTROL OUT 5 ...

Owner's Manual (English)
Page 23
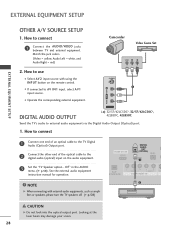
...2 DIGITAL AUDIO OUT (OPTICAL) 2 M.P.I. Y PB PR L R Connect the audio output of the digital set top box to the COMPONENT IN VIDEO jacks on the remote control. How to connect 1 Connect the video outputs (Y, PB, PR) of the digital set-top box to 2 the COMPONENT IN AUDIO jacks on the digital set...-top box. (Refer to the owner's manual for LCD TV models. EXTERNAL EQUIPMENT SETUP EXTERNAL EQUIPMENT SETUP ■ To prevent the equipment damage, never plug in any power cords until you do receive digital...
...2 DIGITAL AUDIO OUT (OPTICAL) 2 M.P.I. Y PB PR L R Connect the audio output of the digital set top box to the COMPONENT IN VIDEO jacks on the remote control. How to connect 1 Connect the video outputs (Y, PB, PR) of the digital set-top box to 2 the COMPONENT IN AUDIO jacks on the digital set...-top box. (Refer to the owner's manual for LCD TV models. EXTERNAL EQUIPMENT SETUP EXTERNAL EQUIPMENT SETUP ■ To prevent the equipment damage, never plug in any power cords until you do receive digital...

Owner's Manual (English)
Page 24
... the output resolution appropriately. How to use ■ Turn on the digital set-top box. ( ) (Refer to HDMI/DVI IN 1(DVI) or 2 jack on the remote control. NOTE G If the device does not support Auto HDMI, you need to set . 2 No separated audio connection is necessary. HDMI/DVI IN 1(DVI) DIGITAL AUDIO...
... the output resolution appropriately. How to use ■ Turn on the digital set-top box. ( ) (Refer to HDMI/DVI IN 1(DVI) or 2 jack on the remote control. NOTE G If the device does not support Auto HDMI, you need to set . 2 No separated audio connection is necessary. HDMI/DVI IN 1(DVI) DIGITAL AUDIO...
Owner's Manual (English)
Page 25
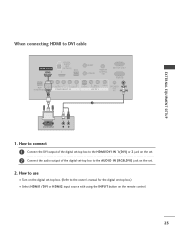
... HDMI1/DVI or HDMI2 input source with using the INPUT button on the set -top box to the AUDIO IN (RGB,DVI) jack on the remote control. 23 How to connect 1 Connect the DVI output of the digital set-top box to DVI cable HDMI/DVI IN 1(DVI) DIGITAL AUDIO OUT (OPTICAL...) 2 M.P.I. RESET UPDATE REMOTE CONTROL OUT SERVICE ONLY RGB IN RJP INTERFACE 1 VIDEO AUDIO COMPONENT IN S-VIDEO (MONO) AUDIO AV IN 1 VIDEO SPEAKER AUDIO OUT IN 8 (RGB, DVI) 2 DVI-DTV...
... HDMI1/DVI or HDMI2 input source with using the INPUT button on the set -top box to the AUDIO IN (RGB,DVI) jack on the remote control. 23 How to connect 1 Connect the DVI output of the digital set-top box to DVI cable HDMI/DVI IN 1(DVI) DIGITAL AUDIO OUT (OPTICAL...) 2 M.P.I. RESET UPDATE REMOTE CONTROL OUT SERVICE ONLY RGB IN RJP INTERFACE 1 VIDEO AUDIO COMPONENT IN S-VIDEO (MONO) AUDIO AV IN 1 VIDEO SPEAKER AUDIO OUT IN 8 (RGB, DVI) 2 DVI-DTV...

Owner's Manual (English)
Page 26
...EQUIPMENT SETUP DVD SETUP When connecting Component cable 1. Y PB PR L R Connect the audio outputs of the DVD to the COMPONENT IN VIDEO jacks on the remote control. ■ Refer to the component input ports as shown below. HDMI/DVI IN 1(DVI) 1 2 DIGITAL AUDIO OUT (OPTICAL) 2 M.P.I. ■ ...the set . 2. How to connect 1 Connect the video outputs (Y, PB, PR) of the DVD to use ■ Turn on the set . Component ports on the TV Y Y Video output ports Y on DVD player Y Y PB PR PB PR B-Y R-Y Cb Cr Pb Pr 24 Match the jack colors (Y = green, PB =...
...EQUIPMENT SETUP DVD SETUP When connecting Component cable 1. Y PB PR L R Connect the audio outputs of the DVD to the COMPONENT IN VIDEO jacks on the remote control. ■ Refer to the component input ports as shown below. HDMI/DVI IN 1(DVI) 1 2 DIGITAL AUDIO OUT (OPTICAL) 2 M.P.I. ■ ...the set . 2. How to connect 1 Connect the video outputs (Y, PB, PR) of the DVD to use ■ Turn on the set . Component ports on the TV Y Y Video output ports Y on DVD player Y Y PB PR PB PR B-Y R-Y Cb Cr Pb Pr 24 Match the jack colors (Y = green, PB =...
Owner's Manual (English)
Page 27
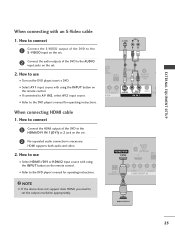
... RJP INTERFACE VIDEO AUDIO COMPONENT IN 1 NOTE G If the device does not support Auto HDMI, you need to the S -VIDEO input on the remote control. ( ) ( ■ Refer to the DVD player's manual for operating instructions. How to connect 1 Connect the S-VIDEO output of the DVD... to the HDMI/DVI IN 1(DVI) or 2 jack on the remote control. ■ If connected to AV IN2, select A V 2 input source. ■ Refer to the DVD player's manual for operating instructions. 1 2 ...
... RJP INTERFACE VIDEO AUDIO COMPONENT IN 1 NOTE G If the device does not support Auto HDMI, you need to the S -VIDEO input on the remote control. ( ) ( ■ Refer to the DVD player's manual for operating instructions. How to connect 1 Connect the S-VIDEO output of the DVD... to the HDMI/DVI IN 1(DVI) or 2 jack on the remote control. ■ If connected to AV IN2, select A V 2 input source. ■ Refer to the DVD player's manual for operating instructions. 1 2 ...
Owner's Manual (English)
Page 29
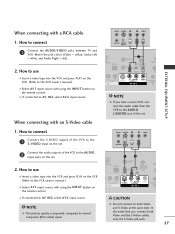
...A V 1 input source with an S-Video cable ANT OUT OUTPUT SWITCH TAL DIO UT CAL) M.P.I . 2. SER REMOTE CONTROL UPDATE OUT ■ Insert a video tape into the VCR and press PLAY on the VCR. (Refer to the AUDIO input jacks ...on the remote control. RESET UPDATE 1 REMOTE CONTROL OUT SERV R AUDIO T IN S-VIDEO (MONO) AUDIO AV IN 1 VIDEO SPEAKE OUT 8 NOTE G If...jack of the VCR to the S -VIDEO input on the remote control. ■ If connected to connect 1 Connect the AUDIO/VIDEO jacks between...
...A V 1 input source with an S-Video cable ANT OUT OUTPUT SWITCH TAL DIO UT CAL) M.P.I . 2. SER REMOTE CONTROL UPDATE OUT ■ Insert a video tape into the VCR and press PLAY on the VCR. (Refer to the AUDIO input jacks ...on the remote control. RESET UPDATE 1 REMOTE CONTROL OUT SERV R AUDIO T IN S-VIDEO (MONO) AUDIO AV IN 1 VIDEO SPEAKE OUT 8 NOTE G If...jack of the VCR to the S -VIDEO input on the remote control. ■ If connected to connect 1 Connect the AUDIO/VIDEO jacks between...
Owner's Manual (English)
Page 30
... option - S-VIDEO 1 VIDEO L/MONO AUDIO R AV IN 2 DIGITAL AUDIO OUTPUT i.e) 32/37/42LC5DC*, 32/37/42LC50C*, 42LB5DC, 42LB50C Send the TV's audio to the digital audio (optical) input on the remote control. ■ If connected to connect 1 Connect the AUDIO/VIDEO jacks between TV and external equipment. See the external audio equipment instruction manual for operation...
... option - S-VIDEO 1 VIDEO L/MONO AUDIO R AV IN 2 DIGITAL AUDIO OUTPUT i.e) 32/37/42LC5DC*, 32/37/42LC50C*, 42LB5DC, 42LB50C Send the TV's audio to the digital audio (optical) input on the remote control. ■ If connected to connect 1 Connect the AUDIO/VIDEO jacks between TV and external equipment. See the external audio equipment instruction manual for operation...
Owner's Manual (English)
Page 31
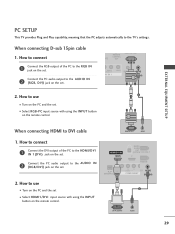
EXTERNAL EQUIPMENT SETUP PC SETUP This TV provides Plug and Play capability, meaning that the PC adjusts automatically to use ■... AUDIO IN 2 (RGB/DVI) jack on the set . ■ Select RGB-PC input source with using the INPUT button on the remote control. 2 1 When connecting HDMI to the AUDIO IN 2 (RGB, DVI) jack on the set. (MONO) AUDIO AV IN 1 VIDEO... ER AUDIO COMPONENT IN (RGB, DVI) 2. When connecting D-sub 15pin cable 1. How to connect SERVICE ONLY REMOTE CONTROL ATE OUT ( ) ( ) RGB IN 1 Connect the RGB output of the PC to use ( ) 1 ■ Turn on the...
EXTERNAL EQUIPMENT SETUP PC SETUP This TV provides Plug and Play capability, meaning that the PC adjusts automatically to use ■... AUDIO IN 2 (RGB/DVI) jack on the set . ■ Select RGB-PC input source with using the INPUT button on the remote control. 2 1 When connecting HDMI to the AUDIO IN 2 (RGB, DVI) jack on the set. (MONO) AUDIO AV IN 1 VIDEO... ER AUDIO COMPONENT IN (RGB, DVI) 2. When connecting D-sub 15pin cable 1. How to connect SERVICE ONLY REMOTE CONTROL ATE OUT ( ) ( ) RGB IN 1 Connect the RGB output of the PC to use ( ) 1 ■ Turn on the...

Owner's Manual (English)
Page 34
... channels such as 2-1, 2-2, etc. CC EXIT MENU RATIO SAP ENTER VOL TIMER MUTE CH PAGE 1 2 3 4 5 6 7 8 9 0 FLASH BACK 32 WATCHING TV / CHANNEL CONTROL WATCHING TV / CHANNEL CONTROL REMOTE CONTROL FUNCTIONS When using the remote control, aim it at the remote control sensor on -screen menus and adjust the system (Up/Down/Left /Right/ENTER) settings to your preference. THUMBSTICK Navigate the...
... channels such as 2-1, 2-2, etc. CC EXIT MENU RATIO SAP ENTER VOL TIMER MUTE CH PAGE 1 2 3 4 5 6 7 8 9 0 FLASH BACK 32 WATCHING TV / CHANNEL CONTROL WATCHING TV / CHANNEL CONTROL REMOTE CONTROL FUNCTIONS When using the remote control, aim it at the remote control sensor on -screen menus and adjust the system (Up/Down/Left /Right/ENTER) settings to your preference. THUMBSTICK Navigate the...

Owner's Manual (English)
Page 35
... PIP INPUT EZ PIC EZ SOUND SWAP INFO CC EXIT MENU RATIO SAP ENTER VOL TIMER MUTE CH PAGE 1 2 3 remote control INPUT TV POWER MODE TV INPUT DVD MULTI VCR PIP PIP CH - Changes the PIP channel. G p.42 INFO Display information at the top of ...TV / CHANNEL CONTROL MODE Select the remote's operating mode: TV, DVD, VCR. G p.45 EZ SOUND Selects the factory preset sound for the sub-picture. G p.55 SWAP Exchange the main/sub images. CC Select a closed caption. Installing Batteries Remote control effective range 32/37/42LC5DC*, 42LB5DC, 32/37/42LC5DC*, 32LX5DC*, 32LX50C* 32/37...
... PIP INPUT EZ PIC EZ SOUND SWAP INFO CC EXIT MENU RATIO SAP ENTER VOL TIMER MUTE CH PAGE 1 2 3 remote control INPUT TV POWER MODE TV INPUT DVD MULTI VCR PIP PIP CH - Changes the PIP channel. G p.42 INFO Display information at the top of ...TV / CHANNEL CONTROL MODE Select the remote's operating mode: TV, DVD, VCR. G p.45 EZ SOUND Selects the factory preset sound for the sub-picture. G p.55 SWAP Exchange the main/sub images. CC Select a closed caption. Installing Batteries Remote control effective range 32/37/42LC5DC*, 42LB5DC, 32/37/42LC5DC*, 32LX5DC*, 32LX50C* 32/37...
Owner's Manual (English)
Page 36
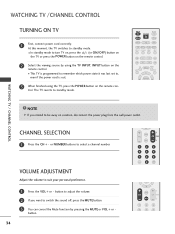
... SAP ENTER CH NOTE 1 2 3 4 5 6 G If you want to , even if the power cord is out. 3 When finished using the TV, press the POWER button on the remote control. ■ This TV is programmed to remember which power state it was last set to switch the sound off, press the MUTE button. 1 2 3 3 You...cancel the Mute function by using the TV INPUT, INPUT button on the remote con- At this moment, the TV switches to standby mode. ■ In standby mode to turn TV on, press the (or ON/OFF) button on the TV or press the POWER button on the remote control. 2 Select the viewing source by...
... SAP ENTER CH NOTE 1 2 3 4 5 6 G If you want to , even if the power cord is out. 3 When finished using the TV, press the POWER button on the remote control. ■ This TV is programmed to remember which power state it was last set to switch the sound off, press the MUTE button. 1 2 3 3 You...cancel the Mute function by using the TV INPUT, INPUT button on the remote con- At this moment, the TV switches to standby mode. ■ In standby mode to turn TV on, press the (or ON/OFF) button on the TV or press the POWER button on the remote control. 2 Select the viewing source by...
Owner's Manual (English)
Page 61
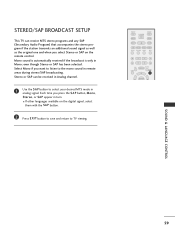
... MTS mode in turn. ■ If other languages available on the remote control. STEREO/SAP BROADCAST SETUP This TV can be received in Analog channel. 1 Use the S A P button to the mono sound in Mono; INPUT TV POWER MODE TV INPUT DVD MULTI VCR PIP PIP CH - even though Stereo or SAP...with the S A P button. 2 Press EXIT button to save and return to TV viewing. PIP CH + PIP INPUT EZ PIC EZ SOUND SWAP INFO CC EXIT RATIO MENU SAP ENTER SOUND & LANGUAGE CONTROL 59 Mono sound is automatically received if the broadcast is only in remote areas during stereo/SAP broadcasting.
... MTS mode in turn. ■ If other languages available on the remote control. STEREO/SAP BROADCAST SETUP This TV can be received in Analog channel. 1 Use the S A P button to the mono sound in Mono; INPUT TV POWER MODE TV INPUT DVD MULTI VCR PIP PIP CH - even though Stereo or SAP...with the S A P button. 2 Press EXIT button to save and return to TV viewing. PIP CH + PIP INPUT EZ PIC EZ SOUND SWAP INFO CC EXIT RATIO MENU SAP ENTER SOUND & LANGUAGE CONTROL 59 Mono sound is automatically received if the broadcast is only in remote areas during stereo/SAP broadcasting.

Owner's Manual (English)
Page 77
... 1 SETUP Lock System G Off VIDEO Set Password On AUDIO Block Channel TIME Movie Rating OPTION TV Rating-Children SCREEN LOCK TV Rating-General Aux. As soon as the 4 digits are entered, re-enter the same 4 digits on the remote control. Block Downloadable Rating New **** Confirm * * * * 2 For USA For Canada SETUP VIDEO AUDIO TIME OPTION...
... 1 SETUP Lock System G Off VIDEO Set Password On AUDIO Block Channel TIME Movie Rating OPTION TV Rating-Children SCREEN LOCK TV Rating-General Aux. As soon as the 4 digits are entered, re-enter the same 4 digits on the remote control. Block Downloadable Rating New **** Confirm * * * * 2 For USA For Canada SETUP VIDEO AUDIO TIME OPTION...

