Owner's Manual (English)
Page 6
... 43 Preset Picture Settings - User Mode 48 XD - Cinema Mode 50 Advanced - Add / Delete Channel (Manual Scan 37 - EZ Picture - EZ Picture - Analog Broadcasting System Captions 62 - CONTENTS WARNING / CAUTION 1 SAFETY INSTRUCTION 2 FEATURE OF THIS TV 6 PREPARATION Accessories 7 Front Panel Controls 8 Back Panel Information 11 Back Cover for Wire Arrangement 13 Attaching the...
... 43 Preset Picture Settings - User Mode 48 XD - Cinema Mode 50 Advanced - Add / Delete Channel (Manual Scan 37 - EZ Picture - EZ Picture - Analog Broadcasting System Captions 62 - CONTENTS WARNING / CAUTION 1 SAFETY INSTRUCTION 2 FEATURE OF THIS TV 6 PREPARATION Accessories 7 Front Panel Controls 8 Back Panel Information 11 Back Cover for Wire Arrangement 13 Attaching the...

Owner's Manual (English)
Page 8
...on . Some minute dot defects may produce some temporary distortion effects on the Plasma TV's efficiency or reliability. Plasma TV is used to react with phosphors in the Plasma TV manufacturing process. FOR LCD TV If the TV feels cold to the colors red, green, and blue. b. These phosphors are ...not available for conferencing, games, and Internet browsing. However, they have any negative effect on the screen. FEATURES OF THIS TV What is nothing wrong with TV. The Plasma TV can be visible on the screen should be exchanged or returned. Gas in a plasma state is used in...
...on . Some minute dot defects may produce some temporary distortion effects on the Plasma TV's efficiency or reliability. Plasma TV is used to react with phosphors in the Plasma TV manufacturing process. FOR LCD TV If the TV feels cold to the colors red, green, and blue. b. These phosphors are ...not available for conferencing, games, and Internet browsing. However, they have any negative effect on the screen. FEATURES OF THIS TV What is nothing wrong with TV. The Plasma TV can be visible on the screen should be exchanged or returned. Gas in a plasma state is used in...

Owner's Manual (English)
Page 9
... www.lg.ca Copyright© 2007 LGE, All Rights Reserved. PIP CH SWAP + DVD VCR PIP INPUT INFO EXIT CC MENU RATIO SAP ENTER 9 VOL TIMER MUTE 1 4 2 7 5 3 8 6 0 9 BAFCLKASH CH PAGE 1.5V 1.5V Owner's Manual, Setup & Operation Guide for Commercial Mode CD Manual Remote Control, Batteries Power Cord LCD TV model only This feature is...
... www.lg.ca Copyright© 2007 LGE, All Rights Reserved. PIP CH SWAP + DVD VCR PIP INPUT INFO EXIT CC MENU RATIO SAP ENTER 9 VOL TIMER MUTE 1 4 2 7 5 3 8 6 0 9 BAFCLKASH CH PAGE 1.5V 1.5V Owner's Manual, Setup & Operation Guide for Commercial Mode CD Manual Remote Control, Batteries Power Cord LCD TV model only This feature is...
Owner's Manual (English)
Page 15
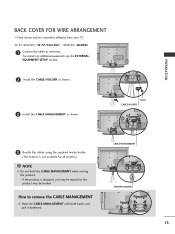
... the product. - PREPARATION BACK COVER FOR WIRE ARRANGEMENT ■ Here shown may be somewhat different from your TV. 32/37/42LC5DC*,32/37/42LC50C*, 42LB5DC, 42LB50C 1 Connect the cables as shown. To connect an additional equipment, see the EXTERNAL EQUIPMENT... SETUP section. 2 Install the CABLE HOLDER as shown. 2 Install the CABLE MANAGEMENT as necessary. BOLT CABLE HOLDER 3 Bundle the cables using the supplied twister holder. (This feature...
... the product. - PREPARATION BACK COVER FOR WIRE ARRANGEMENT ■ Here shown may be somewhat different from your TV. 32/37/42LC5DC*,32/37/42LC50C*, 42LB5DC, 42LB50C 1 Connect the cables as shown. To connect an additional equipment, see the EXTERNAL EQUIPMENT... SETUP section. 2 Install the CABLE HOLDER as shown. 2 Install the CABLE MANAGEMENT as necessary. BOLT CABLE HOLDER 3 Bundle the cables using the supplied twister holder. (This feature...
Owner's Manual (English)
Page 16
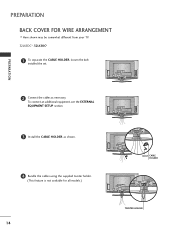
PREPARATION 2 Connect the cables as shown. 4 Bundle the cables using the supplied twister holder. (This feature is not available for all models.) 14 BOLT CABLE HOLDER TWISTER HOLDER To connect an additional equipment, see the EXTERNAL EQUIPMENT SETUP section. 3 Install the CABLE HOLDER as necessary. PREPARATION BACK COVER FOR WIRE ARRANGEMENT ■ Here shown may be somewhat different from your TV. 32LX5DC*, 32LX50C* 1 To separate the CABLE HOLDER, loosen the bolt installed the set.
PREPARATION 2 Connect the cables as shown. 4 Bundle the cables using the supplied twister holder. (This feature is not available for all models.) 14 BOLT CABLE HOLDER TWISTER HOLDER To connect an additional equipment, see the EXTERNAL EQUIPMENT SETUP section. 3 Install the CABLE HOLDER as necessary. PREPARATION BACK COVER FOR WIRE ARRANGEMENT ■ Here shown may be somewhat different from your TV. 32LX5DC*, 32LX50C* 1 To separate the CABLE HOLDER, loosen the bolt installed the set.
Owner's Manual (English)
Page 18
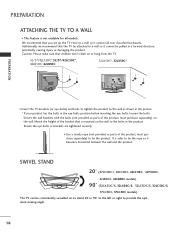
...We recommend that children don't climb on or hang from the TV. 32/37/42LC5DC*,32/37/42LC50C*, 42LB5DC, 42LB50C 32LX5DC*, 32LX50C* PREPARATION ■ Insert the TV brackets (or eye-bolts) and bolts to tighten the product..., 42LC5DC, 42LC50C, 42PX8DC, 42LB5DC, 42LB50C models) 90° (32LX5DC/S, 32LX50C/S, 32LC5DC/S, 32LC50C/S, 37LC5DC, 37LC50C models) The TV can be conveniently swivelled on its stand 20°or 90° to the left or right to...is not available for all models. PREPARATION ATTACHING THE TV TO A WALL ■ This feature is mounted on the wall to tie the product.
...We recommend that children don't climb on or hang from the TV. 32/37/42LC5DC*,32/37/42LC50C*, 42LB5DC, 42LB50C 32LX5DC*, 32LX50C* PREPARATION ■ Insert the TV brackets (or eye-bolts) and bolts to tighten the product..., 42LC5DC, 42LC50C, 42PX8DC, 42LB5DC, 42LB50C models) 90° (32LX5DC/S, 32LX50C/S, 32LC5DC/S, 32LC50C/S, 37LC5DC, 37LC50C models) The TV can be conveniently swivelled on its stand 20°or 90° to the left or right to...is not available for all models. PREPARATION ATTACHING THE TV TO A WALL ■ This feature is mounted on the wall to tie the product.
Owner's Manual (English)
Page 28
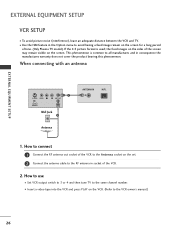
...). EXTERNAL EQUIPMENT SETUP EXTERNAL EQUIPMENT SETUP VCR SETUP ■ To avoid picture noise (interference), leave an adequate distance between the VCR and TV. ■ Use the ISM feature in the Option menu to avoid having a fixed image remain on the VCR. (Refer to the VCR owner's manual.) 26 If the 4:3 picture format... is common to the Antenna socket on the screen. How to use ■ Set VCR output switch to 3 or 4 and then tune TV to the...
...). EXTERNAL EQUIPMENT SETUP EXTERNAL EQUIPMENT SETUP VCR SETUP ■ To avoid picture noise (interference), leave an adequate distance between the VCR and TV. ■ Use the ISM feature in the Option menu to avoid having a fixed image remain on the VCR. (Refer to the VCR owner's manual.) 26 If the 4:3 picture format... is common to the Antenna socket on the screen. How to use ■ Set VCR output switch to 3 or 4 and then tune TV to the...

Owner's Manual (English)
Page 41
... Channel Label 1 Bad Normal Good 23 39 The higher the signal strength, the less likely you need to experience picture degradation. WATCHING TV / CHANNEL CONTROL DTV SIGNAL STRENGTH This feature displays the DTV signal levels being received. DTV Signal: This function is only available when the input signal is DTV or CADTV...
... Channel Label 1 Bad Normal Good 23 39 The higher the signal strength, the less likely you need to experience picture degradation. WATCHING TV / CHANNEL CONTROL DTV SIGNAL STRENGTH This feature displays the DTV signal levels being received. DTV Signal: This function is only available when the input signal is DTV or CADTV...

Owner's Manual (English)
Page 45
... This feature allows an analog picture with an original 4:3 aspect ratio. PIP CH + PIP INPUT EZ PIC EZ SOUND SWAP INFO CC EXIT RATIO MENU SAP ENTER Set By Program Set By Program 4:3 Choose 4:3 when you need to match the source's image. (4:3 4:3) (16:9 16:9) INPUT TV POWER MODE TV INPUT ... PIP CH - Set by program Selects the proper picture proportion to specify how the picture is displayed on your TV. When you receive an analog picture with a 4:3 aspect ratio on your 16:9 TV, you want to view a picture with a 4:3 aspect ratio is to be displayed. ■ RGB-PC/DVI...
... This feature allows an analog picture with an original 4:3 aspect ratio. PIP CH + PIP INPUT EZ PIC EZ SOUND SWAP INFO CC EXIT RATIO MENU SAP ENTER Set By Program Set By Program 4:3 Choose 4:3 when you need to match the source's image. (4:3 4:3) (16:9 16:9) INPUT TV POWER MODE TV INPUT ... PIP CH - Set by program Selects the proper picture proportion to specify how the picture is displayed on your TV. When you receive an analog picture with a 4:3 aspect ratio on your 16:9 TV, you want to view a picture with a 4:3 aspect ratio is to be displayed. ■ RGB-PC/DVI...
Owner's Manual (English)
Page 49
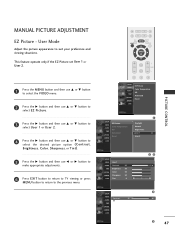
This feature operate only if the EZ Picture set User 1 or CH User 2. 2 3 5 6 8 9 0 1 Press the MENU button and then use D or E button to select the VIDEO menu. 2 ... picture option ( C o n t r a s t, Brightness, Color, Sharpness, or Tint). 5 Press the G button and then use F or G button to make appropriate adjustments. 6 Press EXIT button to return to TV viewing or press MENU button to return to suit your preference and viewing situations. CC EXIT RATIO MENU SAP ENTER VOL TIMER MUTE CH PAGE...
This feature operate only if the EZ Picture set User 1 or CH User 2. 2 3 5 6 8 9 0 1 Press the MENU button and then use D or E button to select the VIDEO menu. 2 ... picture option ( C o n t r a s t, Brightness, Color, Sharpness, or Tint). 5 Press the G button and then use F or G button to make appropriate adjustments. 6 Press EXIT button to return to TV viewing or press MENU button to return to suit your preference and viewing situations. CC EXIT RATIO MENU SAP ENTER VOL TIMER MUTE CH PAGE...
Owner's Manual (English)
Page 52
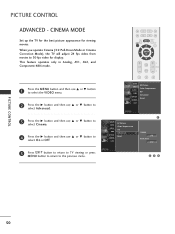
... adjust 24 fps video from movies to 30 fps video for viewing movies. PICTURE CONTROL ADVANCED - CINEMA MODE Set up the TV for the best picture appearance for display. This feature operates only in Analog, AV1, AV2, and CH Component 480i mode. 1 2 3 4 5 6 7 8 0 9 1 Press the MENU... button and then use D or E button to select O n or O f f. 5 Press EXIT button to return to TV viewing or press MENU button to ...
... adjust 24 fps video from movies to 30 fps video for viewing movies. PICTURE CONTROL ADVANCED - CINEMA MODE Set up the TV for the best picture appearance for display. This feature operates only in Analog, AV1, AV2, and CH Component 480i mode. 1 2 3 4 5 6 7 8 0 9 1 Press the MENU... button and then use D or E button to select O n or O f f. 5 Press EXIT button to return to TV viewing or press MENU button to ...
Owner's Manual (English)
Page 53
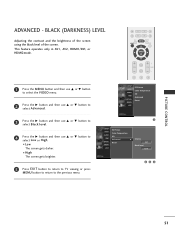
BLACK (DARKNESS) LEVEL Adjusting the contrast and the brightness of the screen using the black level of the screen. This feature operates only in AV1, AV2, HDMI1/DVI, or HDMI2mode. CC EXIT RATIO MENU SAP ENTER CH 2 3 5 6 8 9 1 Press the MENU button and then use D or E button...D or E button to select L o w or High. ■ Low The screen gets darker. ■ High The screen gets brighter. 5 Press EXIT button to return to TV viewing or press MENU button to return to the previous menu. VOL TIMER MUTE CH PAGE 1 2 3 SETUP VIDEO AUDIO TIME OPTION SCREEN LOCK EZ Picture...
BLACK (DARKNESS) LEVEL Adjusting the contrast and the brightness of the screen using the black level of the screen. This feature operates only in AV1, AV2, HDMI1/DVI, or HDMI2mode. CC EXIT RATIO MENU SAP ENTER CH 2 3 5 6 8 9 1 Press the MENU button and then use D or E button...D or E button to select L o w or High. ■ Low The screen gets darker. ■ High The screen gets brighter. 5 Press EXIT button to return to TV viewing or press MENU button to return to the previous menu. VOL TIMER MUTE CH PAGE 1 2 3 SETUP VIDEO AUDIO TIME OPTION SCREEN LOCK EZ Picture...
Owner's Manual (English)
Page 60
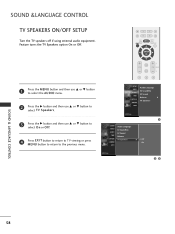
...button and then use D or E button to select O n or O f f. 4 Press EXIT button to return to TV viewing or press MENU button to return to the previous menu. Feature turns the TV Speakers option On or Off. CC EXIT RATIO MENU SAP ENTER VOL TIMER MUTE CH PAGE 1 2 3 SETUP Audio Language VIDEO... EZ SoundRite AUDIO EZ Sound TIME Balance 0 OPTION TV Speakers SCREEN LOCK 1 SETUP VIDEO AUDIO TIME...
...button and then use D or E button to select O n or O f f. 4 Press EXIT button to return to TV viewing or press MENU button to return to the previous menu. Feature turns the TV Speakers option On or Off. CC EXIT RATIO MENU SAP ENTER VOL TIMER MUTE CH PAGE 1 2 3 SETUP Audio Language VIDEO... EZ SoundRite AUDIO EZ Sound TIME Balance 0 OPTION TV Speakers SCREEN LOCK 1 SETUP VIDEO AUDIO TIME...

Owner's Manual (English)
Page 62
.... 3 Press the G button and then use D or E button to select: English, Spanish, or French. 4 Press EXIT button to return to TV viewing or press MENU button to return to the previous menu. CC EXIT RATIO MENU SAP ENTER VOL TIMER MUTE CH PAGE 1 2 3 SETUP Audio ...Language VIDEO EZ SoundRite AUDIO EZ Sound TIME Balance 0 OPTION TV Speakers SCREEN LOCK 1 SETUP VIDEO AUDIO TIME OPTION SCREEN LOCK Audio Language EZ Sound Balance TV Speakers G English Spanish French 23 SOUND & LANGUAGE CONTROL 60 This feature operates only in DTV/CADTV mode.
.... 3 Press the G button and then use D or E button to select: English, Spanish, or French. 4 Press EXIT button to return to TV viewing or press MENU button to return to the previous menu. CC EXIT RATIO MENU SAP ENTER VOL TIMER MUTE CH PAGE 1 2 3 SETUP Audio ...Language VIDEO EZ SoundRite AUDIO EZ Sound TIME Balance 0 OPTION TV Speakers SCREEN LOCK 1 SETUP VIDEO AUDIO TIME OPTION SCREEN LOCK Audio Language EZ Sound Balance TV Speakers G English Spanish French 23 SOUND & LANGUAGE CONTROL 60 This feature operates only in DTV/CADTV mode.

