

Owner's Manual
Page 1
Record model number and serial number of the set . To your set . Refer to the label on the back cover and quote this manual carefully before operating your dealer when requiring service. ENGLISH LCD TV PLASMA TV OWNER'S MANUAL LCD TV MODELS PLASMA TV MODELS 26LC4R* 26LC7R* 32LC4R* 32LC7R* 37LC4R* 37LC7R* 42LC4R* 42LC7R* 32LB9R* 42LB9R* 42PC5R* 42PC5RV* 42PC7R* 50PC5R* Please read this information. Retain it for future reference.
Record model number and serial number of the set . To your set . Refer to the label on the back cover and quote this manual carefully before operating your dealer when requiring service. ENGLISH LCD TV PLASMA TV OWNER'S MANUAL LCD TV MODELS PLASMA TV MODELS 26LC4R* 26LC7R* 32LC4R* 32LC7R* 37LC4R* 37LC7R* 42LC4R* 42LC7R* 32LB9R* 42LB9R* 42PC5R* 42PC5RV* 42PC7R* 50PC5R* Please read this information. Retain it for future reference.
Owner's Manual
Page 3
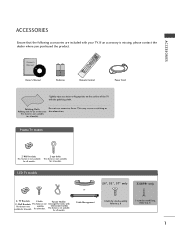
...II INPUT RATIO PIP PSRIM-PLINK PIP PIP PR+ INPUTTINVPUT POWER DVD TEXT VCR TMVODE VOL FAV 1 MUTE PR 4 2 7 5 3 TIME SIZE REVEAL ? TV Brackets 2-bolts Twister Holder 2- This feature is not available available for all models. POSITION 8 0 HOLD INDEX 6 9 1 4 VOL FAV MUTE 2 7 5...If an accessory is not available for all models. This may cause scratching or discolouration. Plasma TV models 2-Wall brackets This feature is not available for all models. LCD TV models 26", 32", 37" only 32LB9R* only or 2- Cable Management 4-bolts for stand ...
...II INPUT RATIO PIP PSRIM-PLINK PIP PIP PR+ INPUTTINVPUT POWER DVD TEXT VCR TMVODE VOL FAV 1 MUTE PR 4 2 7 5 3 TIME SIZE REVEAL ? TV Brackets 2-bolts Twister Holder 2- This feature is not available available for all models. POSITION 8 0 HOLD INDEX 6 9 1 4 VOL FAV MUTE 2 7 5...If an accessory is not available for all models. This may cause scratching or discolouration. Plasma TV models 2-Wall brackets This feature is not available for all models. LCD TV models 26", 32", 37" only 32LB9R* only or 2- Cable Management 4-bolts for stand ...
Owner's Manual
Page 7
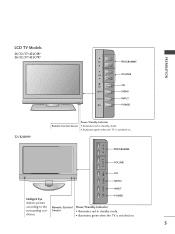
POWER Remote Control Power/Standby Indicator Sensor • illuminates red in standby mode. • illuminates green when the TV is switched on . PROGRAMME PR VOL VOLUME OK MENU INPUT /I PROGRAMME VOLUME OK MENU INPUT POWER 32/42LB9R* Power/Standby Indicator Remote Control Sensor • illuminates red in standby mode. • illuminates green when the TV is switched on . 5 PREPARATION LCD TV Models 26/32/37/42LC4R* 26/32/37/42LC7R* PR VOL OK MENU INPUT /I OK MENU INPUT Intelligent Eye Adjusts picture according to the surrounding conditions.
POWER Remote Control Power/Standby Indicator Sensor • illuminates red in standby mode. • illuminates green when the TV is switched on . PROGRAMME PR VOL VOLUME OK MENU INPUT /I PROGRAMME VOLUME OK MENU INPUT POWER 32/42LB9R* Power/Standby Indicator Remote Control Sensor • illuminates red in standby mode. • illuminates green when the TV is switched on . 5 PREPARATION LCD TV Models 26/32/37/42LC4R* 26/32/37/42LC7R* PR VOL OK MENU INPUT /I OK MENU INPUT Intelligent Eye Adjusts picture according to the surrounding conditions.
Owner's Manual
Page 9
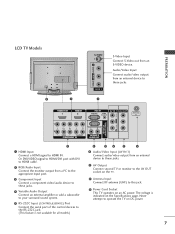
...Audio/Video Input Connect audio/video output from an external device to this jack. 9 Power Cord Socket This TV operates on an AC power. S-VIDEO VIDEO L/MONO AUDIO R PREPARATION MI IN 2 MI IN 2 LCD TV Models HDMI/DVI IN 1 HDMI IN 2 1 2 COMPONENT IN 9 1 R AUDIO L/MONO VIDEO HDMI/... RGB IN AV IN 1 AV OUT RS-232C IN (CONTROL & SERVICE) R AUDIO L/MONO VIDEO VARIABLE 3 A1UDHIOD1OMUITInput Co2nnect a HDMI signal to operate the TV on DC power. 7 RS-232C IN (CONTROL & SERVICE) R AUDIO L/MONO VIDEO 4 Variable Audio Output Connect an external amplifier or add a subwoofer to ...
...Audio/Video Input Connect audio/video output from an external device to this jack. 9 Power Cord Socket This TV operates on an AC power. S-VIDEO VIDEO L/MONO AUDIO R PREPARATION MI IN 2 MI IN 2 LCD TV Models HDMI/DVI IN 1 HDMI IN 2 1 2 COMPONENT IN 9 1 R AUDIO L/MONO VIDEO HDMI/... RGB IN AV IN 1 AV OUT RS-232C IN (CONTROL & SERVICE) R AUDIO L/MONO VIDEO VARIABLE 3 A1UDHIOD1OMUITInput Co2nnect a HDMI signal to operate the TV on DC power. 7 RS-232C IN (CONTROL & SERVICE) R AUDIO L/MONO VIDEO 4 Variable Audio Output Connect an external amplifier or add a subwoofer to ...
Owner's Manual
Page 10
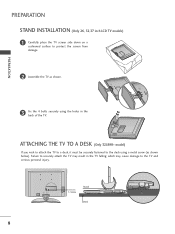
... personal injury. 1-Screw Stand Desk 8 Failure to protect the screen from damage. 2 Assemble the TV as shown below). PREPARATION STAND INSTALLATION (Only 26, 32,37 inch LCD TV models) 1 Carefully place the TV screen side down on a cushioned surface to securely attach the TV may cause damage to the desk using the holes in the...
... personal injury. 1-Screw Stand Desk 8 Failure to protect the screen from damage. 2 Assemble the TV as shown below). PREPARATION STAND INSTALLATION (Only 26, 32,37 inch LCD TV models) 1 Carefully place the TV screen side down on a cushioned surface to securely attach the TV may cause damage to the desk using the holes in the...

Owner's Manual
Page 11
... the TV from falling forward and causing injury. Plasma TV models LCD TV models 1 1 2 2 1 Use the eye-bolts or TV brackets/bolts to fix the product to the wall as shown in the picture. (If your TV has bolts in the eyebolts, loosen then bolts.) * Insert the eye-bolts or TV brackets/bolts...securely in the upper holes. 2 Secure the wall brackets with bolts (must purchase separately) to secure the TV. Secure the cord in position. ! This will also prevent the TV from the TV. G Use a platform or cabinet string and large enough to the wall, avoiding the possibility of it becomes...
... the TV from falling forward and causing injury. Plasma TV models LCD TV models 1 1 2 2 1 Use the eye-bolts or TV brackets/bolts to fix the product to the wall as shown in the picture. (If your TV has bolts in the eyebolts, loosen then bolts.) * Insert the eye-bolts or TV brackets/bolts...securely in the upper holes. 2 Secure the wall brackets with bolts (must purchase separately) to secure the TV. Secure the cord in position. ! This will also prevent the TV from the TV. G Use a platform or cabinet string and large enough to the wall, avoiding the possibility of it becomes...
Owner's Manual
Page 13
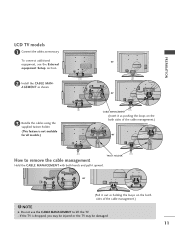
...NOTE G Do not use the CABLE MANAGEMENT to remove the cable management Hold the CABLE MANAGEMENT with both sides of the cable management.) ! If the TV is not available for all models.) or or CABLE MANAGEMENT (Insert it as pushing the loops on the both hands and pull it out as... necessary. PREPARATION LCD TV models 1 Connect the cables as holding the loops on the both sides of the cable management.) or TWIST HOLDER How to lift the TV. - To connect additional equipment, see the External equipment Setup section. 2 Install the...
...NOTE G Do not use the CABLE MANAGEMENT to remove the cable management Hold the CABLE MANAGEMENT with both sides of the cable management.) ! If the TV is not available for all models.) or or CABLE MANAGEMENT (Insert it as pushing the loops on the both hands and pull it out as... necessary. PREPARATION LCD TV models 1 Connect the cables as holding the loops on the both sides of the cable management.) or TWIST HOLDER How to lift the TV. - To connect additional equipment, see the External equipment Setup section. 2 Install the...
Owner's Manual
Page 17
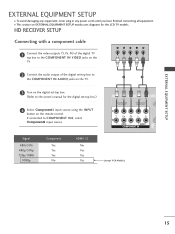
...This section on the remote control. HD RECEIVER SETUP Connecting with a component cable 1 Connect the video outputs (Y, PB, PR) of the digital TV top box to the COMPONENT IN VIDEO jacks on the TV. 2 Connect the audio output of the digital set-top box to the COMPONENT IN AUDIO jacks on the... set-top box.) HDMI DVI IN HDMI IN 4 Select Component1 input source using the INPUT button on EXTERNAL EQUIPMENT SETUP mainly uses diagrams for the LCD TV models. Signal 480i/576i 480p/576p 720p/1080i 1080p Component Yes Yes Yes No HDMI1/2 No Yes Yes Yes 1 2 VIDEO AUDIO COMPONENT IN HHDDMMI ...
...This section on the remote control. HD RECEIVER SETUP Connecting with a component cable 1 Connect the video outputs (Y, PB, PR) of the digital TV top box to the COMPONENT IN VIDEO jacks on the TV. 2 Connect the audio output of the digital set-top box to the COMPONENT IN AUDIO jacks on the... set-top box.) HDMI DVI IN HDMI IN 4 Select Component1 input source using the INPUT button on EXTERNAL EQUIPMENT SETUP mainly uses diagrams for the LCD TV models. Signal 480i/576i 480p/576p 720p/1080i 1080p Component Yes Yes Yes No HDMI1/2 No Yes Yes Yes 1 2 VIDEO AUDIO COMPONENT IN HHDDMMI ...
Owner's Manual
Page 29
... be interference relating to 1280x768, 1360x768, 1366x768 in PC mode. Change the PC mode to another resolution or change the refresh rate to the TV. G If the resolution of the cable. G There may be no picture on the menu until the picture is clear. If the refresh... rate of the TV; G If you use a screen saver when possible. We recommend using 1366x768, 60Hz (LCD TV models) / 852x480, 60Hz (42 inch WVGA PLASMA TV models) / 1024x768, 60Hz (42 inch XGA PLASMA TV models) / 1360x768, 60Hz (50 inch PLASMA TV models) for Horizontal and Vertical frequencies are...
... be interference relating to 1280x768, 1360x768, 1366x768 in PC mode. Change the PC mode to another resolution or change the refresh rate to the TV. G If the resolution of the cable. G There may be no picture on the menu until the picture is clear. If the refresh... rate of the TV; G If you use a screen saver when possible. We recommend using 1366x768, 60Hz (LCD TV models) / 852x480, 60Hz (42 inch WVGA PLASMA TV models) / 1024x768, 60Hz (42 inch XGA PLASMA TV models) / 1360x768, 60Hz (50 inch PLASMA TV models) for Horizontal and Vertical frequencies are...
Owner's Manual
Page 61
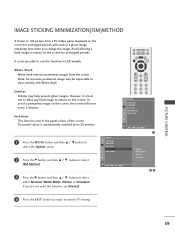
... permanent images from a PC/Video game displayed on the screen for prolonged periods. To avoid a permanent image on the screen, the screen will result in LCD models. If you change the image. LIST MENU Q.VIEW EXIT SLEEP OK FAV VOL PR MUTE 1 2 3 4 5 6 7 8 9 Option Language SIMPLINK Key Lock ISM Method.../ E button to select the Option menu. 2 Press the G button and then D / E button to select ISM Method. 3 Press the G button and then D / E button to normal TV viewing. 59 PICTURE CONTROL IMAGE STICKING MINIMIZATION(ISM)METHOD A frozen or still picture from the screen.
... permanent images from a PC/Video game displayed on the screen for prolonged periods. To avoid a permanent image on the screen, the screen will result in LCD models. If you change the image. LIST MENU Q.VIEW EXIT SLEEP OK FAV VOL PR MUTE 1 2 3 4 5 6 7 8 9 Option Language SIMPLINK Key Lock ISM Method.../ E button to select the Option menu. 2 Press the G button and then D / E button to select ISM Method. 3 Press the G button and then D / E button to normal TV viewing. 59 PICTURE CONTROL IMAGE STICKING MINIMIZATION(ISM)METHOD A frozen or still picture from the screen.

Owner's Manual
Page 62
It is not possible to use this function in LCD models. 1 Press the MENU button and then D / E button to select the Option menu. 2 Press the G button and then D / E button to...Press the G button and then D / E button to select On or Off. 4 Press the EXIT button to return to reduce the power consumption of the TV. Option Language SIMPLINK Key Lock ISM Method Low Power LIST MENU Q.VIEW EXIT SLEEP OK FAV VOL PR MUTE 1 2 3 4 5 6 7 8 9 Option...Off On DE F G OK MENU 23 PICTURE CONTROL 60 PICTURE CONTROL LOW-POWER PICTURE MODE This function allows you to normal TV viewing.
It is not possible to use this function in LCD models. 1 Press the MENU button and then D / E button to select the Option menu. 2 Press the G button and then D / E button to...Press the G button and then D / E button to select On or Off. 4 Press the EXIT button to return to reduce the power consumption of the TV. Option Language SIMPLINK Key Lock ISM Method Low Power LIST MENU Q.VIEW EXIT SLEEP OK FAV VOL PR MUTE 1 2 3 4 5 6 7 8 9 Option...Off On DE F G OK MENU 23 PICTURE CONTROL 60 PICTURE CONTROL LOW-POWER PICTURE MODE This function allows you to normal TV viewing.


