
Owner's Manual
Page 4
...in-Picture 46 Picture Size (Aspect Ratio)Control 48 Preset Picture Settings - Stereo/Dual Reception 66 - User Option 53 - Picture Improvement Technology 54 Demo 55 Advanced - Black(Darkness) Level 57 Picture Reset 58 Image Sticking Minimization(ISM) Method...........59 Low-Power Picture Mode 60 SOUND & LANGUAGE CONTROL Auto Volume Leveler 61 Preset Sound Settings - Screen Setup for Wire Arrangement 10 Desktop Pedestal Installation 12 Wall Mount: Horizontal installation 13 Antenna Connection 14 EXTERNAL EQUIPMENT SETUP HD Receiver Setup 15 DVD Setup 18 VCR Setup 21...
...in-Picture 46 Picture Size (Aspect Ratio)Control 48 Preset Picture Settings - Stereo/Dual Reception 66 - User Option 53 - Picture Improvement Technology 54 Demo 55 Advanced - Black(Darkness) Level 57 Picture Reset 58 Image Sticking Minimization(ISM) Method...........59 Low-Power Picture Mode 60 SOUND & LANGUAGE CONTROL Auto Volume Leveler 61 Preset Sound Settings - Screen Setup for Wire Arrangement 10 Desktop Pedestal Installation 12 Wall Mount: Horizontal installation 13 Antenna Connection 14 EXTERNAL EQUIPMENT SETUP HD Receiver Setup 15 DVD Setup 18 VCR Setup 21...
Owner's Manual
Page 6
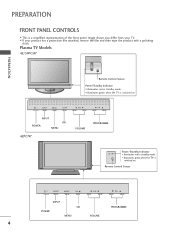
Plasma TV Models 42/50PC5R* PREPARATION Remote Control Sensor Power/Standby Indicator • illuminates red in standby mode. • illuminates green when the TV is switched on . INPUT MENU INPUT MENU OK VOL OK PR INPUT POWER OK MENU 42PC7R* INPUT MENU OK VOL PR VOL PR VOLUME PROGRAMME INPUT MENU OK VOL PR Power/Standby Indicator • illuminates red in standby mode. INPUT MENU OK VOL PR • illuminates green when the TV is a simplified...
Plasma TV Models 42/50PC5R* PREPARATION Remote Control Sensor Power/Standby Indicator • illuminates red in standby mode. • illuminates green when the TV is switched on . INPUT MENU INPUT MENU OK VOL OK PR INPUT POWER OK MENU 42PC7R* INPUT MENU OK VOL PR VOL PR VOLUME PROGRAMME INPUT MENU OK VOL PR Power/Standby Indicator • illuminates red in standby mode. INPUT MENU OK VOL PR • illuminates green when the TV is a simplified...
Owner's Manual
Page 17
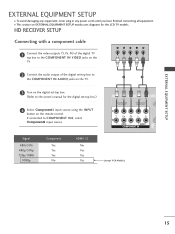
If connected to the owner's manual for the digital set-top box.) HDMI DVI IN HDMI IN 4 Select Component1 input source using the INPUT button on EXTERNAL EQUIPMENT SETUP mainly uses diagrams for the LCD TV models. Signal 480i/576i 480p/576p 720p/1080i 1080p Component Yes Yes Yes No HDMI1/2 No Yes Yes Yes 1 2 VIDEO AUDIO COMPONENT IN HHDDMMI DI/DVVI ININ 1 (except VGA Models) HHDDMMII IINN 2 15 HD RECEIVER SETUP Connecting with a component cable 1 Connect the video outputs (Y, PB, PR) of the digital TV...
If connected to the owner's manual for the digital set-top box.) HDMI DVI IN HDMI IN 4 Select Component1 input source using the INPUT button on EXTERNAL EQUIPMENT SETUP mainly uses diagrams for the LCD TV models. Signal 480i/576i 480p/576p 720p/1080i 1080p Component Yes Yes Yes No HDMI1/2 No Yes Yes Yes 1 2 VIDEO AUDIO COMPONENT IN HHDDMMI DI/DVVI ININ 1 (except VGA Models) HHDDMMII IINN 2 15 HD RECEIVER SETUP Connecting with a component cable 1 Connect the video outputs (Y, PB, PR) of the digital TV...
Owner's Manual
Page 18
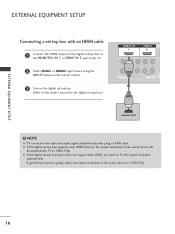
... HDMI cable 1 Connect the HDMI output of the source device will be automatically TV to the owner's manual for the digital set-top box.) HHDDMMI DI/DVVI ININ 1 HHDDMMII IINN 2 1 ! EXTERNAL EQUIPMENT SETUP EXTERNAL EQUIPMENT SETUP 1 2 COMPONENT IN Connecting a set-top box with using the INPUT button on the remote control. 3 Turn on the TV. 2 Select HDMI1 or HDMI2 input source using a HDMI cable. G If the digital set-top box supports Auto HDMI function, the output resolution of the digital set-top box to the HDMI/DVI IN 1 or HDMI IN 2 jack on the digital set...
... HDMI cable 1 Connect the HDMI output of the source device will be automatically TV to the owner's manual for the digital set-top box.) HHDDMMI DI/DVVI ININ 1 HHDDMMII IINN 2 1 ! EXTERNAL EQUIPMENT SETUP EXTERNAL EQUIPMENT SETUP 1 2 COMPONENT IN Connecting a set-top box with using the INPUT button on the remote control. 3 Turn on the TV. 2 Select HDMI1 or HDMI2 input source using a HDMI cable. G If the digital set-top box supports Auto HDMI function, the output resolution of the digital set-top box to the HDMI/DVI IN 1 or HDMI IN 2 jack on the digital set...
Owner's Manual
Page 19
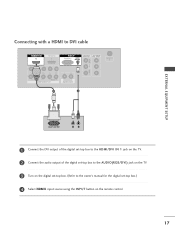
Connecting with a HDMI to DVI cable HHDDMMI DI/DVVI ININ 1 HDMI IN RGB IN RGB(PC) AUDIO (RGB/DVI) RGB(PC) AUDIO (RGB/DVI) AV IN 1 AV OUT L/MONO 1 2 EXTERNAL EQUIPMENT SETUP 1 Connect the DVI output of the digital set-top box to the HDMI/DVI IN 1 jack on the TV. 2 Connect the audio output of the digital set-top box to the AUDIO(RGB/DVI) jack on the TV. 3 Turn on the digital set-top box. (Refer to the owner's manual for the digital set-top box.) 4 Select HDMI1 input source using the INPUT button on the remote control. 17
Connecting with a HDMI to DVI cable HHDDMMI DI/DVVI ININ 1 HDMI IN RGB IN RGB(PC) AUDIO (RGB/DVI) RGB(PC) AUDIO (RGB/DVI) AV IN 1 AV OUT L/MONO 1 2 EXTERNAL EQUIPMENT SETUP 1 Connect the DVI output of the digital set-top box to the HDMI/DVI IN 1 jack on the TV. 2 Connect the audio output of the digital set-top box to the AUDIO(RGB/DVI) jack on the TV. 3 Turn on the digital set-top box. (Refer to the owner's manual for the digital set-top box.) 4 Select HDMI1 input source using the INPUT button on the remote control. 17
Owner's Manual
Page 22
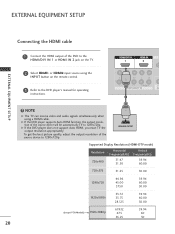
HHDDMMI DI/DVVI ININ 1 HHDDMMII IINN 2 EXTERNAL EQUIPMENT SETUP 3 Refer to the DVD player's manual for operating instructions. 1 ! NOTE G The TV can receive video and audio signals simultaneously when using the INPUT button on the remote control. To get the best picture quality, adjust the output resolution of the source device will be automatically TV to 1280x720p. Supported Display Resolution (HDMI-DTV mode) Resolution 720x480 Horizontal Frequency(kHz) 31.47 31.50 Vertical Frequency(Hz) 59.94...
HHDDMMI DI/DVVI ININ 1 HHDDMMII IINN 2 EXTERNAL EQUIPMENT SETUP 3 Refer to the DVD player's manual for operating instructions. 1 ! NOTE G The TV can receive video and audio signals simultaneously when using the INPUT button on the remote control. To get the best picture quality, adjust the output resolution of the source device will be automatically TV to 1280x720p. Supported Display Resolution (HDMI-DTV mode) Resolution 720x480 Horizontal Frequency(kHz) 31.47 31.50 Vertical Frequency(Hz) 59.94...
Owner's Manual
Page 23
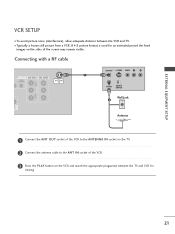
HDMI DVI IN HDMI IN 21 If 4:3 picture format is used for viewing. L/MONO VIDEO L/MONO AUDIO R EXTERNAL EQUIPMENT SETUP VCR SETUP ■ To avoid picture noise (interference), allow adequate distance between the TV and VCR for an extended period the fixed images on the sides of the VCR. 3 Press the PLAY button on the TV. 2 Connect the antenna cable to the ANTENNA IN socket on the VCR and match the appropriate programme between the VCR and...
HDMI DVI IN HDMI IN 21 If 4:3 picture format is used for viewing. L/MONO VIDEO L/MONO AUDIO R EXTERNAL EQUIPMENT SETUP VCR SETUP ■ To avoid picture noise (interference), allow adequate distance between the TV and VCR for an extended period the fixed images on the sides of the VCR. 3 Press the PLAY button on the TV. 2 Connect the antenna cable to the ANTENNA IN socket on the VCR and match the appropriate programme between the VCR and...
Owner's Manual
Page 24
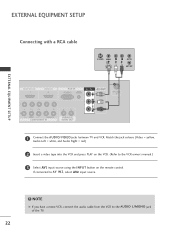
... OUT AUDIO (RGB/DVI) R AUDIO L/MONO VIDEO L/MONO EXTERNAL EQUIPMENT SETUP 1 Connect the AUDIO/VIDEO jacks between TV and VCR. If connected to the VCR owner's manual.) 3 Select AV1 input source using the INPUT button on the VCR. (Refer to AV IN2, select AV2 input source. ! Match the jack colours (Video = yellow, Audio Left = white, and Audio Right = red) 2 Insert a video tape into the VCR and press PLAY on the remote control. NOTE G If you have a mono VCR, connect the audio cable from the VCR to the AUDIO L/MONO jack...
... OUT AUDIO (RGB/DVI) R AUDIO L/MONO VIDEO L/MONO EXTERNAL EQUIPMENT SETUP 1 Connect the AUDIO/VIDEO jacks between TV and VCR. If connected to the VCR owner's manual.) 3 Select AV1 input source using the INPUT button on the VCR. (Refer to AV IN2, select AV2 input source. ! Match the jack colours (Video = yellow, Audio Left = white, and Audio Right = red) 2 Insert a video tape into the VCR and press PLAY on the remote control. NOTE G If you have a mono VCR, connect the audio cable from the VCR to the AUDIO L/MONO jack...
Owner's Manual
Page 29
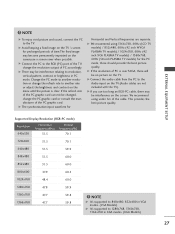
....8 1366x768 47.7 59.8 ! G Avoid keeping a fixed image on the TV. G Connect the PC to 1280x768, 1360x768, 1366x768 in VGA modes. (VGA Models) G It's supported to the RGB (PC) port of time.The fixed image may become permanently imprinted on the screen;use too long an RGB-PC cable, there may be changed, change the refresh rate to the Audio input on the menu until the picture is over SXGA, there will...
....8 1366x768 47.7 59.8 ! G Avoid keeping a fixed image on the TV. G Connect the PC to 1280x768, 1360x768, 1366x768 in VGA modes. (VGA Models) G It's supported to the RGB (PC) port of time.The fixed image may become permanently imprinted on the screen;use too long an RGB-PC cable, there may be changed, change the refresh rate to the Audio input on the menu until the picture is over SXGA, there will...
Owner's Manual
Page 30
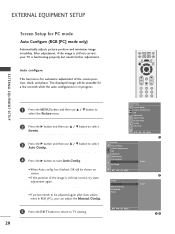
.... LIST MENU Q.VIEW EXIT SLEEP OK FAV VOL PR MUTE 1 2 3 4 5 6 7 8 9 Picture Picture Mode Colour Temperature XD Advanced Aspect Ratio Picture Reset Screen XD Demo DE F G OK MENU 1 Picture Picture Mode Colour Temperature XD Advanced Aspect Ratio Picture Reset Screen XD Demo G To Set DE F G OK MENU 2 Screen Auto cCoonnffiigg.. Auto configure This function is for automatic adjustment of the image is still not correct, try Auto adjustment again. • If picture needs to be adjusted again after Auto adjustment in progress. 1 Press the MENU button and then use D / E button...
.... LIST MENU Q.VIEW EXIT SLEEP OK FAV VOL PR MUTE 1 2 3 4 5 6 7 8 9 Picture Picture Mode Colour Temperature XD Advanced Aspect Ratio Picture Reset Screen XD Demo DE F G OK MENU 1 Picture Picture Mode Colour Temperature XD Advanced Aspect Ratio Picture Reset Screen XD Demo G To Set DE F G OK MENU 2 Screen Auto cCoonnffiigg.. Auto configure This function is for automatic adjustment of the image is still not correct, try Auto adjustment again. • If picture needs to be adjusted again after Auto adjustment in progress. 1 Press the MENU button and then use D / E button...
Owner's Manual
Page 31
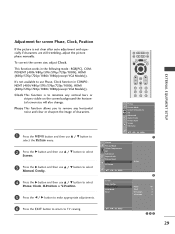
... to make appropriate adjustments. 6 Press the EXIT button to return to remove any vertical bars or stripes visible on the screen background the horizontal screen size will also change. EXTERNAL EQUIPMENT SETUP LIST MENU Q.VIEW EXIT SLEEP OK FAV VOL PR MUTE 1 2 3 4 5 6 7 8 9 Picture Picture Mode Colour Temperature XD Advanced Aspect Ratio Picture Reset Screen XD Demo DE F G OK MENU Picture Picture Mode Colour Temperature XD Advanced Aspect Ratio Picture Reset Screen XD Demo DE F G OK MENU G To Set Screen Auto Config. This function works in COMPONENT (480i/480p...
... to make appropriate adjustments. 6 Press the EXIT button to return to remove any vertical bars or stripes visible on the screen background the horizontal screen size will also change. EXTERNAL EQUIPMENT SETUP LIST MENU Q.VIEW EXIT SLEEP OK FAV VOL PR MUTE 1 2 3 4 5 6 7 8 9 Picture Picture Mode Colour Temperature XD Advanced Aspect Ratio Picture Reset Screen XD Demo DE F G OK MENU Picture Picture Mode Colour Temperature XD Advanced Aspect Ratio Picture Reset Screen XD Demo DE F G OK MENU G To Set Screen Auto Config. This function works in COMPONENT (480i/480p...
Owner's Manual
Page 32
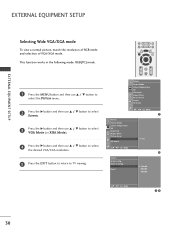
...then use D / E button to select the desired VGA/XGA resolution. 5 Press the EXIT button to return to TV viewing. Manual Config. VGA Mode Reset G 640x480 848x480 852x480 DE F G OK MENU 34 30 LIST MENU Q.VIEW EXIT SLEEP OK FAV VOL PR MUTE Picture Picture Mode Colour Temperature XD Advanced Aspect Ratio Picture Reset Screen XD Demo DE F G OK MENU 1 Picture Picture Mode Colour Temperature XD Advanced Aspect Ratio Picture Reset Screen XD Demo G To Set DE F G OK MENU 2 Screen Auto Config. EXTERNAL EQUIPMENT SETUP EXTERNAL EQUIPMENT SETUP Selecting Wide VGA/XGA mode To view...
...then use D / E button to select the desired VGA/XGA resolution. 5 Press the EXIT button to return to TV viewing. Manual Config. VGA Mode Reset G 640x480 848x480 852x480 DE F G OK MENU 34 30 LIST MENU Q.VIEW EXIT SLEEP OK FAV VOL PR MUTE Picture Picture Mode Colour Temperature XD Advanced Aspect Ratio Picture Reset Screen XD Demo DE F G OK MENU 1 Picture Picture Mode Colour Temperature XD Advanced Aspect Ratio Picture Reset Screen XD Demo G To Set DE F G OK MENU 2 Screen Auto Config. EXTERNAL EQUIPMENT SETUP EXTERNAL EQUIPMENT SETUP Selecting Wide VGA/XGA mode To view...
Owner's Manual
Page 33
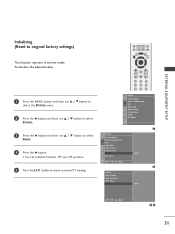
EXTERNAL EQUIPMENT SETUP Initializing (Reset to normal TV viewing. LIST MENU Q.VIEW EXIT SLEEP OK FAV VOL PR MUTE 1 2 3 4 5 6 7 8 9 Picture Picture Mode Colour Temperature XD Advanced Aspect Ratio Picture Reset Screen XD Demo 1 Picture Picture Mode Colour Temperature XD Advanced Aspect Ratio Picture Reset Screen XD Demo G To Set DE F G OK MENU 2 Screen Auto Config. Manual Config. VGA Mode Reset G To Set DE F G OK MENU 34 31 To initialize the adjusted value 1 Press the MENU button and then use D / E button to select the Picture menu. 2 Press the G button and...
EXTERNAL EQUIPMENT SETUP Initializing (Reset to normal TV viewing. LIST MENU Q.VIEW EXIT SLEEP OK FAV VOL PR MUTE 1 2 3 4 5 6 7 8 9 Picture Picture Mode Colour Temperature XD Advanced Aspect Ratio Picture Reset Screen XD Demo 1 Picture Picture Mode Colour Temperature XD Advanced Aspect Ratio Picture Reset Screen XD Demo G To Set DE F G OK MENU 2 Screen Auto Config. Manual Config. VGA Mode Reset G To Set DE F G OK MENU 34 31 To initialize the adjusted value 1 Press the MENU button and then use D / E button to select the Picture menu. 2 Press the G button and...
Owner's Manual
Page 34
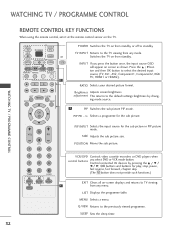
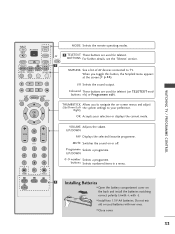
... viewing from standby or off to TV viewing 1 from standby. OK PIP PR - /+ Selects a programme for the sub picture in PIP picture mode. INPUT If you select DVD or VCR mode button. MENU Selects a menu. PIP PR+ PIP INPUT 1 LIST MENU Q.VIEW EXIT SLEEP POWER Switches the TV on from any mode. INPUT MODE TV POWER TV INPUT DVD or RATIO VCR STB SIMPLINK PIP TEXT I/II PIP PR- RATIO Selects your desired picture format. REVEAL POSITION INDEX PIP INPUT Selects the input source for the sub picture...
... viewing from standby or off to TV viewing 1 from standby. OK PIP PR - /+ Selects a programme for the sub picture in PIP picture mode. INPUT If you select DVD or VCR mode button. MENU Selects a menu. PIP PR+ PIP INPUT 1 LIST MENU Q.VIEW EXIT SLEEP POWER Switches the TV on from any mode. INPUT MODE TV POWER TV INPUT DVD or RATIO VCR STB SIMPLINK PIP TEXT I/II PIP PR- RATIO Selects your desired picture format. REVEAL POSITION INDEX PIP INPUT Selects the input source for the sub picture...
Owner's Manual
Page 35
... CONTROL INPUT MODE MODE Selects the remote operating modes. When you to navigate the on TELETEXT mod- MUTE Switches the sound on the back and install the batteries matching correct polarity (+with +,-with new ones. ■ Close cover. 33 buttons Selects numbered items in a menu. Do not mix old or used for teletext (on -screen menus and adjust (Up/Down/Left the system settings to TV. UP/DOWN 0~9 number Selects a programme. RATIO VCR STB...
... CONTROL INPUT MODE MODE Selects the remote operating modes. When you to navigate the on TELETEXT mod- MUTE Switches the sound on the back and install the batteries matching correct polarity (+with +,-with new ones. ■ Close cover. 33 buttons Selects numbered items in a menu. Do not mix old or used for teletext (on -screen menus and adjust (Up/Down/Left the system settings to TV. UP/DOWN 0~9 number Selects a programme. RATIO VCR STB...
Owner's Manual
Page 37
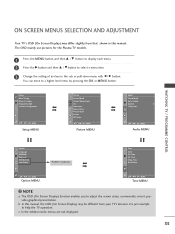
...this manual. Setup Auto Tuning Manual Tuning Programme Edit Favourite Programme DE F G OK MENU Setup MENU Picture Picture Mode Colour Temperature XD Advanced Aspect Ratio Picture Reset Screen XD Demo DE F G OK MENU Picture MENU Audio Sound Mode Auto Volume Balance 0 TV Speaker DE F G OK MENU Audio MENU WATCHING TV / PROGRAMME CONTROL Option Language SIMPLINK Key Lock ISM Method Low Power * PLASMA TV models only Time Clock Off Time On Time Sleep Time Auto Sleep DE F G OK MENU Option MENU DE F G OK MENU Time MENU ! c. You can move to select a menu item. 3 Change the setting of...
...this manual. Setup Auto Tuning Manual Tuning Programme Edit Favourite Programme DE F G OK MENU Setup MENU Picture Picture Mode Colour Temperature XD Advanced Aspect Ratio Picture Reset Screen XD Demo DE F G OK MENU Picture MENU Audio Sound Mode Auto Volume Balance 0 TV Speaker DE F G OK MENU Audio MENU WATCHING TV / PROGRAMME CONTROL Option Language SIMPLINK Key Lock ISM Method Low Power * PLASMA TV models only Time Clock Off Time On Time Sleep Time Auto Sleep DE F G OK MENU Option MENU DE F G OK MENU Time MENU ! c. You can move to select a menu item. 3 Change the setting of...

Owner's Manual
Page 50
... of the screen. Spectacle DE • Original When your TV receives the wide screen signal, when selected it will appear on the screen for viewing 4:3 formatted DVDs). PIP PR+ PIP INPUT LIST MENU Q.VIEW EXIT SLEEP OK 1 Press the RATIO button repeatedly to view a picture with an original 4:3 aspect ration, grey bars will automatically change to the picture format to be broadcast. 4:3 • 16:9 The following signal. You can adjust the enlarge proportion using D / E button.
... of the screen. Spectacle DE • Original When your TV receives the wide screen signal, when selected it will appear on the screen for viewing 4:3 formatted DVDs). PIP PR+ PIP INPUT LIST MENU Q.VIEW EXIT SLEEP OK 1 Press the RATIO button repeatedly to view a picture with an original 4:3 aspect ration, grey bars will automatically change to the picture format to be broadcast. 4:3 • 16:9 The following signal. You can adjust the enlarge proportion using D / E button.
Owner's Manual
Page 52
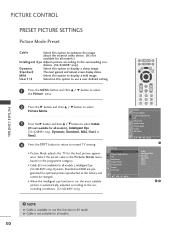
... optimize the image about the external video device. (It's not available for the best picture appearance. Mild Select this option to the surrounding con- User1/2 Selection this option to normal TV viewing. • Picture Mode adjusts the TV for all models. 50 LIST MENU Q.VIEW EXIT SLEEP OK 1 Press the MENU button and then D / E button to select the Picture menu. 2 Press the G button and then D / E button to select Picture Mode. 3 Press the G button and then D / E button to select Cable (It's not...
... optimize the image about the external video device. (It's not available for the best picture appearance. Mild Select this option to the surrounding con- User1/2 Selection this option to normal TV viewing. • Picture Mode adjusts the TV for all models. 50 LIST MENU Q.VIEW EXIT SLEEP OK 1 Press the MENU button and then D / E button to select the Picture menu. 2 Press the G button and then D / E button to select Picture Mode. 3 Press the G button and then D / E button to select Cable (It's not...
Owner's Manual
Page 78
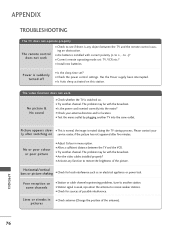
...; Is the power cord inserted correctly into the same outlet. APPENDIX TROUBLESHOOTING The TV does not operate properly The remote control does not work . Please contact your antenna direction and/or location. ■ Test the mains outlet by plugging another channel. The problem may be with the broadcast. ■ Are the video cables installed properly? ■ Activate any object between the TV and the VCR. ■...
...; Is the power cord inserted correctly into the same outlet. APPENDIX TROUBLESHOOTING The TV does not operate properly The remote control does not work . Please contact your antenna direction and/or location. ■ Test the mains outlet by plugging another channel. The problem may be with the broadcast. ■ Are the video cables installed properly? ■ Activate any object between the TV and the VCR. ■...
Owner's Manual
Page 83
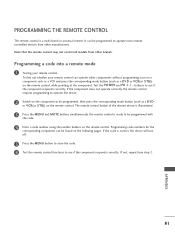
... on the component to be programmed to operate the device. 2 Switch on the following pages. It can be programmed with the code. 4 Enter a code number using the number buttons on the remote control, while pointing at the component. Test the POWER and PR + / - Programming code numbers for the corresponding component can be programmed, then press the corresponding mode button (such as a D V D or V C R(or S T B)) on the remote control. PROGRAMMING THE REMOTE CONTROL The remote control is a multi brand or universal remote. If...
... on the component to be programmed to operate the device. 2 Switch on the following pages. It can be programmed with the code. 4 Enter a code number using the number buttons on the remote control, while pointing at the component. Test the POWER and PR + / - Programming code numbers for the corresponding component can be programmed, then press the corresponding mode button (such as a D V D or V C R(or S T B)) on the remote control. PROGRAMMING THE REMOTE CONTROL The remote control is a multi brand or universal remote. If...


