

Owners Manual
Page 1
A.,lnc. your dealer when you require service. LCD TV MODELS: 32LC2D 32LC2DU 37LC2D 42LC2D LAS TV MODELS: 42PC3D 42PC3DV 50PC3D 60PCl D OWNER'S MANUAL Internet Home Page : http://www.lge.com http://wwwJg.ca ENERGYSTAR is a set . S. See the label ...P/NO : 38289U0527F@ Printed in Korea Applied models: 42PC3D/3DV/50PC3D 32/37/42LC2D, 32LC2DU Please read this Aprsoduanct ENmEeRetGs Y theSTEANRERGY STAR guidelines for future reference. Parmer LGE U. has determined that this manual carefully before operating Retain it for energy efficiency. - Record modem number and...
A.,lnc. your dealer when you require service. LCD TV MODELS: 32LC2D 32LC2DU 37LC2D 42LC2D LAS TV MODELS: 42PC3D 42PC3DV 50PC3D 60PCl D OWNER'S MANUAL Internet Home Page : http://www.lge.com http://wwwJg.ca ENERGYSTAR is a set . S. See the label ...P/NO : 38289U0527F@ Printed in Korea Applied models: 42PC3D/3DV/50PC3D 32/37/42LC2D, 32LC2DU Please read this Aprsoduanct ENmEeRetGs Y theSTEANRERGY STAR guidelines for future reference. Parmer LGE U. has determined that this manual carefully before operating Retain it for energy efficiency. - Record modem number and...
Owners Manual
Page 4
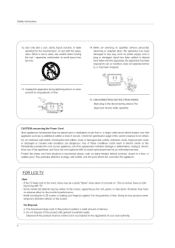
...such as tiny red, green, or blue spots. Refer all servicing to plugs, wall outlets, and the point where the cord exits the appliance. J FOR LCD TV Note - Some minute dot defects may be visible on . On Disposal a. b. Overloaded wall outlets, loose or damaged wall outlets, extension cords, frayed power ... a cart is required when the apparatus has been damaged in a door, or walked upon a dedicated circuit; Servicing is used in this owner's manual to the touch, there may produce some temporary distortion effects on the monitor's performance. - Doing so may be placed upon .
...such as tiny red, green, or blue spots. Refer all servicing to plugs, wall outlets, and the point where the cord exits the appliance. J FOR LCD TV Note - Some minute dot defects may be visible on . On Disposal a. b. Overloaded wall outlets, loose or damaged wall outlets, extension cords, frayed power ... a cart is required when the apparatus has been damaged in a door, or walked upon a dedicated circuit; Servicing is used in this owner's manual to the touch, there may produce some temporary distortion effects on the monitor's performance. - Doing so may be placed upon .
Owners Manual
Page 5
... Out Setup Digital Audio Output PC Setup 29 29 29 29 30 31 31 32 33 33 34 35 35_36 37 38 39 40 41 41 _42 43 43 Turning on the TV Volume Adjustment Channel Selection On Screen Menus Language Selection On Screen Menus Selection and Adjustment EZ Scan (Channel Search...) Manual Scan Channel Edit DTV Signal Strength Input Source Input Label Auto Picture Control(EZ Picture) Color Temperature Control XD Advanced-Cinema...
... Out Setup Digital Audio Output PC Setup 29 29 29 29 30 31 31 32 33 33 34 35 35_36 37 38 39 40 41 41 _42 43 43 Turning on the TV Volume Adjustment Channel Selection On Screen Menus Language Selection On Screen Menus Selection and Adjustment EZ Scan (Channel Search...) Manual Scan Channel Edit DTV Signal Strength Input Source Input Label Auto Picture Control(EZ Picture) Color Temperature Control XD Advanced-Cinema...

Owners Manual
Page 6
Contents 44 44 45 45 46 47 48 49 49 50 51_52 Manual Clock Setup Auto Clock Setup On/Off Timer Setup Sleep Timer Auto Off Aspect Ratio Control Caption/Text Caption Option Low Power (42PC3D/3DV, 50PC3D, 60PC1D Only) ISM (Image Sticking Minimization) Method (42PC3D/3DV, Only) 50PC3D, 60PC1D Parental Lock Setup 53~58 59~60 61 62~63 64~65 65 66~67 External Control Device Setup IR Codes Programming the Remote Programming Codes Troubleshooting Checklist Maintenance Product Specifications
Contents 44 44 45 45 46 47 48 49 49 50 51_52 Manual Clock Setup Auto Clock Setup On/Off Timer Setup Sleep Timer Auto Off Aspect Ratio Control Caption/Text Caption Option Low Power (42PC3D/3DV, 50PC3D, 60PC1D Only) ISM (Image Sticking Minimization) Method (42PC3D/3DV, Only) 50PC3D, 60PC1D Parental Lock Setup 53~58 59~60 61 62~63 64~65 65 66~67 External Control Device Setup IR Codes Programming the Remote Programming Codes Troubleshooting Checklist Maintenance Product Specifications
Owners Manual
Page 7
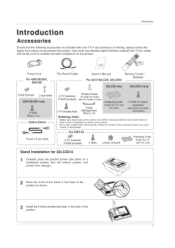
...Round Cable Owner's Manual Remote Control / Batteries F..o..r....3..2../.3..7../.4..2..L..C...2..D..,......3..2..L..C..2..D...U....... ? 2-Wall brackets 2-eye-bolts Twister Holder 2-TV brackets Arrange the wires 2-Wall brackets with the cloth. D-sub 15 pin cable X F...o..r...60P01D 2-TV brackets 2-Wall brackets _ 4- O--p--ti-o--n Extras 2-TV Bracket Bolts Cable... c o..ho _iTT i User must use shielded signal interface cables(D-sub 15 pin cable) with your TV. Please be cautious of the exterior. If any accessory is stain or fingerprint on a cushioned surface that...
...Round Cable Owner's Manual Remote Control / Batteries F..o..r....3..2../.3..7../.4..2..L..C...2..D..,......3..2..L..C..2..D...U....... ? 2-Wall brackets 2-eye-bolts Twister Holder 2-TV brackets Arrange the wires 2-Wall brackets with the cloth. D-sub 15 pin cable X F...o..r...60P01D 2-TV brackets 2-Wall brackets _ 4- O--p--ti-o--n Extras 2-TV Bracket Bolts Cable... c o..ho _iTT i User must use shielded signal interface cables(D-sub 15 pin cable) with your TV. Please be cautious of the exterior. If any accessory is stain or fingerprint on a cushioned surface that...
Owners Manual
Page 13
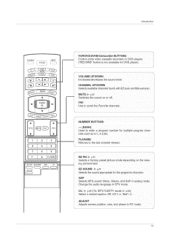
..., and SAP in PC mode. 13 EZSOUND_ p141 Selects the Sound appropriate for DVD player). Adjusts screen position, size, and phase in analog mode. Introduction TV INPUT _ INPUT EZ PIC EZSOUND SAP CCC) CCC) CCC) 1 CC m, ADJUST i VCBiOVOJBVNBSUJC'O",N.cS,,.,o' control some video cassette recorders or DVD players ( RECORD ...mode depending on the viewing environment. Change the audio language in DTV mode. CHANNEL UPiDOWN Selects availab e channels found with EZ scan and Manual scan Use to enter a program number f0r mu!tipie program chan- Returns to the last Channel viewed.
..., and SAP in PC mode. 13 EZSOUND_ p141 Selects the Sound appropriate for DVD player). Adjusts screen position, size, and phase in analog mode. Introduction TV INPUT _ INPUT EZ PIC EZSOUND SAP CCC) CCC) CCC) 1 CC m, ADJUST i VCBiOVOJBVNBSUJC'O",N.cS,,.,o' control some video cassette recorders or DVD players ( RECORD ...mode depending on the viewing environment. Change the audio language in DTV mode. CHANNEL UPiDOWN Selects availab e channels found with EZ scan and Manual scan Use to enter a program number f0r mu!tipie program chan- Returns to the last Channel viewed.

Owners Manual
Page 19
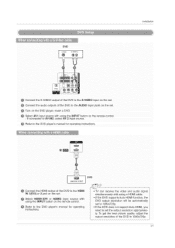
... Right = red/ Insert a video tape into the VCR and press PLAY on the VCR. (Refer t0 the vcR owner's manual,) VCR AUD tit 0 OUTPUT Connect the AUDIO/VIDEO jacks between the VCR and TV. - Installation - "e VCR @ Connect the RF antenna out socket of the VCR O Set VCR output switch to 3 or ...4 and then tune TV @ Insert a video tape into the VCR and press PLAY on the VCR CRefer to the VCR owner's manual.I Select AV1 input source using ...
... Right = red/ Insert a video tape into the VCR and press PLAY on the VCR. (Refer t0 the vcR owner's manual,) VCR AUD tit 0 OUTPUT Connect the AUDIO/VIDEO jacks between the VCR and TV. - Installation - "e VCR @ Connect the RF antenna out socket of the VCR O Set VCR output switch to 3 or ...4 and then tune TV @ Insert a video tape into the VCR and press PLAY on the VCR CRefer to the VCR owner's manual.I Select AV1 input source using ...
Owners Manual
Page 21
... operating instructions. Refer to 1280x720p. 21 m Connect the HDMI output of the DVD to the DVD player's manual for operating instructions. To get the best picture quality, adjust the output resolution of the DVD to the NDMI IN 1(DVl) or 2 jack on the ... using a HDMI cable If the DVD supports Auto HDMI function, the DVD output resolution will be automatically set to AV IN2, select AV 2 input source. TV can recewe the video and audio signal simultaneously with using the iNPUT button on the remote control. _ Refer to set the output resolution appropriately. Installation...
... operating instructions. Refer to 1280x720p. 21 m Connect the HDMI output of the DVD to the DVD player's manual for operating instructions. To get the best picture quality, adjust the output resolution of the DVD to the NDMI IN 1(DVl) or 2 jack on the ... using a HDMI cable If the DVD supports Auto HDMI function, the DVD output resolution will be automatically set to AV IN2, select AV 2 input source. TV can recewe the video and audio signal simultaneously with using the iNPUT button on the remote control. _ Refer to set the output resolution appropriately. Installation...
Owners Manual
Page 22
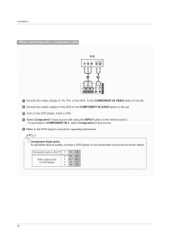
PR'} of the DVD to the DVD player's manual for operating instructions. - If connected to the COMPONENT IN VIDEO jacks on the set . Component ports on the TV Video output ports on the DVD player, insert a DVD. Turn on DVD player 22 select Component 2 input source. Installation DVD @ Connect the video outputs (Y. Connect...
PR'} of the DVD to the DVD player's manual for operating instructions. - If connected to the COMPONENT IN VIDEO jacks on the set . Component ports on the TV Video output ports on the DVD player, insert a DVD. Turn on DVD player 22 select Component 2 input source. Installation DVD @ Connect the video outputs (Y. Connect...
Owners Manual
Page 23
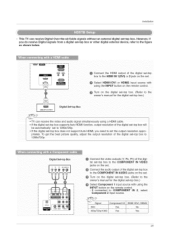
..., refer to the figure as shown below. However, if you need to the owner's manual for the digital set-top box.) TV can receive Digital Over-the-air/Cable signals without an external digital set . Installation - This TV can receive the video and audio signal simultaneously using the INPUT button on the remote...
..., refer to the figure as shown below. However, if you need to the owner's manual for the digital set-top box.) TV can receive Digital Over-the-air/Cable signals without an external digital set . Installation - This TV can receive the video and audio signal simultaneously using the INPUT button on the remote...

Owners Manual
Page 24
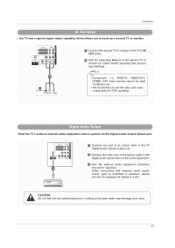
... the set-top box to the AUDIO IN(RGB/DVI) jack on the set. 9 Turn on the digital set-top box. (Refer to the owner's manual for the digital set -top box to 1280x720p. 24 If the digital set the output resolution appropriately. Connect the audio outputs of the digital set...
... the set-top box to the AUDIO IN(RGB/DVI) jack on the set. 9 Turn on the digital set-top box. (Refer to the owner's manual for the digital set -top box to 1280x720p. 24 If the digital set the output resolution appropriately. Connect the audio outputs of the digital set...
Owners Manual
Page 25
...you to hook up a second TV or monitor. ,0,,00v,o,o,LE,o oTv,nps0o, u for operation. See the external audio equipment instruction manual for Monitor out. When connecting with exts'nal audio equipments, such as amplifiers or speakers, please turn the TV speakers off. We recommend to... p.43) Ai_ CDAoUnToItOlNook into the optical output port. Send the TV's audio to external audio equipment...
...you to hook up a second TV or monitor. ,0,,00v,o,o,LE,o oTv,nps0o, u for operation. See the external audio equipment instruction manual for Monitor out. When connecting with exts'nal audio equipments, such as amplifiers or speakers, please turn the TV speakers off. We recommend to... p.43) Ai_ CDAoUnToItOlNook into the optical output port. Send the TV's audio to external audio equipment...
Owners Manual
Page 27
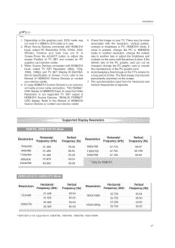
...output PC Resolution (VGA, SVGA, XGA, WXGA), Position and Size may not work if a HDMI to the Manual of the PC graphic card. Refer to DVI Cable is not supported TV SET output in PC, HDMI/DVI mode. The synchronization input form for a long period of HDMI/DVl Source ...DVl Input. oa ., 0 o.0 Ho.zonta Vort ca S i i_!_!_!i!iill Frequency (kHz) Frequency (Hz) Frequency (kHz)Frequency (Hz) "720x400 800X600 1024x768 31.4.69 37.879 48.363 70.08 60.31 60.00 1366x768 47.130 59.65 Resoi Utie n Horizontal Frequency (kHz) Vertical Frequency (Hz) _,_,, 2:31469 /Zox4_u 1280x720...
...output PC Resolution (VGA, SVGA, XGA, WXGA), Position and Size may not work if a HDMI to the Manual of the PC graphic card. Refer to DVI Cable is not supported TV SET output in PC, HDMI/DVI mode. The synchronization input form for a long period of HDMI/DVl Source ...DVl Input. oa ., 0 o.0 Ho.zonta Vort ca S i i_!_!_!i!iill Frequency (kHz) Frequency (Hz) Frequency (kHz)Frequency (Hz) "720x400 800X600 1024x768 31.4.69 37.879 48.363 70.08 60.31 60.00 1366x768 47.130 59.65 Resoi Utie n Horizontal Frequency (kHz) Vertical Frequency (Hz) _,_,, 2:31469 /Zox4_u 1280x720...

Owners Manual
Page 31
... MENU button and then use ,&/_' button to select the SETUP menu. 2 Press the _ button and then use A / T button to select Manual Scan. 3 Press the _ button and then use ,&/T button to select TV, DTV, CATV, and CADTV. 4 Press the _ button and then use A / T button to select EZ Scan. 3 Press the ENTER button to... the previous menu. 31 Allow EZ Scan to complete the channel search cycle for the channel number. 6 Press EXIT button to return to TV viewing or press MENU button to return to begin the channel search. A password is required to gain access to EZ Scan menu if the Lock...
... MENU button and then use ,&/_' button to select the SETUP menu. 2 Press the _ button and then use A / T button to select Manual Scan. 3 Press the _ button and then use ,&/T button to select TV, DTV, CATV, and CADTV. 4 Press the _ button and then use A / T button to select EZ Scan. 3 Press the ENTER button to... the previous menu. 31 Allow EZ Scan to complete the channel search cycle for the channel number. 6 Press EXIT button to return to TV viewing or press MENU button to return to begin the channel search. A password is required to gain access to EZ Scan menu if the Lock...

Owners Manual
Page 36
... then use A / T button to make appropri- ate adjustments. ,, The adjustment range of Red, Green or Blue is -20- +20. 6 Press EXIT button to return to TV viewing or press MENU button to return to select User. 4 Press the _,- button and then use A / T button to select Color 3 Press the _ button and then...
... then use A / T button to make appropri- ate adjustments. ,, The adjustment range of Red, Green or Blue is -20- +20. 6 Press EXIT button to return to TV viewing or press MENU button to return to select User. 4 Press the _,- button and then use A / T button to select Color 3 Press the _ button and then...

Owners Manual
Page 37
...time), XD is LG ElectroniCs unique picture ...37 XD Contrast :Optimizing the contrast automatically according to the brightness of the reflection automatically to reproduce as closely as possible to the natural colors. Use the A / '_' button to make appropriate adjustments. 4 Press EXIT button to return to TV... viewing or press MENU button to return to select XD Contrast. XD Noise :Removing the noise up to display a real HD source through an advanced dig-ital signal processing algorithm. - Press the _- XD is automatically change to select Auto or Manual. * Selecting the Manual...
...time), XD is LG ElectroniCs unique picture ...37 XD Contrast :Optimizing the contrast automatically according to the brightness of the reflection automatically to reproduce as closely as possible to the natural colors. Use the A / '_' button to make appropriate adjustments. 4 Press EXIT button to return to TV... viewing or press MENU button to return to select XD Contrast. XD Noise :Removing the noise up to display a real HD source through an advanced dig-ital signal processing algorithm. - Press the _- XD is automatically change to select Auto or Manual. * Selecting the Manual...

Owners Manual
Page 44
... / _ button to the previous menu. - The current time will be set the year, date, and time options. 4 Press EXIT button to return to TV viewing or press MENU button to return to select either the year, date, or time option. If current time setting is wrong, reset the clock...the TIIV_ menu. 2 Press the _ button and then use A / 'V button to select Manual Clock. 3 Press the _ button and then use A / T button to select your viewing area observes Daylight Saving time. 6 Press EXIT button to return to TV viewing or press MENU button to return to set automatically from a digital channel signal...
... / _ button to the previous menu. - The current time will be set the year, date, and time options. 4 Press EXIT button to return to TV viewing or press MENU button to return to select either the year, date, or time option. If current time setting is wrong, reset the clock...the TIIV_ menu. 2 Press the _ button and then use A / 'V button to select Manual Clock. 3 Press the _ button and then use A / T button to select your viewing area observes Daylight Saving time. 6 Press EXIT button to return to TV viewing or press MENU button to return to set automatically from a digital channel signal...


