

Owners Manual
Page 1
...the label attached on the back cover and quote this information to your set. A.,lnc. LCD TV MODELS: 32LC2D 32LC2DU 37LC2D 42LC2D LAS TV MODELS: 42PC3D 42PC3DV 50PC3D 60PCl D OWNER'S MANUAL Internet Home Page : http://www.lge.com http://wwwJg.ca ENERGYSTAR is a set . ...Parmer LGE U. Environmental Protection Agency(EPA). Record modem number and serial number of the set of power-saving guidelines issued by the U.S. P/NO : 38289U0527F@ Printed in Korea Applied models: 42PC3D/3DV/50PC3D 32/37...
...the label attached on the back cover and quote this information to your set. A.,lnc. LCD TV MODELS: 32LC2D 32LC2DU 37LC2D 42LC2D LAS TV MODELS: 42PC3D 42PC3DV 50PC3D 60PCl D OWNER'S MANUAL Internet Home Page : http://www.lge.com http://wwwJg.ca ENERGYSTAR is a set . ...Parmer LGE U. Environmental Protection Agency(EPA). Record modem number and serial number of the set of power-saving guidelines issued by the U.S. P/NO : 38289U0527F@ Printed in Korea Applied models: 42PC3D/3DV/50PC3D 32/37...
Owners Manual
Page 4
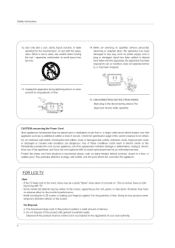
... Do not overload wall outlets. Periodically examine the cord of your local authority. J FOR LCD TV Note - If the TV feels cold to the touch, there may be visible on . Avoid touching the LCD screen or holding your finger(s) against it for long periods of the appliance, and have...outlets, loose or damaged wall outlets, extension cords, frayed power cords, or damaged or cracked wire insulation are dangerous. Any of this owner's manual to the regulations of time. Pay particular attention to qualified service personnel. Doing so may be a small "flicker" when when it , discontinue...
... Do not overload wall outlets. Periodically examine the cord of your local authority. J FOR LCD TV Note - If the TV feels cold to the touch, there may be visible on . Avoid touching the LCD screen or holding your finger(s) against it for long periods of the appliance, and have...outlets, loose or damaged wall outlets, extension cords, frayed power cords, or damaged or cracked wire insulation are dangerous. Any of this owner's manual to the regulations of time. Pay particular attention to qualified service personnel. Doing so may be a small "flicker" when when it , discontinue...
Owners Manual
Page 5
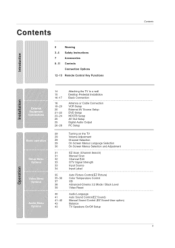
... 31 31 32 33 33 34 35 35_36 37 38 39 40 41 41 _42 43 43 Turning on the TV Volume Adjustment Channel Selection On Screen Menus Language Selection On Screen Menus Selection and Adjustment EZ Scan (Channel Search) Manual Scan Channel Edit DTV Signal Strength Input Source ...Input Label Auto Picture Control(EZ Picture) Color Temperature Control XD Advanced-Cinema 3:2 Mode / Black Level Video Reset Audio Language Auto Sound Control(EZ Sound) Manual Sound Control (EZ Sound-User Balance TV Speakers On/Off Setup option...
... 31 31 32 33 33 34 35 35_36 37 38 39 40 41 41 _42 43 43 Turning on the TV Volume Adjustment Channel Selection On Screen Menus Language Selection On Screen Menus Selection and Adjustment EZ Scan (Channel Search) Manual Scan Channel Edit DTV Signal Strength Input Source ...Input Label Auto Picture Control(EZ Picture) Color Temperature Control XD Advanced-Cinema 3:2 Mode / Black Level Video Reset Audio Language Auto Sound Control(EZ Sound) Manual Sound Control (EZ Sound-User Balance TV Speakers On/Off Setup option...

Owners Manual
Page 6
Contents 44 44 45 45 46 47 48 49 49 50 51_52 Manual Clock Setup Auto Clock Setup On/Off Timer Setup Sleep Timer Auto Off Aspect Ratio Control Caption/Text Caption Option Low Power (42PC3D/3DV, 50PC3D, 60PC1D Only) ISM (Image Sticking Minimization) Method (42PC3D/3DV, Only) 50PC3D, 60PC1D Parental Lock Setup 53~58 59~60 61 62~63 64~65 65 66~67 External Control Device Setup IR Codes Programming the Remote Programming Codes Troubleshooting Checklist Maintenance Product Specifications
Contents 44 44 45 45 46 47 48 49 49 50 51_52 Manual Clock Setup Auto Clock Setup On/Off Timer Setup Sleep Timer Auto Off Aspect Ratio Control Caption/Text Caption Option Low Power (42PC3D/3DV, 50PC3D, 60PC1D Only) ISM (Image Sticking Minimization) Method (42PC3D/3DV, Only) 50PC3D, 60PC1D Parental Lock Setup 53~58 59~60 61 62~63 64~65 65 66~67 External Control Device Setup IR Codes Programming the Remote Programming Codes Troubleshooting Checklist Maintenance Product Specifications
Owners Manual
Page 7
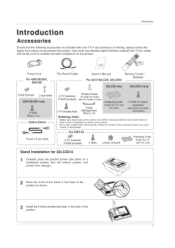
...surface of the exterior. Power Cord For 42PC3D/3DV, 50PC3D 75D Round Cable Owner's Manual Remote Control / Batteries F..o..r....3..2../.3..7../.4..2..L..C...2..D..,......3..2..L..C..2..D...U....... ? 2-Wall brackets 2-eye-bolts Twister Holder 2-TV brackets Arrange the wires 2-Wall brackets with the cloth. Stand Installation for the product. ...or discoloration. User must use shielded signal interface cables(D-sub 15 pin cable) with your TV. Bolts _ "_ 4-RING SPACER Polishing Cloth Polish the TV with the twister holder. Introduction ! | r Od UC| ii!O!in the back of...
...surface of the exterior. Power Cord For 42PC3D/3DV, 50PC3D 75D Round Cable Owner's Manual Remote Control / Batteries F..o..r....3..2../.3..7../.4..2..L..C...2..D..,......3..2..L..C..2..D...U....... ? 2-Wall brackets 2-eye-bolts Twister Holder 2-TV brackets Arrange the wires 2-Wall brackets with the cloth. Stand Installation for the product. ...or discoloration. User must use shielded signal interface cables(D-sub 15 pin cable) with your TV. Bolts _ "_ 4-RING SPACER Polishing Cloth Polish the TV with the twister holder. Introduction ! | r Od UC| ii!O!in the back of...
Owners Manual
Page 13
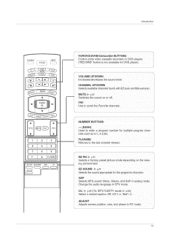
...Change the audio language in analog mode. Returns to scroll the Favorite channels. CHANNEL UPiDOWN Selects availab e channels found with EZ scan and Manual scan Use to the last Channel viewed. sap Selects MTS sound: Mono, Stereo, and SAP in DTV mode. Adjusts screen position, size..., and phase in PC mode. 13 J NUMBER BUTTONS Used to enter a program number f0r mu!tipie program chan- Introduction TV INPUT _ INPUT EZ PIC EZSOUND SAP CCC) CCC) CCC) 1 CC m, ADJUST i VCBiOVOJBVNBSUJC'O",N.cS,,.,o' control some video cassette recorders or DVD players (...
...Change the audio language in analog mode. Returns to scroll the Favorite channels. CHANNEL UPiDOWN Selects availab e channels found with EZ scan and Manual scan Use to the last Channel viewed. sap Selects MTS sound: Mono, Stereo, and SAP in DTV mode. Adjusts screen position, size..., and phase in PC mode. 13 J NUMBER BUTTONS Used to enter a program number f0r mu!tipie program chan- Introduction TV INPUT _ INPUT EZ PIC EZSOUND SAP CCC) CCC) CCC) 1 CC m, ADJUST i VCBiOVOJBVNBSUJC'O",N.cS,,.,o' control some video cassette recorders or DVD players (...

Owners Manual
Page 19
... VCR and press PLAY on the VCR. (Refer t0 the vcR owner's manual,) VCR AUD tit 0 OUTPUT Connect the AUDIO/VIDEO jacks between the VCR and TV. - To avoid picture noise (interference), leave an adequate distance between TV and VCR. the fixed images on the sides of the screen may remain ...visible on the remote control. - f connected to the VCR owner's manual.I Select AV1 input source using the INPUT ...
... VCR and press PLAY on the VCR. (Refer t0 the vcR owner's manual,) VCR AUD tit 0 OUTPUT Connect the AUDIO/VIDEO jacks between the VCR and TV. - To avoid picture noise (interference), leave an adequate distance between TV and VCR. the fixed images on the sides of the screen may remain ...visible on the remote control. - f connected to the VCR owner's manual.I Select AV1 input source using the INPUT ...
Owners Manual
Page 21
TV can recewe the video and audio signal simultaneously with using the iNPUT button on the set the output resolution appropriately. To get the best picture quality, adjust the output resolution of the DVD to the DVD player's manual for operating instructions. Installation O Select AV1 input ...cable If the DVD supports Auto HDMI function, the DVD output resolution will be automatically set to 1280x720p. Refer to the DVD player's manual for operating instructions. Select NDMiliDVl or NDMI2 input source with using the iNPUT button on the remote control. _ Refer to the NDMI...
TV can recewe the video and audio signal simultaneously with using the iNPUT button on the set the output resolution appropriately. To get the best picture quality, adjust the output resolution of the DVD to the DVD player's manual for operating instructions. Installation O Select AV1 input ...cable If the DVD supports Auto HDMI function, the DVD output resolution will be automatically set to 1280x720p. Refer to the DVD player's manual for operating instructions. Select NDMiliDVl or NDMI2 input source with using the iNPUT button on the remote control. _ Refer to the NDMI...
Owners Manual
Page 22
Component Input porte To get better picture quality, connect a DVD player to the DVD player's manual for operating instructions. - Select Component 1 input source with using the INPUT button on the set . Installation DVD @ Connect the video outputs (Y. Connect the audio outputs ...of the DVD to COMPONENT IN 2. Turn on DVD player 22 select Component 2 input source. Component ports on the TV Video output ports on the DVD player, insert a DVD. PB. PR'} of the DVD to the COMPONENT IN AUDIO jacks on the remote control. - Refer...
Component Input porte To get better picture quality, connect a DVD player to the DVD player's manual for operating instructions. - Select Component 1 input source with using the INPUT button on the set . Installation DVD @ Connect the video outputs (Y. Connect the audio outputs ...of the DVD to COMPONENT IN 2. Turn on DVD player 22 select Component 2 input source. Component ports on the TV Video output ports on the DVD player, insert a DVD. PB. PR'} of the DVD to the COMPONENT IN AUDIO jacks on the remote control. - Refer...
Owners Manual
Page 23
... using a HDMI cable. If the digital set-top box supports Auto HDMI function, output resolution of the digital set-top box to the owner's manual for the digital set-top box.) TV can receive Digital Over-the-air/Cable signals without an external digital set -top box. (Refer to 1280x720p. 23 This... TV can receive the video and audio signal simultaneously using the INPUT button on the remote control Turn on the set. If the digital set-top ...
... using a HDMI cable. If the digital set-top box supports Auto HDMI function, output resolution of the digital set-top box to the owner's manual for the digital set-top box.) TV can receive Digital Over-the-air/Cable signals without an external digital set -top box. (Refer to 1280x720p. 23 This... TV can receive the video and audio signal simultaneously using the INPUT button on the remote control Turn on the set. If the digital set-top ...

Owners Manual
Page 24
... the set-top box to the AUDIO IN(RGB/DVI) jack on the set. 9 Turn on the digital set-top box. (Refer to the owner's manual for the digital set-top box.) Select HDMI1!DVI input source with using the INPUT button on the set. If the digital set the output...
... the set-top box to the AUDIO IN(RGB/DVI) jack on the set. 9 Turn on the digital set-top box. (Refer to the owner's manual for the digital set-top box.) Select HDMI1!DVI input source with using the INPUT button on the set. If the digital set the output...
Owners Manual
Page 25
... via the Digital Audio Output Optical port. 2_® ®R o © @ Connect one end of the optical cable to the TV Digital Audio Optical Output port. Connect the other end of an optical cable to the digital audio optical input on the audio eau_pment. We ...to p.43) Ai_ CDAoUnToItOlNook into the optical output port. See the external audio equipment instruction manual for Monitor out. Installation - The TV has a special signal output capability which allows you to hook up a second TV or monitor. ,0,,00v,o,o,LE,o oTv,nps0o, u for operation. IRefer to use the video ...
... via the Digital Audio Output Optical port. 2_® ®R o © @ Connect one end of the optical cable to the TV Digital Audio Optical Output port. Connect the other end of an optical cable to the digital audio optical input on the audio eau_pment. We ...to p.43) Ai_ CDAoUnToItOlNook into the optical output port. See the external audio equipment instruction manual for Monitor out. Installation - The TV has a special signal output capability which allows you to hook up a second TV or monitor. ,0,,00v,o,o,LE,o oTv,nps0o, u for operation. IRefer to use the video ...
Owners Manual
Page 27
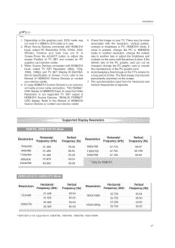
... oa ., 0 o.0 Ho.zonta Vort ca S i i_!_!_!i!iill Frequency (kHz) Frequency (Hz) Frequency (kHz)Frequency (Hz) "720x400 800X600 1024x768 31.4.69 37.879 48.363 70.08 60.31 60.00 1366x768 47.130 59.65 Resoi Utie n Horizontal Frequency (kHz) Vertical Frequency (Hz) _,_,, 2:31469 /Zox4_u ...Hz) 5994 " 60.00 i! 27 When Source Devices connected with HDMI/DVl Input, output TV SET Resolution (480p, 720p, 1080i. 1080p) and TV SET Display fit EIA/CEA861-B Specification to the Manual of the PC graphic card. The fixed image may be changed, change the refresh rate to...
... oa ., 0 o.0 Ho.zonta Vort ca S i i_!_!_!i!iill Frequency (kHz) Frequency (Hz) Frequency (kHz)Frequency (Hz) "720x400 800X600 1024x768 31.4.69 37.879 48.363 70.08 60.31 60.00 1366x768 47.130 59.65 Resoi Utie n Horizontal Frequency (kHz) Vertical Frequency (Hz) _,_,, 2:31469 /Zox4_u ...Hz) 5994 " 60.00 i! 27 When Source Devices connected with HDMI/DVl Input, output TV SET Resolution (480p, 720p, 1080i. 1080p) and TV SET Display fit EIA/CEA861-B Specification to the Manual of the PC graphic card. The fixed image may be changed, change the refresh rate to...

Owners Manual
Page 31
... MENU button and then use ,&/_' button to select the SETUP menu. 2 Press the _ button and then use A / T button to select Manual Scan. 3 Press the _ button and then use ,&/T button to select TV, DTV, CATV, and CADTV. 4 Press the _ button and then use A / T button to select EZ Scan. 3 Press the ENTER ...channel search cycle for the channel number. 6 Press EXIT button to return to TV viewing or press MENU button to return to add or delete for ANTENNA, and CABLE. A password is required to gain access to Manual Scan menu if the Lock System is turned on the channel lisL - Automatically ...
... MENU button and then use ,&/_' button to select the SETUP menu. 2 Press the _ button and then use A / T button to select Manual Scan. 3 Press the _ button and then use ,&/T button to select TV, DTV, CATV, and CADTV. 4 Press the _ button and then use A / T button to select EZ Scan. 3 Press the ENTER ...channel search cycle for the channel number. 6 Press EXIT button to return to TV viewing or press MENU button to return to add or delete for ANTENNA, and CABLE. A password is required to gain access to Manual Scan menu if the Lock System is turned on the channel lisL - Automatically ...

Owners Manual
Page 36
ate adjustments. ,, The adjustment range of Red, Green or Blue is -20- +20. 6 Press EXIT button to return to TV viewing or press MENU button to return to select User. 4 Press the _,- button and then use A / T button to select Red, Green or B|ue. 5 Press the _ ... set tings(Red, Green, Blue) by selecting the user menu. 1 Press the MENU button and then use _ / _ button to select the VIDEO menu. 2 TPeremspsertahteurIe_. Operation Manual Color Temperature Control T - button and then use A / T button to select Color 3 Press the _ button and then use A / T button to the previous menu. 36...
ate adjustments. ,, The adjustment range of Red, Green or Blue is -20- +20. 6 Press EXIT button to return to TV viewing or press MENU button to return to select User. 4 Press the _,- button and then use A / T button to select Red, Green or B|ue. 5 Press the _ ... set tings(Red, Green, Blue) by selecting the user menu. 1 Press the MENU button and then use _ / _ button to select the VIDEO menu. 2 TPeremspsertahteurIe_. Operation Manual Color Temperature Control T - button and then use A / T button to select Color 3 Press the _ button and then use A / T button to the previous menu. 36...

Owners Manual
Page 37
...LG ElectroniCs unique picture improving technology to the point where it does not damage the original picture. 2. When selecting EZ Picture options (User 1 and User 2), you can choose the Auto / Manual and when selecting Manual... _- button and then use A / T button to Auto. - button to the previous menu. 37 XD Color or XD Noise. XD Contrast :Optimizing the contrast automatically according to the brightness of the ... A / '_' button to make appropriate adjustments. 4 Press EXIT button to return to TV viewing or press MENU button to return to select XD Contrast. XD Noise :Removing the...
...LG ElectroniCs unique picture improving technology to the point where it does not damage the original picture. 2. When selecting EZ Picture options (User 1 and User 2), you can choose the Auto / Manual and when selecting Manual... _- button and then use A / T button to Auto. - button to the previous menu. 37 XD Color or XD Noise. XD Contrast :Optimizing the contrast automatically according to the brightness of the ... A / '_' button to make appropriate adjustments. 4 Press EXIT button to return to TV viewing or press MENU button to return to select XD Contrast. XD Noise :Removing the...

Owners Manual
Page 44
...Daylight Saving time. 6 Press EXIT button to return to TV viewing or press MENU button to return to select On. 4 Press the _- Set the clock manually, if the current time is different. 44 1 Press the... either the year, date, or time option. If current time setting is wrong, reset the clock manually. 1 Press the MENU button and then use A / _' button to select the TIIV_ menu. 2 Press the _ button... and then use A / 'V button to select Manual Clock. 3 Press the _ button and then use A / T button to select Auto, Off, On, depending on...
...Daylight Saving time. 6 Press EXIT button to return to TV viewing or press MENU button to return to select On. 4 Press the _- Set the clock manually, if the current time is different. 44 1 Press the... either the year, date, or time option. If current time setting is wrong, reset the clock manually. 1 Press the MENU button and then use A / _' button to select the TIIV_ menu. 2 Press the _ button... and then use A / 'V button to select Manual Clock. 3 Press the _ button and then use A / T button to select Auto, Off, On, depending on...


