

Owners Manual
Page 1
Please read this manual carefully before operating your set and retain it for future reference. 32QP880 32QP880N www.lg.com Copyright 2021 LG Electronics Inc. Owner's Manual LED LCD MONITOR (LED Monitor*) * LG LED Monitor applies LCD screen with LED backlights. All Rights Reserved.
Please read this manual carefully before operating your set and retain it for future reference. 32QP880 32QP880N www.lg.com Copyright 2021 LG Electronics Inc. Owner's Manual LED LCD MONITOR (LED Monitor*) * LG LED Monitor applies LCD screen with LED backlights. All Rights Reserved.
Owners Manual
Page 2
The terms HDMI, HDMI High-Definition Multimedia Interface, and the HDMI Logo are trademarks or registered trademarks of HDMI Licensing Administrator, Inc. * 2 Visit www.lg.com for more information on the license. ENGLISH TABLE OF CONTENTS LICENSE 2 OPEN SOURCE SOFTWARE NOTICE INFORMATION 3 ASSEMBLING AND PREPARING 3 USING THE MONITOR 15 USER SETTINGS 18 TROUBLESHOOTING 25 PRODUCT SPECIFICATION 26 LICENSE Each model has different licenses.
The terms HDMI, HDMI High-Definition Multimedia Interface, and the HDMI Logo are trademarks or registered trademarks of HDMI Licensing Administrator, Inc. * 2 Visit www.lg.com for more information on the license. ENGLISH TABLE OF CONTENTS LICENSE 2 OPEN SOURCE SOFTWARE NOTICE INFORMATION 3 ASSEMBLING AND PREPARING 3 USING THE MONITOR 15 USER SETTINGS 18 TROUBLESHOOTING 25 PRODUCT SPECIFICATION 26 LICENSE Each model has different licenses.

Owners Manual
Page 4
... Supported Drivers and Software You can download and install the latest version from which you purchased the product. •• The power cord provided may differ depending upon the region. ENGLISH NOTE •• The components may look different from those illustrated here. •• Without prior notice, all product information and specifications contained in this manual are subject to change...
... Supported Drivers and Software You can download and install the latest version from which you purchased the product. •• The power cord provided may differ depending upon the region. ENGLISH NOTE •• The components may look different from those illustrated here. •• Without prior notice, all product information and specifications contained in this manual are subject to change...

Owners Manual
Page 5
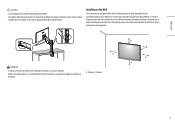
... monitor, keep it upright and never turn the monitor on the monitor. Volume control: You can easily control the functions of the monitor frame firmly. NOTE •• The joystick button is located at the bottom of its side or tilt it sideways. •• Disassemble and reposition the head and stand separately when moving the monitor. ENGLISH How to Use the Joystick Button You can control the volume...
... monitor, keep it upright and never turn the monitor on the monitor. Volume control: You can easily control the functions of the monitor frame firmly. NOTE •• The joystick button is located at the bottom of its side or tilt it sideways. •• Disassemble and reposition the head and stand separately when moving the monitor. ENGLISH How to Use the Joystick Button You can control the volume...

Owners Manual
Page 7
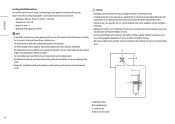
... to support the monitor. •• Make sure to fix the stand firmly on the table. •• When installing the stand on the table, make sure the stand is provided in the product package and connect it to fix a clamp 1 After positioning the stand on the table, secure it by verifying that you would not hit your head when you need another power cord, please...
... to support the monitor. •• Make sure to fix the stand firmly on the table. •• When installing the stand on the table, make sure the stand is provided in the product package and connect it to fix a clamp 1 After positioning the stand on the table, secure it by verifying that you would not hit your head when you need another power cord, please...

Owners Manual
Page 11
Max. 130.0 mm (5.1 inches) WARNING •• To avoid injury when adjusting the height, do not put your hands on the stand. 11 Adjusting the Stand Height 1 Make sure to one side after the product has been placed in position, straighten the angle horizontally as follows. ENGLISH Leveling the Screen If the screen appears crooked to hold and move the monitor with both hands.
Max. 130.0 mm (5.1 inches) WARNING •• To avoid injury when adjusting the height, do not put your hands on the stand. 11 Adjusting the Stand Height 1 Make sure to one side after the product has been placed in position, straighten the angle horizontally as follows. ENGLISH Leveling the Screen If the screen appears crooked to hold and move the monitor with both hands.
Owners Manual
Page 13
ENGLISH WARNING •• If you do not remove the cable when adjusting the monitor, it may result in this manual. Installing on the Wall This monitor meets the specifications for how to avoid wiring difficulties. : 100 mm (3.9 inches) 13 Detailed installation instructions can be obtained from the wall and leave about 100 mm (3.9 inches) of space at least 100 mm (3.9 inches) away from your local retail...
ENGLISH WARNING •• If you do not remove the cable when adjusting the monitor, it may result in this manual. Installing on the Wall This monitor meets the specifications for how to avoid wiring difficulties. : 100 mm (3.9 inches) 13 Detailed installation instructions can be obtained from the wall and leave about 100 mm (3.9 inches) of space at least 100 mm (3.9 inches) away from your local retail...
Owners Manual
Page 14
...;• The length of screws: 4 -- Number of the screw may cause damage to the screen. •• Remove the stand before moving or installing the monitor to avoid electric shock. •• Installing the monitor on the ceiling or on a wall mount by performing the stand attachment in this apparatus must be covered by the use of the Monitor : Standard screw : Max. 8 mm (0.3 inches) 14 You can obtain...
...;• The length of screws: 4 -- Number of the screw may cause damage to the screen. •• Remove the stand before moving or installing the monitor to avoid electric shock. •• Installing the monitor on the ceiling or on a wall mount by performing the stand attachment in this apparatus must be covered by the use of the Monitor : Standard screw : Max. 8 mm (0.3 inches) 14 You can obtain...
Owners Manual
Page 15
... possible. •• When connecting the power cord to the outlet, use a certified HDMI cable, the screen may not display or a connection error may differ from your computer without having to reconfigure anything or install any manual drivers. This may be image noises. •• Do not press the screen for a prolonged time. This is normal. •• Sometimes red, green, or blue spots may appear on in...
... possible. •• When connecting the power cord to the outlet, use a certified HDMI cable, the screen may not display or a connection error may differ from your computer without having to reconfigure anything or install any manual drivers. This may be image noises. •• Do not press the screen for a prolonged time. This is normal. •• Sometimes red, green, or blue spots may appear on in...

Owners Manual
Page 16
... not use a Mini DP to DP (Mini DisplayPort to DisplayPort) cable or gender that supports DisplayPort1.4. (Sold separately) USB-C connection Transmits digital video and audio signals from your PC to the monitor. High Speed HDMI®/™ cable -- If you are using a Mini DisplayPort output graphics card, use a certified HDMI cable, the screen may not display or a connection error may cause compatibility issues. •• Use a certified cable with Ethernet 16 Connect adapter to supply power to the monitor.
... not use a Mini DP to DP (Mini DisplayPort to DisplayPort) cable or gender that supports DisplayPort1.4. (Sold separately) USB-C connection Transmits digital video and audio signals from your PC to the monitor. High Speed HDMI®/™ cable -- If you are using a Mini DisplayPort output graphics card, use a certified HDMI cable, the screen may not display or a connection error may cause compatibility issues. •• Use a certified cable with Ethernet 16 Connect adapter to supply power to the monitor.

Owners Manual
Page 17
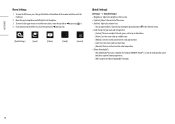
... the USB C-A cable is connected between Upstream port of monitor and Host PC, the Downstream port of monitor support USB 3.0 device. ENGLISH Connecting Peripherals USB Device connection The USB port on the device. •• To use USB Downstream port of monitor, user must support USB 3.0 function. NOTE •• It is not adequate, the USB device may not be recognized properly.) 17 A USB device with power supplied. (If the power supply is recommended you install all Windows Updates to keep your Windows...
... the USB C-A cable is connected between Upstream port of monitor and Host PC, the Downstream port of monitor support USB 3.0 device. ENGLISH Connecting Peripherals USB Device connection The USB port on the device. •• To use USB Downstream port of monitor, user must support USB 3.0 function. NOTE •• It is not adequate, the USB device may not be recognized properly.) 17 A USB device with power supplied. (If the power supply is recommended you install all Windows Updates to keep your Windows...
Owners Manual
Page 18
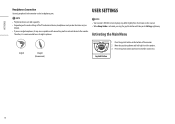
ENGLISH Headphones Connection Connect peripherals to use angled earphones, it is activated, pressing the joystick button will take you use straight earphones. USER SETTINGS NOTE •• Your monitor's OSD (On Screen Display) may cause a problem with connecting another external device to the monitor. Therefore, it may differ slightly from that shown in this manual. •• When Beep Guide is recommended to the monitor via the headphones port. Joystick...
ENGLISH Headphones Connection Connect peripherals to use angled earphones, it is activated, pressing the joystick button will take you use straight earphones. USER SETTINGS NOTE •• Your monitor's OSD (On Screen Display) may cause a problem with connecting another external device to the monitor. Therefore, it may differ slightly from that shown in this manual. •• When Beep Guide is recommended to the monitor via the headphones port. Joystick...
Owners Manual
Page 19
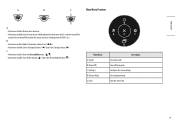
... at any time, including when the OSD is on.) •• Main menu disabled: Adjusts the monitor volume level Main menu enabled: Enters the [Input] features. ( ) / Enters the [Settings] feature. ( ) •• Main menu disabled: Enters the Accessibility menu Main menu enabled: Turns off the monitor. Sets the picture mode. You can turn off the monitor. ( ) / Enters the [Picture Mode] feature. ( ) Main Menu : [Input] : [Power Off] : [Settings] : [Picture Mode] : [Exit] Description Sets input mode. Configures the screen settings. Turns off the monitor. Exits the main...
... at any time, including when the OSD is on.) •• Main menu disabled: Adjusts the monitor volume level Main menu enabled: Enters the [Input] features. ( ) / Enters the [Settings] feature. ( ) •• Main menu disabled: Enters the Accessibility menu Main menu enabled: Turns off the monitor. Sets the picture mode. You can turn off the monitor. ( ) / Enters the [Picture Mode] feature. ( ) Main Menu : [Input] : [Power Off] : [Settings] : [Picture Mode] : [Exit] Description Sets input mode. Configures the screen settings. Turns off the monitor. Exits the main...
Owners Manual
Page 20
...button to in the [Volume] menu. •• [Color Temp]: Set your own color temperature. -- [Custom]: The user can fine-tune the color temperature. •• [Waves MaxxAudio®] -- [On]: MaxxAudio® by customization. -- [Warm]: Sets the screen color to a reddish tone. -- [Medium]: Sets the screen color between a red and blue tone. -- [Cool]: Sets the screen color to until you exit. [Quick Settings] [Input] [Picture] [Sound] [General] [Quick Settings] [Settings] [Quick Settings] •• [Brightness]: Adjusts the brightness of the screen. •• [Contrast...
...button to in the [Volume] menu. •• [Color Temp]: Set your own color temperature. -- [Custom]: The user can fine-tune the color temperature. •• [Waves MaxxAudio®] -- [On]: MaxxAudio® by customization. -- [Warm]: Sets the screen color to a reddish tone. -- [Medium]: Sets the screen color between a red and blue tone. -- [Cool]: Sets the screen color to until you exit. [Quick Settings] [Input] [Picture] [Sound] [General] [Quick Settings] [Settings] [Quick Settings] •• [Brightness]: Adjusts the brightness of the screen. •• [Contrast...

Owners Manual
Page 21
...; [Color Weakness]: This mode is not adjusted from the original. [Picture] [Settings] [Picture] [Picture Mode] [Picture Mode] on the Input signal. •• If the [Picture Mode] is changed in the DP (DisplayPort) input, the screen may flicker or the resolution of your PC screen may look the same for [Full Wide], [Original] and [Just Scan] options at the recommended resolution (2560 x 1440). -- [Full Wide]: Displays the video in the OSD menu. •• [Cinema]: Optimizes the screen to...
...; [Color Weakness]: This mode is not adjusted from the original. [Picture] [Settings] [Picture] [Picture Mode] [Picture Mode] on the Input signal. •• If the [Picture Mode] is changed in the DP (DisplayPort) input, the screen may flicker or the resolution of your PC screen may look the same for [Full Wide], [Original] and [Just Scan] options at the recommended resolution (2560 x 1440). -- [Full Wide]: Displays the video in the OSD menu. •• [Cinema]: Optimizes the screen to...

Owners Manual
Page 22
... setting. Best for UCC or SD videos. -- [Low]: Optimizes the screen for HDMI only). -- ENGLISH [Picture Mode] on /off according to Graphic card performance. [Settings] [Picture] [Picture Adjust] •• [Brightness]: Adjusts the brightness of the screen. •• [Contrast]: Adjusts the contrast of the screen. •• [Sharpness]: Adjusts the sharpness of the screen. •• [SUPER RESOLUTION+]: Because this is the darkest color the monitor can display. -- [High]: Keeps the current contrast ratio of the screen. -- [Low]: Lowers the black...
... setting. Best for UCC or SD videos. -- [Low]: Optimizes the screen for HDMI only). -- ENGLISH [Picture Mode] on /off according to Graphic card performance. [Settings] [Picture] [Picture Adjust] •• [Brightness]: Adjusts the brightness of the screen. •• [Contrast]: Adjusts the contrast of the screen. •• [Sharpness]: Adjusts the sharpness of the screen. •• [SUPER RESOLUTION+]: Because this is the darkest color the monitor can display. -- [High]: Keeps the current contrast ratio of the screen. -- [Low]: Lowers the black...
Owners Manual
Page 23
...;• [Black Stabilizer]: You can customize the picture color using [Red], [Green], and [Blue] colors. •• [Six Color]: Meets the user requirements for displayed pictures based on the movement of the screen colors. -- For more saturated and darker the colors become . Hue: Adjusts the tone of the picture on the screen. ENGLISH [Settings] [Picture] [Game Adjust] •• [Response Time]: Sets a response time for colors by synchronizing the vertical frequency of the input signal with that supports AMD's FreeSync...
...;• [Black Stabilizer]: You can customize the picture color using [Red], [Green], and [Blue] colors. •• [Six Color]: Meets the user requirements for displayed pictures based on the movement of the screen colors. -- For more saturated and darker the colors become . Hue: Adjusts the tone of the picture on the screen. ENGLISH [Settings] [Picture] [Game Adjust] •• [Response Time]: Sets a response time for colors by synchronizing the vertical frequency of the input signal with that supports AMD's FreeSync...

Owners Manual
Page 24
...-- [Low]: Saves energy using the low-efficiency [SMART ENERGY SAVING] feature. -- [Off]: Disables the feature. •• [Power LED]: Turns the power LED on the screen for a superior listening experience. -- [Off]: Disables the [Waves MaxxAudio®] function. [General] [Settings] [General] •• [Language]: Sets the menu screen to the default settings. -- [No]: Cancel the select. [Sound] [Settings] [Sound] •• [Volume]: Adjusts the volume level. -- ENGLISH [Settings] [Picture] [Picture Reset] •• [Do you want to reset your picture settings?] -- [Yes...
...-- [Low]: Saves energy using the low-efficiency [SMART ENERGY SAVING] feature. -- [Off]: Disables the feature. •• [Power LED]: Turns the power LED on the screen for a superior listening experience. -- [Off]: Disables the [Waves MaxxAudio®] function. [General] [Settings] [General] •• [Language]: Sets the menu screen to the default settings. -- [No]: Cancel the select. [Sound] [Settings] [Sound] •• [Volume]: Adjusts the volume level. -- ENGLISH [Settings] [Picture] [Picture Reset] •• [Do you want to reset your picture settings?] -- [Yes...
Owners Manual
Page 25
.... 25 Change the resolution to 1080p or the recommended resolution. -- If this manual to set the sound generated from the PC (graphics card) are disabled. -- [Brightness] -- [Contrast] -- [Volume] -- [Input List] -- [Aspect Ratio] -- [OSD Lock] -- [Information] •• [Deep Sleep Mode]: When [Deep Sleep Mode] is [On], power consumption is minimized while the monitor is displayed on ? -- Check that the connected input is unstable and shaky. / Images displayed on the performance of menus. -- [On]: Enables [OSD Lock]. -- [Off]: Disables [OSD Lock]. ENGLISH •...
.... 25 Change the resolution to 1080p or the recommended resolution. -- If this manual to set the sound generated from the PC (graphics card) are disabled. -- [Brightness] -- [Contrast] -- [Volume] -- [Input List] -- [Aspect Ratio] -- [OSD Lock] -- [Information] •• [Deep Sleep Mode]: When [Deep Sleep Mode] is [On], power consumption is minimized while the monitor is displayed on ? -- Check that the connected input is unstable and shaky. / Images displayed on the performance of menus. -- [On]: Enables [OSD Lock]. -- [Off]: Disables [OSD Lock]. ENGLISH •...
Owners Manual
Page 26
... (red, green, blue, white, or black) may differ depending on the operating system (OS) you use a screensaver. •• Are there spots on the screen. No sound from our web site: http://www.lg.com. -- Set the audio output of the image. -- Do you see an "Unrecognized monitor, Plug and Play (VESA DDC) monitor found" message? •• Have you press the Menu button? -- Make sure that the headphone port connections...
... (red, green, blue, white, or black) may differ depending on the operating system (OS) you use a screensaver. •• Are there spots on the screen. No sound from our web site: http://www.lg.com. -- Set the audio output of the image. -- Do you see an "Unrecognized monitor, Plug and Play (VESA DDC) monitor found" message? •• Have you press the Menu button? -- Make sure that the headphone port connections...


